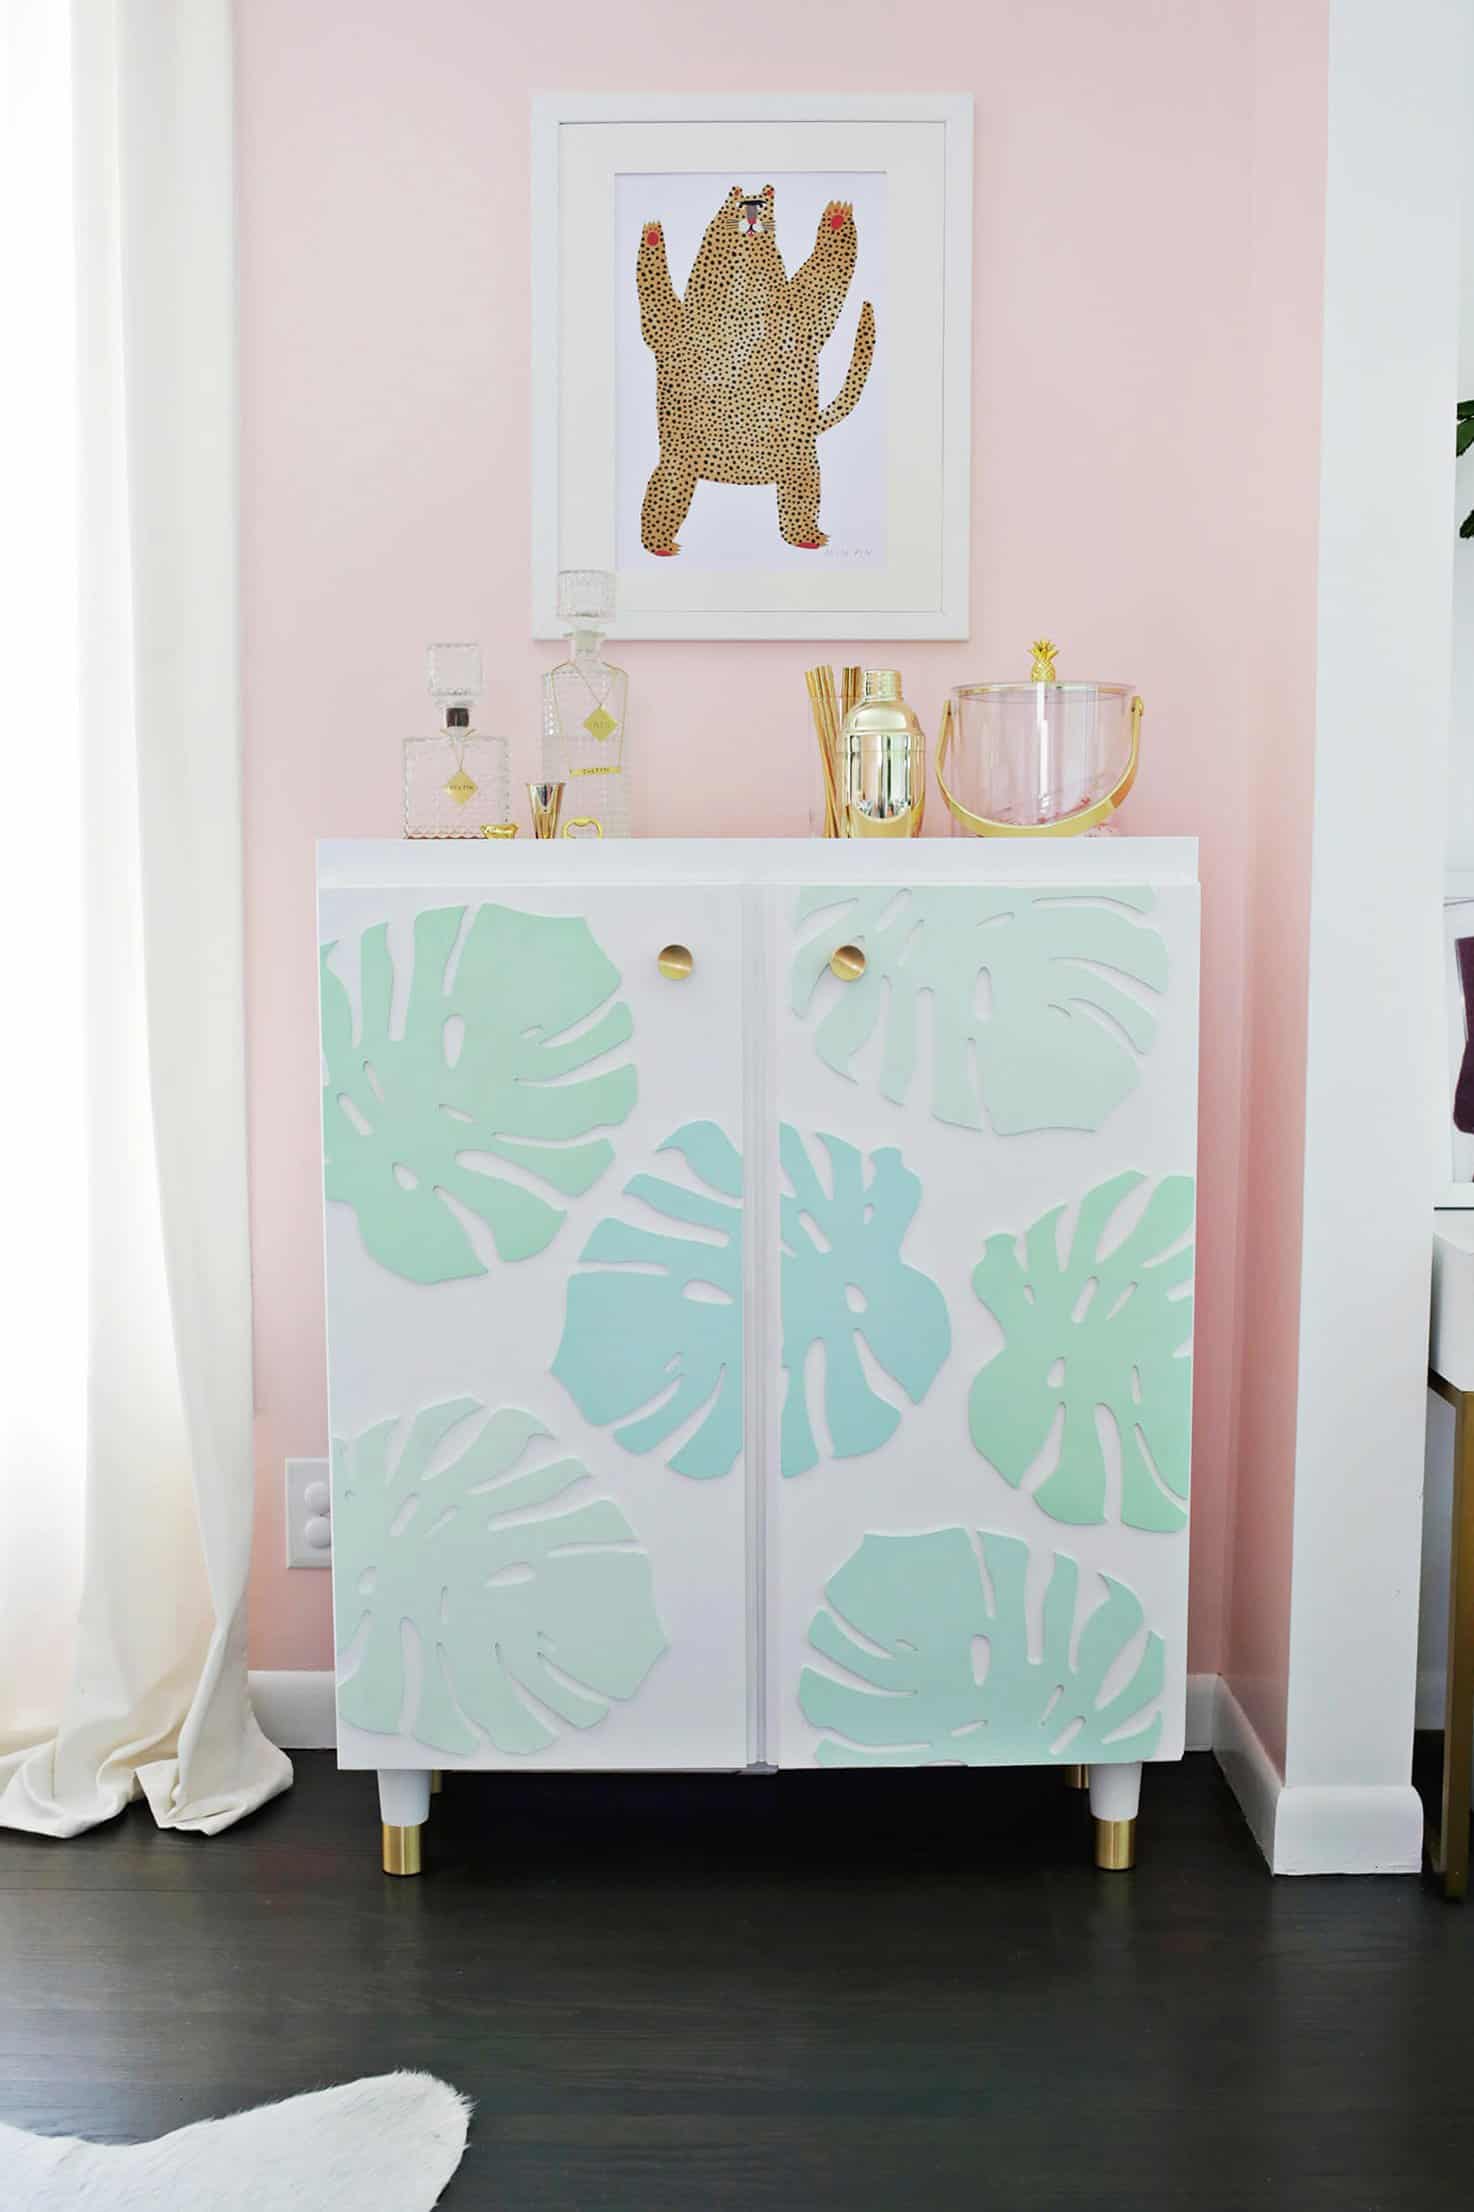
 So, in our pre-baby life, I picked out a vintage open bar cart to use in our living room and it’s been serving us pretty well for the last five years until … we had a baby. Nowadays, having a metal cart out with lots of glass bottles and fine glassware within our 11-month-old’s reach is not the best idea, so I realized we needed to make a change! I thought something with doors would be good so we could add the magnetic cabinet locks to keep her out (which I also love that you can’t see that kind from the outside), and something tall would also be good so we could have things on top of the cabinet as well as inside to give it more of that traditional bar cart feel. I found a plain cabinet at IKEA that fit the dimensions I needed, so all I had to do was add a little personality and I LOVE how it turned out!!
 Supplies:
–IKEA IVAR cabinet (I used the smaller 30′ x 12′ x 33″ size)
-legs (I used these pretty legs)
-white semi-gloss paint
-1 1/2″ boards to create the top tray
–3/32″ x 2″ x 36″ basswood sheet to close door gap
-wood glue and clamps
-X-acto knife
–cabinet pulls
-wooden monstera leaves (I used 6 from this shop)
–miter saw or jig saw
First, assemble your cabinet as per the instructions. 
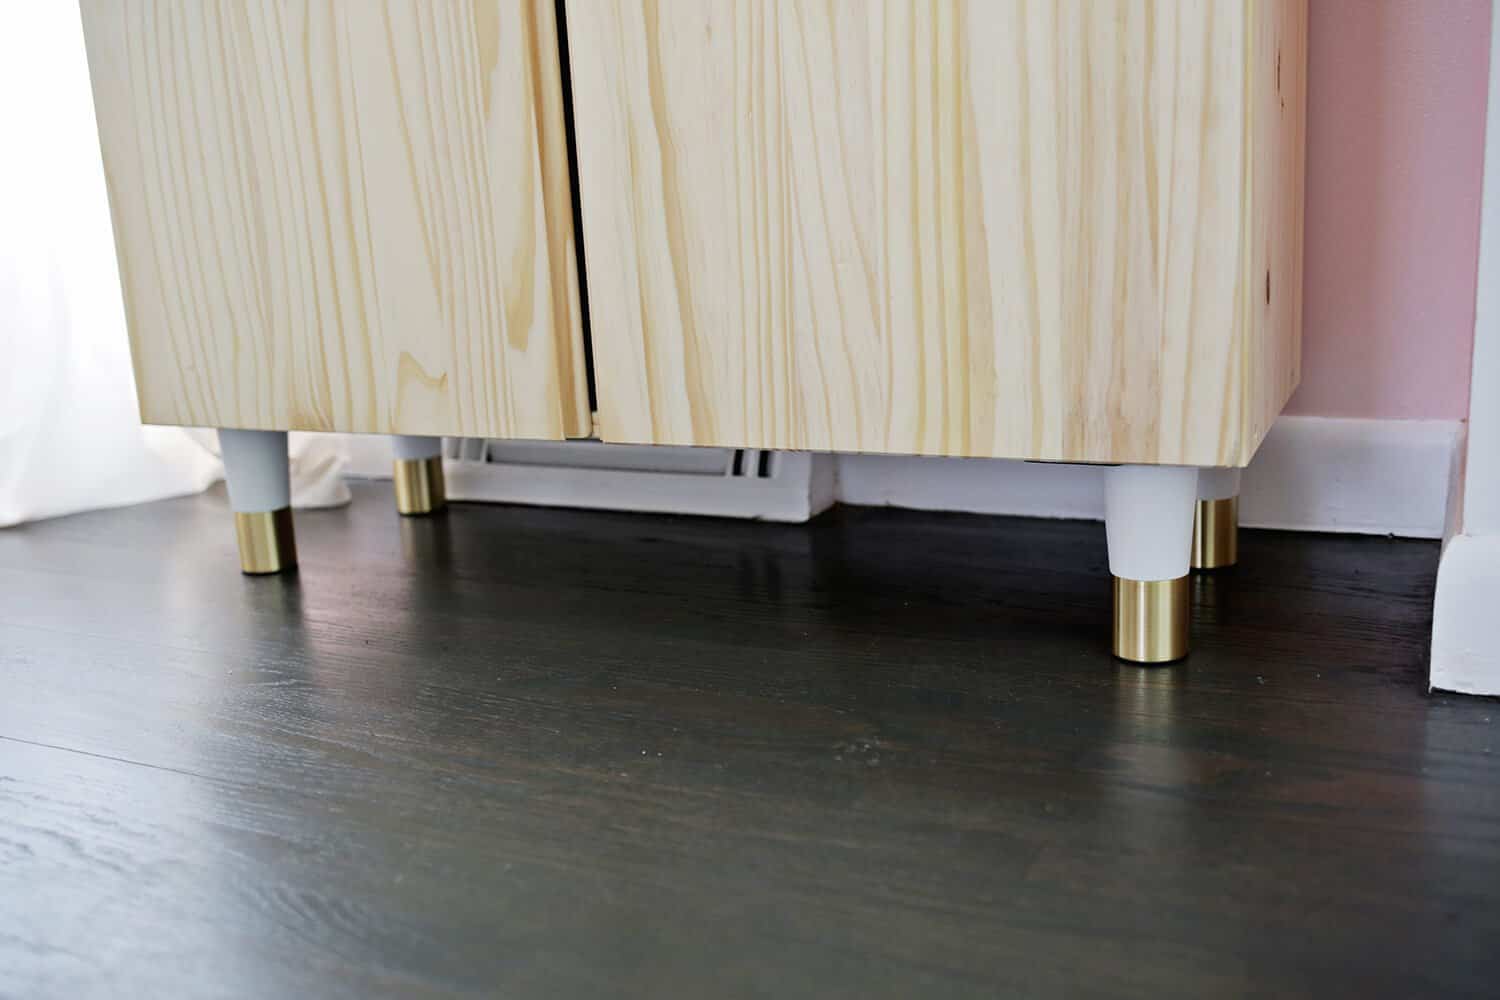 Attach your legs to the bottom of your cabinet. While you can use any legs you want, those legs I got are great because they come with plates to attach the legs to, which makes for a more stable attachment.
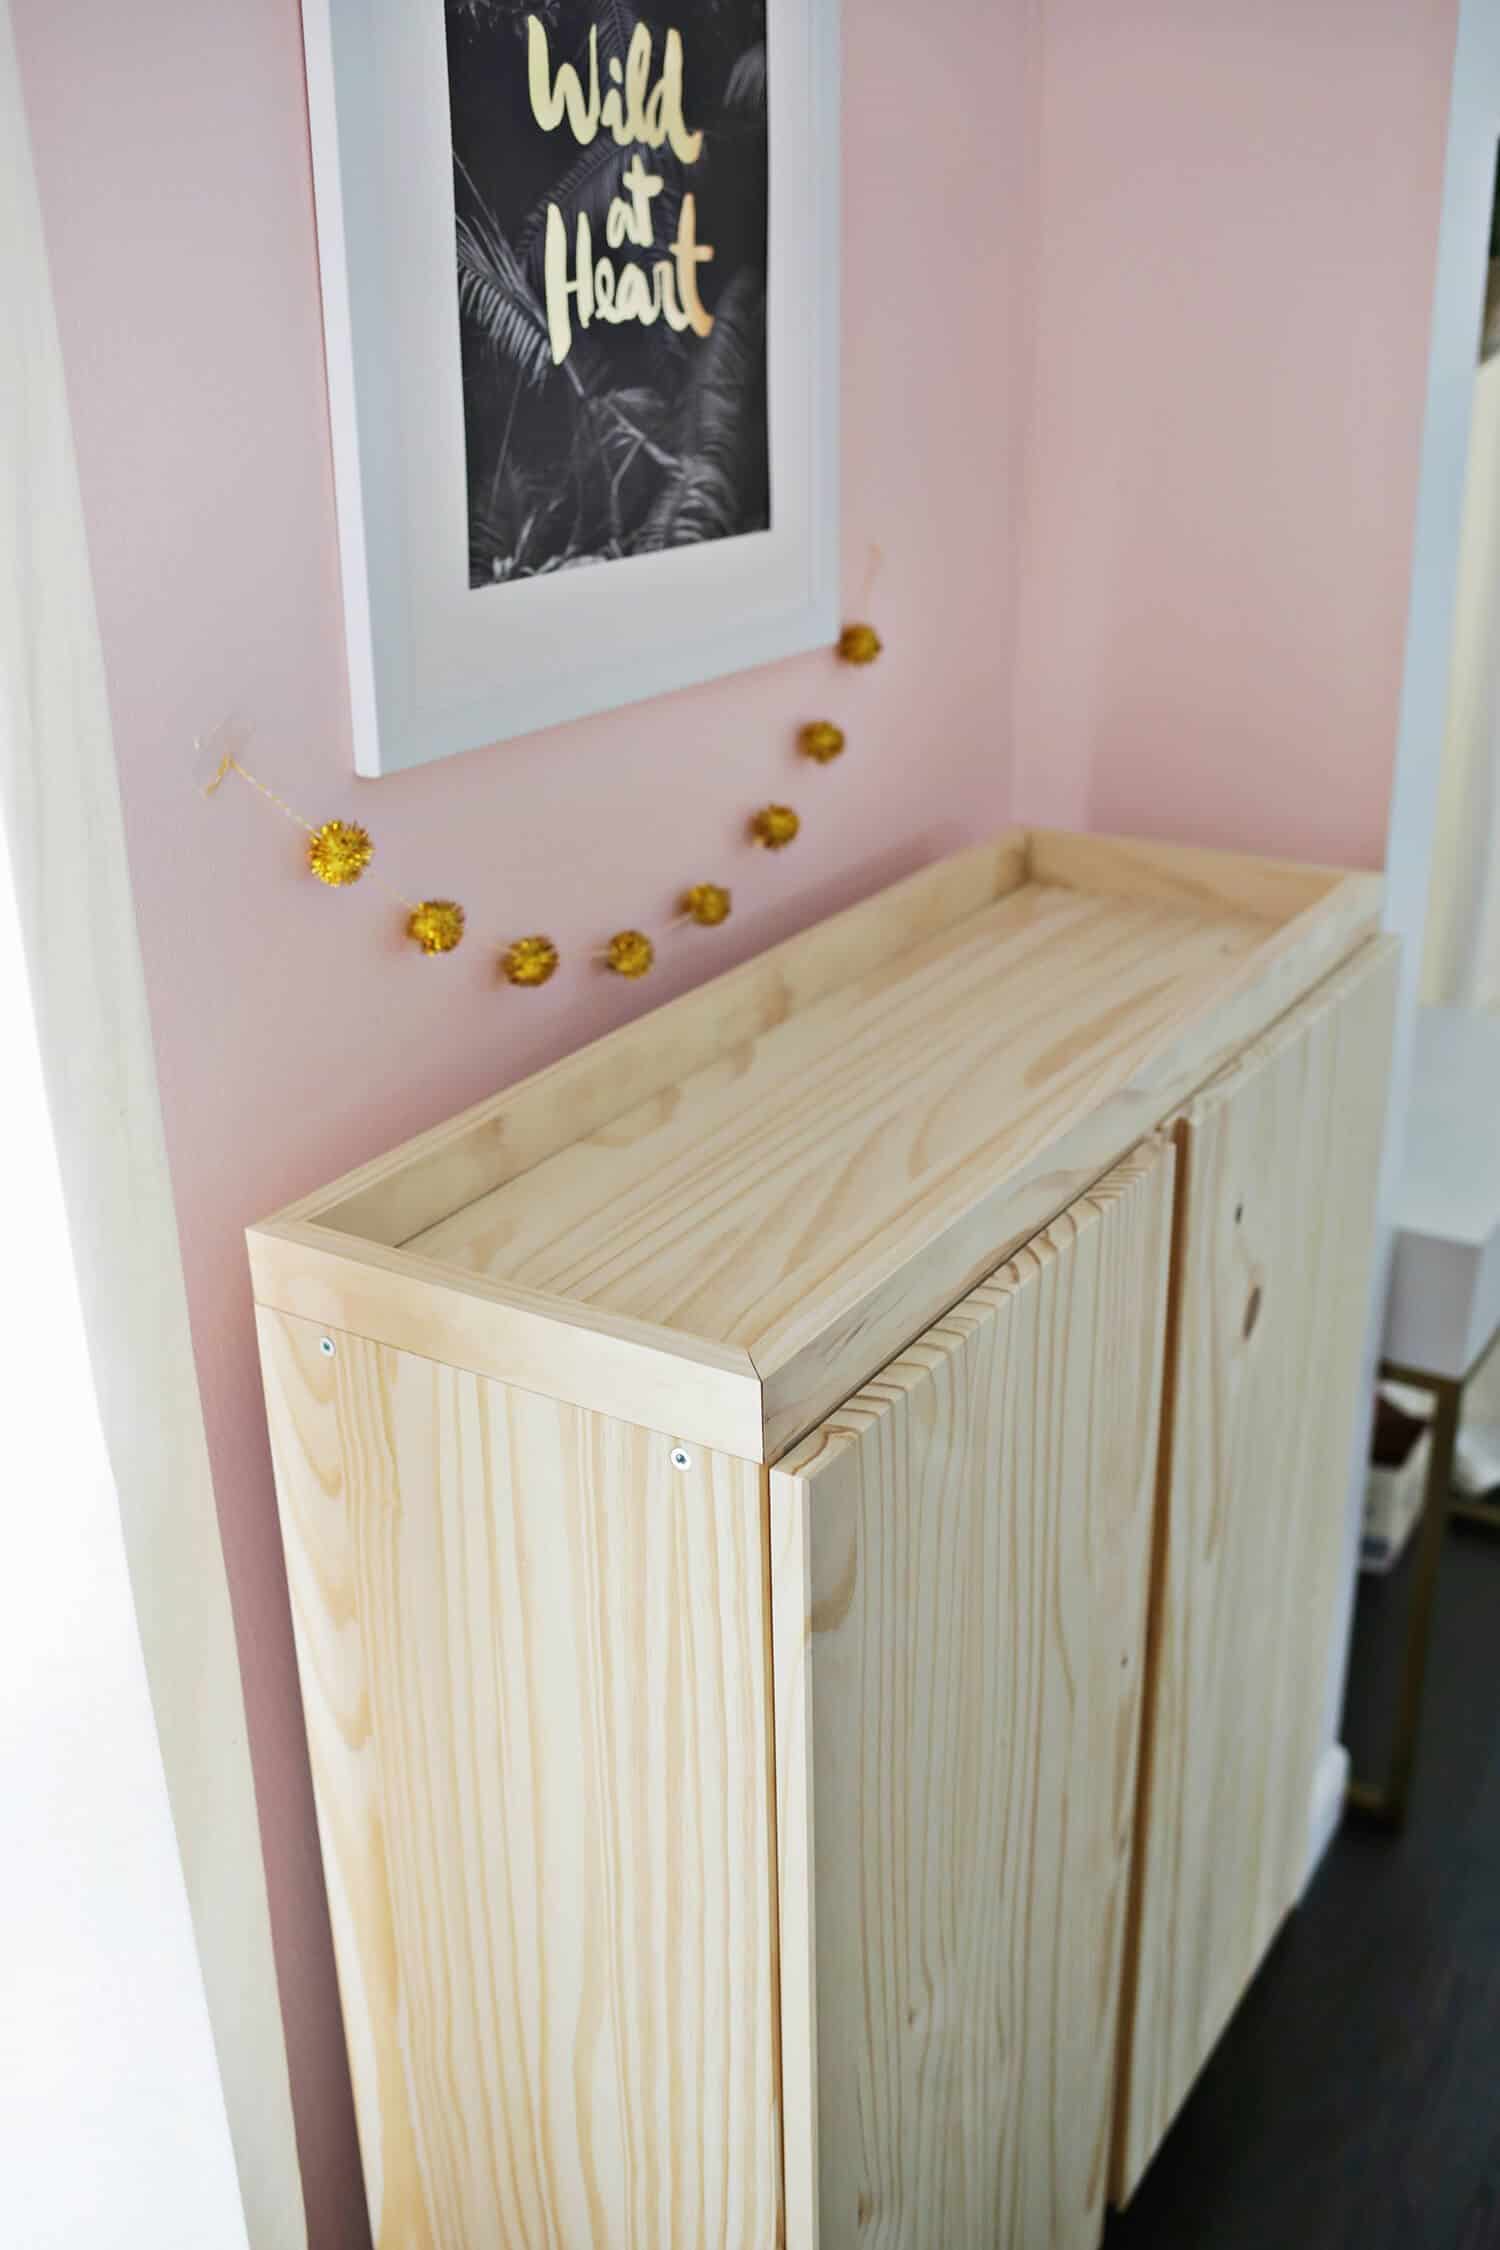 So now we are going to build a little lip around the top of your cabinet so we can keep bar cart items on top without worrying about them falling off the edge. Cut your 1 1/2″ board into 4 pieces to fit around the top of your cabinet. If you have a miter saw, cut 2 boards that are 31 1/2″ long and 2 that are 11″ long and cut them at 45° angles so they all fit together like above. If you don’t have a miter saw to cut a 45° angle where they come together, no worries! You can use a jig saw or ask the hardware store to cut the wood for you and cut 2 pieces that are 31 1/2″ for the front and the back and 2 that are 9 1/4″ to fit in between those boards for the side pieces to make your rectangle. Use wood glue and nails or screws to attach the frame together and then glue it to the top of your cabinet.
 One frustrating thing about this cabinet that I noticed from all the reviews about it is that the doors don’t close together and there’s an 1/2″ gap in the middle no matter how you try to adjust the doors. It’s such a good price point for the item though that I knew I could glue a thin piece of 2″ wide basswood to one of the doors to close the gap and it totally worked! Basswood is available at hobby stores with the balsa wood and you can cut it down with an X-acto knife to size. Just glue the wood onto one of the doors to cover the opening (I glued it onto the left door since we are right handed and will instinctually open the right door first) and clamp into place while it dries.
 Paint your cabinet white, and, if you want to, you can paint the backboard of your cabinet a color to give it a little pop when you open it (that’s Hello Dolly by Valspar).
 Lay your monstera leaves on top of your cabinet and arrange them in place until they are where you like them. I hung some of them over the edge, marked the edge line on the leaf, and cut the leaf along the line which you can do with a miter saw or jig saw. If you don’t have or don’t want to use a saw on this part, then you’ll have to arrange the leaves so that there’s no overhang and nothing to cut off the ends. Once the leaves are cut, paint them 4 Valspar colors: Summer Sigh (top left and middle right), Meadow Mist (middle), Ultra Green (bottom right), and Mint Hint (bottom left and top right). Once they are painted, glue and nail them in place.
 After filling the nail holes, do a light sanding on those spots when the wood filler is dry, and touch up your paint.
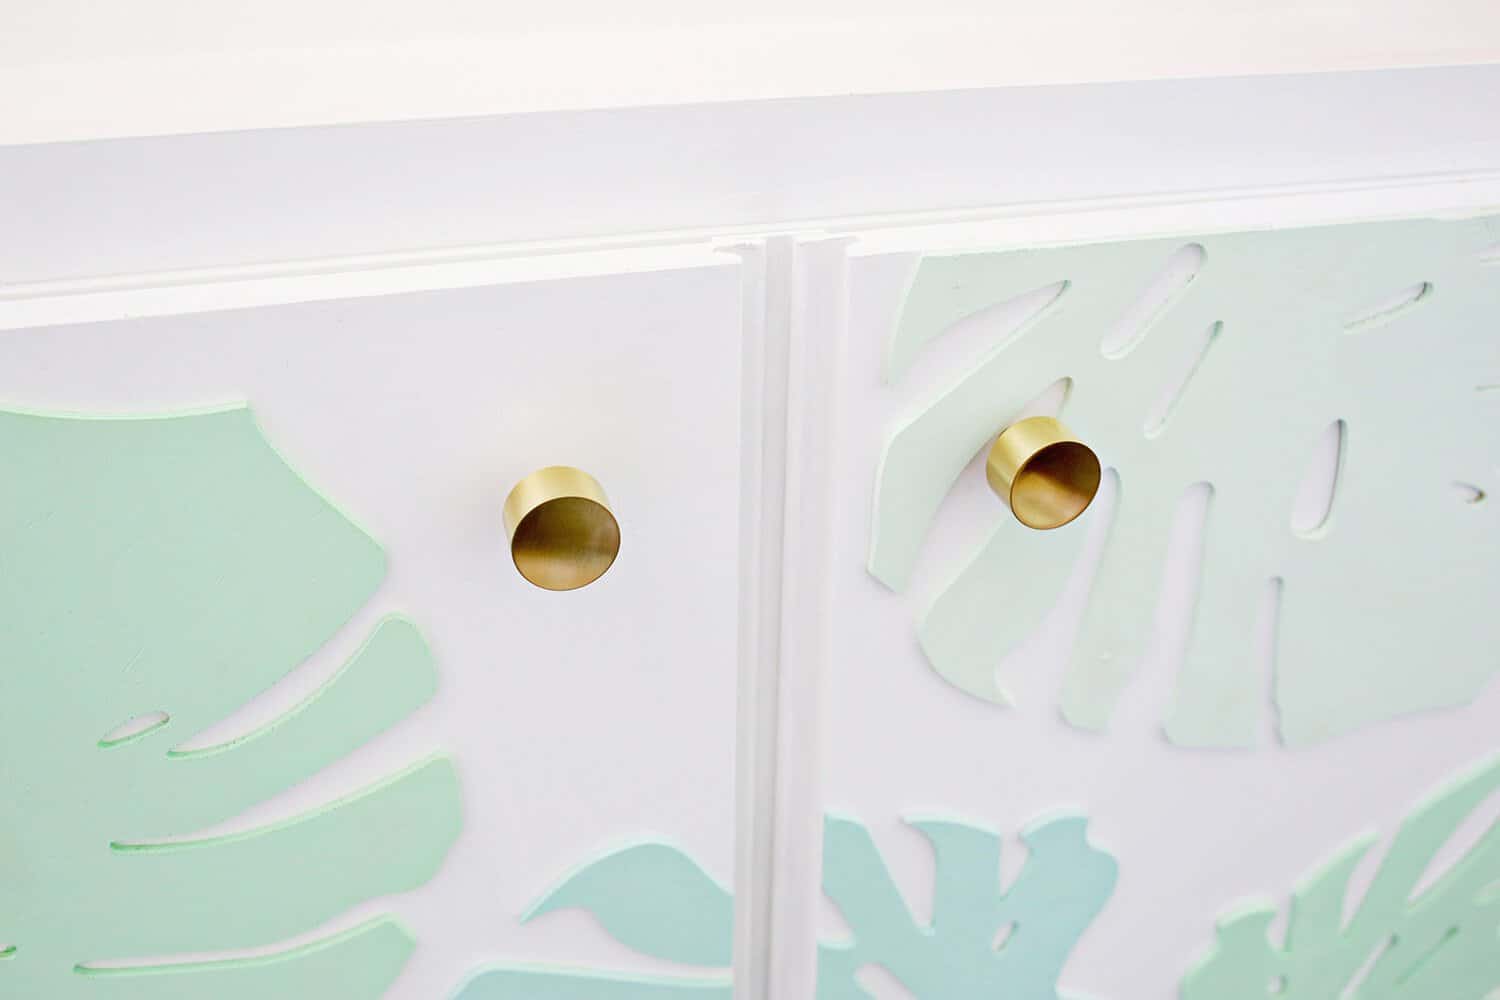 Attach your cabinet pulls (and magnetic locks if you have kids around) and your bar cabinet is ready to use!
  I would definitely suggest mounting this to the wall so that it can’t be tipped over as well if you have little ones around.
  Whoa, what a difference!!

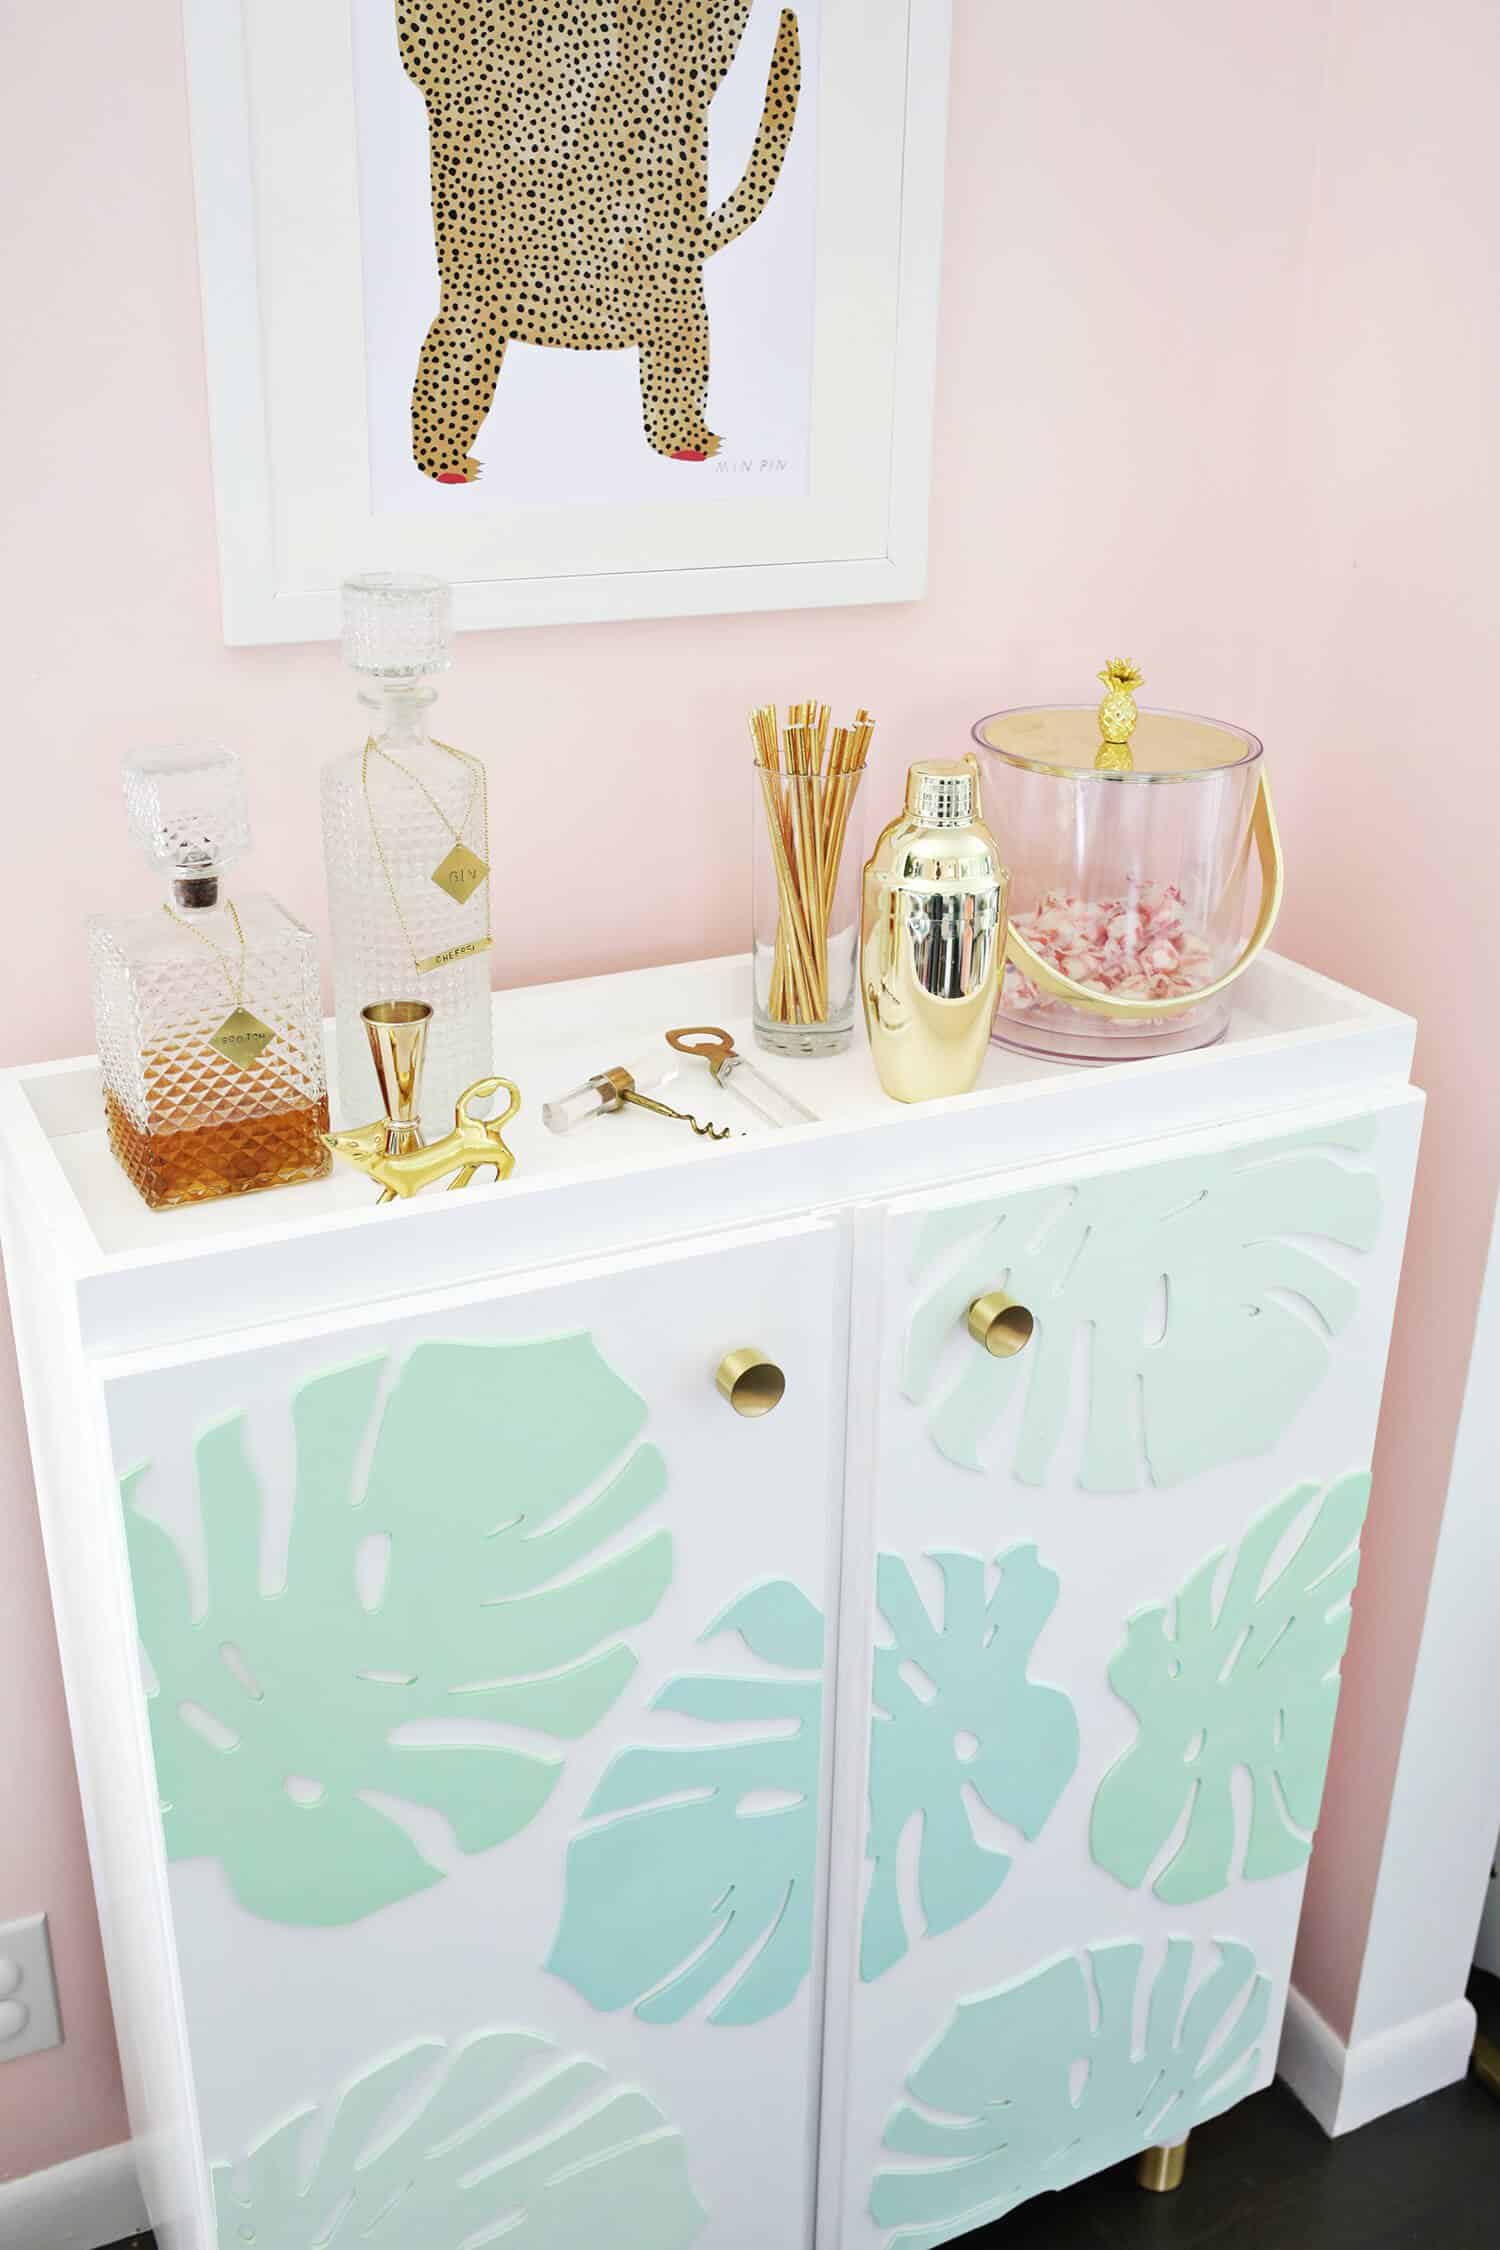

I love having the top edge on the cabinet since that really makes it feel more like a traditional bar cart and the monstera leaf pattern is just perfect for a pop of pattern and color without feeling too over the top. And how awesome is that new print I picked out to go above the cart—it’s SO GOOD! No more worries here now that Lola and our bar stock are separated from each other, and we also got an adorable piece of new furniture at the same time! xo. Laura

27 Comments
Love the palm leaves print of the cabinet! I myself prefer closed shelving (nothing against bar carts, though!) so this would be more suitable for me if I were to DIY something! 🙂
Charmaine Ng | Architecture & Lifestyle Blog
http://charmainenyw.com
Wow, this looks amazing! It’s crazy how just a few extra things, like the legs and the ledge, give this a totally different look and makes it so personalized! Love it!
This is fabulous! The palm leaves completely make it!
Great job!
Debs @ tiger-mint.com
The cabinet is cute, but I want to know about the crazy cat print. That’s awesome funny!
It’s linked in the post!
Laura
Dang! Laura this is so good! As we’ve got a 4 month old now this DIY is bound to come in handy in the near future..!
What an amazing transformation, I definitely love the monstera design!
https://www.makeandmess.com/
I don’t even drink, but I now feel like I need a bar cart! x
Brooke | http://www.brookeclarke.com
Coffee & tea carts are the new bar carts!
Thanks for sharing! I love to see how people spruce up IKEA furniture. And I am so happy to have the link to that Pretty Pegs website; I will definitely be bookmarking that as I recently spent days scouring Etsy and other websites for some midcentury legs to add to an IKEA Kallax shelf. Doh!
Wow!! Love this IKEA hack so much! Also, I’ve never been one to bolt furniture to the wall but over the weekend while I was in OHIO, Smith pulled our 6 ft. lockers over and if Sebastian’s bed hadn’t been there, it would’ve been so much scarier. Officially a bolter now!!!
This is beautiful!
OH MY GOSH!! So glad he’s ok!! Yes, it’s better to be safe for sure!!
Laura
Wow, amazing transformation! I need a bar cabinet!
Laura! This is absolute perfection! The colors match your home so nicely! Major heart eyes for the monstera. Not only are your glasses and bottles safe from Lola, they now don’t require any dusting/cleaning.
The magnet locks are so spiffy these days. And sleek. Way better than what was around when we were little!
So awesome Laura! I love how you made the back of the cabinet match your wall color – it looked see-through. Great DIY’s, as always!
Eva | http://www.shessobright.com
Awesome, I wanna try to change like that too. It looks really good 🙂
That’s adorable!! What cocktails do you use St. Germain in? I love it, but can’t justify buying the whole bottle just for one drink.
Where is the phone decal from? I love it?
Those monstera leaves have upgraded this IKEA hack to a whole new level. So ingenious! and it looks fantastic!
Do you have to use a primer on it first? I’ve hacked other IKEA items but not a pine one.
I had the same door gap problem with my ivar, took it to Ikea & one of the employee adjusted the hinges with a Phillips screwdriver and fixed it right before my eyes . It was quick too. They know something we don’t idk!?
It’s pretty simple to close the gap, there are two adjustment screws on the hinge and you just tighten the smaller one all the way or close to. There’s a few tricks though.
First you loosen the larger screw to allow room for the smaller screw to be tightened. Then use a Posidriv screwdriver instead of a Phillips for best results and tighten the small screw all the way. Repeat for all hinges. If you have some overlap of the doors now just loosen things up a bit.
My doors meet perfectly and I didn’t have to fuss with adding a strip of wood. Bringing it to Ikea was smart, glad they knew how to solve the issue. I hope by posting I can help someone else out who is coming across this post.
Omg it’s so cool ! I will add it to my selection !
Love this cabinet! I have that little Ivar cabinet that I’m going to hack for my powder room. One question: what size are those monstera leaves? Mind if I copy you?
Thank you so much for this – I had totally mapped out a wall of dining room storage on the ikea planner using ivar cabinets and was heartbroken (and confused – why can’t ikea fix it?) to see the weird door problem once visiting the showroom. This is a great solution.
hi
I want to buy the basswood but the company your link sends me to has a minimum order of $25 do you know where else I can get it?
Thank you
I would check Amazon!