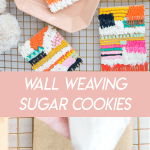
 Around the holidays last year, I made a batch of mitten sugar cookies that I decorated to look like embroidery stitches. I loved those cookies so much and wanted to find a way to incorporate even more icing “yarn” stitching into cookies that could be made any time of year. Emma and I were chatting about ideas and I thought that it would be fun to make wall weaving cookies using the royal icing to get the telltale yarn tassels, chunky weaves, and roving balls. While the tassel part was a little difficult to master, I can’t tell you how fun the cookies were to make. And they would be perfect for that friend in your life who is obsessed with yarn. I know I have a few!

 Not to worry if you aren’t that much of a baker or cake decorator. I consider myself a beginner in that world and I was still able to make semi convincing wall weaving sugar cookies. The key is to make sure that your icing is stiff so that it holds its shape when piped. Then it’s just a matter of making dots, lines, fringe, and swirls with the icing.
To begin, I made a batch of rolled sugar cookies and cut them into rectangles using a knife, then baked until just golden brown. Then I made my favorite royal icing recipe. Once mixed, I divided the icing into small bowls, added a drop or two of food coloring and mixed to make my “yarn” colors.
 Once I had my colors mixed, I made parchment icing bags for each of my colors. To do this, cut a triangle out of parchment paper, then fold the two end points up and around to the top point. Fold the tip down and fill. This tutorial helps quite a bit. If you prefer, you can also use regular disposable piping bags with a small piping tip, too. For the white icing, I used a piping bag with a grass tip to get the strand look of real yarn.

 Now that all your pieces are in place, use the piping bags to pipe the yarn weaving components onto the cookie, starting at the bottom with a few fringe strands and working your way to the top of the cookie.

With the grass tip, I pulled the piping bag away from the cookie and downward to create a fringed yarn look. The key to making the weaving look realistic is to make sure the icing is asymmetric and varied. Each component separately may not look like yarn or a weaving, but all together the look is perfect!


Now it’s time to eat all these hard earned cookies! Xo. Kara


9 Comments
This is super cute, as with all your DIYs! Thank you so much for sharing! 🙂 ❤️
Charmaine Ng | Architecture & Lifestyle Blog
http://charmainenyw.com
These cookies look amazing! They turned out beautiful!
Paige
http://thehappyflammily.com
Wow, I think I’m in love!! Thanks so much for sharing them! Now I’m inspired to make the cookies AS WELL AS a wall hanging! xx
What an awesome twist! Love the creative idea.
I’m not going to lie. I had to do a double take on this post. at first I thought these cookies were hanging carpet art. Nevertheless, food idea and they look amazing. atowle|https://formationvacations.com/
Awe, these are super-cute! I probably can’t eat these, but I love the idea of them. I’ve never seen a design like this before.
~Laurali Star
https://www.girlynaturelovers.com/
Oh my gosh, these are the cutest cookies!!
OMG! This is the most brilliant cookie idea ever! I’ll just have to make them gluten and dairy free so that my husband can enjoy.
I saw these cookies on TenThousandCookies insta and I thought they were so cute so I’m very excited to find the tutorial here! So fun!