 When figuring out the curves feature on A Color Story, it can be confusing. So we’re having Arielle Vey share what she knows about curves and how they can make your photos pop!
Hey, everyone! It’s Arielle, photographer and creator of the Weekend pack in A Color Story. I’m jumping in today to start a series of tutorials on curves and how to use this tool to its fullest potential. I was introduced to curves in Photoshop *many* years ago, and it has been a huge part of my editing process ever since. This tool allows you to get as specific as you’d like and even allows you to shift colors, which is a huge bonus in my book because frankly, I’m obsessed with ALL the hues!
Essentially, curves is a more intricate version of two tools we use all the time: brightness and contrast. The dots you see along the line in curves are called anchor points. The top right represents highlights, the middle is midtones, and the bottom left affects the shadows. As a general jumping off point, I truly believe that with every good edit, comes a great photo first. Take your time shooting, try different exposures, and shoot as many as you can!
Today I have three examples of colorful outdoor photos all edited using only curves and one filter at the end of each edit. If you’re looking for a way to take your editing to the next level, utilizing curves is the best place to start.
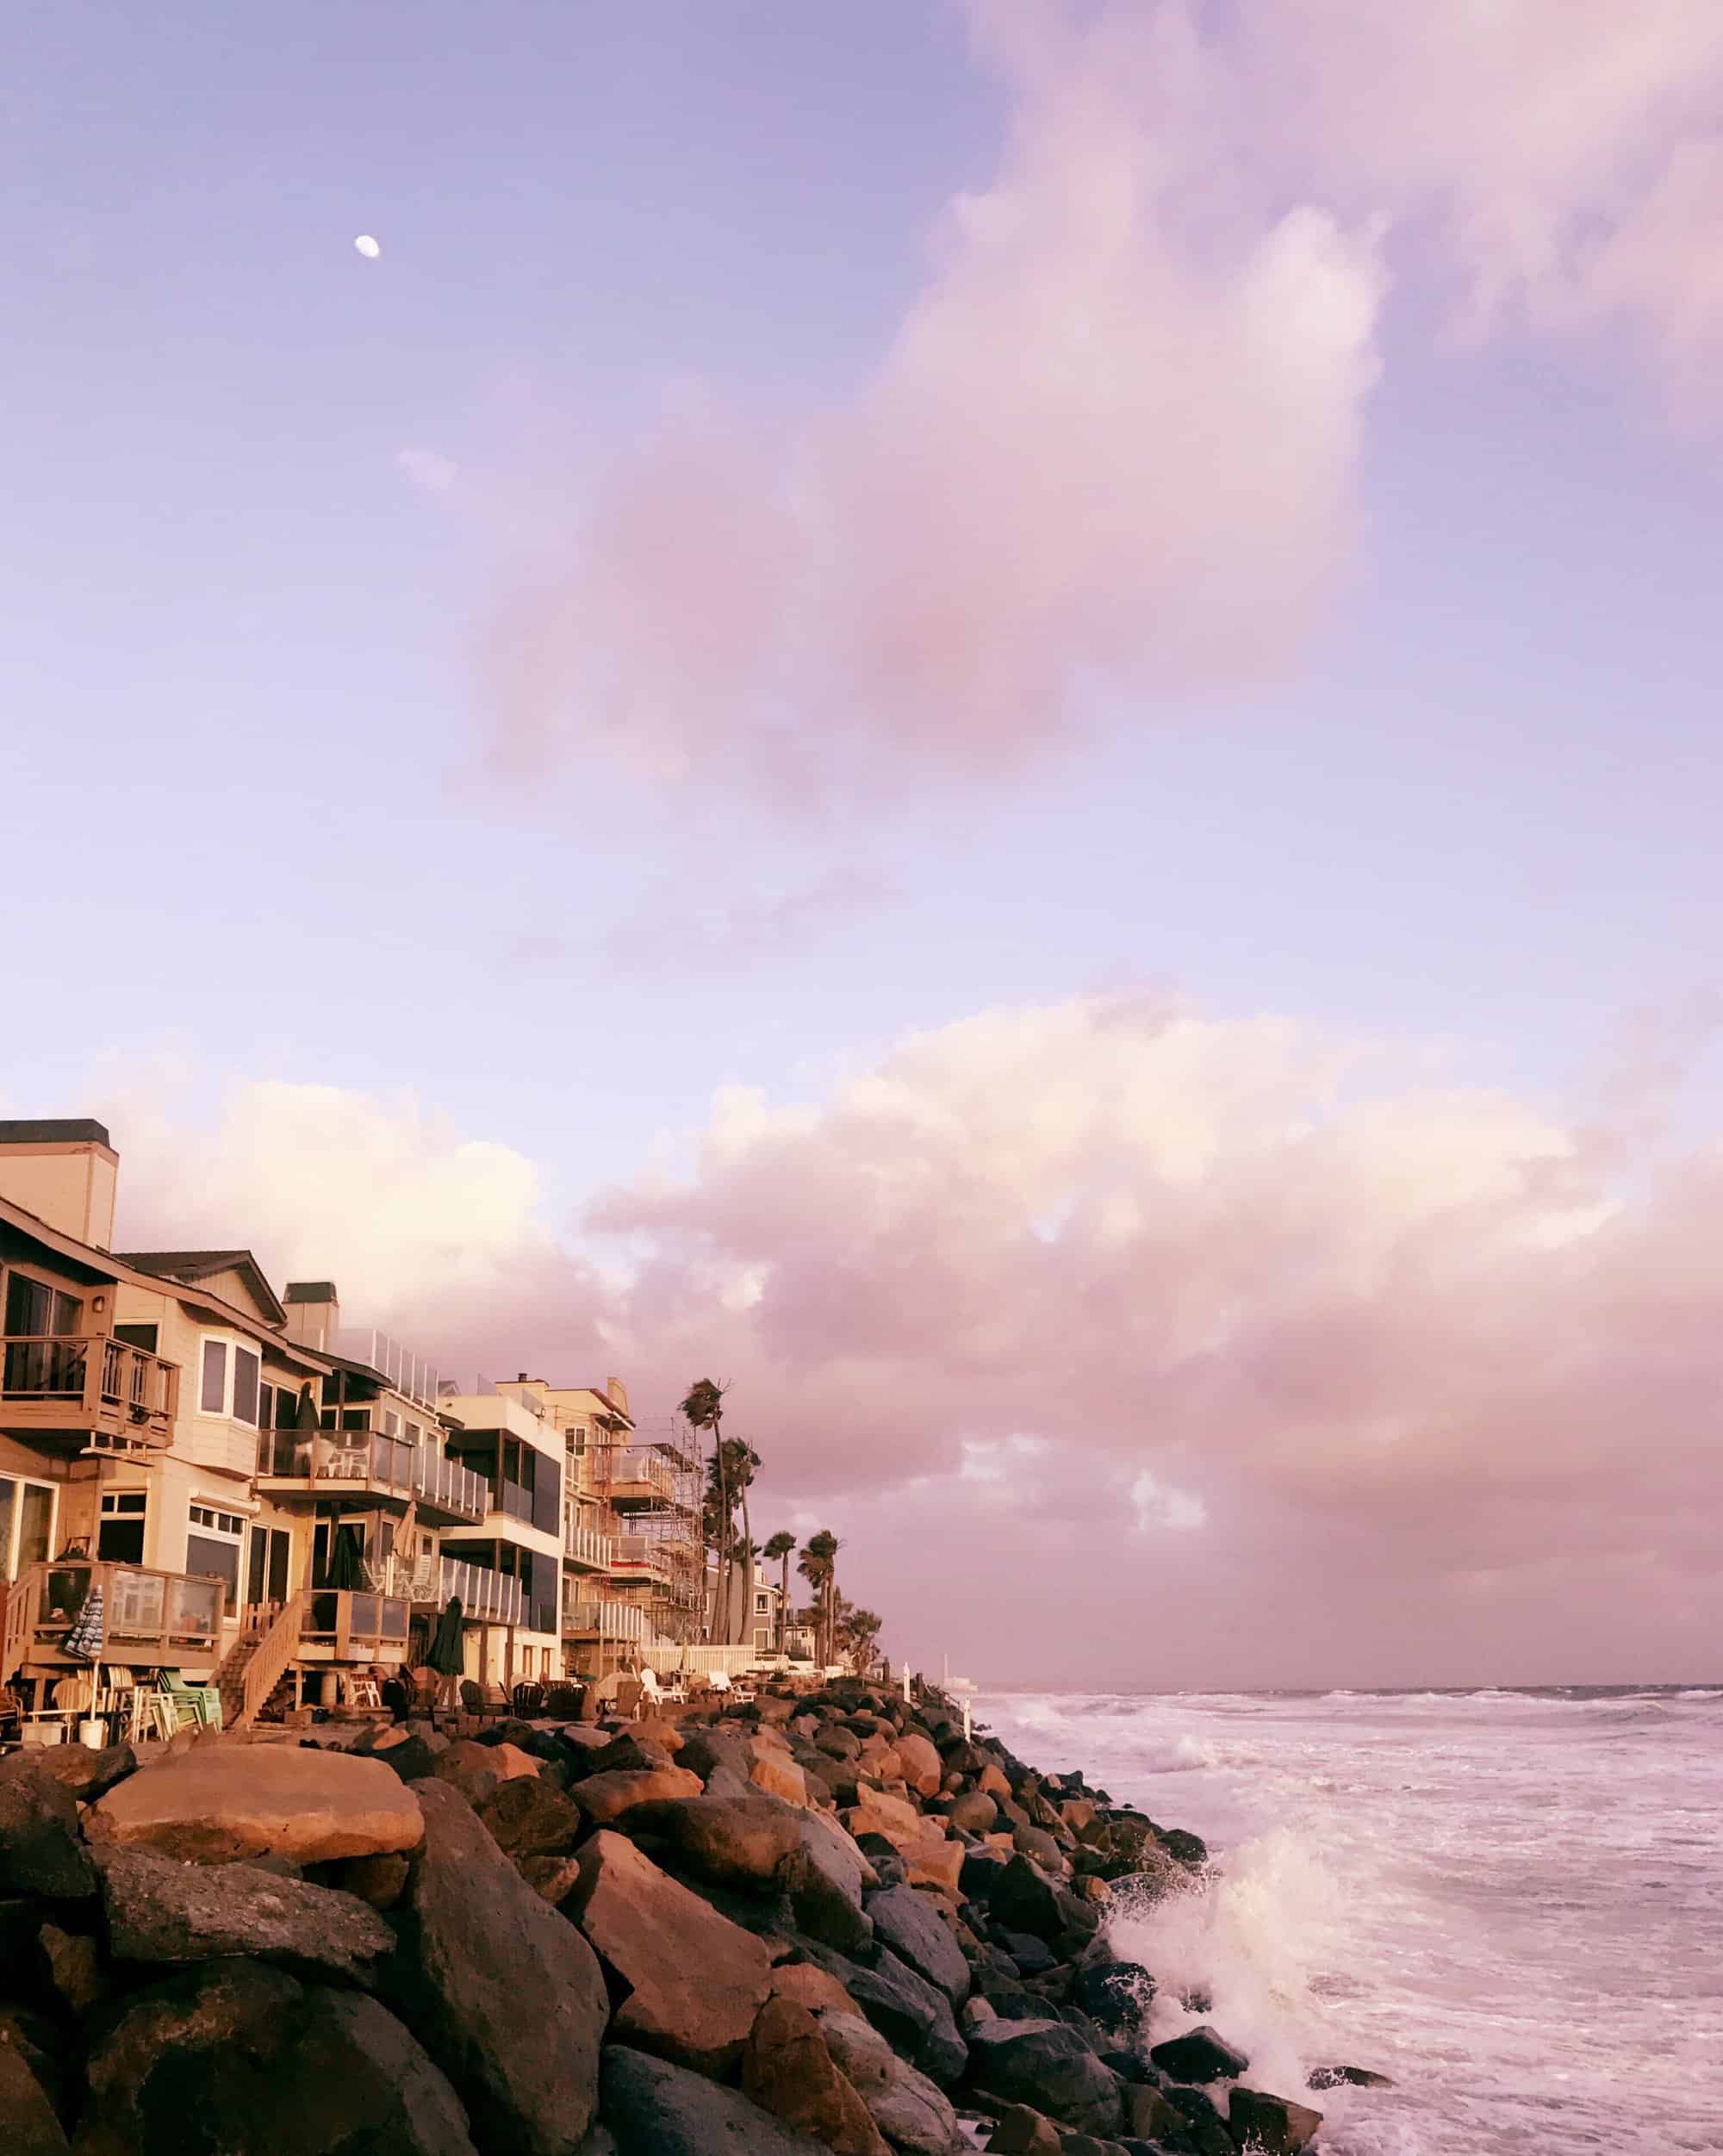
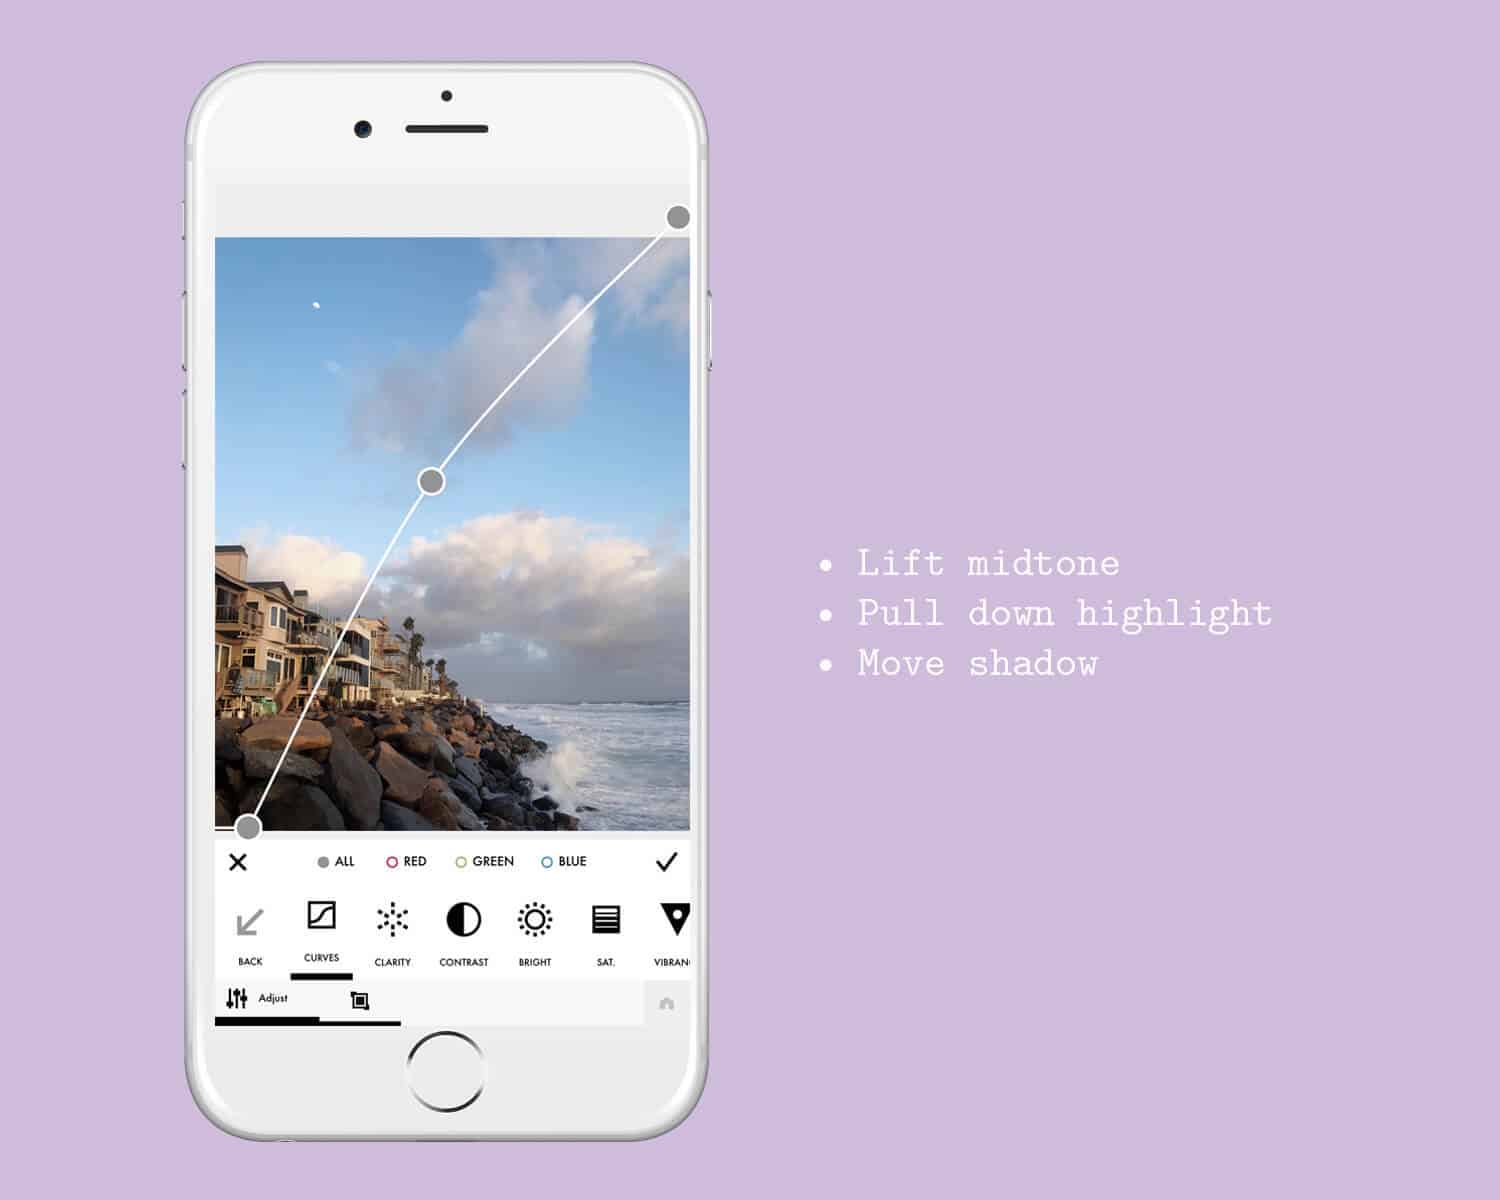
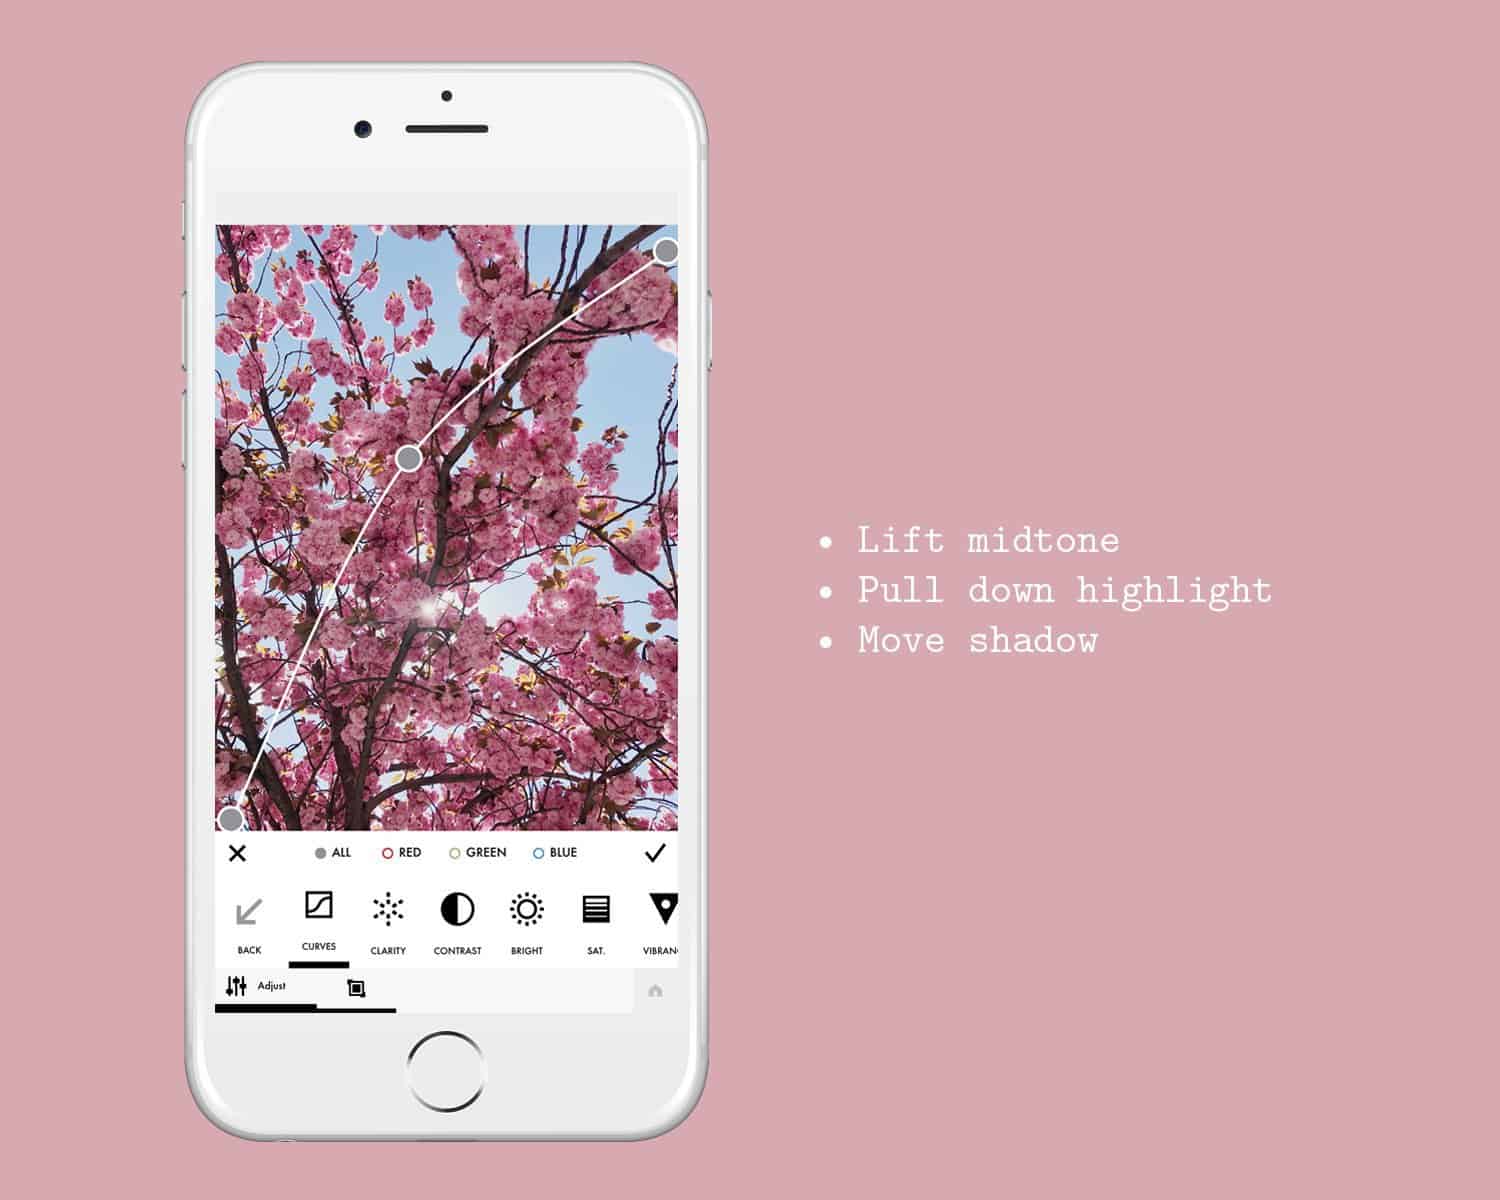 For this first image, I started off by lifting the midtone point up until the desired brightness was achieved. I also took the highlight point down just a little bit to decrease the brightest part of the photo. In addition, I took the shadow curve over to the right just slightly, deepening the shadows.
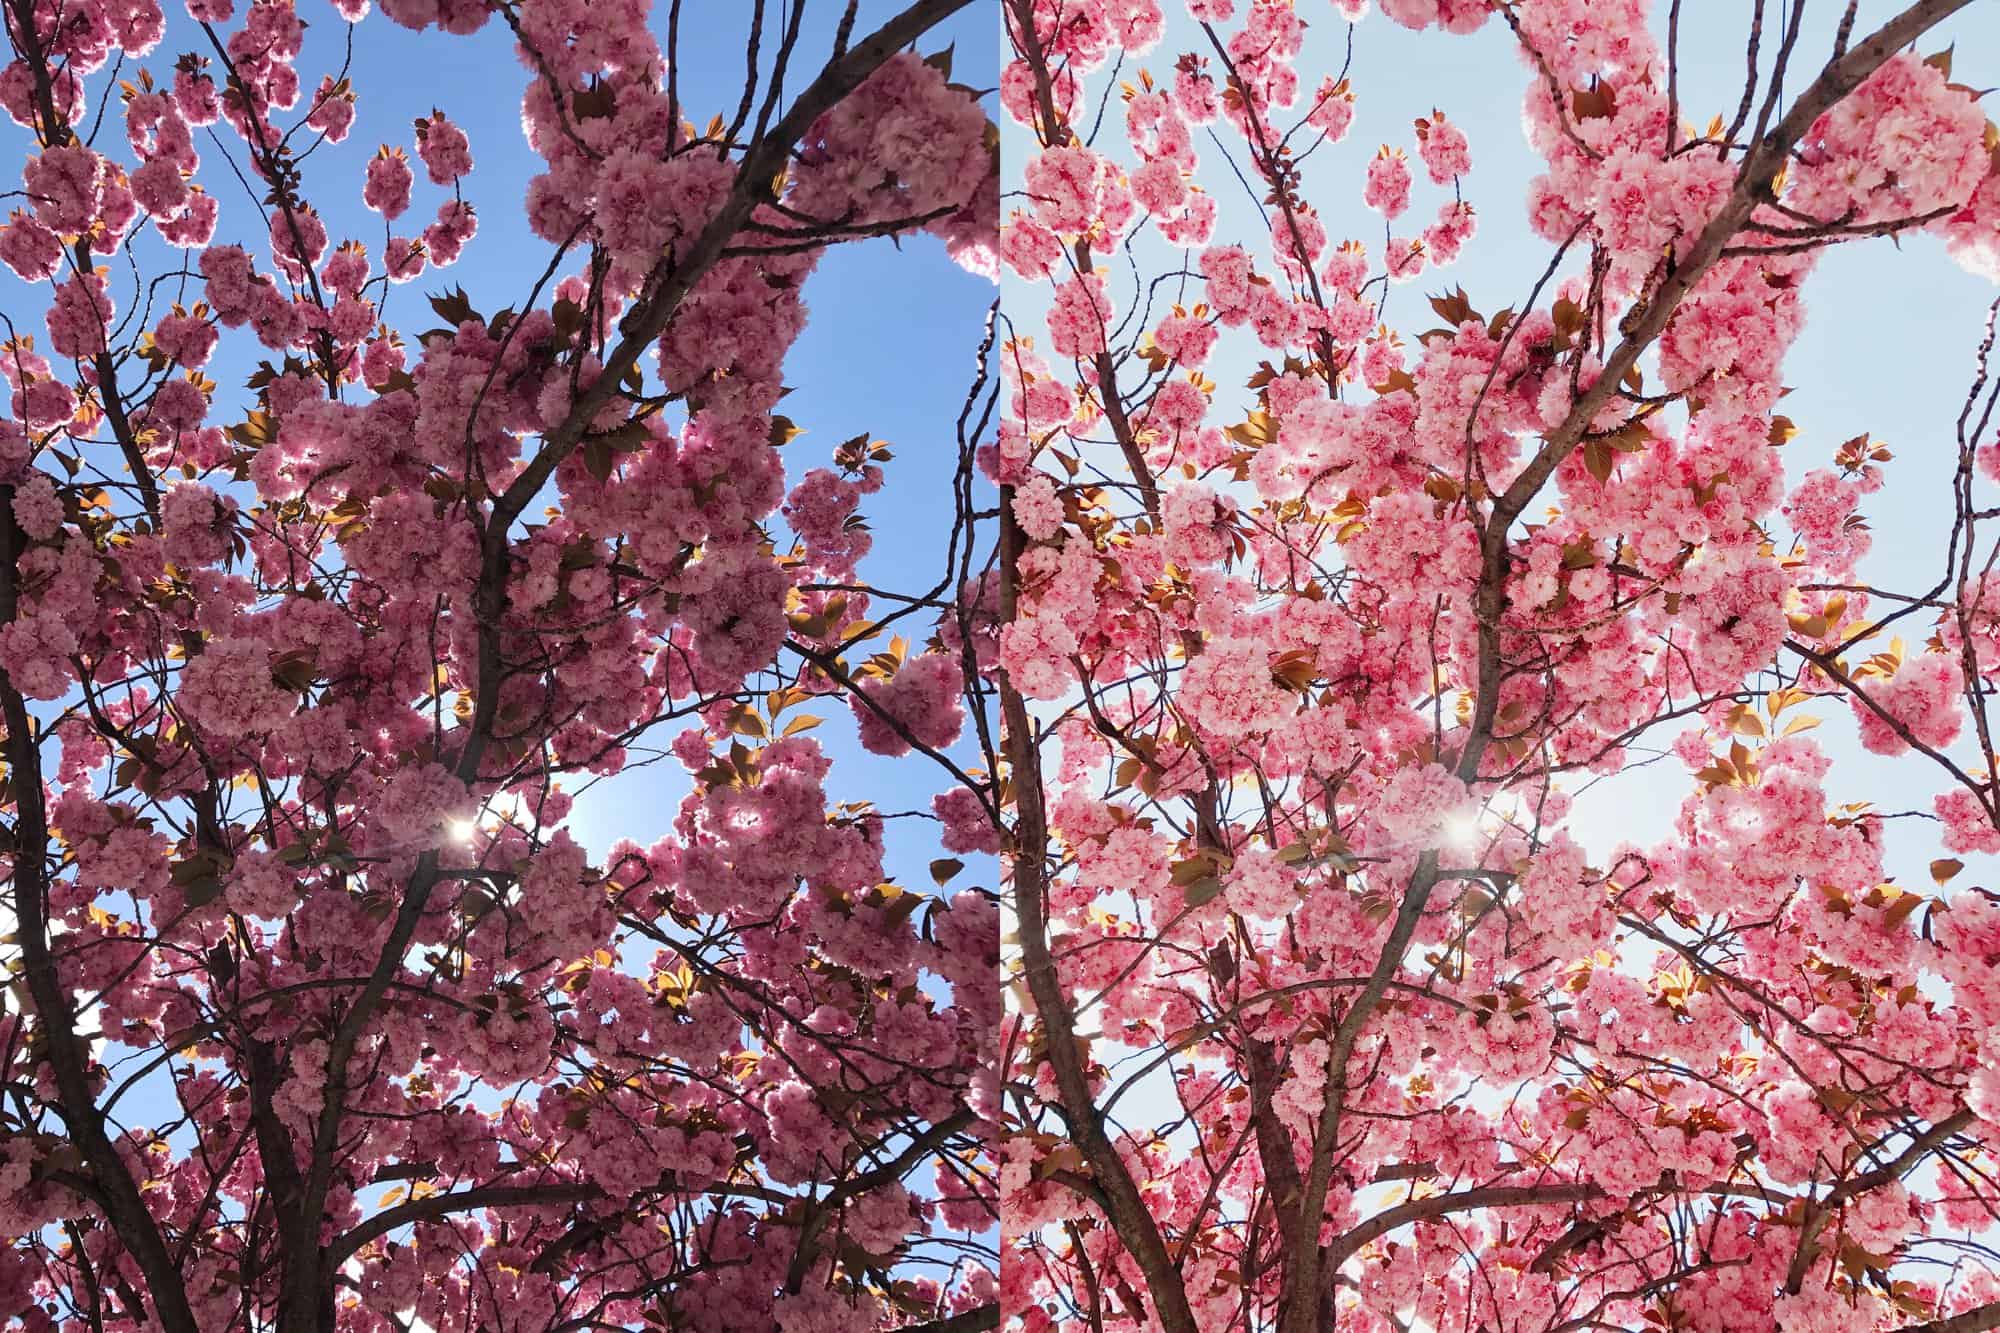
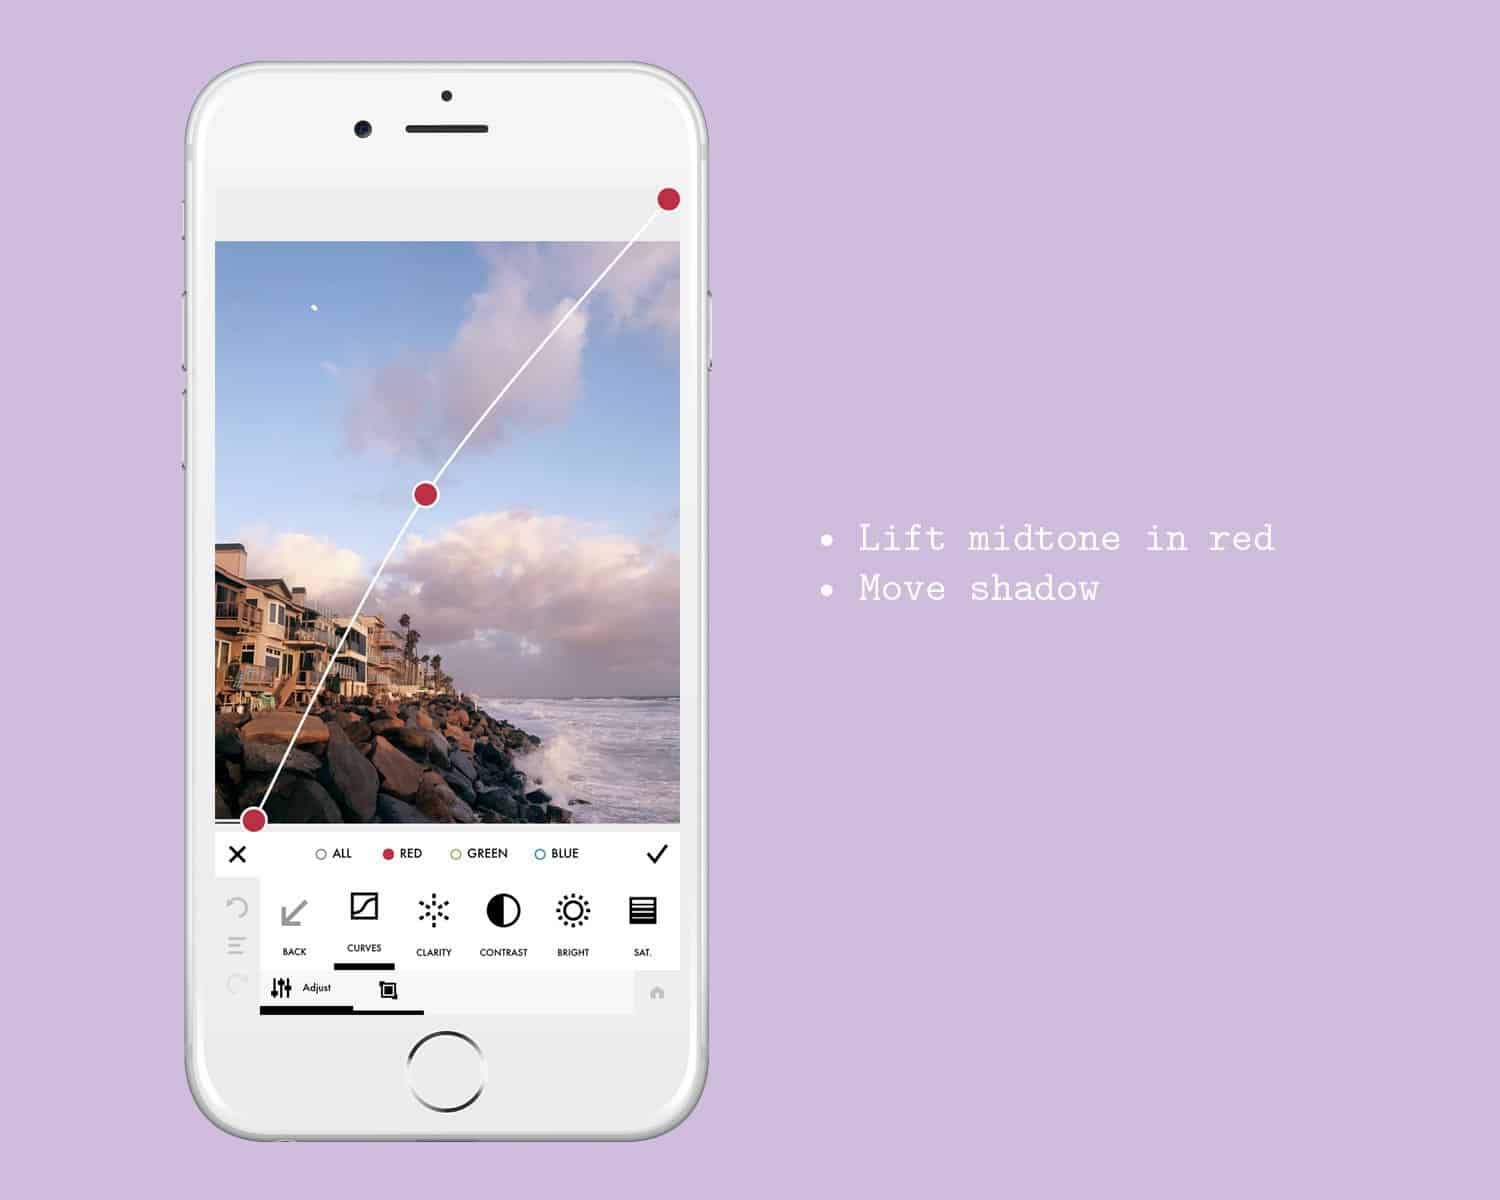
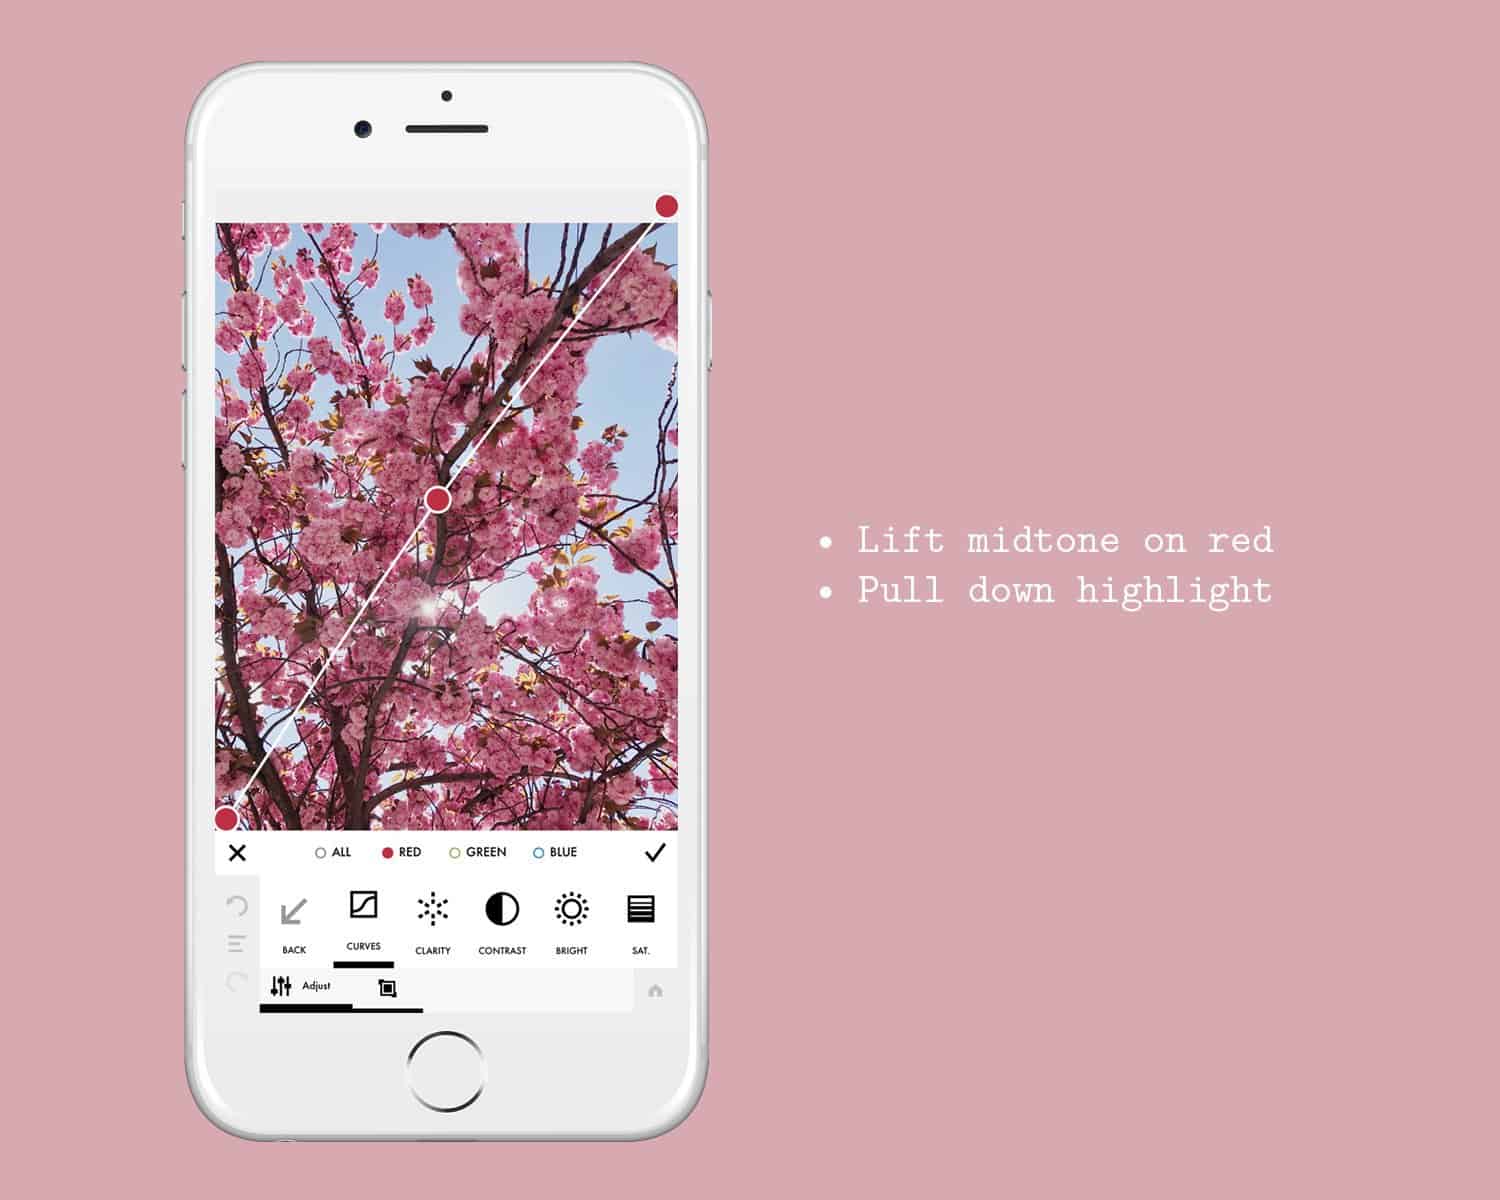 With this photo in particular, I really wanted the pink to pop. Switching over to the red curves, I brought up the midtone point slightly. I then took the red highlight point down a little bit as well just to reduce the redness in the sky.
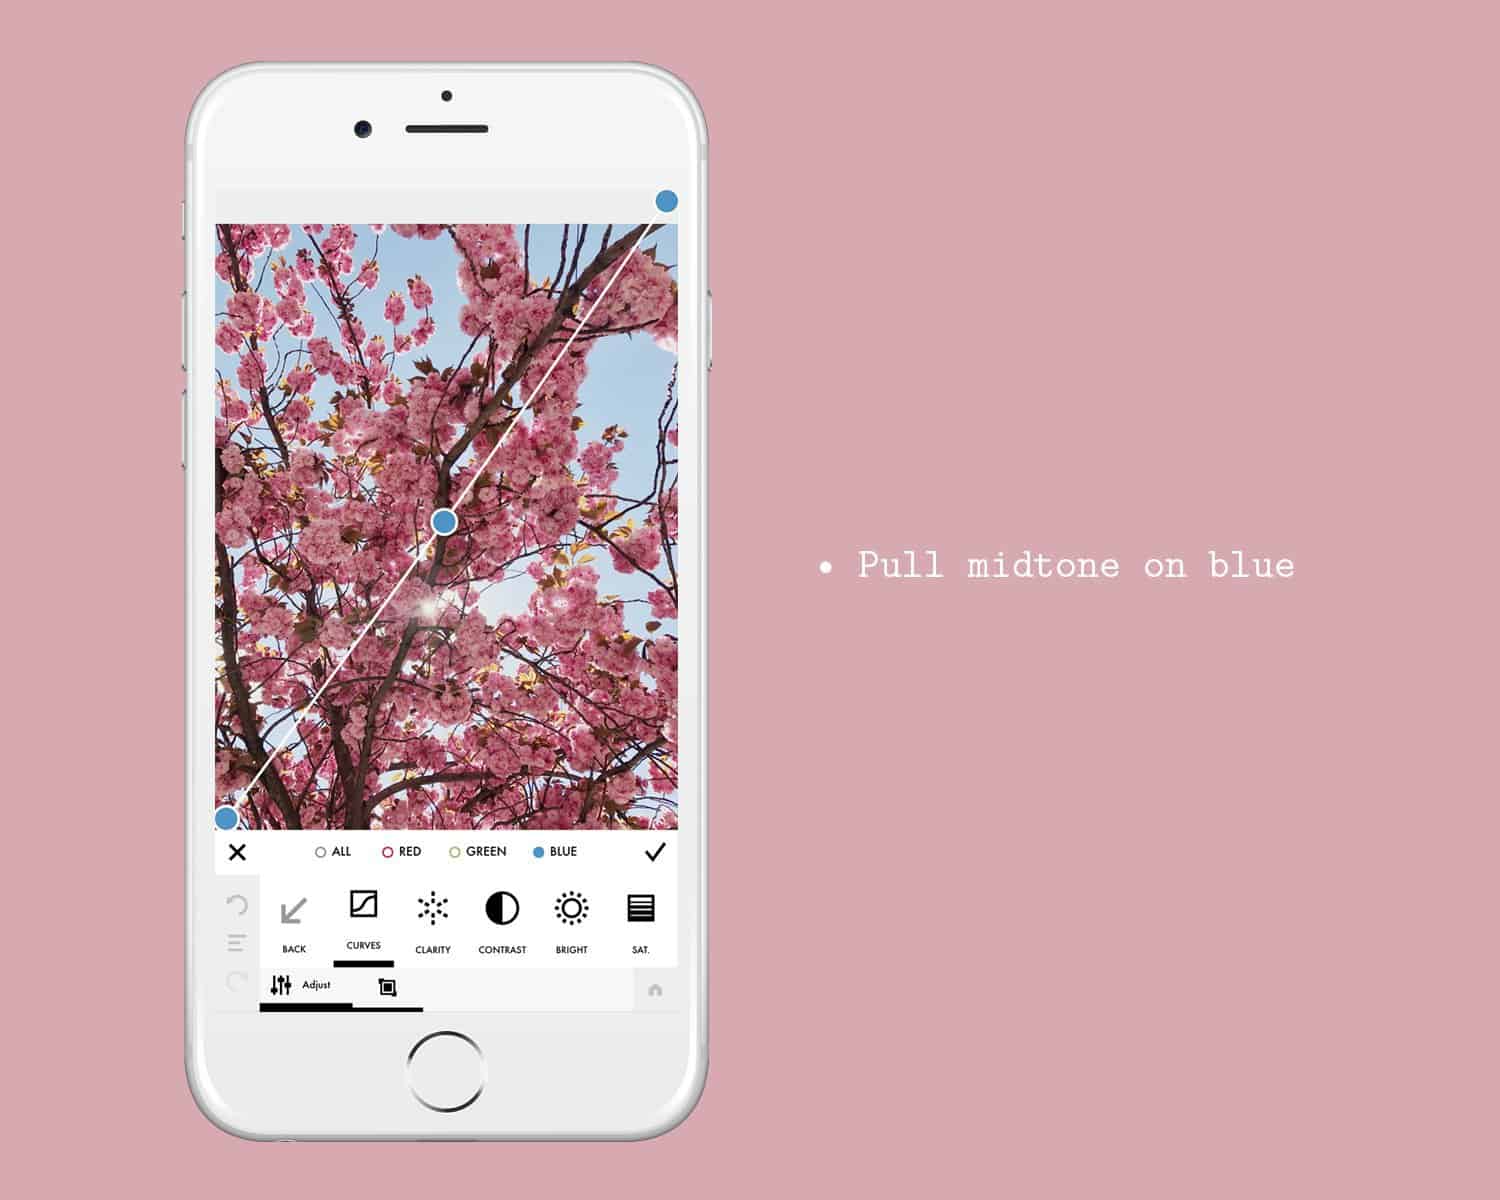
To balance out the sky and pink tones, I went over to the blue curves and took the midtone point down. One of the keys to achieving precise tones, is going little by little to start. Take your time adjusting in the slightest movements and really look at what the curves are doing for you.
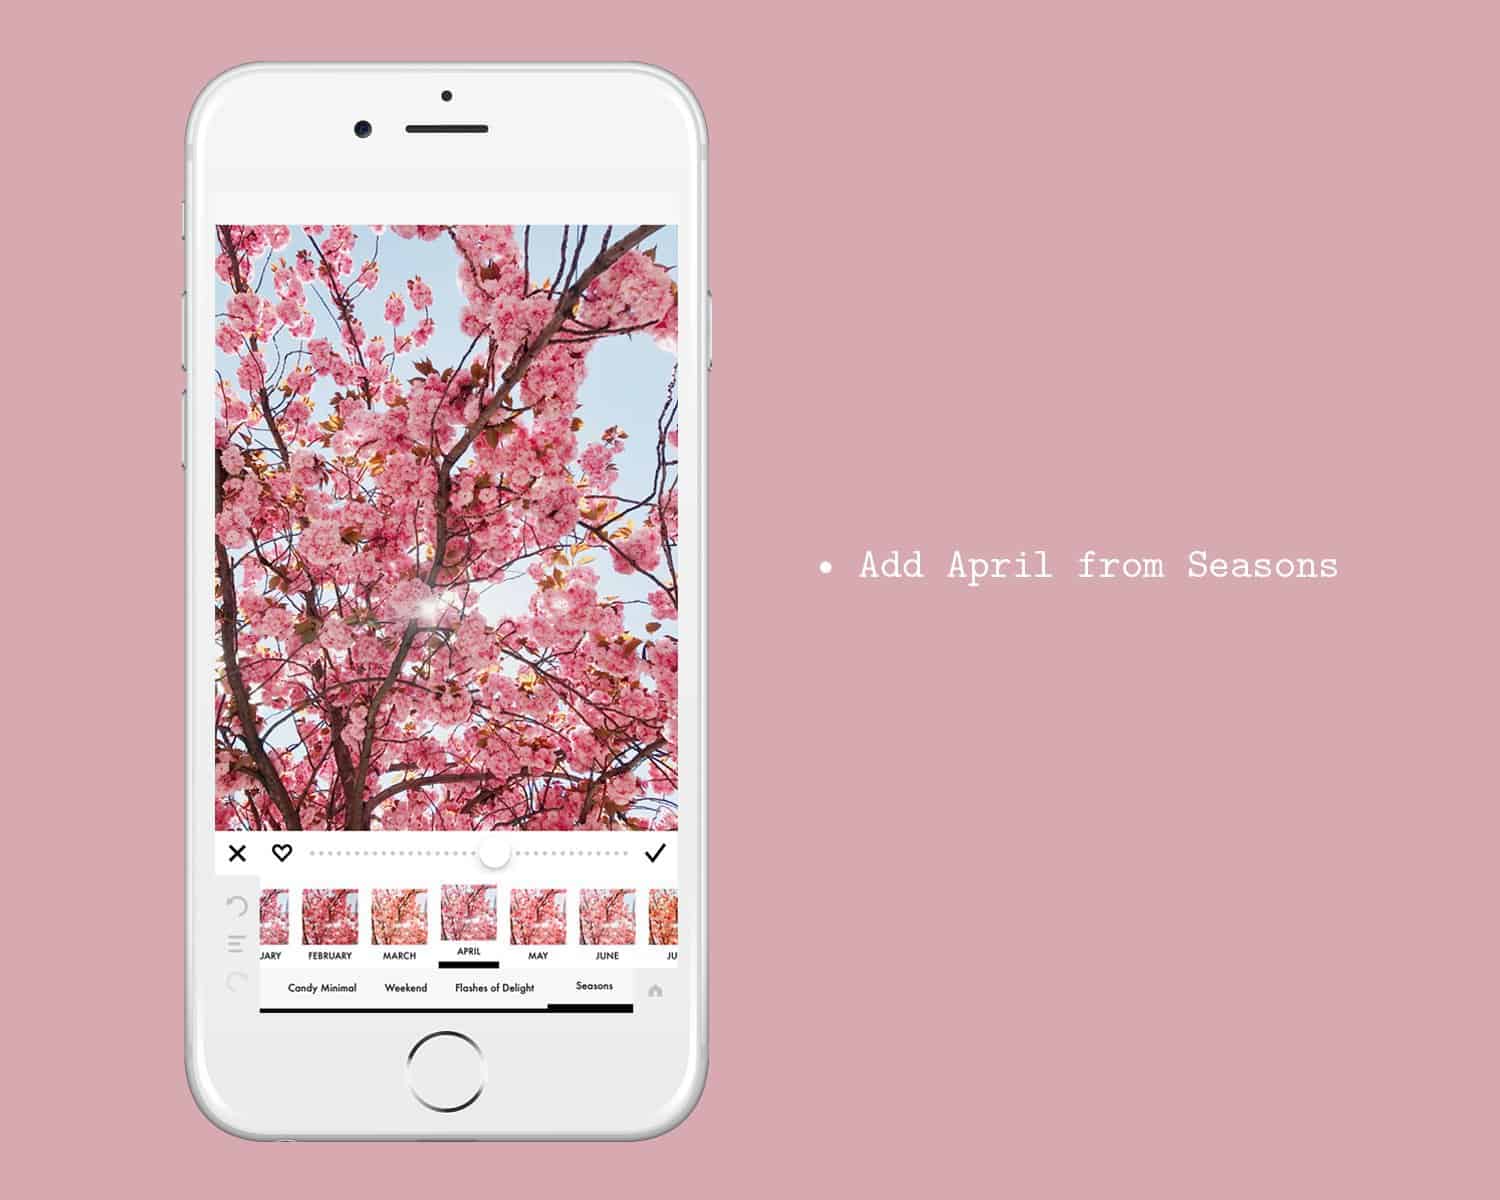 To finish this one off, I applied April from the Seasons pack at 55% to add a natural brightness and pastel tone.
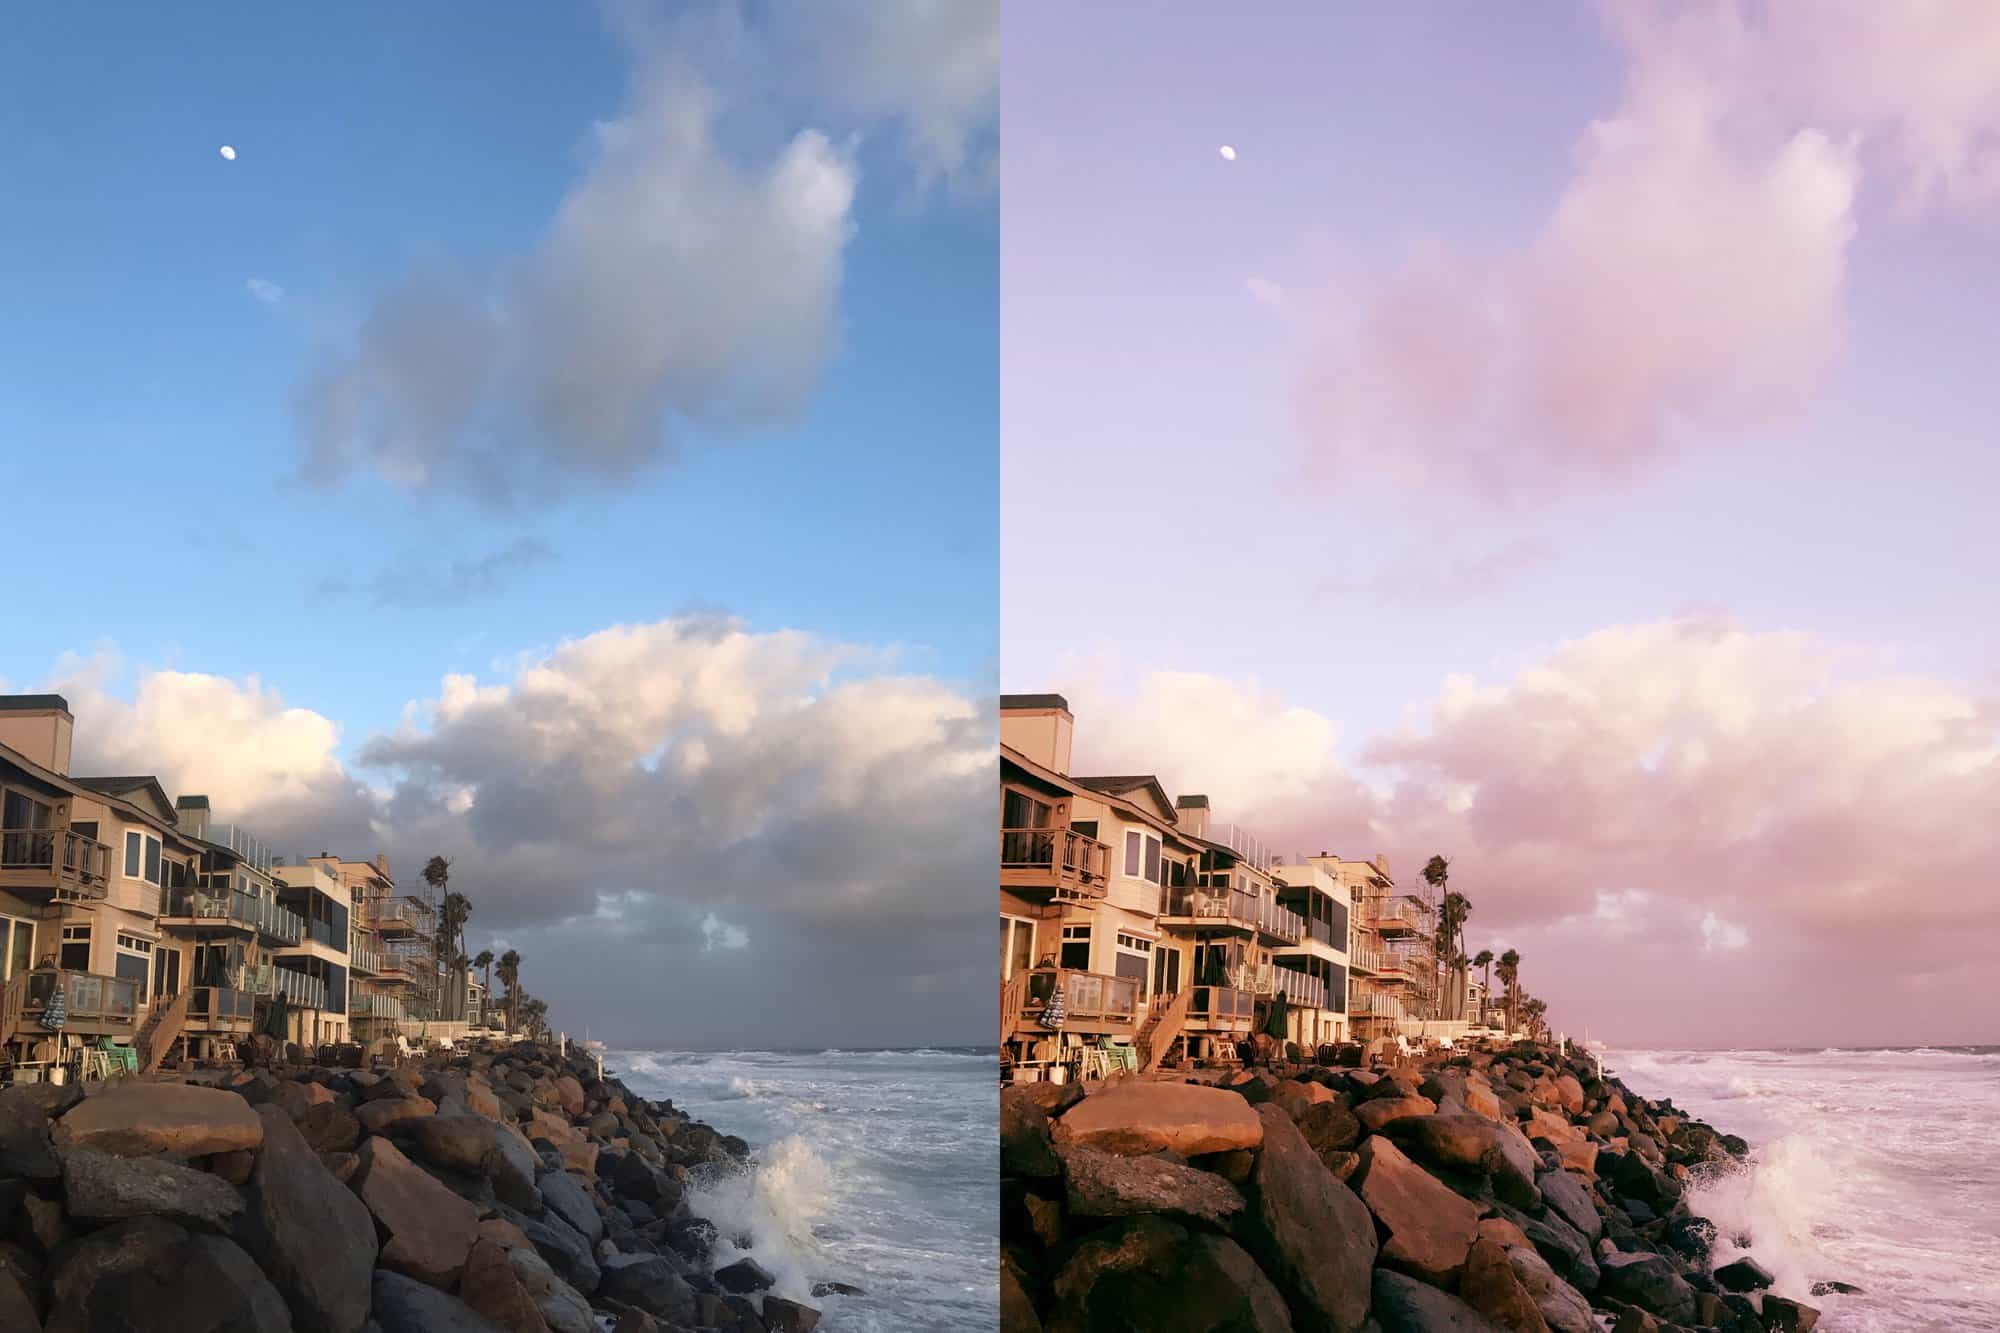
 The next example portrays more colors and depth. Starting off, I applied the same methods as the first photo. Up on the midtones to brighten it up, down on the highlights, and moving the bottom point to the right to add contrast.
 For this edit, I really wanted the sky to have a more dramatic feel. Going into the red curves, I brought up the midtone point little by little until it had a very subtle pink overlay. Then I shifted the red shadow point over to the right to really make the rocks glow. Since red is a contrasting color to green, it takes away any green tone if the curve is taken down.
 Hopping over to the blue curves, I took the shadow point over to the right to even out the overall shadows. The midtone point was brought down to really warm up everything as a whole.
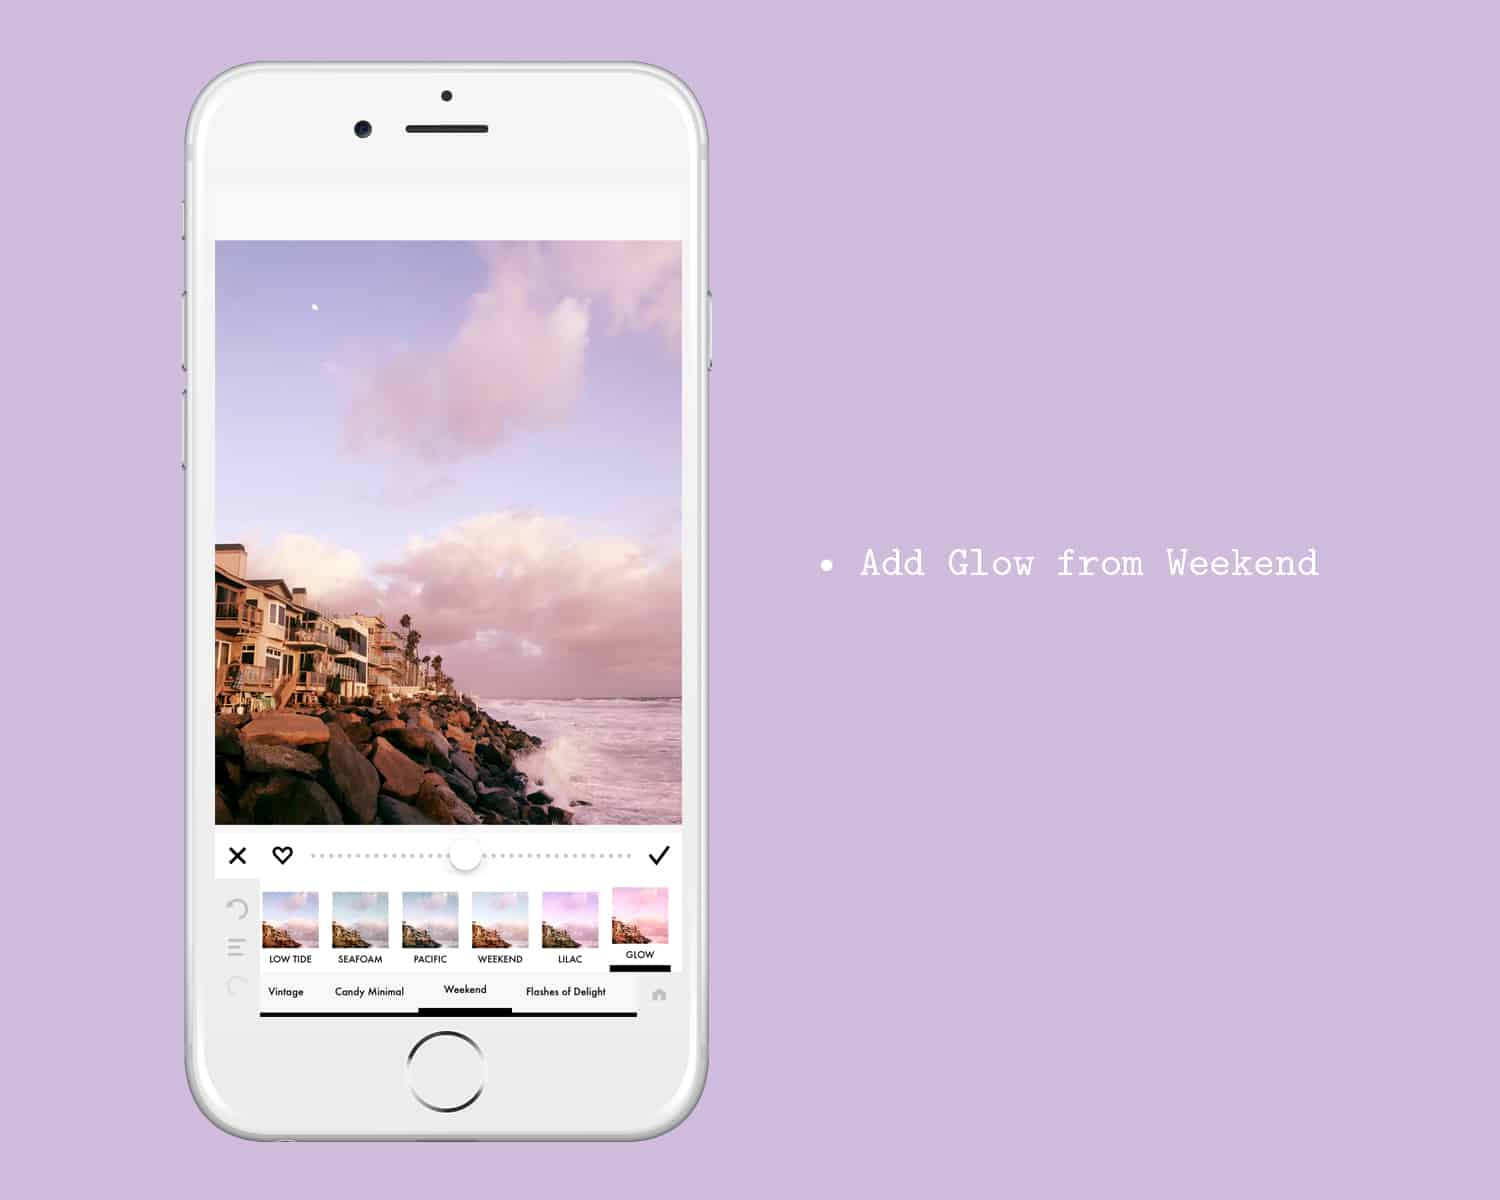 Lastly, I used Glow from Weekend at 50% to bump up the pink.
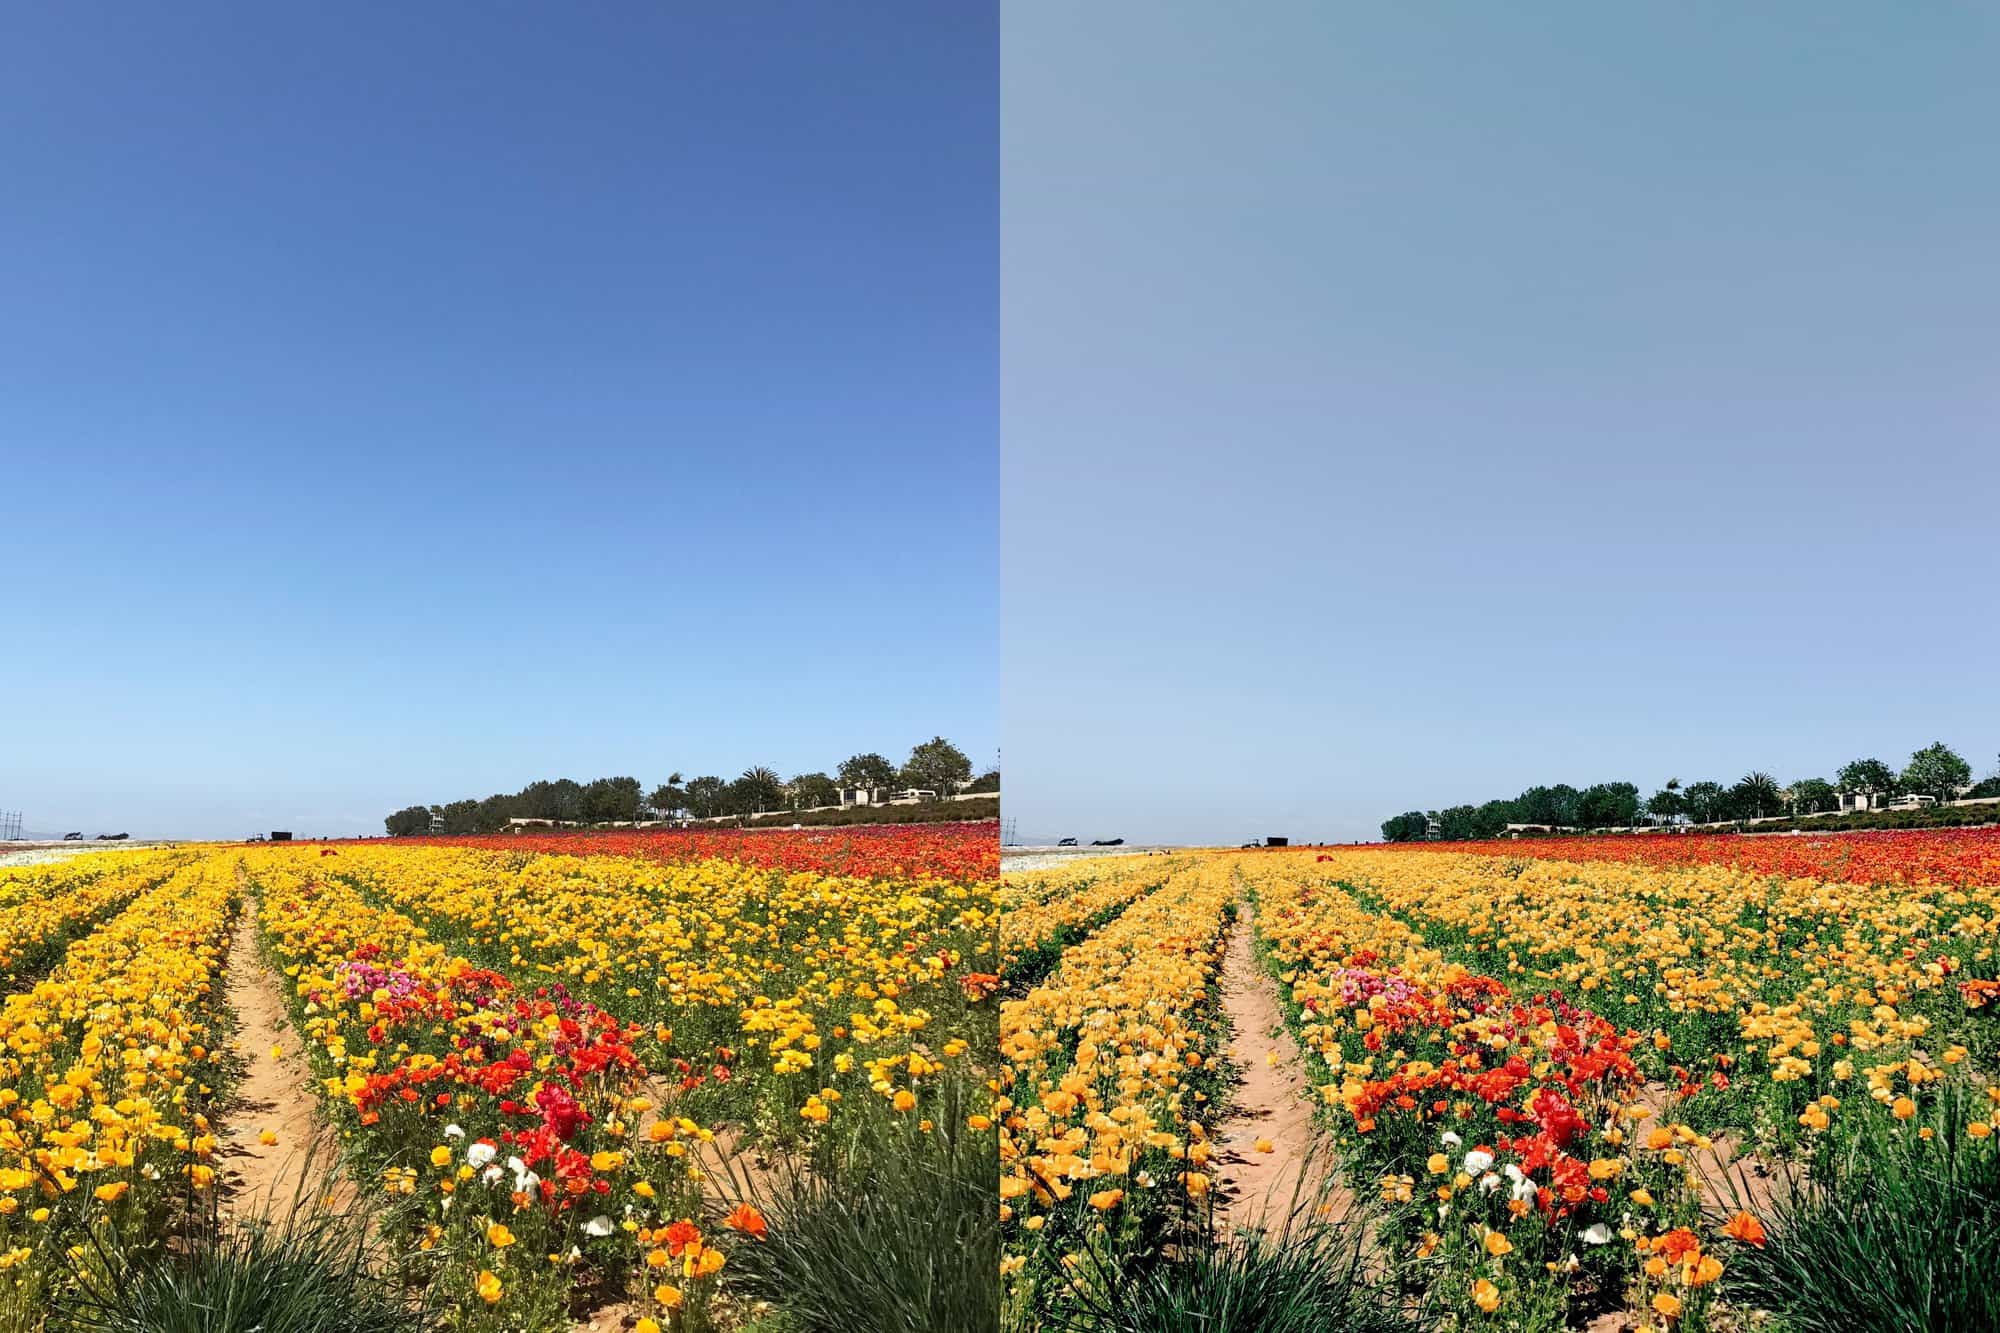
 This final edit is much different from the first two, as it was shot midday outside. I wanted to show an example of how to counteract harsh sunlight while making sure the color holds its integrity.
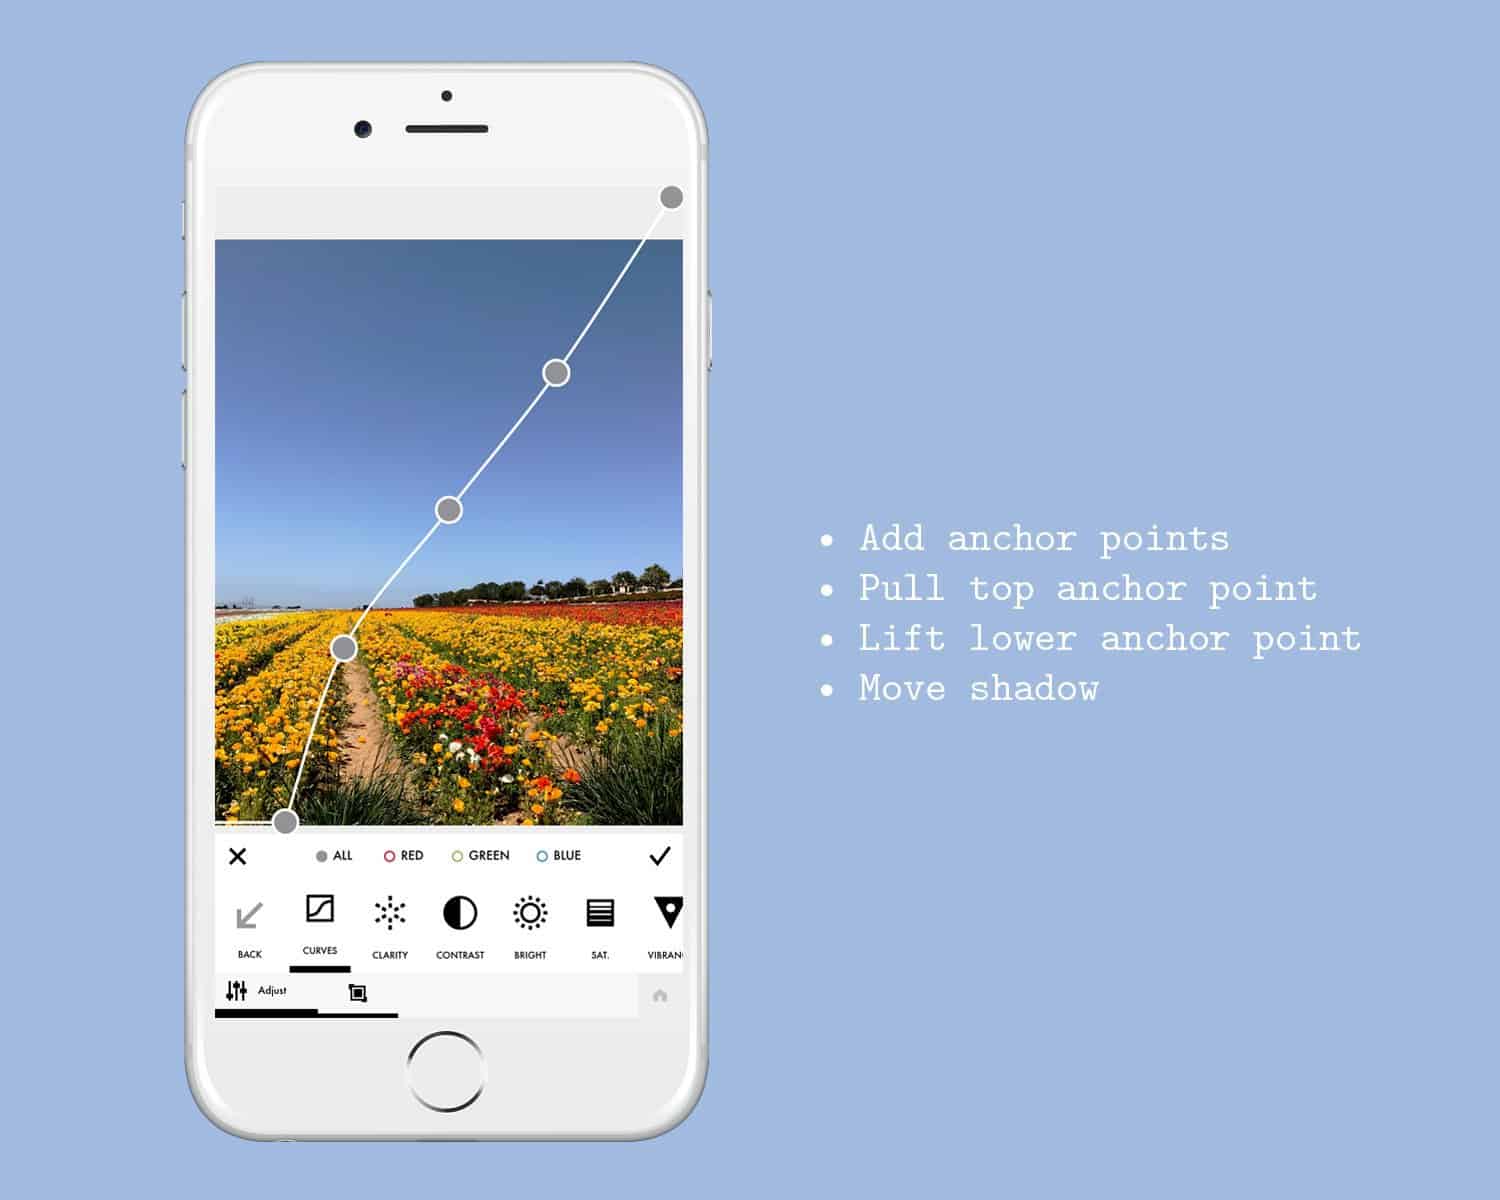
Starting off with all curves, I compensated for the bright highlights by adding one anchor point in between the highlight and midtone points and bringing it down slightly. (You can add anchor points anywhere by tapping the line). Then adding in another anchor point between the shadow point and midtown point, I brought it up slightly.
Then, I brought the shadow point to the right to bring out the natural shadows. You can see the pattern in the curves is a reverse “s” making the image a little more flat and less harsh.
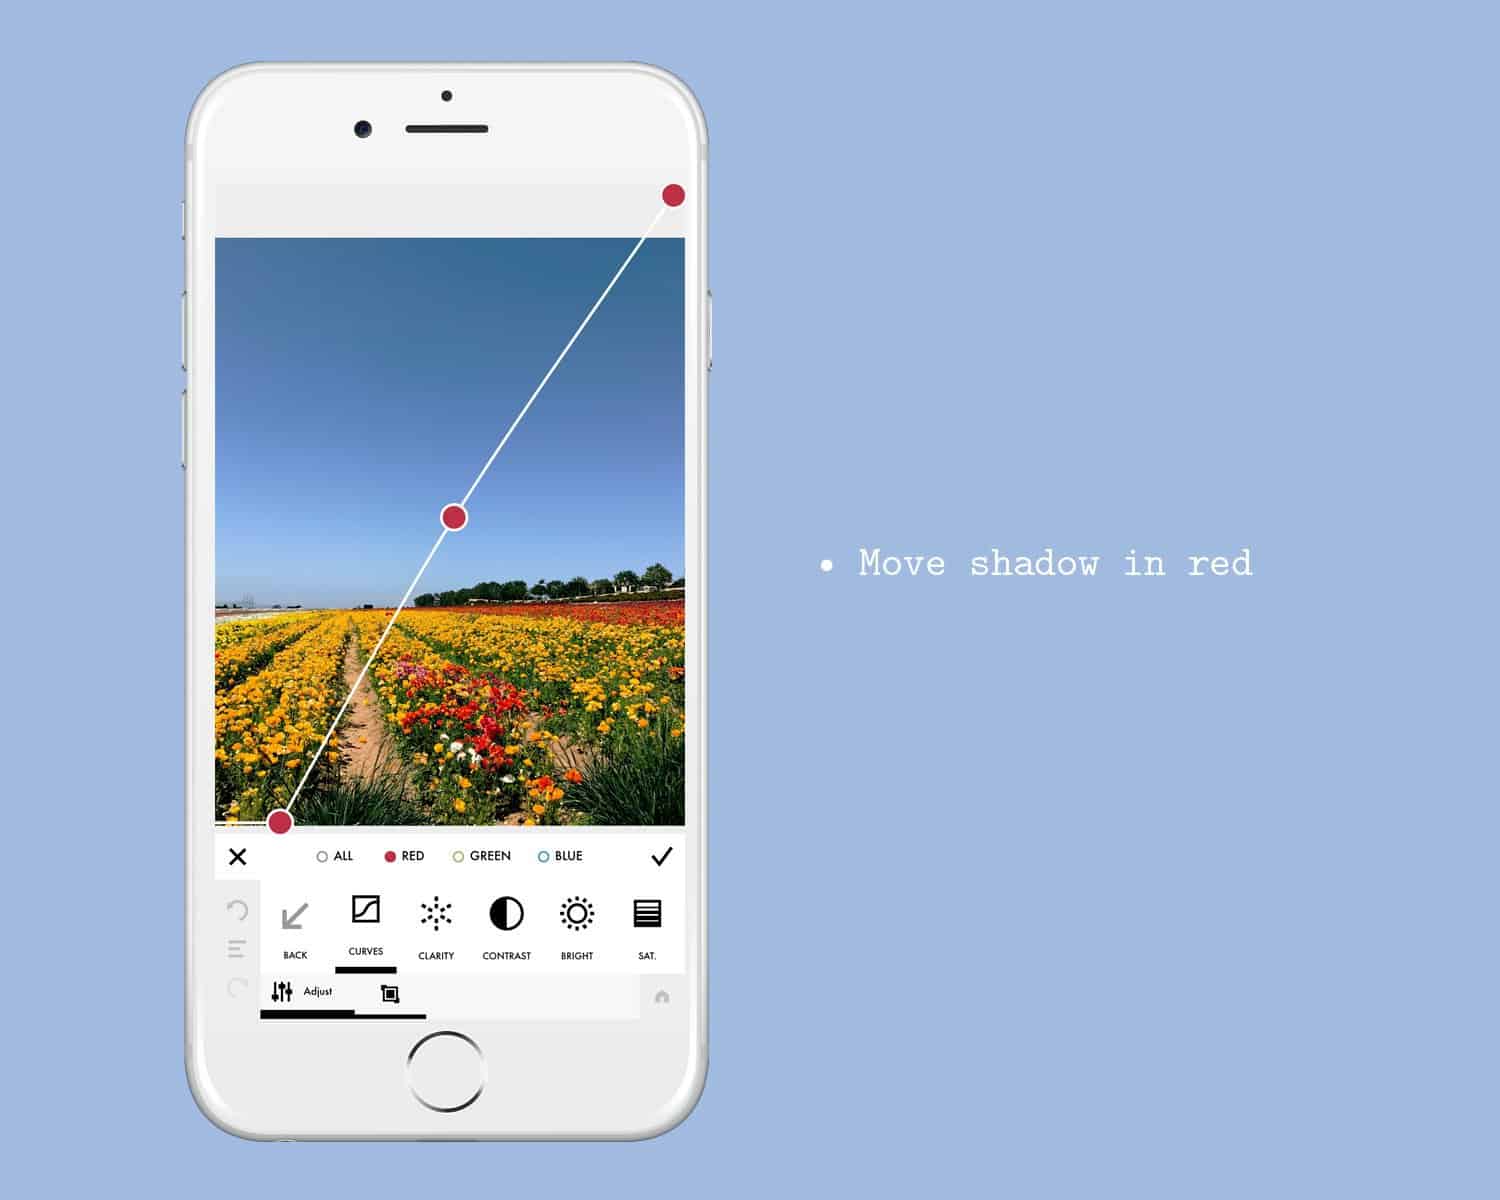 I wanted the greens in this image to stand out, so for the second curve adjustment, I brought the red shadow point across to the right.
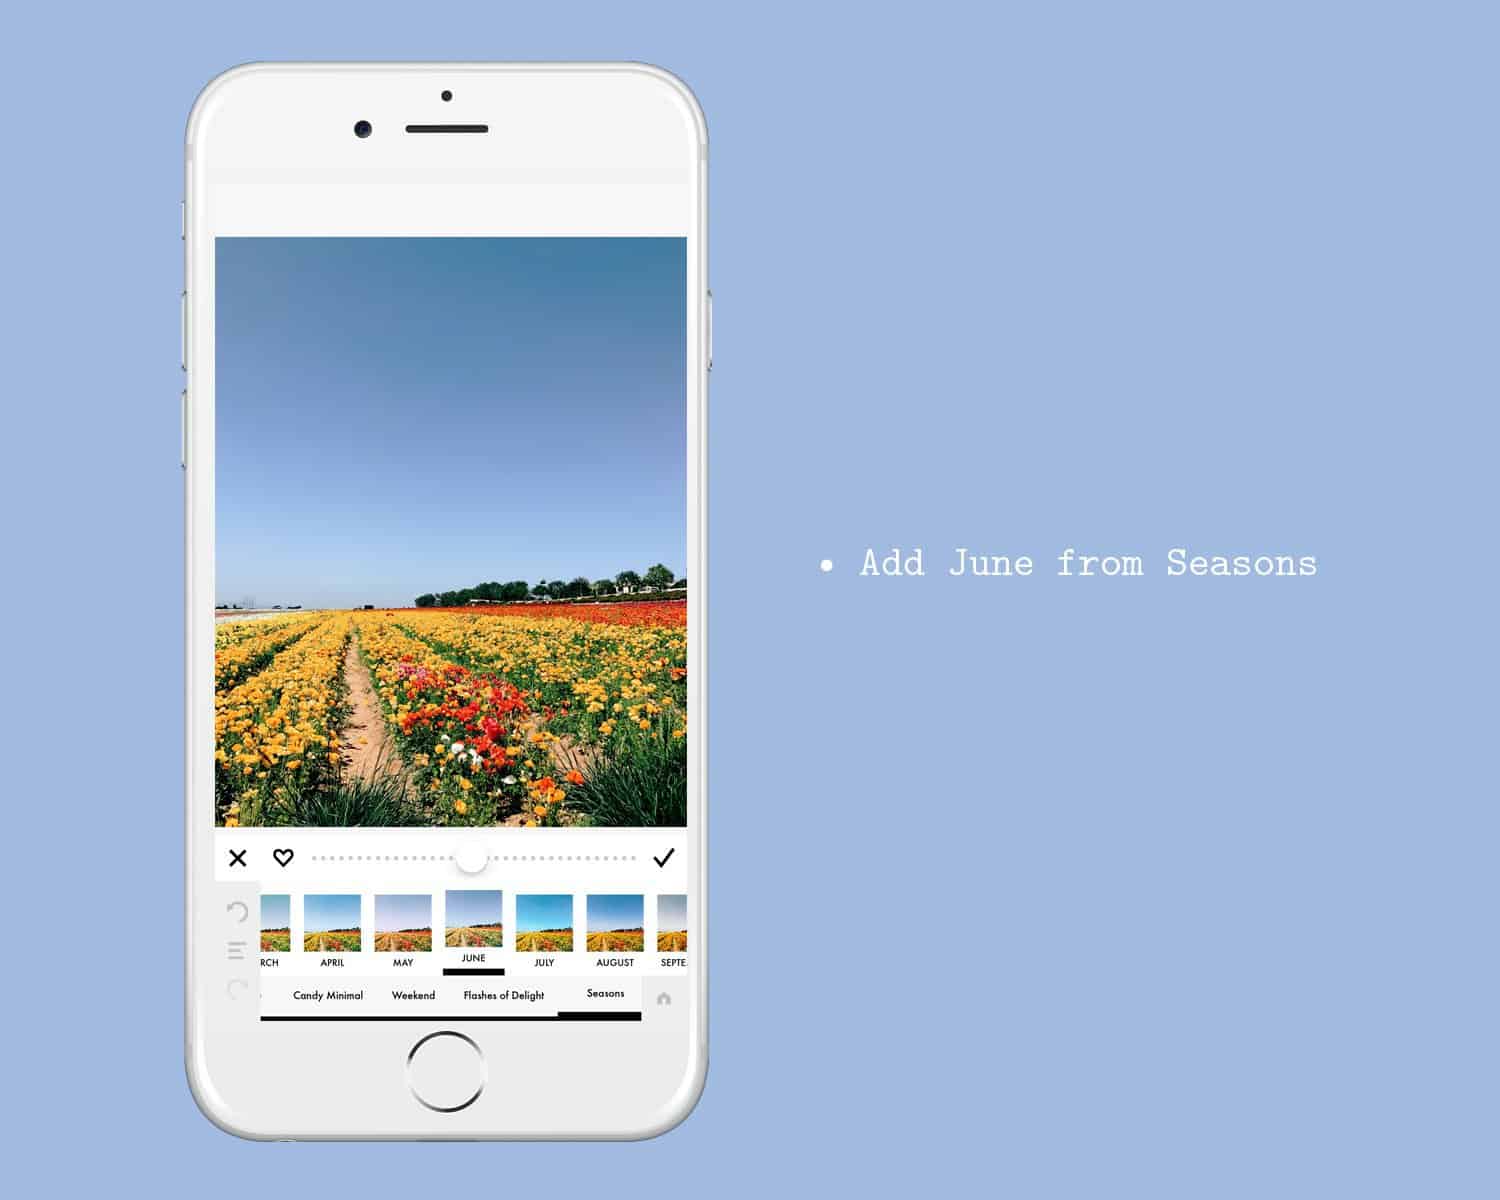
 June was applied at 50% to finish off the coloring and white fog was added to brighten the blue sky for more of a film look.
 The best way to really get to know curves is by experimenting. See what works for your style and take your time when applying any given adjustment. Remember to tag your work with #AColorStory so we can see what you’re creating!
29 Comments
Great post
The Pink Pineapple
New post:http://thepinkpineappleblog.blogspot.com/
This is awesome! I’ve always wondered how to use color curves but was so intimidated by them!
COLLEENWELSCH.COM
Wow….thanks for this tip! I’m going to try this app.
– Greta
http://www.mintyfrosting.com
This was REALLY helpful. I normally use levels in a lot of apps (like Photoshop), but I never tried using curves which I know is a lot more accurate. Definitely taking your tips.
Charmaine Ng | Architecture & Lifestyle Blog
http://charmainenyw.com
This answers so many of the questions U had in my mind when looking at other’s flawless pictures! I love the lilac undertone and can imagine I’ll have hours of fun messing around with this.
The Color app is such a useful tool!
This is so great Arielle!
xx
This was a super helpful post! I had been wondering how to use the curves tool for a while. Thanks for going in depth with it!
This really lifts up the photo’s just by only using curves and one filter ! Def going to try this, thanks for the tips, Charissa.
http://www.ladygoldapple.com
Wow, these tips are really helpful! Great post 🙂
Curves is edit tool I’d never used –mainly because I didn’t have any idea how it worked. Thanks for this information–I’m excited to give curves a try. Mary Wilding http://www.mytributejournal.com
LOVE this tutorial – thank you for making it so simple and easy to understand!
I love how naturals all of these improvements look! Great tips! x
Ariadna || RAWR BOWS
I love the Curves tool, and this is a great tutorial! I would’ve loved to see the pictures side by side from start to finish so we can really see the difference, because scrolling down to see the next changes is not enough to really see them.
And one thing I realised: the more I use A Color Story, the more I like it! I hope you will make an Ipad version soon because I use it a lot with it to edit my pictures, but the fact that you can only use the app vertically is really annoying and uncomfortable.
Thank you for this great article, and keep improving the app ❤️??
Beautiful! Relly love it! Thank you for this tutorial.
Hello, I just downloaded your app. I would like to purchase “Current & All packs” but I don’t see that as an option. They are all listed individually :/ How do I purchase this for the $10.99 ? Love your tutorials on this app, So many wonderful options, now if I could just get them all at the same time 🙂 Thank you ~ Cynthia
Hi Cynthia! We don’t have all all packs option, but we do a pack called The Story Collection that includes Blush, Chroma, Organic, Fresh, Airy, B&W, Vintage, and our free packs, Essentials + Good Vibes. 🙂
Thank you so much for sharing this! I have had no idea how to use curves, but now I’m excited to experiment.
Can you clarify what moving the dots up and down versus left and right does?
http://www.wonderlandsam.com
This was great, thanks! I’ve been a photographer and designer for years, but I’m self-taught, and never understood curves, therefore never used it. I edit all of my phone photos in A Color Story, and the only tool I use is Curves! That’s what taught me how to do it in Photoshop. So thank you! This extra tutorial was very helpful, also. I didn’t realize I could even move the top and bottom dots, I’ve only been using the middle! duuuuuh.
This is so useful as I hadn’t quite got to grips with the colour curve but this is fab x
useful.
Thank you so much for this post! I have played around with curves a little bit but always end up abandoning the project. This really helped demonstrate the purpose of curves, and how versatile they are. Such a powerful tool! I can’t wait to experiment.
julielauferofficial.com
Hello ma’am! You’re doing a wonderful job as a Lifestyle Blogger. I’m a Lifestyle Blogger, very new to this field. I really look up to your posts and admire them. More power to you. Thank you!
This is so fascinating. Thanks for sharing the amazing tips. I really like the photo curves.
cantik dan manis sekali
Awesome info! – love the examples, particularly the blossom image. Thanks for sharing!
nice
I Never use the curves by pulling my self, In stead i find it easy for me to use the sliders.
This is excellent to know. Great post!