

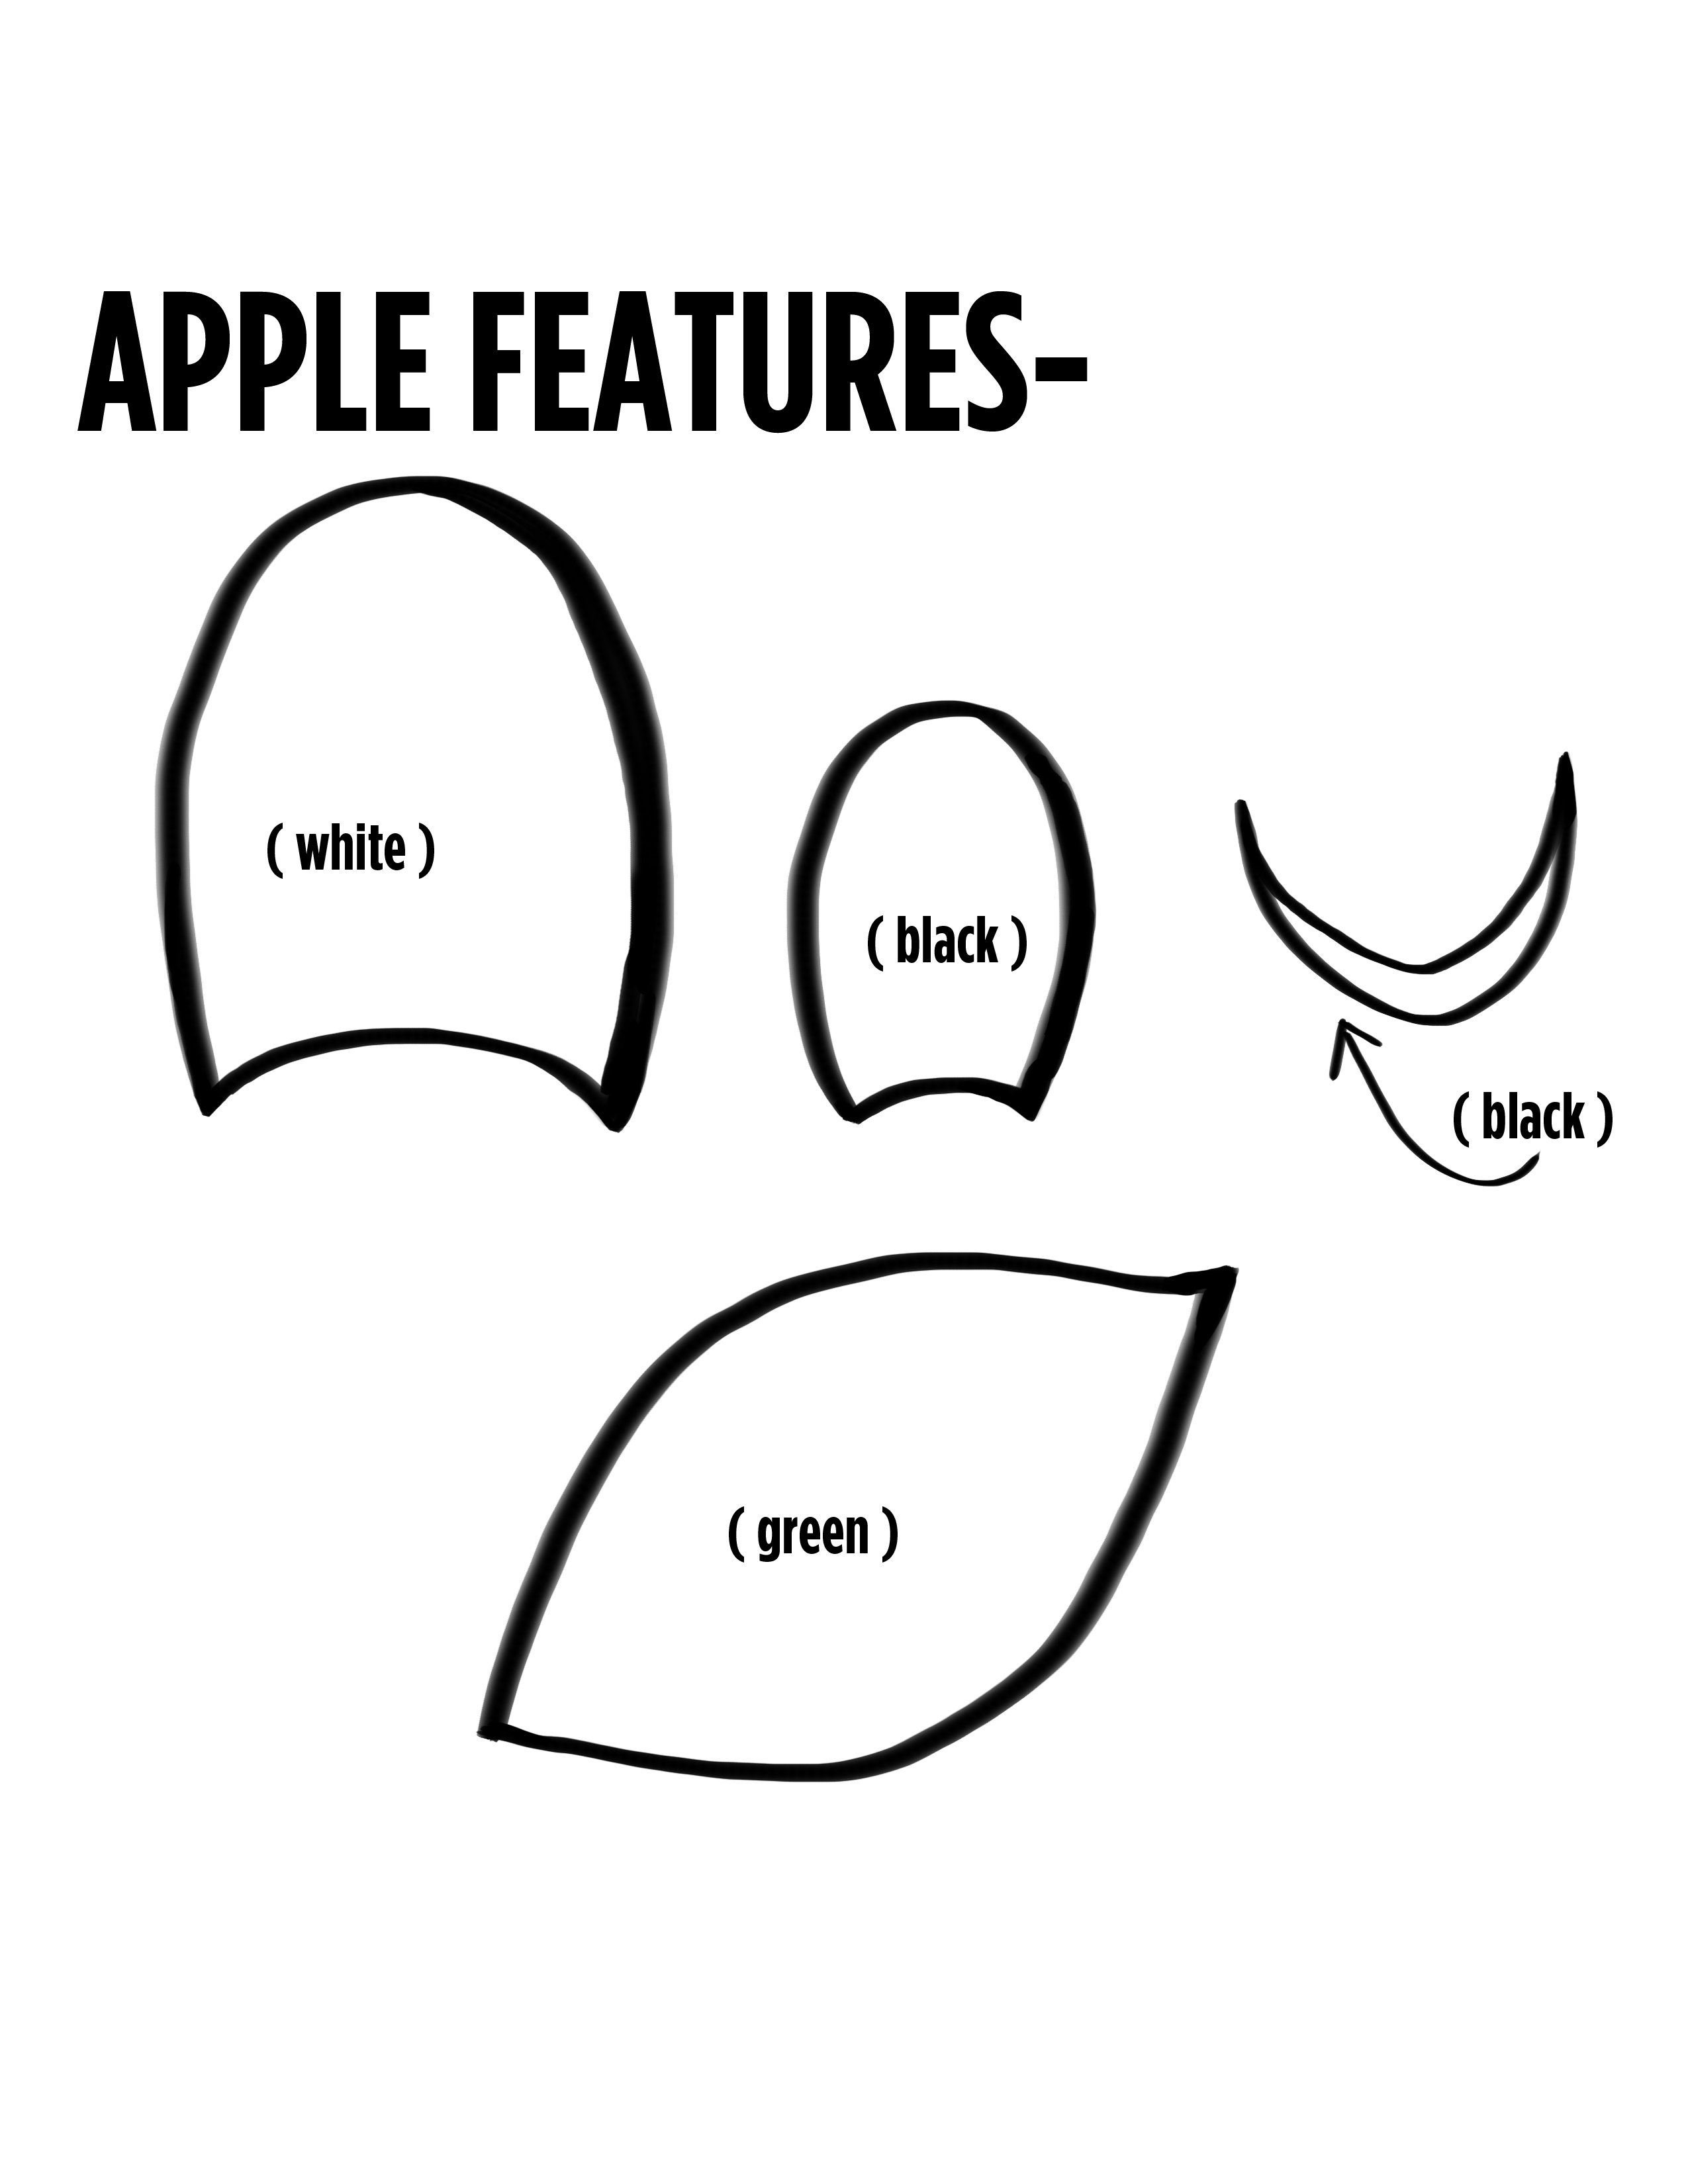
1. Supplies Needed: red velvet, white and black felt, burlap, green cotton fabric, scissors, stuffing, iron. 2. Cut out pieces using the templates. Turn the red velvet inside out and stitch around the edges, leaving an opening at the top where the stem will go. Flip the apple right-side-out (so the velvet is now showing). Stuff the pillow with the stuffing. 3. Stitch around the edges of the leaf (green fabric), leaving a small opening. Flip the leaf right-side out and iron flat. 4. Stitch around the edge of the stem (burlap), leaving the bottom open. Stuff the stem until slightly plump. 5. Insert the stem and leaf into the opening of the apple and hand-stitch the opening closed (sewing through the stem and leaf). 6. Apply the eyes and mouth with fabric glue. You're all finished!

")
PS. Everyone please give Katie a warm welcome because she will be working part time in our studio now. Welcome Katie!
80 Comments
Welcome Katie! I love that your studio family is growing:)
Julia
Oh, this is just too cute! I love it.
And welcome Katie, I bet you’re having fun with the girls!
I am so making that!
THIS IS SO CUTE:D
This is amazing, such a brilliant autumn craft! And I can’t wait to see more of Katie’s posts!
http://www.styleisalwaysfashionable.blogspot.com
This is too adorable! and “Welcome Katie”
That’s so cuuuute I can’t believe it! But I guess I’d always be hungry looking at it. I love apples! Oh, and especially baked apples! As much as I dislike the cold weather, there are things I love about autumn 🙂
x
Sabrina
http://apixiesviewonfashion.com
What a cute face he has 🙂 Love plush crafts!
i love it! i need to get my sewing machine out and start crafting!
http://amoremiobello.wordpress.com/
That is so so cute! ^_^ I wish I could make that!
http://donutpastry.blogspot.com/
Very sweet, I imagine this would look lovely as a pumpkin too.x
ADORABLE, already added to my fall list of things to make 🙂
Super cute!!!
this is very cute! Can’t wait to see what other great project you got Katie 🙂
This is adorable! I actually have some red velvety (but not velvet… I don’t like the feeling for some reason. Corduroy too) material at home I could play with!
I’m excited to see more from Katie!
http://whiskeybreakfast.blogspot.com
It’s so cute!!! Love it 😀
Looks like it’s apple day here on A Beautiful Mess, first apple pie recipe and now this cute apple pillow, but hey I’ not complaining I love apples!
My blog: acolorfulcreation.blogspot.com
Love how cute he is! I recently made a frog pillow very similarly!
http://theoccasionalindulgence.blogspot.com
oooh they are so cute! As soon as i have some spare time i’m going to try to make these.
http://bravebrunette.blogspot.com
So cute! I’m definitely gonna try this!
Definitely going to make one of these to display with my foxes! Going to give mine cute little black eyes instead to fit with the theme.
That is SO CUTE! I’ve got to try it out! 🙂
xoxo
Nat
So cute! This would be perfect in a teachers classroom.
SO cute! Every time I come to this page it just makes me realize once again how much I need to learn to sew!
-Lindsey
http://ettu-tutu.blogspot.com
This is the cutest thing ever! I love it 🙂
lifeatruestory4.blogspot.com
That’s really cute! I’ve been meaning to take the sewing e-course on here so I can finally stop talking about it and just do it:)
http://www.popsparkleandshineclub.com
That little apple is so cute!! Perfect for the season 🙂 Thanks for sharing!
-Jessica (Sew In Love)
too cute!
i made something similar in 6th grade home ec!
Still cant imagine what a creative persons you both are. Seriously EVERYTIME i check out this blog, I find such unique and special things! Amazing!!
XX
http://fashion-stains.blogspot.nl
This is so cute!
http://www.bakingincouture.typepad.com
awwwwwww! the cutest!
http://slidingdrawersblog.blogspot.com/
so cute & so fun! Love the little apple!
XOXO
-Daisy Nguyen from PS BANANAS fashion blog:
http://psbananas.com
This is totally adorable. I can’t help thinking that this would make a great gift to thank a teacher. 🙂 Thanks for sharing! – Alison { aliology.com }
Cutest pillow I’ve seen yet. Please make a strawberry or banana pillow! or… since it’s fall decor, perhaps a pumpkin?!
M.
WELCOME KATIE! I’m sooo super happy you’re joining “A Beautiful Mess”! You seem like such a beautiful person. I look forward to hearing (seeing) more of you, and I hope you have fun! WELCOME!
oh my god.. this is so cute.. i wanna try this. 🙂
Irene Wibowo
Just had a cute attack. Welcome Katie!
http://catherinedenton.com
Catherine Denton
What a super cute apple pillow!!!
Elle xoxo
http://www.thehighfeather.com
I love it! Apples with eyes!! AHHH!
VERY cute!
Xx
http://kendra-genevieve-rose.blogspot.com/
I know it’s lame, but I totally got a kick out of you guys featuring a project made with *real* red velvet.
Oh I wish someone would make this for me for my future classroom 🙂
wow, that’s an aexciting news! lovely pillow and thank you for template!
so cute http://www.ireneccloset.com
Whoooooa my gosh! Cutest little thing! I definitely need this for my dorm room <3
xo Heather
http://ahopelessnotebook.blogspot.com/
Love shaped pillow, i made my owl months ago ; )
http://mykitschworld.blogspot.com.es/2012/02/my-diy-owl-pillow.html
Cute! I love that!
Theresa
http://bomamma.blogspot.com
I am making that as soon as I go back to France !
So incredibly cute! and how exciting Katie is joining the shop 🙂
Zoe
http://gypsiesister.blogspot.co.uk
Really cute! I have to do it!
: )
Lovely Idea
This is absolutely fantastic!
http://www.theironyou.com
Wow! Funny pillow! I like it!
http://www.xeanafashion.com
I think this is really cute for Autumn. I am getting a sewing machine soon and hope to make a collection of season cushions and these would be adorable as my first project!
Sam
http://liveandlove.typepad.com
Such a cute idea! I was wondering whether you could make a post about your favorite books (not only novels, also inspiring ones)? Or maybe a tutorial on how to draw things/write using a graphics tablet? 🙂 I really adore your blog, you’re so creative.
I absolutely love this project! I need a sewing machine to be able to follow all these projects! Welcome to ABM Katie!
It’s adorable!
Love the photos as well, nice and sharp.
Kudos,
James http://www.19rivoli.com
How sweet apple <3 I love this !!
So adorable!!!
http://www.creativityandchocolate.blogspot.com
Oh, I love Katies blog! This will be so awesome!
Welcome Katie – this little apple guy is so cute!
this blog is the only blog where everytime i open bloglovin to see whats new, i want to read every single one of your posts! its never boring, always beautiful! 🙂
SO cute! What a sweet little face!
The apple eyes look so lively and lovely. Also the little smiling lip is way too cute. I wish I knew how to sew so I can make this for myself 🙂
http://fabnfun.com
Awww, how cute is that? I will definitely make one of these for our couch! (: Oh, and hello, Katie! So great to hear you’re a part of the ABM family now. (:
Very nice piece of work! So cute! Love it!!
AHHHHHHHHHHHH!!! THIS IS SO ADORABLE!!!!! AHHHHHHH!!!!!!! XD
cute! i think it would be fun with some different fabrics too!
That would be so cute for my dorm! And the supplies aren’t terribly expensive for someone on a low budget. I see a project in the near future!
http://caitylenox.blogspot.com/
Adorable, love it!
amazing and cute pillow!! 🙂
Welcome Katie!!! This is suuuuper cute and I’m definitly going to be hitting the sewing machine this weekend…or maybe even handsewing it…I mean, why go to the trouble of lifting up that 30 pounder, its heavier than both of my dogs combined! Hahaha…but I send Katie a warm welcome all the way from Texas!!
aw it’s the sweetest … I need to buy a sewing machine as soon as possible, once again I say I love your work, Katie
xx
Aww, it’s so happy! haha. He’s super cute. I would love to snuggle with him. <3
http://horsesofares.blogspot.com
This is so cute!!
This is completely adorable!
xo
Diana
http://unusuallylovely.com
So cute! I have to try and make this.
I suck at sowing but…this is adorable, cute gift for a teacher.
http://www.LesliMarrie.com
Thats so cute!! 🙂
Love this fun apple DIY so much I just have to share on my kids blog this week! Check it out—> Sunday Coffee Links on chiquititosjb.blogspot.co.uk
http://madewithlovebyjackieb.blogspot.co.uk/
Welcome Katie