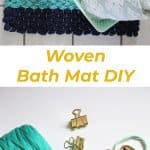
Shopping for bath mats isn’t the most glamorous way to spend an afternoon, but spending a few hours enjoying your new favorite hobby with the outcome being a custom woven piece of pure joy to step on sure is. Any time you can pair finger knitting and weaving into the same project, you’re going to end up with a textural feast! The best news is you can turn this beginner-level woven bath mat into a larger rug if you’ve got enough patience and plenty of podcasts queued up in iTunes.
Our house has two smaller bathrooms besides our master bath and neither have a tub. The showers in both are so snug that we didn’t bother installing shower curtains for almost a year because we never used them. After awhile, though, they started looking like shiny storage units for bulk toilet paper boxes, so I decided it was time to put a little effort into making them look like bathrooms again. It was also the perfect space to try out an idea I’d had to weave using finger-knit fabric yarn. Finger knitting your yarn takes some forethought as you can’t just sit down and start weaving, but it’s another mindless and therapeutic motion that can be done while being entertained by Netflix or chatty roommates. It also makes the weaving portion of this craft rather quick since it ends up giving you such a bulky end result. It turned out so good! The texture is dreamy and it has so much cushion when you step on it. I promise you’ll love yours, too.
Supplies:
-2 skeins of navy fabric yarn (find exceptional color choices here)
-2 skeins of teal fabric yarn
-colored cotton yarn for warp
-cut of wood measuring at least 2′ wide and 4′-6′ long
-31 nails
-hammer
-2 binder clips or clothespins
Finger knit one skein of fabric yarn at a time. This took me between 1-1.5 hours, but I was also able to do it while keeping an eye on my kids. It’s similar to knitting in that you can nerd out and take it places with you like your boyfriend’s softball game or your kid’s ballet class. For a standard-sized bath mat, you’ll use four skeins of fabric yarn with a little bit left over. If you’ve never finger knit before, head over to this tutorial for the step-by-step instructions. It’s fun and easy, and you can make more things with this craft than you realize.
When you need to stop finger-knitting, carefully pull each loop off of your finger and hook each one over a clothespin or opposite sides of a binder clip where it will patiently wait for your eager return.
Create your loom by nailing 15 nails across the top of your wood so that they are spaced just over one inch apart. Since you’re working with such a chunky yarn, you’ll want a little breathing room so things don’t get too crowded. Measure down about 3′ from the top row of nails and hammer another row of 16 nails that are spaced equally apart. This doesn’t have to be perfect, but straight lines do help. So use a ruler and a pencil to pre-mark your rows if you’d like.
Warp your loom with your colored cotton yarn. Start on the bottom left row with a generously large loop knot so that you can weave at least two rows of weft, your finger-knit yarn, through it. Then wind your cotton yarn, or warp, up and down so that it wraps around each nail as you move to the opposite side of the loom. End again on the bottom nail with a generous loop knot. You don’t want your warp tension to be too tight, but you also don’t want it to fall off your loom if you barely touch it. Again, working with a super chunky weft yarn will require a little more space for movement than when using much lighter yarns.
Weaving with an unbroken chain of finger knit yarn was rather cumbersome, but I didn’t want to cut up my hard work. Since I wanted to do a striped pattern, I needed to end each color on the selvedge edge (outer warp row). To solve the problem of wanting to work with less bulk but not come up short on length, I decided to measure out six warp rows of finger knit garland, and then add another 8″ of wiggle room to my measurement.
A: Cut only one strand of the garland where you’d like to separate it into pieces. B: Gently remove both cut ends from the various loops until they are untangled from each other and you have about 3″ of a tail on each cut end. C: Loop the tail through the loops of its respective garland and tie a double-knot to secure. Repeat with the other tail. You’ve now carefully separated your garland without losing much ground.
Step One: Tie the tail of your first section of garland to the outer warp row that the loop knot on the right side creates. Start weaving from the right side of your loom so that you pass your finger knit garland over and under until you get all the way to the left side of your loom. Your loop knot will serve as two warp rows instead of just one since there will be two rows to your knot. Weaving through both before starting your second row will secure things and keep your bath mat from falling apart when you take it off the loom.
Step Two: Weave your garland back to the right, making sure your over and under motion is the opposite of what it was in the first row. This will create a plain weave pattern and your cotton warp will be showing. Create an arch with your garland. This helps create some excess in your row so that it doesn’t pull too tightly and create the dreaded hourglass shape.
Step Three: Gently push your arch down from the center and on each side of the center with your fingers to create a wavelength pattern. Then carefully push it down so that it is flush with your first row.
Step Four: Continue until you’ve woven six rows and make sure to tie your knotted loose end to the outer warp row before pushing it down into place. We’ll tuck these tails in later. If you’ve got a little too much garland left, follow the A, B, C steps above to cut it to the appropriate length.
To start your next color, simply repeat the same steps from above. Be sure to tie your loose end around the outer warp row when you start. You’ll also want to tie it in a double knot to the loose end from the previous garland to help bind them together and keep things from separating with use. You’ll tuck these in on the back side when you pull your mat off the loom.
If you run out of garland about halfway through your row but don’t want to change colors, simply tie your loose end onto the loose end of the next section of garland so that there isn’t much of a break between the two knotted ends and continue weaving as if you didn’t skip a beat.
When you’ve finished your very last row near the top, wrap your loose end around the outer warp row and tie it through a loop a few inches back before double-knotting. This will keep it wrapped around the outer warp row in a more aesthetically pleasing way.
Your finished bath mat should look something like this. You can weave a little closer to the top row of nails is you have enough yarn, but I ran out early.
Starting from the outer edge, carefully lift your cotton warp off the nail and tie a knot so that it rests snugly against the last row of garland. Do a few at a time and then switch to the opposite edge of your loom to keep things from getting unevenly shifted. I didn’t want to trim these and have a measly fringe, so I just tucked them to the back side of the mat and stitched them under the warp rows to hold them in place. Another option is adding a ton of fabric yarn fringe. Tuck in the rest of your loose ends to the back side and carefully remove the bottom of your woven bath mat from your loom.
Put your mat in place and enjoy lingering a little longer as you step out of your shower!
Note: While this project is 100% washable, I would suggest hand-washing and line-drying. It is also likely to retain water since it’s super chunky. So if you’re noticing it isn’t drying between uses, hang it over the edge of your tub or another raised but flat surface for it to air dry a little quicker.
Pick up a new candle and some bath salts to go with your fancy new bath mat and enjoy a little more luxury at home. Now, who is brave enough to turn this into an area rug?
For even more inspiration and instructions for learning to weave a variety of projects, my book, DIY Woven Art, is now available for pre-order! –Rachel
Credits// Author and Photography: Rachel Denbow. Photos edited with A Beautiful Mess actions.
33 Comments
This is SO cute! And I LOVE the colors you picked!
This looks so chunky and warm! I think I might try this is some more neutral colors. I’ve never done finger-knitting (although I love to regular knit) so this would also be a chance to try a new skill!
http://danielleandco.com/
I love the look of this! I wish I could find the time to make one for our kitchen (in front of the sink). I’ll be saving for later. 🙂
Bath mats are such a weird thing to me, where I am from they are considered a thing of evil for a bathroom design 🙂 So funny that cultures can differ on such silly things! I love the colour though (and envy the warm feet).
This is a great idea, I think I might collect all my old t-shirts, take some bleach and dye and try and make my own “yarn” to weave with!
Hi there. Do you have a source for the shower curtain?
Love this! However, how does it look after washing? Including multiple washings? We have animals, so washing bath mats fairly often is necessary!
Target!
Pretty colors! Great idea 🙂
Thank you! I was THIS close to going with pinks but I thought I should try something different. ha!
Yes! It’d be great anywhere you have to spend a lot of time standing up.
Perfect idea!
I haven’t needed to run it through the wash yet but I did mention handling with care. It’s pretty solid as a woven structure but is obviously looser than a machine-woven mat.
What a great idea – and perfect timing. I just last night started my first ever weaving project (with a homemade loom) following your simple weaving tutorial.
Love this! I can never find a perfect bath mat, might try this myself!
http://www.sprinkleofroses.co.uk
Thank you!
Oh, I love to hear that! I bet it turned out great!
It’s always the reason behind every DIY for me! I just can’t find what I want in stores so why not make it myself? Good for you.
Great idea! The colors are beautiful!! I may have to make my own bathroom mats from now on… I always have a hard time finding one thats unique in the colors that I want!
This is so awesome. I’m definitely going to try it!
On a side note I’ve been thinking about wanting to incorporate yellow into my decor (have zero yellow now). Was actually wondering how yellow and blue would look together just yesterday and so I was pleasantly surprised to see how well this bath mat and the shower curtain go together. I may just have to try weaving a yellow mat for my blue bathroom now!
I love how it seems the DIY section is picking up again! It was feeling a little dry and recipe bogged but I’m feeling inspired again with a lot of the recent projects! This one is especially great cause I have been looking for the right bath rug for two years and found nothing!
I love the chunky texture that the finger knitting gives to the weave. Beautiful project, Rachel!
This looks awesome! I never tried finger knitting before, but it looks easy enough and if I can craft things like this it’s totally worth it. Great project!
https://www.makeandmess.com/
I was going to ask the same thing!! I love it.
I was thinking the exact same thing!
Amazing result
http://soldenochedecocrochet.blogspot.com.ar
This reminds me of weaving crafts I used to make when I was little. The bath mat turned out great and I love the colors you picked out!
-Helen
http://www.sweethelengrace.com
Very cool. I need one of these.
xo,
Vicky
http://www.aspiringsocialite.com/
Love it!
Regards from http://inatrendytown.com
YOur blog always has such good ideas. Love this DIY
makes me feel like I could actually make something like this
thanks for sharing!!
This is fascinating! Do you step onto a slippery tile surface then, or is there another preferred option for bathroom floors?
I love the ideas that I have seen tonight. thank you.