
 This project is very much inspired by having a lot of scrap wood lying around. Ha! For any of you DIYers out there who do wood projects, even only once in a blue moon, I bet you’ve been there. Scrap wood just seems to multiple when left alone at our house, so I had been thinking about projects that could use some of that wood because it keeps projects more economical, and it just feels good to finally use something that you’ve been saving forever. Makes me feel JUSTIFIED and not like just some scrap wood hoarder. 🙂
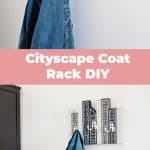
 I also thought it would be fun to make a little wall coat rack in our entryway area for us to use or for when friends come over. I’ve seen cityscape coat racks before (google it, they are everywhere!), and the shape seemed like something that could work well with the scrap wood I had around. So I went for it. Here’s how I made mine in case you feel inspired to use some scrap wood you might have laying around. 😉
 Supplies:
-scrap wood pieces
-wood glue
-paint + paint pen
-hooks
-hanging hardware + drywall anchors
-clamp
-paint brushes
-power drill
You might also need a saw if you need to cut your scrap wood pieces.
 Step One: If needed, cut your wood into rectangles to be the “buildings” in your cityscape. Then glue the pieces together, holding together as they dry with a clamp.
My piece was something that had already been glued together. It’s actually a scrap piece from when the counter at our bar, The Golden Girl Rum Club, was built over a year ago. I have been saving this piece for that long! I just thought it was an interesting shape that I would use in some project someday. So, maybe I do have a little bit of a supply hoarder tendency, but I also just liked the idea of having a piece of our bar in our home. I’m cheesy and sentimental like that.
 Step Two: Paint the buildings, and then use a paint pen to add windows, doors, etc. There’s a lot of ways to change up your design to suit your style… you could paint the buildings pretty much any color that suits your space. Have fun with this step!
Step Three: Screw the hooks to the front and add the hanging hardware to the back. Unless you find studs while you are hanging this, I would recommend wall anchors so that your coat rack will be able to hold a substantial amount of weight since it may have many heavy coats on it if you have a lot of guests over or something. Always good to make things more sturdy (rather than less sturdy).
 That’s it. This is a pretty simple little wood project that I really enjoyed making for our home. Thanks for letting me share! xo. Emma
Credits // Author: Emma Chapman. Photography: Janae Hardy and Emma Chapman. Photos edited with the NEW A Beautiful Mess actions.
45 Comments
Cute coat rack! That end table on wheels on the right also looks genius.
I love everything about this! Thanks for sharing!
XX -KK
http://www.KayleeKarcher.com
Awe. The buildings remind me of paintings Elsie used to sell on Etsy. #longtimefan I think with these cartoon like girl characters that I really liked… they deserved to be story characters.
This is so cool!
Im totally in LOVE! x
Izzy |https://pinchofdelight.wordpress.com
What a cute idea! I am ALWAYS throwing my jackets and purses on our kitchen chairs or letting them pile up on top of our bedroom hamper. It’d be so nice to have a place for everything. 🙂
http://www.wonderlandsam.com
I just love that coat rack. I want one now!!
That’s an old DIY too:
http://abeautifulmess.com/2013/05/diy-tree-stump-side-tables.html
-Emma
Thanks so much!
-Emma
Oh yes, I remember those. I bet she’ll do something with those designs/styles again one day. I know she’s currently getting back into painting.
Thanks for reading for so long! It means a lot.
-Emma
This is adorable.
http://goldclutter.blogspot.com
Such a great idea, and directions are pretty straightforward and easy to follow. Thanks!
-Greta
http://www.mintyfrosting.com
Love it!
-Rachel
This is absolutely adorable!
https://blairshares.blogspot.com
This is so easy to make, and so cute! It would match well at my place, since I live in Hong Kong, a busy city hehe!
Charmaine Ng | Architecture & Lifestyle Blog
http://charmainenyw.com
This is such a cool idea to use leftover scrap wood, and it looks amazing!
https://www.makeandmess.com/
I love this so much! So unique, and much cheaper than buying a coat rack.
The shape of the wood blocks actually remind me of book spines, now I really want to make this and paint my favourite book titles on it!
Such a great idea, and directions are pretty straightforward and easy to follow. Thanks! produse naturiste
The hooks look a bit like elephants sticking their trunks out of the windows 🙂
Love these being the city person I am.
It’s adorable, and I love city skylines!! It’s sweet to have a little piece of your bar at home, too.
LOVELY!!!
Can I just say that I love that your bookcase looks like it has your actual books on it? It looks lovely but also authentic to real life. Thank you!
This is so cute! I love it!
Paige
http://thehappyflammily.com
This has to be one of my all time fave projects you’ve brainstormed, Emma! Love it!
This is so cute! http://www.likehanna.com
This is so cute! and I love any project that involves using up scraps, especially sentimental scraps!
This is such a good idea ! The cityscape design on it is nice .
Love it!
http://www.petiteandhungry.com
Thanks for sharing such an informative article, the article contains very good quality images and content. I have also written some of the stuff on home decor check at here.
http://www.dizzartdecor.in/
Thanks for sharing. Please check my link and surely you find something interesting.
Yeah this is a special tutorial for making coat rack. At that time you have a lot of coat in your home that needs a good place to keep it. So you need a coat rack at your home. There are some process to make a coat.
This DYI project has such a great modern feel to it. Gray colors are on point!
– Katie
https://thebippityboppitybeautifulblog.wordpress.com
Very cute, never tried woodworking before, but thinking of covering it on a weekend away for the blog!
So need this! I only have 2 coat hooks now and they’re not enough!
Thanks for sharing a fantastic article..
Any graphic designer knows that Adobe Illustrator is one of the best vector graphics editors , it’s esencial for doing clipping path service company are the best Expert Clipping.
clipping path service company
Thank you for the idea! Very good collection keep it up
http://greenappleimages.com/
Really fantastic tips. The paint of building is looking so nice. Great !!!
Thanks for sharing a incredible article, I like a lot off
Thanks for your sharing.you try every time useful sharing for all.
I found this post to be very informative and helpful. I will have to recommend you to my friends. I am very thankful to you for giving this post.
Thanks for sharing. I love it.
Such a great idea, and directions are pretty straightforward and easy to follow. I am very thankful to you for giving this post.Thanks for your sharing.you try every time useful sharing for all. The paint of building is looking so nice.
Hey,
I’m a new hare is your blog. Thanks for sharing your amazing DIY idea.
Very informative and helpful post…thanks for sharing..
This has to be one of my all time fave projects you’ve brainstormed, Emma! Love it!
Really simple but innovative way to use wood as creative household craft. Looks really cute and functional. Good job!