
 With 2018 just around the corner, it’s time to start thinking about how you want to ring in the new year. For me, the desserts I’ll be making (and eating) for the occasion are typically the first thing I think about … which may or may not be a good thing. Don’t judge me! To celebrate this year, I thought that I’d make some disco ball cupcakes because what goes more perfectly with NYE than shiny, glittery disco balls?!
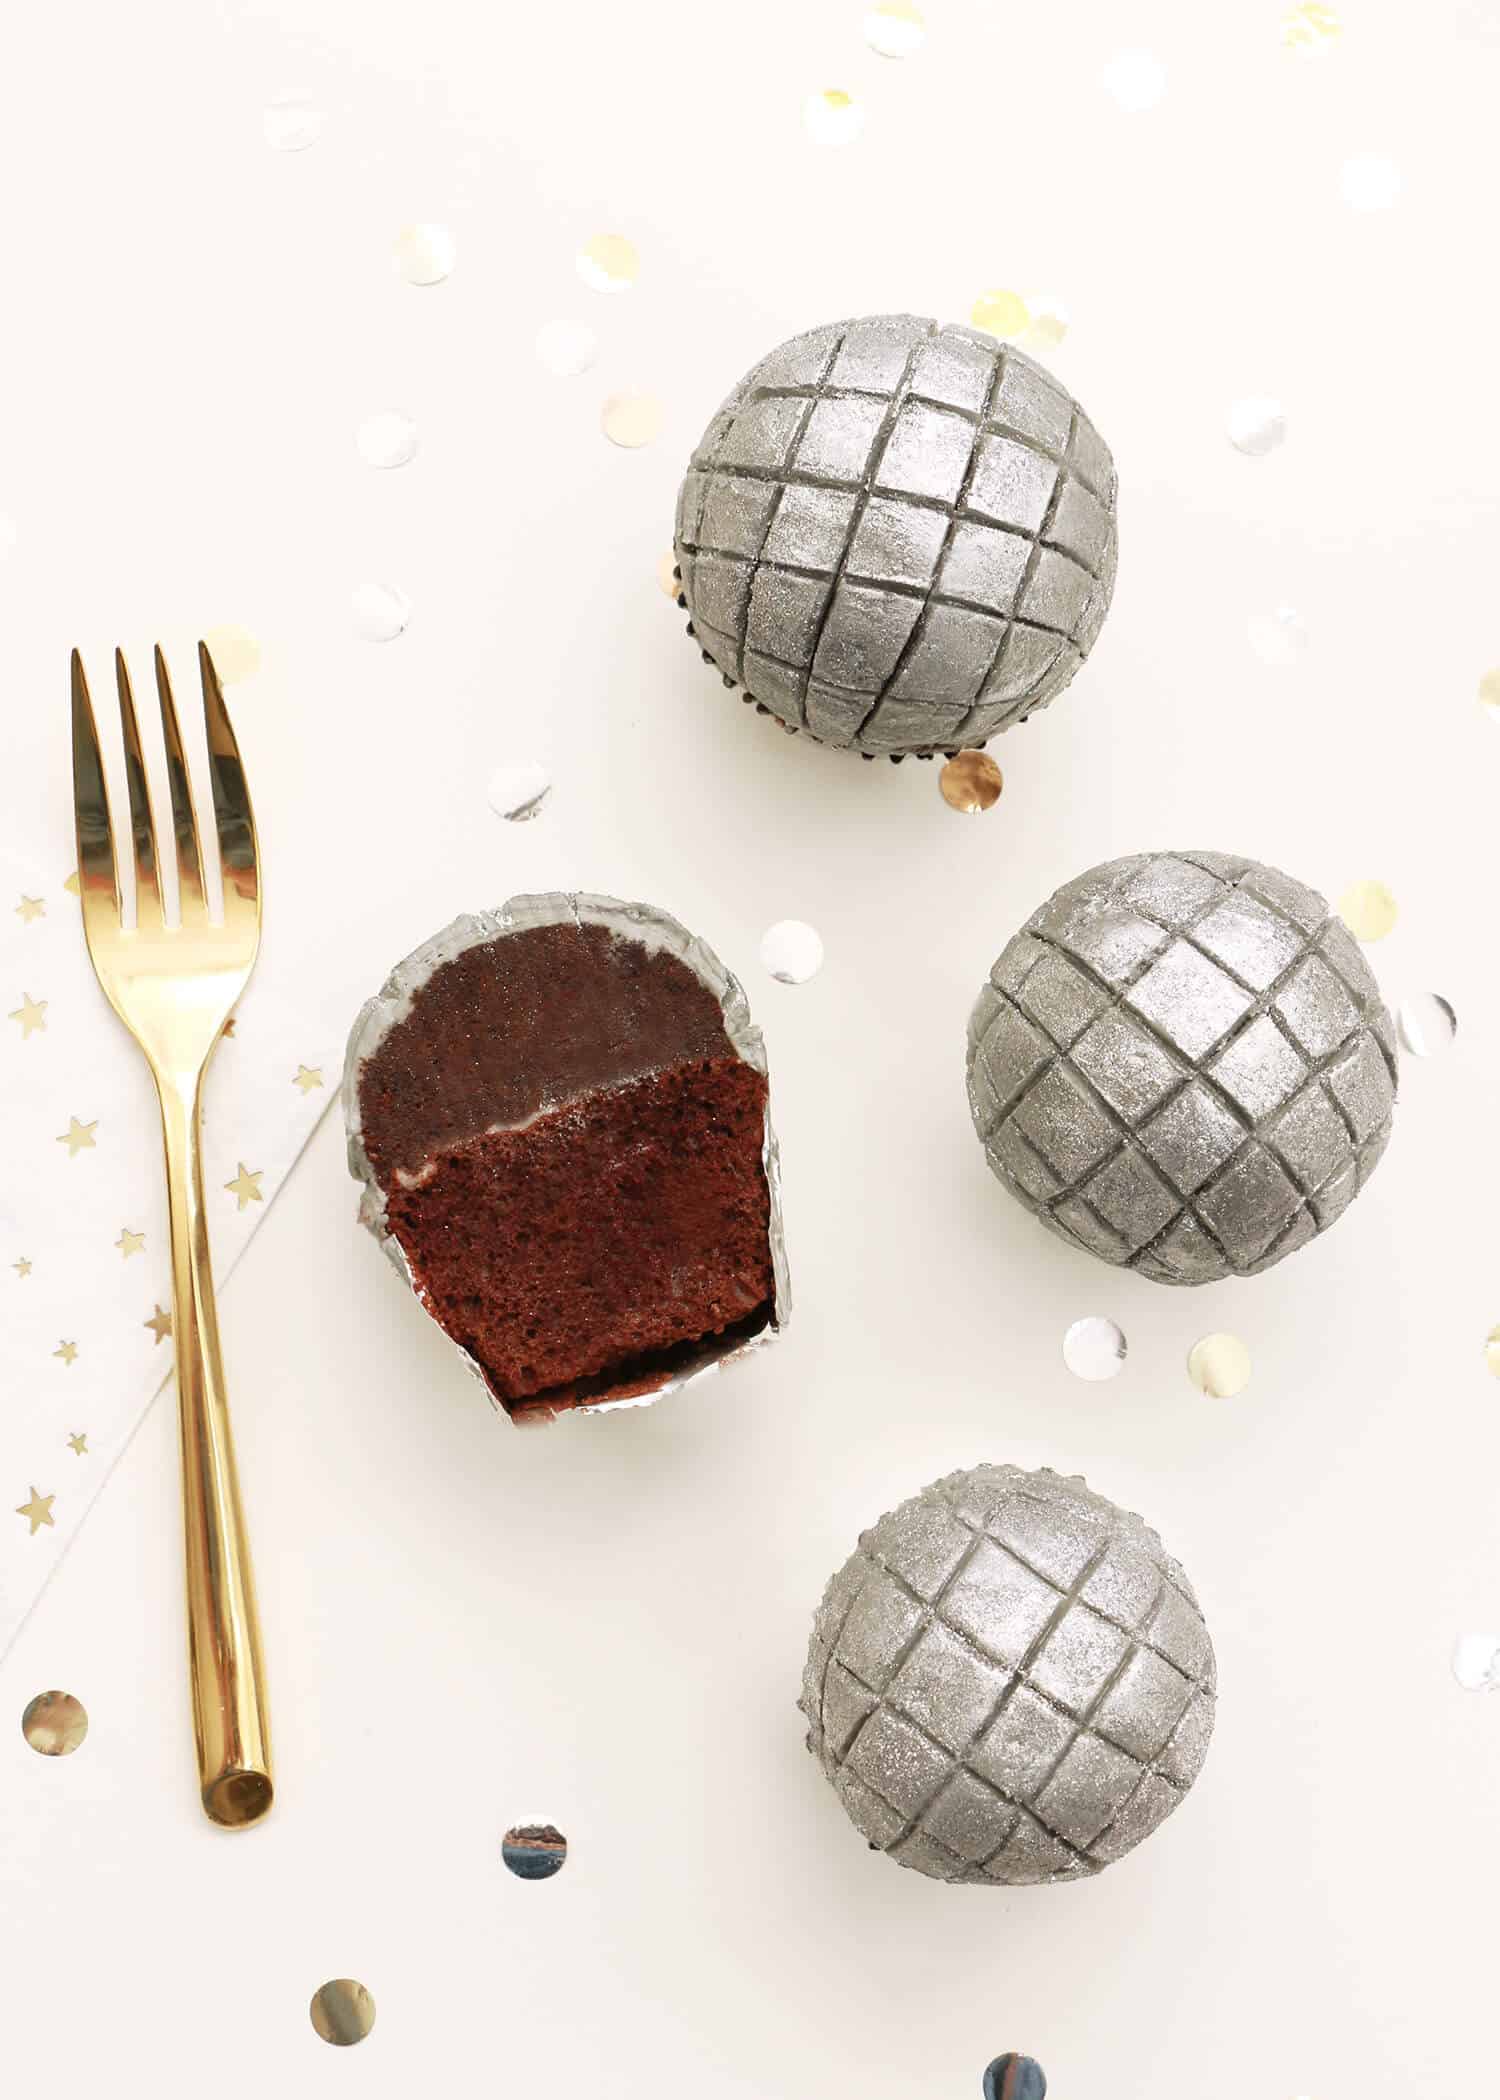
 You might think these are cupcakes topped with fondant tiles at first glance, but NOPE, no fondant on here! Believe it or not, there isn’t anything on top of these aside from buttercream frosting and a little edible glitter. I’ve covered all the details below; follow along so that you too can start the new year off on the sweetest, sparkliest note.
  Disco Ball Cupcakes, makes 12 cupcakes
1 box chocolate cake mix
silver cupcake liners
For the buttercream frosting:
2 cups unsalted butter, softened
4 cups powdered sugar
1 tablespoon vanilla extract
black gel food coloring
edible silver luster dust
 Mix your box cake with the ingredients listed on the package. Line cupcake pans with silver cupcake liners. Even though the recipe says you’ll be making 12 cupcakes, each disco ball is actually two cupcakes (bonus!) so fill all 24 liners. Bake cupcakes at 325°F for 25 minutes. Once baked, divide the cupcakes by the shape of their tops. Set the 12 most level cupcakes together to serve as the bases for each disco ball, and the 12 larger (more dome-shaped) cupcakes together. Allow the cupcakes to cool to room temperature.
While the cupcakes are cooling, prepare your buttercream. In a large bowl or bowl of your stand mixer, beat the butter on low speed for 1 minute. Gradually add in the powdered sugar and vanilla extract, and beat until smooth. Add in one small drop of black gel food coloring. Mix until the color is combined. If the gray is too light, add a little more until you’ve achieved the most similar shade to silver.
 In a bowl, add one of your large (domed) cupcakes and break it down with your hands until you have a bowl of crumbs. Add one large dollop of frosting into the bowl, mix together with your hands (just as you would if you were making a cake pop), and roll the mixture into a ball shape.
 Lightly frost the top of one of your smaller (more level) cupcakes, and then position the cake ball on top. Use your palm to gently shape the cake ball to a dome shape. Frost with a thin layer of gray buttercream, smooth with a spatula (or your finger), and then place the cupcake in the freezer for 5-10 minutes to allow the frosting to set. Repeat the process with your other cupcakes as well, pairing each of the smaller cupcakes with a larger cupcake for the topper. You’ll notice that once the frosting sets in the freezer it becomes MUCH easier to work with—any uneven spots can easily be smoothed with your fingers once the frosting has firmed.
 Take a couple of your cupcakes out of the freezer and allow them to slightly come to room temperature. As they do, make your indentations into the frosting. Use a trussing needle, toothpick, or any flat edge (ruler, spatula, etc.) to make horizontal and vertical lines across the cupcake, roughly 1/2-inch apart. If you notice your frosting is cracking as you make the indentations, the frosting is too cold. Allow it to sit untouched for a little longer if you’re having that issue.
 Once your lines have been made, use your fingertip to add the silver luster dust onto the surface of each cupcake. Make sure the frosting is still cold while you’re doing this. If it’s warmed too much while you were adding the lines, place the cupcake back into the fridge or freezer for a few minutes until the frosting is firm to the touch. And voilà, a disco ball cupcake! Repeat the indenting and glittering steps with your other domed cupcakes until you have a dozen disco balls ready to party!
 These cupcakes do take some time with all the in-and-out of the freezer business, but they’re totally worth it. If you’re attending or hosting a New Year’s party, they are the perfect treat to ring in the new year with! xo. Alana
Disco Ball Cupcakes
Ingredients
- 1 box chocolate cake mix
- silver cupcake liners
For the buttercream frosting:
- 2 cups unsalted butter, softened
- 4 cups powdered sugar
- 1 tablespoon vanilla extract
- black gel food coloring
- edible silver luster dust
Instructions
-
Mix your box cake with the ingredients listed on the package. Line cupcake pans with silver cupcake liners. Even though the recipe says you’ll be making 12 cupcakes, each disco ball is actually two cupcakes (bonus!) so fill all 24 liners. Bake cupcakes at 325°F for 25 minutes. Once baked, divide the cupcakes by the shape of their tops. Set the 12 most level cupcakes together to serve as the bases for each disco ball, and the 12 larger (more dome-shaped) cupcakes together. Allow the cupcakes to cool to room temperature.
-
While the cupcakes are cooling, prepare your buttercream. In a large bowl or bowl of your stand mixer, beat the butter on low speed for 1 minute. Gradually add in the powdered sugar and vanilla extract, and beat until smooth. Add in one small drop of black gel food coloring. Mix until the color is combined. If the gray is too light, add a little more until you’ve achieved the most similar shade to silver.
-
In a bowl, add one of your large (domed) cupcakes and break it down with your hands until you have a bowl of crumbs. Add one large dollop of frosting into the bowl, mix together with your hands (just as you would if you were making a cake pop), and roll the mixture into a ball shape.
-
Lightly frost the top of one of your smaller (more level) cupcakes, and then position the cake ball on top. Use your palm to gently shape the cake ball to a dome shape. Frost with a thin layer of gray buttercream, smooth with a spatula (or your finger), and then place the cupcake in the freezer for 5-10 minutes to allow the frosting to set. Repeat the process with your other cupcakes as well, pairing each of the smaller cupcakes with a larger cupcake for the topper. You’ll notice that once the frosting sets in the freezer it becomes MUCH easier to work with—any uneven spots can easily be smoothed with your fingers once the frosting has firmed.
-
Take a couple of your cupcakes out of the freezer and allow them to slightly come to room temperature. As they do, make your indentations into the frosting. Use a trussing needle, toothpick, or any flat edge (ruler, spatula, etc.) to make horizontal and vertical lines across the cupcake, roughly 1/2-inch apart. If you notice your frosting is cracking as you make the indentations, the frosting is too cold. Allow it to sit untouched for a little longer if you’re having that issue.
-
Once your lines have been made, use your fingertip to add the silver luster dust onto the surface of each cupcake. Make sure the frosting is still cold while you’re doing this. If it’s warmed too much while you were adding the lines, place the cupcake back into the fridge or freezer for a few minutes until the frosting is firm to the touch. And voilà, a disco ball cupcake! Repeat the indenting and glittering steps with your other domed cupcakes until you have a dozen disco balls ready to party!
8 Comments
Wow these are so cool! I’m definitely going to have to give these a try ????????????
These are awesome! They’re super for a themed party and I’m sure they’ll impress even the most picky of bakers or eaters. Yum! 😀
Charmaine Ng | Architecture & Lifestyle Blog
http://charmainenyw.com
these are so cute! xx
Can this be any more perfect for nye parties? So cute and creative <3
https://www.myblackcloset.com/
This is such a fun and clever idea! I love it!
Paige
http://thehappyflammily.com
Wow ???? these are so cute!
What a hilarious idea, they look super cool!
https://www.makeandmess.com/
Wow, these are so cool! I’m definitely going to adopt this in this summer. Love your ideas.