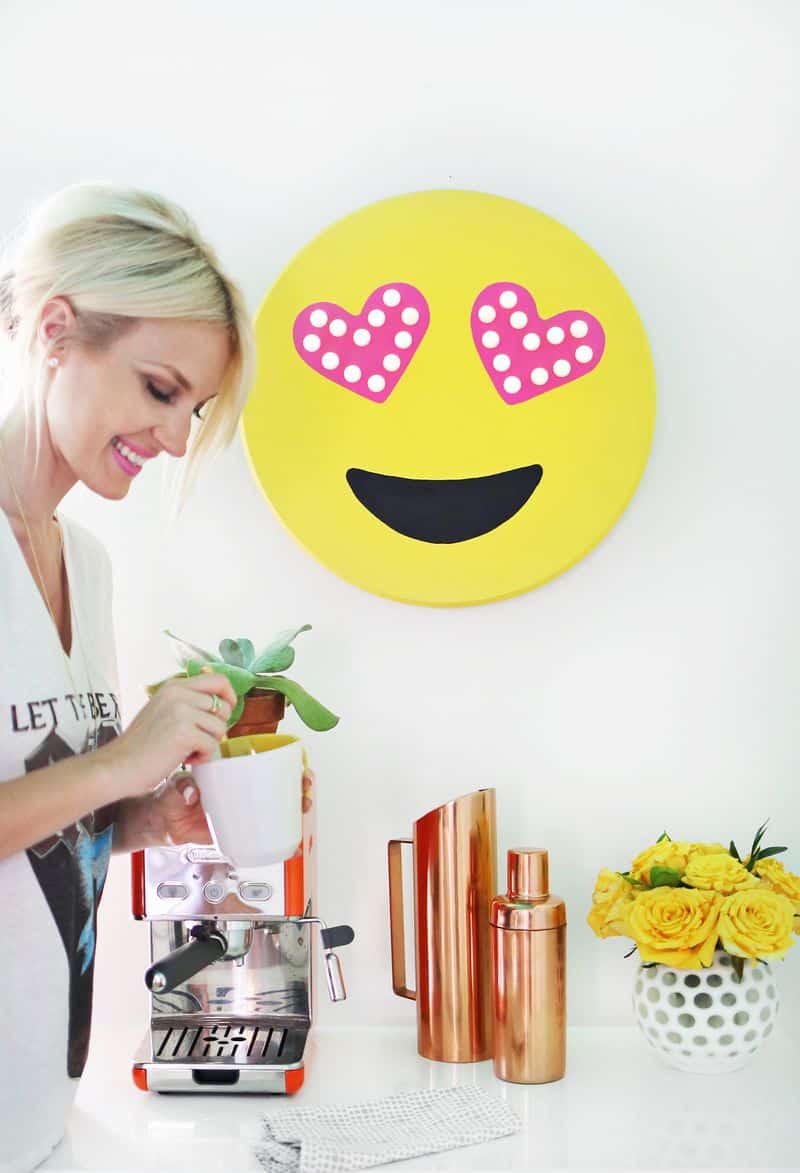
") If you are a savvy ABM reader, you may have seen this one coming. We love making light up marquee signs (like here, here, and here), and we also love emoji themed projects (like here and here), so it was only a matter of time before we combined the two for the ultimate project of sheer cuteness and fun!! This is definitely the easiest light up sign we’ve made so far. So if you’ve wanted to make one before but weren’t sure you had the skills, well, this is a great one for you to start with!
If you are a savvy ABM reader, you may have seen this one coming. We love making light up marquee signs (like here, here, and here), and we also love emoji themed projects (like here and here), so it was only a matter of time before we combined the two for the ultimate project of sheer cuteness and fun!! This is definitely the easiest light up sign we’ve made so far. So if you’ve wanted to make one before but weren’t sure you had the skills, well, this is a great one for you to start with!
") Supplies:
Supplies:
–round wood top (they sell different sizes)
-drill with various drill bits
–battery-operated globe string lights ![]() (use LED lights since they don’t get hot)
(use LED lights since they don’t get hot)
-acrylic paint
emoji template (right click to download and then reduce or enlarge image when printing depending on the size circle you choose)
-duct tape or gaff tape
–picture hangers and wire for mounting
-dowel rods (optional)
") Paint your wood with a few coats of bright yellow acrylic paint and allow the paint to dry.
Paint your wood with a few coats of bright yellow acrylic paint and allow the paint to dry.
") Use the template to print and cut out the hearts and mouth for the emoji. Then trace them onto your yellow circle with a pencil. Paint in the mouth and heart eyes with black and pink paint and let dry.
Use the template to print and cut out the hearts and mouth for the emoji. Then trace them onto your yellow circle with a pencil. Paint in the mouth and heart eyes with black and pink paint and let dry.
") Tape your eye template over the painted eye and drill a hole in the middle of each white dot with a 5/8″ drill bit (or whatever size of hole your LED lights would need). I started out with a much smaller bit to first make each hole, then went back through with a medium size bit, and then did the larger 5/8″ bit. You’ll get a much cleaner hole if you do it that way.
Tape your eye template over the painted eye and drill a hole in the middle of each white dot with a 5/8″ drill bit (or whatever size of hole your LED lights would need). I started out with a much smaller bit to first make each hole, then went back through with a medium size bit, and then did the larger 5/8″ bit. You’ll get a much cleaner hole if you do it that way.
") Gently wiggle off the bulb caps on the lights. Then push the light through from the backside of the face and put the bulb back on from the front. Push the base of the light bulb snugly into the hole.
Gently wiggle off the bulb caps on the lights. Then push the light through from the backside of the face and put the bulb back on from the front. Push the base of the light bulb snugly into the hole.
Use duct tape or gaff tape to secure the extra wires and battery pack onto the back of your circle, but make sure to place the battery pack switch near an edge so you can get to it easily to turn it on and off. Attach picture mounting hardware and wire on the back so you can hang your light. Remember, since it’s battery powered, you don’t have to hang it near an outlet—nice!
") I also drilled four evenly spaced holes about 1/2″ deep near the top, bottom, and each side of the marquee on the back, and glued in 1 1/2″ long pieces of dowel rods the same size. That way, the posts stuck out a little further than the battery pack and all the wires on the back and the four posts rest evenly on the wall. Optional move, but I think it hangs much better since it doesn’t have a “lumpy” back with all the cords, etc.
I also drilled four evenly spaced holes about 1/2″ deep near the top, bottom, and each side of the marquee on the back, and glued in 1 1/2″ long pieces of dowel rods the same size. That way, the posts stuck out a little further than the battery pack and all the wires on the back and the four posts rest evenly on the wall. Optional move, but I think it hangs much better since it doesn’t have a “lumpy” back with all the cords, etc.
")
") How fun is that!! Also, these lights have a blinking mode, so you can imagine how cool that looks when they blink. I think it looks adorable above the coffee cart here at the studio, but I have a feeling that it’s going to get snagged and put up at my house instead in the near future. Of course, you can do whatever face you like, but I felt like the heart eyes were just made to have lights installed in them, and I think I was right! xo. Laura
How fun is that!! Also, these lights have a blinking mode, so you can imagine how cool that looks when they blink. I think it looks adorable above the coffee cart here at the studio, but I have a feeling that it’s going to get snagged and put up at my house instead in the near future. Of course, you can do whatever face you like, but I felt like the heart eyes were just made to have lights installed in them, and I think I was right! xo. Laura
Credits // Author: Laura Gummerman, Photography: Laura Gummerman and Janae Hardy. Photos edited with A Beautiful Mess actions.
SAFETY TIPS: We spoke with our local fire department to double check the safety of this type of project. It’s no less safe than a lit Christmas tree, as you’d probably guess. Just be sure to follow these guidelines:
-Before purchasing your lights, check for a label of an independent testing laboratory (most commercially sold Christmas lights will have this). Some lights are specially made for indoor or outdoor use. Be sure to use lights made for indoor use.
-Replace any string of lights with worn or broken cords or loose/broken lights.
-Just as you would with your house decorations or your Christmas tree, always turn off lights before leaving your home or going to bed.
41 Comments
This is so cute!! http://www.hannamarielei.com
Hi where is that cute little coffee machine from? Gab
Thank you!
Laura
http://laurahager.blogspot.com/
They are from Target, but last year 🙂
Laura
I think they were from Target last year 🙂
Laura
This marquee is so fun! It makes me smile to see it. Thank you for this fun project!
Juju Sprinkles
http:/www.jujusprinkles.com
Such a cute idea. I wish it was easier to see that it’s turned on but this is adorable.
www.thrumypeepers.com
omg this is such a cute idea! Will have to make this for my study desk!
http://www.simplisticallystyled.com/
love this so funky and cute! Id love to recreate this! 🙂
Sophie
x
*Check Out My DIY Felt Plush Cute Robot FREE pattern on my blog!*
I LOVE THIS DIY!!! The heart-eye emoji is probably my favourite and most used emoji ever!
I wish you guys sold your DIYs! Do you?? Please let me know if you do 😀
x Carina
Running White Horses | Fashion + Travel
This is so cute! And looks so easy to make. Great diy! 🙂
tonixox.blogspot.com
This is so cute !
wwww.ellenmayillustration.blogspot.co.uk
Oh wow! I love this idea! It’s gorgeous!
Oh my god this is so cute!
http://myteaandhoney.blogspot.com/
I’m obsessed with this! It might be fun to try the confetti emoji using the lights as the confetti part 🙂
Chelsey
hipsterartteacher.com
This is so cute, I also feel like if you are not as handy with tools like me you could leave the lights off and still have something that is pretty cool.
I love how you turned the awesome heart eyed emoji into on of your amazing marquee projects! Above the coffee cart is the perfect placement. It would just make me so happy all of the time!
Mocha and Moccasins
M.
This is adorable!
HUGE UK drugstore haul in PHOTOS- superdrug and boots
Big time heart eyes for this! 😀
Carrie
www.wearwherewell.com
That would be so cute as a night light for a little girl (or a big scaredy cat like me).
Xoxo,
Erin
www.erineveryday.com
How CUTE! I love it!
this is so cute and an awesome DIY <3
http://amelodyofdiaries.blogspot.co.uk/
Or for my I’m-totally-a-grown-up bedroom… ? Ha!
This is adorable! 🙂
So this is truly amazeballs! Definitely going to have a go at doing this for my university halls next year!
Maisie x
Thoroughlymodernmaisie.wordpress.com
This is so cute! I think it would look really nice outside in the summer time – maybe in some sort of covered patio. Love it!
That emoji is the cutest!
Paige
http://thehappyflammily.com
hahaha… This is definitely not my kind of thing, but it’s a super cute project! Specially for children 🙂
http://www.misadventuro.us
This is such an adorable project! Love it!
♥Heather and Melissa
This so fun! I want to make one! Also, I love the copper cocktail shaker and pitcher! Do you mind sharing where they are from? Thanks for the tutorial!
Laura
http://laurahager.blogspot.com/
So fun! I need to make a light up donut emoji!
Christine | http://www.DimesandDonuts.com
Adorable! But what I really want to know is…where did you get that adorable copper drink shaker? I need this in my life.
Fun! I feel like every home could benefit from a light up emoji!
Kristi | www.beloverly.com
This is so darn sweet! Great idea! I’m even seeing the potential for an emoji collage! Love it! 😉
http://sometimesgracefully.com
What fun! I love the emoji that you chose, too! Couldn’t be more perfect!
This is way too cute – I need one for my office!
Warm Regards,
Alexandra
www.littlewildheart.com
Great idea! I wish I could make this!
Natalie Ann xo // Petal Poppet Blogs ♥
You gals and your emojis… I love it! I mean, I feel smiley heart eyes emoji about it. 😉
-Molly
http://www.modcircus.com/
Such a great idea! Thanks for sharing! 🙂
Dorky-and-weird.blogspot.com
Xoxo Jessy
You ladies are so damn clever. ~megan
www.booksteaandnyc.com
Oh gosh, how cute! Perfect decoration for a kid’s bedroom, love it!
Haley @ www.beautyinthischaos.com