") Maybe it’s just because I’m a child of the 80s, but I looove all things holographic. The last time I got a manicure, my salon girl was telling me about the new foils that had just gotten in, and as it was a new thing to me, I was kind of fascinated with how they work. Of course being a DIY-minded girl, I wanted to find out how to use foils myself, and it turns out that it’s pretty easy!
Maybe it’s just because I’m a child of the 80s, but I looove all things holographic. The last time I got a manicure, my salon girl was telling me about the new foils that had just gotten in, and as it was a new thing to me, I was kind of fascinated with how they work. Of course being a DIY-minded girl, I wanted to find out how to use foils myself, and it turns out that it’s pretty easy!
") Supplies:
Supplies:
–nail foils
-nail foil adhesive (you can also get adhesive at the above link, and some foil packs come with one included)
-base coat color nail polish
–top coat (it’s better not to use a quick dry top coat for this)
–cuticle stick
-small pair of scissors
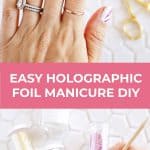
") Cut and trim your nails to desired shape and apply a few coats of whichever base coat you would prefer. I chose to use a white polish so the pink foil would clearly stand out against it.
Cut and trim your nails to desired shape and apply a few coats of whichever base coat you would prefer. I chose to use a white polish so the pink foil would clearly stand out against it.
") Once your nails are totally dry, use your scissors to cut triangle strips from your nail foil paper that are about 3/4″ long (you can cut one that’s a little smaller for your pinky). Cut some straight and long but thin strips of foil as well if you want to do little stripes next to your triangle pieces.
Once your nails are totally dry, use your scissors to cut triangle strips from your nail foil paper that are about 3/4″ long (you can cut one that’s a little smaller for your pinky). Cut some straight and long but thin strips of foil as well if you want to do little stripes next to your triangle pieces.
") Brush a thin but even coat of foil adhesive over your nails and let them dry (I would do one hand at a time). The glue should turn clear when dry, but you really don’t want it to be too wet or the foil won’t stick. So I would wait about 15-20 minutes to make sure it’s dry enough. It should be a little tacky, but not wet.
Brush a thin but even coat of foil adhesive over your nails and let them dry (I would do one hand at a time). The glue should turn clear when dry, but you really don’t want it to be too wet or the foil won’t stick. So I would wait about 15-20 minutes to make sure it’s dry enough. It should be a little tacky, but not wet.
") When the glue is dry enough, place a piece of your foil where you want to apply it to your nail and use your orange stick to rub the foil onto the nail so the pattern will transfer to the tacky glue beneath. You’ll want to rub pretty hard to get it to stay, but you can always lift up a bit on the end that’s hanging over the edge of your nail to see what’s sticking and what’s not. Once your foil is fully rubbed onto the nail, peel the rest of the transfer strip off the nail and it should leave the foil design behind!
When the glue is dry enough, place a piece of your foil where you want to apply it to your nail and use your orange stick to rub the foil onto the nail so the pattern will transfer to the tacky glue beneath. You’ll want to rub pretty hard to get it to stay, but you can always lift up a bit on the end that’s hanging over the edge of your nail to see what’s sticking and what’s not. Once your foil is fully rubbed onto the nail, peel the rest of the transfer strip off the nail and it should leave the foil design behind!
") Repeat with each nail until you have your shape on each one.
Repeat with each nail until you have your shape on each one.
") You can either leave just your triangle shapes, or you can add some long thin strips next to the shapes for more of a pattern. Just apply onto the glue, rub, and peel the transfer layer off!
You can either leave just your triangle shapes, or you can add some long thin strips next to the shapes for more of a pattern. Just apply onto the glue, rub, and peel the transfer layer off!
Seal your foil with a quick coat of top coat (they recommended not doing multiple passes if you can help it to keep the foil in tact), and once your top coat is dry, you’re good to go!
") Oh la la! How fun! The nice thing is that you can remove the foil easily with regular polish remover when you go to take the polish off later, so no extra steps are needed there. You are technically supposed to be able to cover your entire nail with the foil so it is your nail polish, buuuut I can’t quite get that method down yet and the edges always look kind of wonky. Maybe some more practice on that one? xo. Laura
Oh la la! How fun! The nice thing is that you can remove the foil easily with regular polish remover when you go to take the polish off later, so no extra steps are needed there. You are technically supposed to be able to cover your entire nail with the foil so it is your nail polish, buuuut I can’t quite get that method down yet and the edges always look kind of wonky. Maybe some more practice on that one? xo. Laura
Credits // Author: Laura Gummerman, Photography: Laura Gummerman + Todd Gummerman. Photos edited with the NEW A Beautiful Mess actions.
11 Comments
I’m obsessed with this.
This is amazing and looks so professional! 🙂 Not sure what would happen if I would try this
daydreamdancing
Your Pictures are always so beautiful and bright. Do you use lights or natural light? also What are your editing techniques? Your pictures are so impressive. Thanks
Oh I LOVE these. I too love anything holographic being a 90’s girl.
Beckie xo // The Pale Tails
This looks incredible ! I really want to try it out for myself, yours looks so professional. I love your jewellery you’re wearing too by the way
🙂
Cyber Mermaids | Alternative beauty, fashion and lifestyle blog
totally unrelated to your nails (although i really like them) – where do you get your gold rings? they’re so perfect and simple…i feel like most look soooo cheap!
Wow I love this idea! Definitely need to try this out, though it will probably not come out as professional, but more messy haha 🙂 So pretty.
I’m a 2000s girl- but I still LOVE anything Holographic!
You nails look amazing. I think the pattern of the foil is far preferable to covering the entire nail. They look fantastic. I’m not sure that mine would look quite so perfect like yours!
They look so cool, really extraordinary!
https://www.makeandmess.com/
Omg this is such a fun thing to do. I can’t wait to try this nailart.
Ash | http://www.mstantrum.com