 Hi there! We’re Britta & Carli from Twinspiration, and we’re thrilled to joining the ABM team, as we’ve been longtime fans. Every month we’ll be bringing you small & useful DIY projects that you can conquer in one day! We’ve been blogging for over three years now and what was once just a hobby has turned into our greatest passion. We hope you enjoy our projects here on A Beautiful Mess!
Let us just say that this is one of our favorite projects for a couple of reasons–it’s super easy and useful. What more could you ask for in a DIY project?! You’ll see that most of our DIYs fall into both of those categories. We love a good, easy project. Once in awhile we enjoy challenging projects that push our DIY skills, but easy is our jam.
We’ve made these balms a few times now, and we love how easy it is to switch them up. For summer months, we love mixing in grapefruit essential oil, but this time around, we went with peppermint since it just felt right for wintertime.
 Supplies (for two lip balms):
–gold tins
-1 tablespoon coconut oil
-1 tablespoon beeswax pellets
-1 teaspoon almond oil
-essential oils (we used peppermint)
-beads/decorations
–E600 glue
Once you have everything together, here’s how you make the lip balm:
Step One: In a small dish mix together the coconut oil, beeswax pellets, and almond oil.
Step Two: Microwave for 1 minute, stir, and then microwave for one more minute. We microwaved the ingredients on 100% heat. Caution—dish will be hot!
 Step Three: Now remove dish from microwave and immediately add 20-30 drops of your essential oil. This may seem like a lot, but you need it to be strong enough to cut through the smell of the coconut oil.
 Step Four: Next, pour the mixture into your gold tin. Stop pouring when you reach the top of the tin. No worries if you pour too much, it’s pretty simple to clean up! Allow to cool for 15 minutes, until solid. We like to let ours cool for at least an hour to be on the safe side, but they do solidify fast. Tip—work over wax paper for easy clean up!
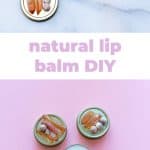
 Step Five: Last but not least, glue your beads to the gold tin lid using your E6000 glue. We like to use beads with different textures to make it more interesting. Any pattern will do.


 Overall we love how these little balms turned out and the process was way easier than expected. We’ve found they make perfect gifts for your friends & family… our mom uses hers every day! Make a bunch and give out for birthdays, everyone will love them. –Britta & Carli Garsow
Credits // Author and Photography: Britta & Carli Garsow. Photos edited with A Beautiful Mess actions.
26 Comments
Just in time… I recently found out my lip balm is long expired… I mean, it was manufactured in 2011 (LOL).
Charmaine Ng | Architecture & Lifestyle Blog
http://charmainenyw.com
This is awesome!! I never knew creating lip balms was so easy. Thanks for sharing
– Belen from A Hint of Life
This look like a very easy and helpful DIY !! I love the decoration too, very nice 🙂 Xx
https://ayeuh.wordpress.com/2017/02/18/cafe-bianca/
Sounds like it would smell delicious 🙂
I love this idea! Way more cost efficient than buying lip balm and losing it once a month ?
Sounds perfect! I definitely need to start making my own as I prefer to know what’s going on my skin!
https://bybreannamarie.com/
I love homemade lip balms and will have to give this recipe a try!
This is such an easy craft! And the little tins are so cute. 🙂
http://www.wonderlandsam.com
These are so cute!
Paige
http://thehappyflammily.com
Excited to see what you two bring to ABM 🙂
What a pretty packaging idea!!
Heads up though, loves, grapefruit oil is phototoxic and can burn your lips if applied and exposed to sunlight for an extended period of time. Bad idea for summer, especially at such a high ratio! A better choice might be spearmint or lavender!
Xoxo,
Steph
Cute!
http://www.petiteandhungry.com
I love this idea for a gift!
http://thatsmagsforyou.com
My family goes through a lot of lip balm. I definitely want to try making these! I also appreciate your philosophy on easy DIY projects. So much more fun when they actually get done.
http://www.windlasse.com
Welcome 🙂 this sounds yummy
This is such a great DIY gift idea. I will include it to my to do list and link to this post. Awesome!
http://boonicles.com/homemade-gift-ideas/
this post is very helpful and I Love it! Thanks for sharing and please take
a minute to check out my latest post too if you can, I would love to
hear your thoughts.
http://www.nataschacox.com
Looking forward to your next one 🙂 xxx
Ohhh those are beads on the tin- I thought they were vitamins? hahah This is a great idea!
Loving the beads!
I love the way you elevated the look of this with the beads & embellishments! Something I hadn’t considered when I make my own natural beauty products. Excited to see more easy tutorials from you!
Such a cute project! I love the beads on top 🙂
http://www.madisontaylor.co
Will this work with making tube versions too? I don’t really like to use tins and I find them unsanitary because as often as I hydrate my lips, I can’t always have 100% clean hands.
What a cool and easy DIY project! Keep up the good work.
A good hobby, I discovered the essential oils a few years ago and it is still very pleasant. Create a new blends of essential oils is interesting and exciting.
Love this idea and the decor of the box! But not a big fan of E6000- I used to use it for my blog DIY tutorials but THE SMELL !!!!!
I love this idea, i cant believe how many ingredients are in some products. My quick question is….can you suggest an alternative to Almond oil? My daughter is allergic to nuts so it would be nice to make her own.
Cheers from Australia