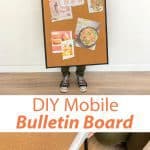
 Here’s is a super easy project I recently completed for my office—it’s a mobile bulletin board. I was wanting a bulletin board in my office space, but I wanted to create something I could easily move around because I sometimes photograph various projects in my space (so I need to be able to easily move things around). I also tend to change up my office space often, so this just made more sense for me. But I also want to point out that this project is super renter friendly because you can create a large bulletin board to keep yourself organized or save inspiration, but you don’t have to add a whole bunch of nails or screws to your walls. We hear from you all often that you want more renter-friendly projects, so I just wanted to point that out (and click the “renter friendly” tag on this post if you want to see more ideas!).
For this project, I worked with Fiskars. I have been using their scissors for many years, so I was really excited to hear that they are launching new tools. I used their Precision Hammer, Power Cut Snips, and Nail Positioner to create this bulletin board and I absolutely loved each of these tools!


 The board is easy to pick up and move anyway but I also added some simple leather handles to each side so it’s easy to pull off the wall and slide easily too. You could totally customize the trim color and handle material to fit your color preferences. You could also paint the cork board white or another color to give it a really different look. I kept mine pretty clean and classic as I already have a lot going on in my office due to the faux living wall. 🙂
 Supplies:
-plywood (should be the size you want your bulletin board)
-foam board
-cork board (comes in rolls)
-all-purpose glue
-wood trim or moulding cut to board side sizes
-finishing nails
-leather or other strong material
–Precision Hammer
–PowerCut Shears
–Precision Nail Starter
I actually already had some scrap plywood in my garage that was the perfect size for this project. But you can also just go to any hardware store and have them cut plywood to the size you want (and also, make sure it will fit in your car if you are doing something really large).
 Step One: Cut the foam board and cork to the size of your plywood, leaving space for the wood trim. The Power Cut Snips were perfect for cutting through these materials as well as the leather.
Step Two: Assemble the layers, glueing the foam to the plywood and then the cork on top of the foam. This will give your pins something to push into as you hang things on the board, as the depth of these layers will get hidden by the wood trim.
 Step Three: If you’re painting the wood trim, go ahead and do that and allow it to fully dry. This is optional as you may want to keep the natural wood color, but I chose to paint my trim black to match my space better.
Step Four: Add the trim to the outer edges of the board with the finishing nails.
 I LOVED using this nail positioner! It made it so much easier to add these tiny nails to the trim without accidentally hammering my fingers. I’m gonna be using this little tool ALWAYS from now on. Ha!
Step Five: Nail the leather handles onto the sides. I used a slightly larger black nail for this, but the finishing nails would also work well.


 I’m really happy with how this mobile bulletin board turned out! And excited to have a spot I can add visual inspiration to as well as notes or to-do lists. At the moment, I have a few October-friendly things hung on the board, but you better believe I’ll be updating it for the the holidays in just another month or so. 🙂 Thanks for letting me share! xo. Emma
11 Comments
Hey Emma! Where do you buy the cork rolls?
Hi Micky! You can find them on Amazon:)
I’ve never made my own corkboard before! When I was young, I just bought them from the dollar store. Never knew it was this simple!! 🙂
Charmaine Ng | Architecture & Lifestyle Blog
http://charmainenyw.com
This is so cute! What a fun idea!
Paige
http://thehappyflammily.com
What a cool idea!
https://www.makeandmess.com/
This is really perfect for reminders.
Great idea! This would be really handy to have and seems nice and simple.
https://wanderlovefam.com
A super easy project!!!
I got a new job and really want to do something like this because my new space doesn’t have near the space I had before. Great idea!
This is really perfect for reminders
http://www.kayseriliforumu.com
This is so cute! What a fun idea! Tokatescort