 Raise your hand if you’ve found yourself a wee bit houseplant obsessed. Now, keep your hand raised if you’ve brought home a new plant in the past month. If your hand it still raised, I’d wager that you could use a new plant stand (or two, or three? We won’t judge!).
Spring always inspires me to bring home some new plant babies, but they can seem a little dowdy in just their plain Jane pots. Not to worry! This plant stand DIY is pretty simple and really elevates the look of your favorite potted plants.

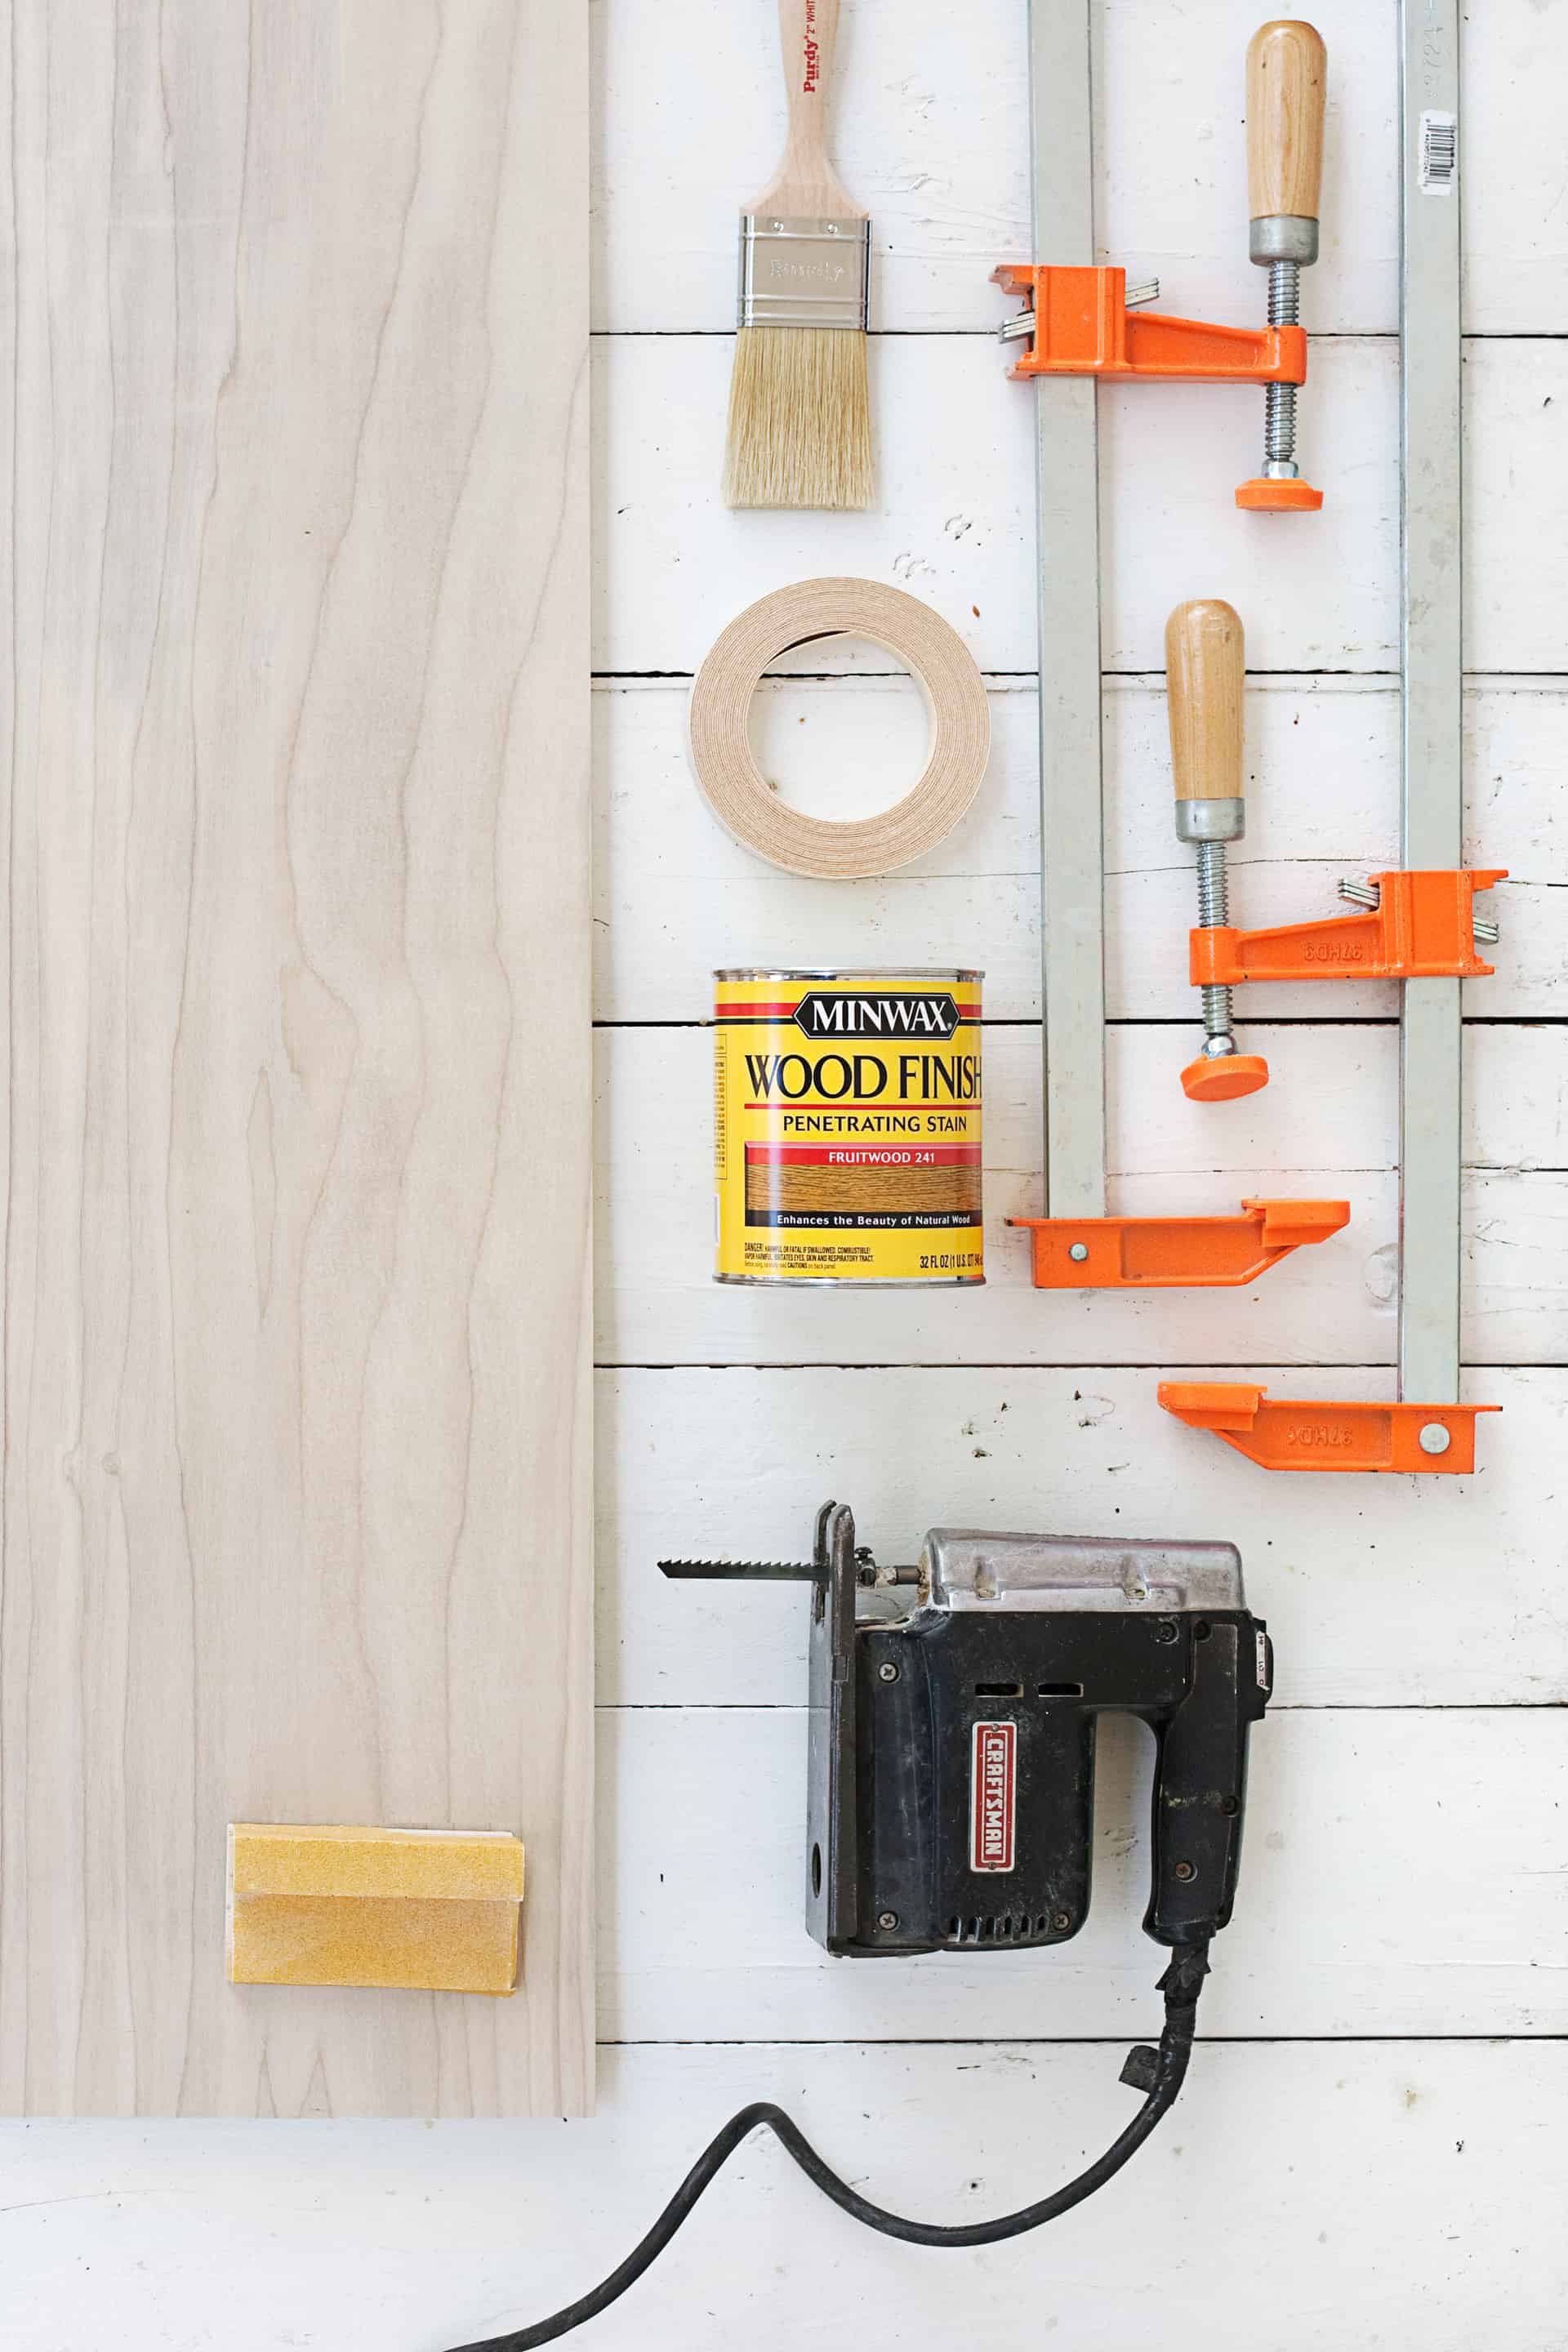 Tools:
–jig saw
–clamps (that extend to at least 12″)
-hammer (not pictured)
–orbital sander (optional, but super helpful!)
-staining brush or rag
Materials:
–1×12 lumber* (length at least 3.5′)
–sandpaper in 80 and 180 grit (bonus points if you use 120 grit in between!)
–wire brads or finishing nails in .75″ length (not pictured)
–wood glue (not pictured)
–iron-on veneer edgebanding (optional if you use plywood)
*Recommended Wood Species: If you are staining your wood, I recommend using maple. Rift sawn oak is also nice, but quarter sawn is more prevalent in lumber yards and showcases a busy grain—not my favorite. Beware of using pine, which doesn’t stain well and dents easily. I used poplar, which also doesn’t stain that well and tends to have yellowish streaks in it. But poplar does take paint nicely. You can always use plywood and use matching iron-on veneer banding if you’re not a fan of the layered look of the plywood edge.
Cost of Project: A 1x10x6 board will yield two plant stands and costs about $35 if you are using a higher quality wood species. Many of you already have sandpaper, nails, glue, and wood finishers (stain, poly, or paint) on hand. You can purchase stain, polyurethane, or paint for around $5 each if you don’t already have some. That puts the total around $45 for two plant stands, a price which can be lower if you use pine lumber.
 Step One: Use a circular object or compass to draw a 10″ circle at the end of your lumber. Cut out the circle with a jigsaw. (Cut two circles if you’re making two stands.)
Never used a jigsaw? You can purchase a jigsaw for about $23 on Amazon. To use it, hold the wood firmly on top of a table or surface as you cut the overhanging edge with the jigsaw blade (use a fine cutting blade), stopping the saw to adjust which part of the wood overhangs as you go along. I like to cut with a jigsaw on a lower height surface like a bench, and use my body weight (pressing down with my knee) on top of the wood to keep it steady as I move the blade slowly across the surface.
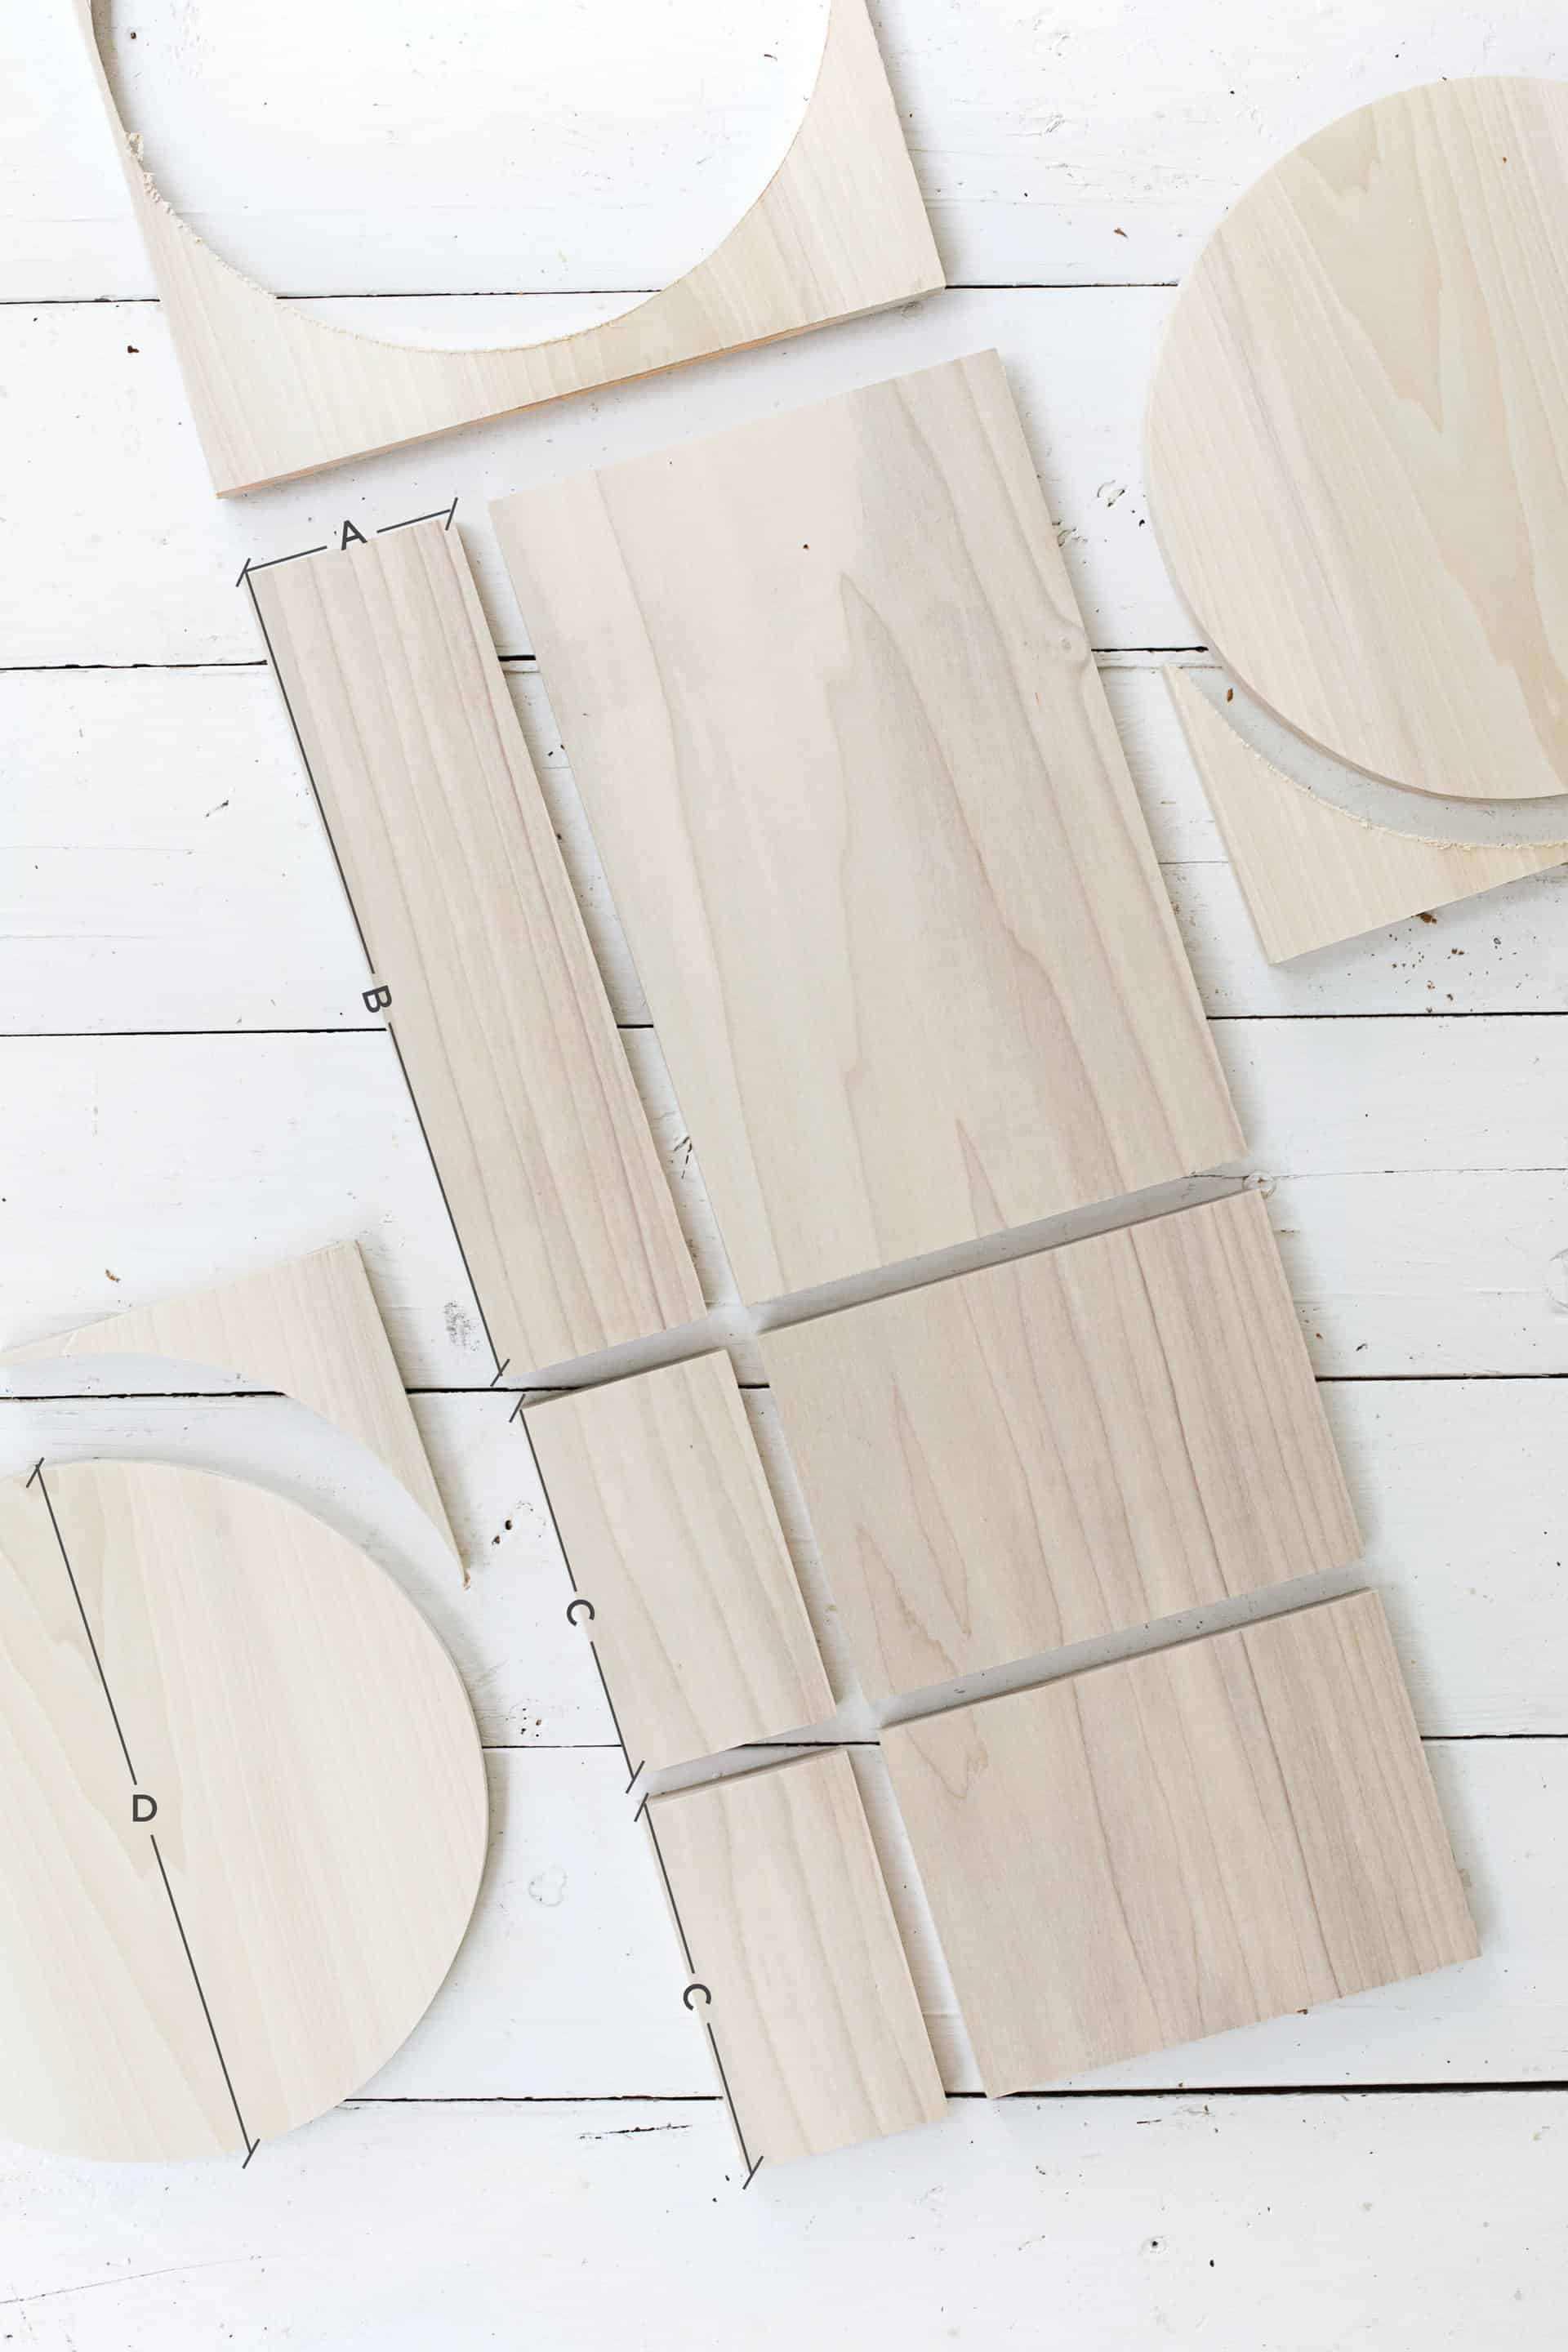 Step Two: Cut the wood for the x-bases of the plant stands.
As I mentioned earlier, you can get two plant stands out of a 6′ long board. Cut out two circles, and the rest of the board length will give you the wood for the x-base. The measurements below all hinge on the diameter of the circle you cut, so determine that measurement first.
D– Diameter of your circle (mine was 10″)
A– Height of your x-base (I think higher than 6″ looks awkward.)
B– This measurement should be the diameter of your circle plus 2″.
C– This measurement should be half of measurement B minus half of your board thickness.
 Step Three: Thoroughly sand all surfaces of your wood pieces. Begin with 80 grit sandpaper to shape the edges of the wood, particularly the edge of your wood circle. Then move up to 120 grit to sand out scratch marks from the lower grit sandpaper. Then, finish with 180 grit sandpaper to make it nice and smooth. If you do not take time to properly sand your wood, it won’t take the stain nicely and will be blotchy and rough after staining.
Step Four: Use wood glue to assemble the x-base of your stand, which are measurements B + C + C from step two. Only use wood glue on unstained wood, as stained wood will not absorb the wood as it should, decreasing the strength of the glue. If your wood is already stained at this point, use something like Gorilla Glue instead.
 Step Five: Clamp together the x-base tightly, and immediately wipe away all wood glue that seeps out of the seams. Any visible wood glue will repel stain and appear yellow. It is very difficult to sand away.
Step Six: After the wood glue has dried, glue and affix the circular piece on top of the x-base. Clamp the top into place and, if desired, use finishing nails to add further strength to the finished piece. If you’re clamping the pieces together with wood glue on unfinished wood, however, I believe the nails aren’t completely necessary to the stability of the plant stand.
If you choose to use nails on your plant stand, use a nail setter or something similar to tap the finishing nails beneath the surface of the wood and cover the hole with stainable wood filler (sanding it smooth after it dries).
 Step Seven: Finish the wood as you desire. If you use stain as I did, I recommend finishing with polyurethane to protect the wood from inevitable water splashing. To properly finish the wood, spray with two light coats of poly, then sand with 0000 grade steel wool, and finish with one last coat of poly. This will smooth down the roughness of the little wood hairs that stick up when the wood is moistened by the initial coats of poly.
If you choose to use paint, I recommend spraying with one coat of primer, lightly sanding with 400 grit wet sandpaper to smooth down the rough wood hairs that stick up when the wood is moistened by the primer, and then spraying with one last coat of primer. Then finish with as many light coats of your finish color as needed.
 I think the finished stands look great with all shapes of pots, but I particularly love how it looks with this vintage planter that used to belong to my grandmother before she passed away ten years ago. I think she’d be happy to know how much I love using it today!

 This project ended up being so simple that I think I’ll make another larger one out of plywood to give a little height to my beloved ficus tree. I’m thinking maybe white lacquer for that one? Let us know if you make your own—we’d love to see it! –Mandi

19 Comments
What a simple and beautiful way to use wood!
Charmaine Ng | Architecture & Lifestyle Blog
http://charmainenyw.com
Wood working always feels so out of my eliminate..so many coffee tables I’ve wanted to build! This project looks small enough that U could actually accomplish it. This will just be the beginning o my wood working, I swear!
This is a great project to get you started!
Ohhh I must try to make these they’re amazing! I love woodwork but I must admit it’s been a while since I tried my hands at it. Time to get stuck in again!
Yemmi | itsYemmi
Love this. Cute and simple!
-Greta
http://www.mintyfrosting.com
Wow, these are amazing. I really love the simple and modern look. Aaaand since I actually have bought several new plant babies in last couple of months, I could really use this kind of plant stands. Maybe I’ll step out of my comfort zone and try to do a little woodwork next weekend.
Not sure about the ‘so simple to make’ aspect. Okay if you happen to have a workshop/shed and a jigsaw handy. Love the look and idea but unfortunately not something I can just knock up over a weekend. Maybe it could be adapted using a small round chopping board and offcuts from a wood yard. Great idea and look though.
It’s all relative. As far as woodworking goes, this project is very simple considering you can buy the wood already to the width you need, there are no joinery techniques for connecting the wood, and the edges are left blunt, with no routering or whatnot. 🙂
Those are pretty cool!
https://www.makeandmess.com/
Great wood DIY project!
I JUST got a jigsaw and used it for the first time so I’m finally feeling confident to tackle these types of projects. I love how fresh but simple these are! Good job, Mandi! -Rachel
I was so intimidated of the jigsaw until I finally wanted to make someone bad enough and felt feminist enough to not ask my dad for help. So glad I finally took the plunge! Turns out to be pretty straightforward, yet empowering. 🙂
Love how minimalistic these look!
Rabeyah (@rabeyahn)
http://byrabeyah.blogspot.com/
This is so cute! it hit me right in the soft spot since I love everything wood <3
https://www.myblackcloset.com/
Ugh these are too freaking cute!!! Wish I had all the tools to make them.
http://shannoninthecity.com
These are fabulous!! Great job!
Thanks for sharing! I will be updating my master bedroom soon and would love to create one. It just so happens I have quite a few 10” white oak slabs lying around from a product design. I would just need to create the x-base. I’m thinking 4” inches.
the step 3 and 4 is not clear to me. I still dont get how to get the shape of the top part of the leg before pitting the round wood. And there’s no picture on how the top shpuld look like prior pitting on the rounf top/wood. This diy its hard to follow even if i have the equipment.
I’m so into this plant stand trend! Never thought about making my own, but it would be so much cheaper. 🙂 Thank you for the idea!