
Today I’m so excited to share a rainbow accent wall that we put into a spare bedroom to make it into a creative space. I have always wanted a rainbow wall, and it’s finally happened!

Here’s how I planned out my wall—

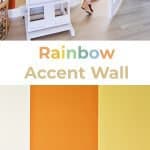
Next, I chose the design. You can see above I chose between two designs. Ultimately I felt like the vertical lines were going to be less busy and easier to decorate a room around. So I went that route. The only thing that would have been cooler about the diagonal lines is that you’d be able to see more colors in a frame. I definitely think about my rooms in photo terms, since I love to take photos in our home.
Maybe one of you will try the option I didn’t choose so I can see how that would look as well?? The colors I used (from left to right) were Henrietta, Antoinette, Barcelona Orange, Arles, English Yellow, Antibes Green, Provence and one of their newest colors, Giverny. If you’re looking for these colors or others, you can use this link to find a stockist near you!

-paint brush or mini paint roller
-painter’s tape (We used frog tape and would highly recommend it for super clean edges!)
-measuring tape or ruler
Step One: Start by measuring the length of your wall. Then, figure out how many colors you’re going to be using and divide the length of your wall into however many colors you have so that each color is an equal size. For example, our wall was 144″ and we used 8 colors. 144 divided by 8 is 18, so we knew to mark our walls every 18″.
Step Two: To get your lines perfectly straight up and down your wall, get a measuring tape (or a ruler is easier!) and measure 18″ from the top of one side of your wall and mark little 1/2″ lines every 6″ or so all the way down the wall. Continue this process over the entire wall until completed. Now you have a guideline for your tape! Next take your painter’s tape and tape off every other color using your pencil marks to get a perfectly straight line.
Step Three: Paint those colors doing as many coats as needed until your surface is completely covered. (It’s very important to make sure you have enough coats so you don’t have to fix it later!)
Steps Four-Five: Let dry completely for 1 to 2 hours, and then it’s time to peel off your tape and repeat the process with the remaining colors.


What do you think? Do you have a space in your home for a rainbow or color blocked wall? xx -Elsie
Credits//Author: Elsie Larson. Project Assistant: Collin DuPree. Photography: Elsie Larson, Collin DuPree, Laura Gummerman, and Jeremy Larson (haha—that really was a group effort!). Photos edited with the NEW A Beautiful Mess actions.
29 Comments
This is amazing! I’ve never seen Annie Sloan paint used on a wall. The final product is great.
So cute!! Just dying to see the rest of the room tours for your gorg house ?
Wow I absolutely love this. If only I could convince my partner…..
This is SO cute 🙂 amazing to have wall space to do this! If not in an arts room, I could see this used in a kids room or a laundry room or entry way, somewhere it could really pop but not be overwhelming at all times.
Wow this is so cute! And perfect for a photo backdrop 🙂
Julia – http://bunnybaubles.com
Is this paint that you can draw on with chalk after it dries?
Hey Darci!
So, no, actually. Chalk paint is different than “chalkboard” paint. I asked the same question at first!! Chalk paint has kind of a chalky matte finish, but it’s not meant to be written on with chalk. It’s purely for aesthetics.
xx- Elsie
Thanks Julia!
I feel like it will be! :)) So excited!
xx- Elsie
Hey Joanna!
Really? Fun!!!
xx- Elsie
Thank you so much LRS! I have two tours coming SOON!
xx- Elsie
Man, I can’t wait to buy a house one day so I can paint without having to worry about painting it back to white upon move out! Rental woes!!
Oh my God, pretty! I love how the bold accents can still blend in with the whole decor.
I love the idea!
https://www.makeandmess.com/
That wall is gorgeous! It’s an awesome idea! When I saw the first picture I thought it would look great in a kid’s room because it’s fun and not gender specific. But having an office with that wall would be amazing as well, to boost creativity and inspiration.
But, but…it’s not in rainbow order. ROY B GIV forever! 🙂 It is very cheery, and will feel nice in the middle of winter.
I just love this! A rainbow wall could easily be too much if it wasn’t done right, but this is perfect for a creative space. Such a great idea.
It looks so pretty 🙂
Painting is so so daunting to me, but I think this would be worth it. It looks amazing!
Jamie
http://www.sweetteasalvage.com
This wall would make anyone happy!! So brilliant
Yeah- I kind of just went with my visual instincts on that one. :))
xx- Elsie
I would never have thought to do this, and will never be brave enough to, but I’m so impressed! It looks fantastic and not juvenile at all!
This is so cute, Els!!!
Carrie
http://www.wearwherewell.com
Wow! What a statement. I love it.
It looks awesome! I would love to have this in my home <3
That’s so bold! I would never consider doing a rainbow accent wall in my house- especially not by myself!
But it looks great- and you’re right, sometimes creativity is inspired by color.
Thanks for sharing!
I love Annie Sloan chalk paint! It covers furniture and everything else perfectly. One fun new product you should check out (if you already have done so, sorry, I just found your blog today) that works GREAT with chalk paint or alone on wood, glass, metal, pottery, fabric, canvas, etc. is Unicorn SPiT colored gel stain. Completely non-toxic and an amazing product. Go to UnicornSPiT.com and look up information for days about how this is growing across the nation and globally.
Omgosh yes. If I have a kid one day, I want this rainbow wall in his/her room.
Love, love love your wall!!!! So cheery!!! I plan on painting a wall in my home, I wonder do you have wax the wall for the final step?
The things you do are GORGEOUS!!