 Hey! It’s Katie and I want to talk about garlands. Oh, how I love them! Are there any others out there like me? I honestly believe you can never have too many. Like, I don’t even have a mantle in our home right now, but I still string them everywherrrrrrre. You can probably tell by my enthusiasm on the subject that this is a post dedicated to the newest garland addition in my home. She is so darn whimsical and pretty. Let me introduce you to: SWAN GARLAND.
 Supplies
–white Sculpey clay
–swan cookie cutter
-parchment paper
-rolling pin
-chopsticks and washi tape (optional but recommended)
-yarn/string and needle
-acrylic paint in white, black, and salmon
-toothpicks
-aluminum foil
-white feathers
 Let’s begin! Tape the chopsticks to your parchment paper. My craft table is never clean, so I used a cutting board wrapped in the parchment paper to ensure I had a very smooth surface. Once your rolling area is prepped, grab that Sculpey clay and knead it until it’s soft. Roll the clay out in preparation for cutting. (Can you tell my “rolling pin” was a drumstick? It worked.)
 Before we continue, I just want to point out the purpose of the chopsticks. It’s easy to roll clay without a border, but the chopsticks definitely ensure a more uniform shape to your garland. Just sayin’.
Use your cookie cutter to cut out the swan. If you need help removing the clay from the mold, try tapping the clay gently with the blunt end of a pencil. Repeat as many times as you’d like. My garland is eight swans wide. 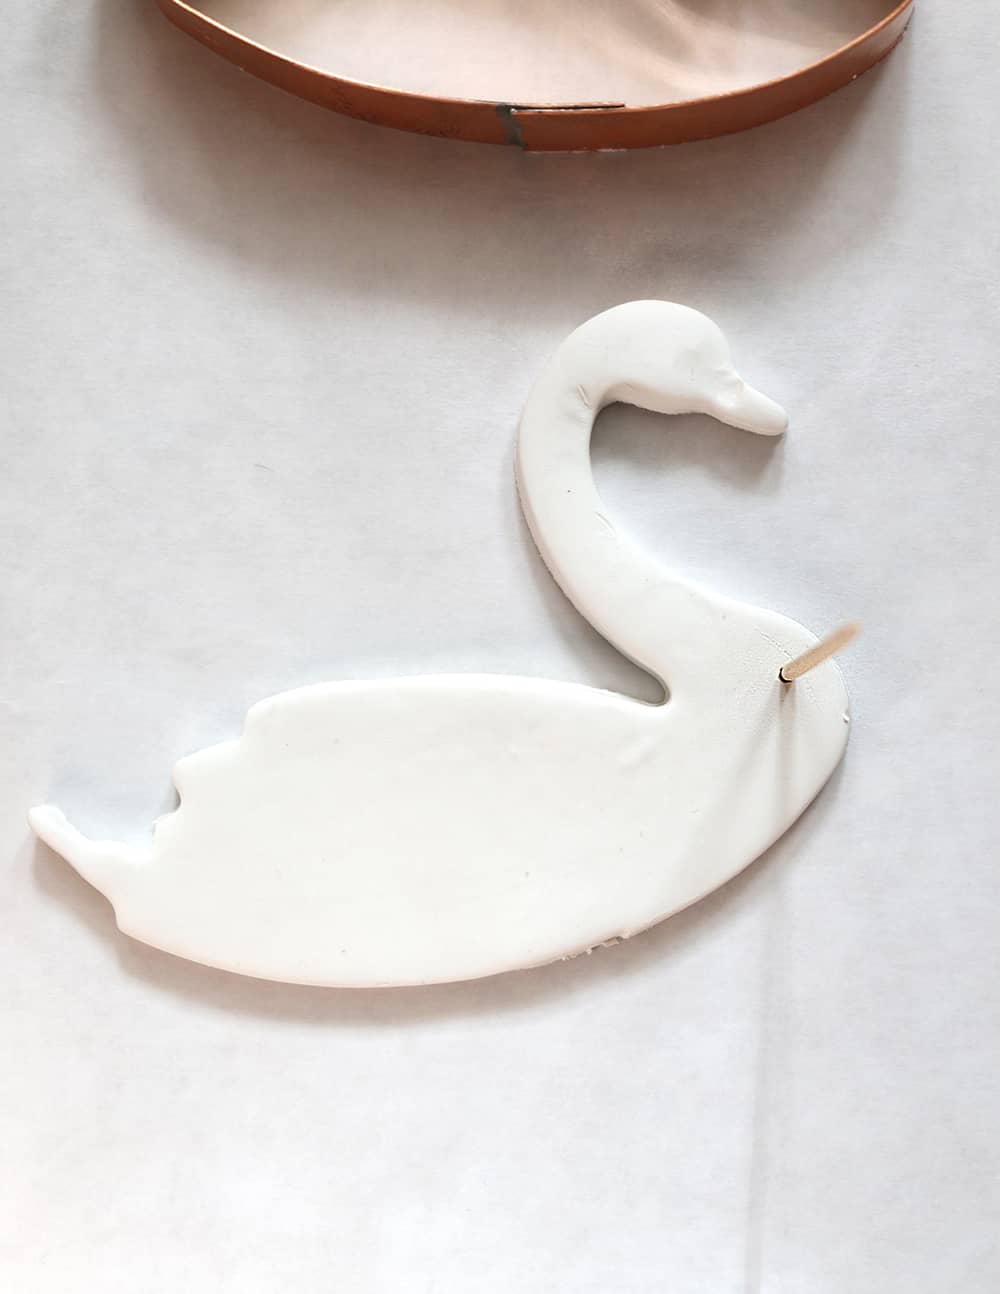 After you’ve gotten all of your swans cut, use a toothpick to create holes for stringing. Please take a sec and make note of where my holes are placed (pictured above and below). If you go too low with them, your swans will try to swim upside down. Nobody wants that. Or, maybe you do. If you do, disregard this advice.
So … now it’s time to throw the swans onto an aluminum foil-lined baking sheet and bake those guys according to the package instructions.

 After baking, throw on a couple coats of paint and finish with a feather. When they’re all dressed and pretty, string them up and find the perfect place in your home for a whimsical bevy of swans.


 I love these guys because they’re great for the holidays, but I will totally be using them year-round. They could compliment so many different seasons. I’m basically just scanning my house trying to figure out how many of these garlands I can get away with making. Now, who else is ready to grab some black Sculpey clay and make a dreamy black swan garland? I smell a craft party coming on! xo. Katie
 />
/>
21 Comments
What a beautiful idea, I love the swan theme!
https://www.makeandmess.com/
Nailed it!!!! xoxo-Rachel
Um, just thought I’d point out the obvious…it’s “7 swans a swimming” not 8. Hahaha, cute project!
Ha! Yeah, if you want to make your garland based off the 12 Days of Christmas song then you better make it 7. You might make a few extra though just in case any break during baking or assembling. Also, you might measure where you plan to hang your garland first as some spots might not work well with a seven, like it might be too many or not enough. But yeah, you do you friend. 🙂 Happy Holidays!
Such an elegant piece of decor! Love it! 😀
Charmaine Ng | Architecture & Lifestyle Blog
http://charmainenyw.com
The pearlescent white and fluffy feather really glam it up and make it shine! I wouldn’t have guessed how easy it was to make if you didn’t share steps with us. 🙂
It is so awesome!!! I love garlands. I have a question. How many sculpey packs did you use for this?
Umm that’s adorable. I think it’d be so sweet for a kids room, maybe with one black swan mixed in. Hmmm…
wow. MIND BLOWN! Think of all the animal garland possibilities!
This is seriously so cute! I love it, thanks for sharing <3
https://www.myblackcloset.com/
I love swans, so this is fabulous! How creative and lovely!
xx, Elise
http://www.sparkleandslippers.blogspot.com
STOP IT OMG This is SO. CUTE!!!
Ooh those layered garlands look awesome! It’s bringing me back to my high school days in the 90s when I would layer 5 or 6 beaded necklaces around my neck that I would string out of hemp or embroidery thread. I’ve been wanting to garland up my mantel and I think the layered look is right up my alley 🙂
This is such a creative and fun idea for a decoration! Definitely something to get the whole family in on, good post!
Such a great project. I’m looking at my cookie cutters again !
Omigosh, super cute!
Saw these on IG and had no idea they were clay!! So good. ????
Eeeekkkk!!! These are just too cute!! Gonna have to try these, great idea????
Thanks for this DIY
https://thepinkpineappleblog.blogspot.com/2017/12/5-ways-to-dress-in-holidays_19.html
OK, I am totally going to make this for my dorm next year because I LOOOOOVE swans. This is so cute and precious, thanks for the idea!
Where are your bottle brush Christmas tress from? I LOVE them!!