 If you saw my living room refresh last month, then you probably already noticed this pretty terrarium coffee table. This is a pretty new addition to our home and (bonus!) it’s a DIY, so I thought we’d share that for all you woodworking DIYer’s out there.
Two years ago, I built this terrarium side table and loved it. It was next to our couch in the living room of our last house. Since we moved, I’ve never really found a new home for him in our current house. I moved it around the house a few times, trying out different spots. The best spot was where the giant split leaf plant now is (see here), so once I got that my terrarium side table was homeless again. So it’s just been sitting in the back of my home office area, collecting random things on top of it (not great). I really loved the terrarium aspect but the overall size and shape of the side table (basically a large box) just didn’t seem to fit anywhere in our home. What’s a gal to do?!
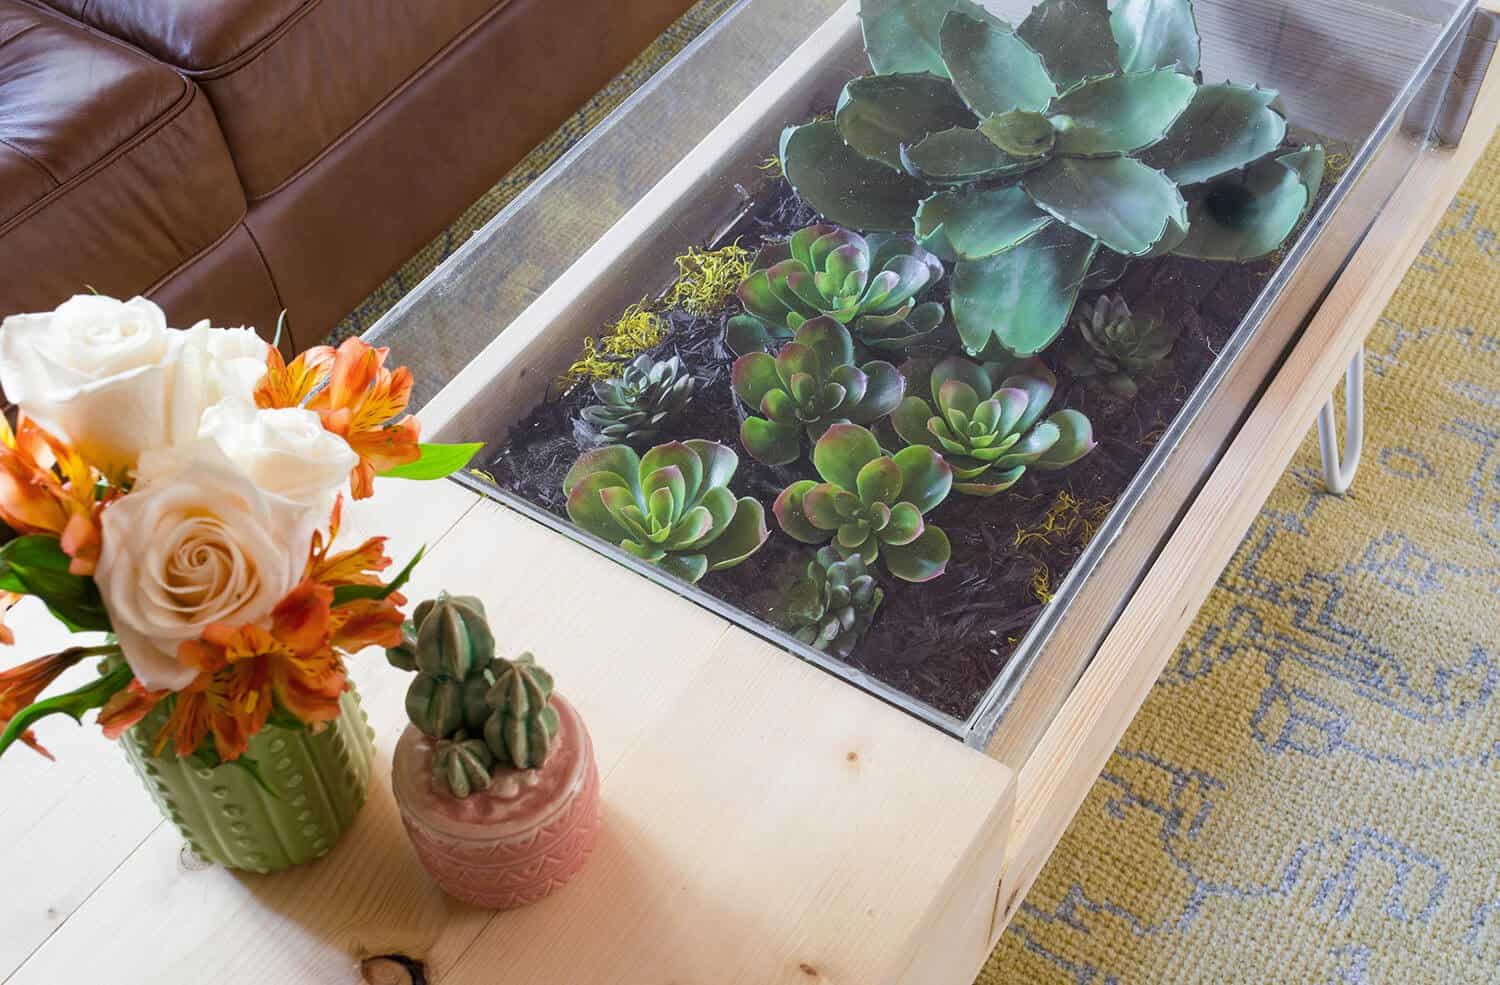
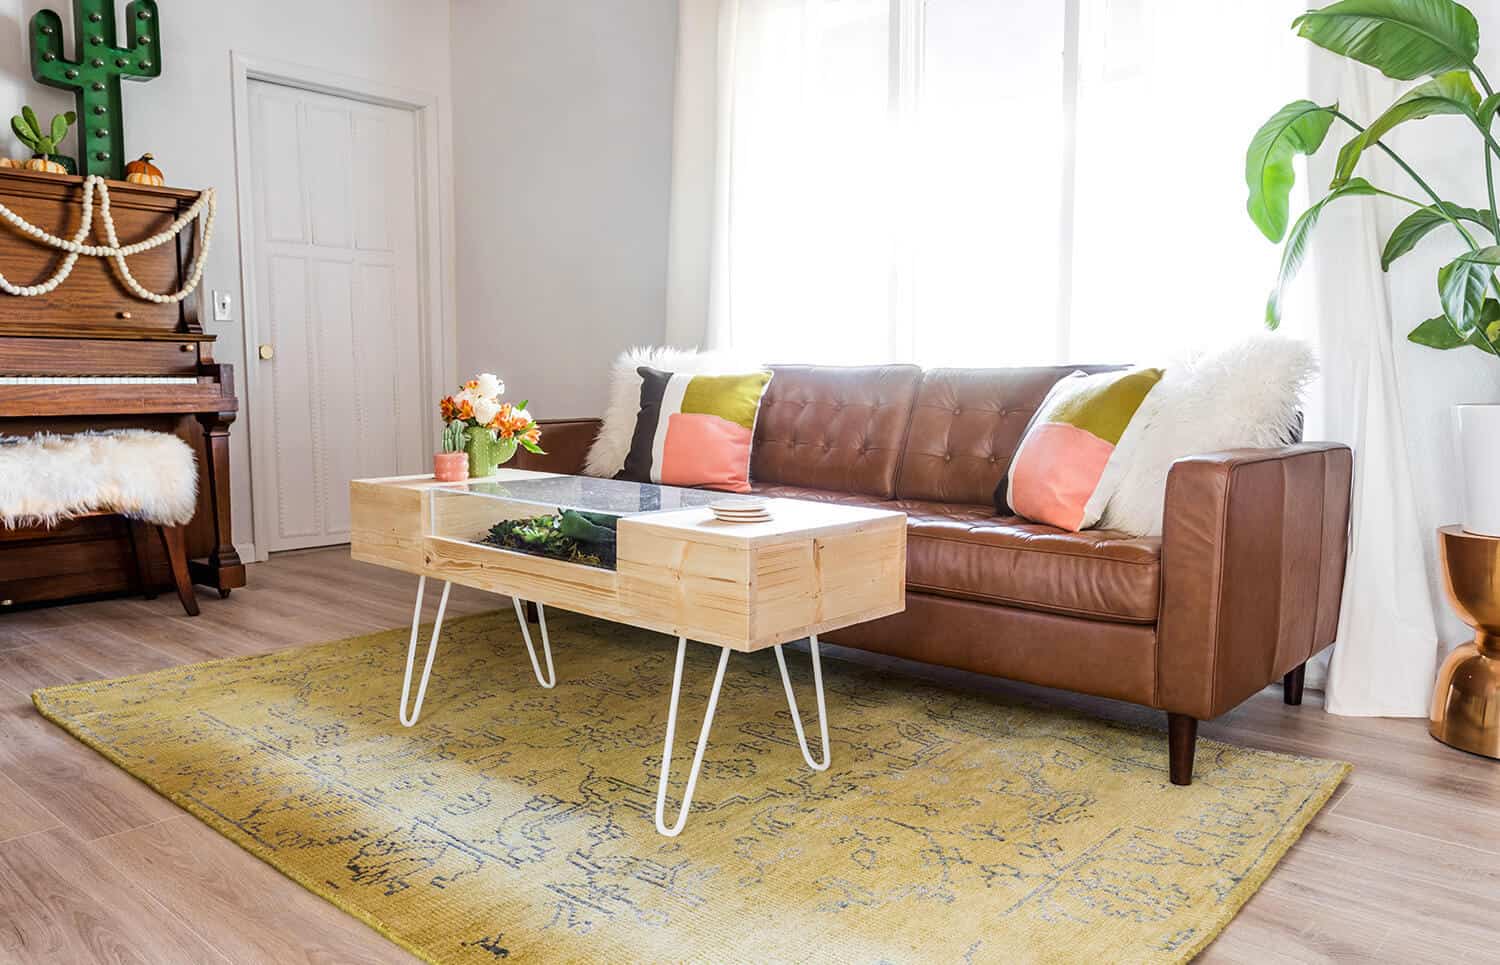 So that became the inspiration behind this coffee table. I wanted something that felt like the right shape and size for in front of our brown couch, but I still wanted it to have a terrarium aspect to it. I even planned to reuse the (faux) succulents from the last terrarium in this new one. Ethan was helping me with some other things in our home last month (including the bathroom remodel—whoa!) and he created the final design for this table as well as put it together. So I’m gonna let him teach you how to make your own, take it away Ethan:
Hello everyone! I was very excited when Emma asked me to design and build this coffee table for them. The goal was to continue the sleek, clean lines in the rest of the house while brightening the room. We decided to go with pine boards to achieve that lighter, brighter look. Which brings us to supplies!
 Supplies:
-6 10-in x 8-ft pine boards
-1 3-in x 5-ft pine board
-1 14.5 x 2-ft acrylic sheet
-2 7.5 x 2-ft acrylic sheets
-1 box of 1 3/4-in wood screws
-1 box of 1-in screws
-4 white hairpin legs
-wood glue
–weld on #4 with applicator (glue for acrylic)
Tools:
-Circular saw
-Clamps
-Medium and Fine grit sandpaper
Step One: I took three of the boards and using a circular saw, cut them in half to make three 4-ft boards. Once the boards were cut, I used medium grit sandpaper to smooth out the cut ends and prepare the sides to be glued together.
 Then I took the three, 4-ft boards and ran wood glue on the long sides and began to place my clamps. (When placing the clamps, ensure the ends are even.) Then begin to place your clamps on the desired spots. Make sure there are clamps on both ends and across the middle, keeping the boards even and flat. Add clamps on the sides, forcing the boards together. A tip when using clamps is to place something in between the clamp and wood (or whatever material you are working with) to prevent unwanted dents in your wood, I used scrap cardboard and scrap wood. Tighten the clamps until beads of glue appear from the joints. Let the glue dry overnight. Once dry, sand away the dried glue beads.
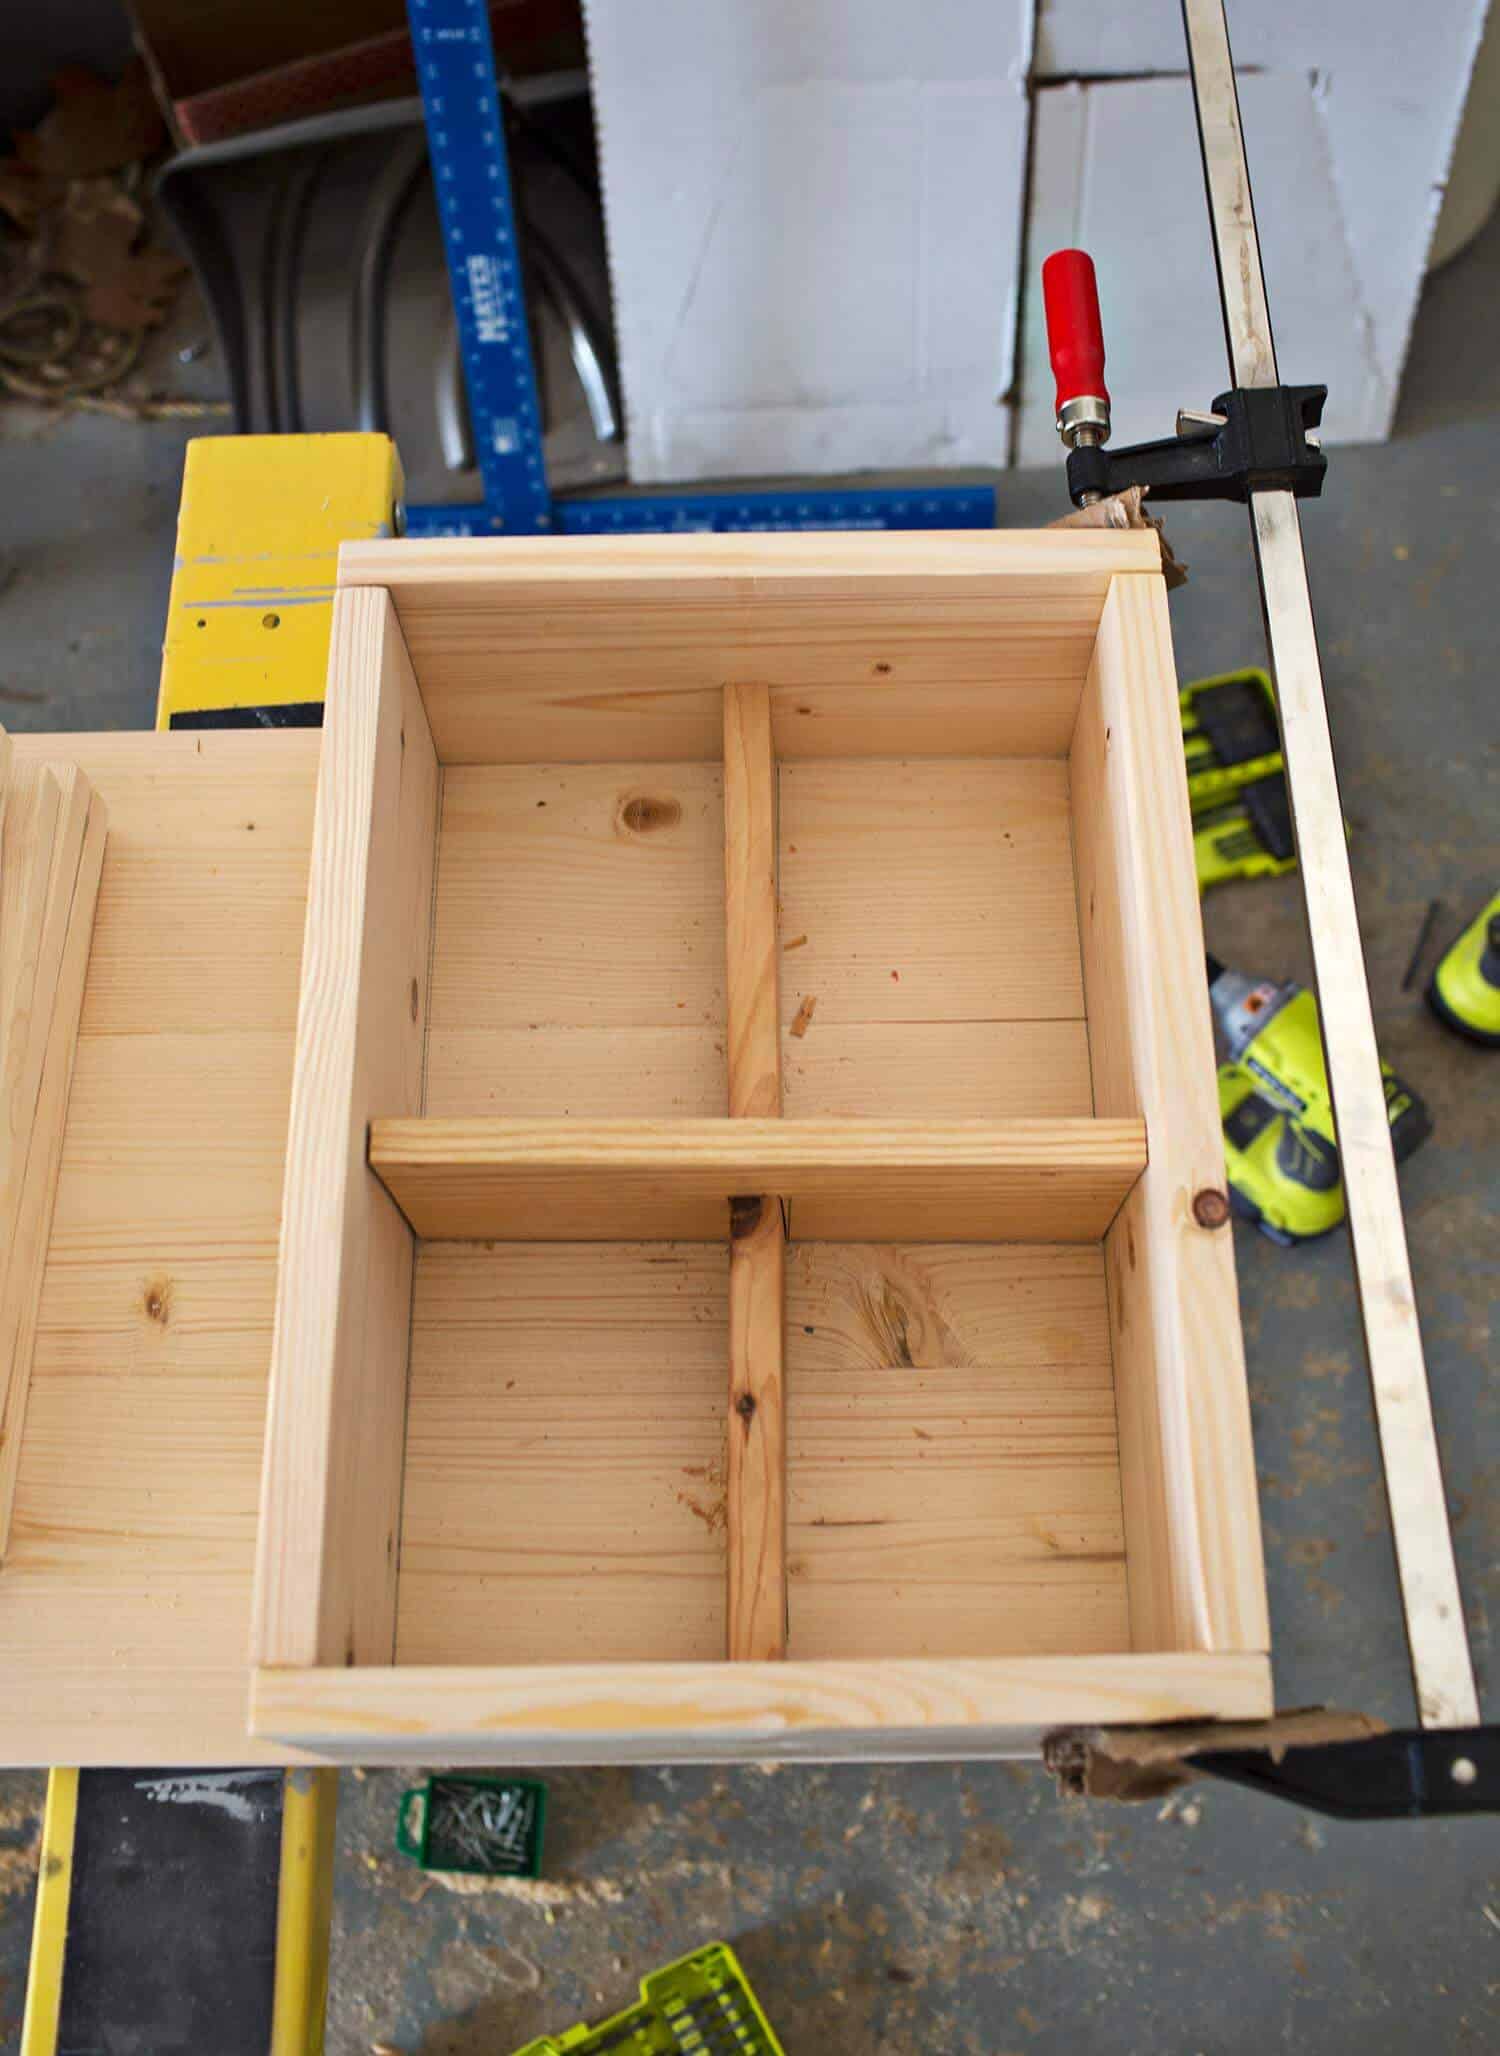
 Step Two: Build the boxes for the ends of the table. I wanted to make this as simple as possible when planning the sizes of the boxes and terrarium. I decided to divide the table into fourths and make the boxes 1-ft long and the terrarium 2-ft long. I cut four, 1-ft boards and four, 28-in boards to make the boxes. When it makes sense, I like to screw and glue joints to make them really strong. I started by pre-drilling holes from underneath the base up into the box. I screwed the 1-ft boards in first then applied glue to the 28-in boards and once in place screwed them in. I then placed clamps on the corners to make sure the joints were tight, allowing that to dry overnight.
An optional addition, you can make a cross brace for the inside of the box to make it extra sturdy. I used scrap wood in my shop, but any wood will do. Just make sure one half of the cross is shorter than the other. Measure and cut the wood to fit inside the box. Place the shorter board on the side of the taller board, and trace the edge. Then cut out the traced shaped, making a half-lap joint. Then just like the sides of the box, predrill and screw the cross brace in place.
 Once the boxes were dry and in place, I used the remaining wood to cover the top of the boxes. I cut six, 1-ft boards for the top of the table. I glued the sides of the top wood pieces and the perimeter of the top of the box, clamping the top pieces of wood to the box until glue beads appeared, allowing the glue to dry overnight. After the glue dries, sand the dried glue beads from the joints.
Next, I cut the 3-inch board to fit in between the two boxes to create a lip for the acrylic box to fit inside. I repeated the steps for the box walls here and predrilled, screwed and glues the boards in place, allowing to dry overnight.
Step Three: Build the acrylic box. After doing some research and testing, I found acrylic is hard to cut and maintain smooth edges. I used my circular saw as carefully as possible, while being smart and planning out the edges, to make sure to use as many of the smooth factory edges as I could. It’s possible you may be able to buy acrylic in the sizes you will need (noted in the supplies), but more than likely you will need to cut one larger piece down to size, like I did.
Measure the inside of the middle of your table and cut the acrylic to match the height and width of your space. Once cut, apply acrylic glue to the edges then clamp the joints. Don’t tighten too tight or you run the risk of bowing the acrylic, or worse, breaking it! Allow that to dry overnight. Now insert the acrylic box and screw the legs in the desired position and you have yourself a new terrarium coffee table!
 Thanks for letting us share! And remember, if you create this project (or any project from our site) we’d LOVE to see it, so please tag us on Instagram! xo. Emma + Ethan

25 Comments
This is by far the cutest thing I have seen on ABM. Sooo need it in my life <3
Thank you so much!
What a truly original design, I love it! Looks so natural and beautiful! ❤
Charmaine Ng | Architecture & Lifestyle Blog
http://charmainenyw.com
So cute! <3 Do you have a desk diy? If not, I would love to see one! 🙂
xx Kenzie
Here you go! http://abeautifulmess.com/2015/12/emmas-super-easy-diy-sewing-desk.html
That looks soooo cool, what an amazing idea this is!
https://www.makeandmess.com/
LOVE THIS! Where did you get the faux succulents from? I’ve been having a tough time finding ones that don’t look like straight up plastic.
This is so much fun! And the perfect way to add some greenery in an unexpected place!
I don’t think I would go for it yet, I admit that it looks good and really livens everything up in the room! Great idea! 🙂
It’s absolutely beautiful. I had never see a terranium table, and the result is perfect. We really like the combination of wood and cactus. Congratulations!
I’m in desperate need of a new coffee table, so this is definitely on my to-do list! Love it.
This is a super cute idea! I love this! So fun!!!
xo, Meghan | http://tanlinesanddaisies.com/
Amazing table its cool
https://thepinkpineappleblog.blogspot.com/2017/11/lfw-day-45.html
What an amazing idea! This is taking coffee tables to the next level. Basically placing decor IN the table and not on it. I smell this becoming a 2018 interior trend, haha. Gorgeous result!
Have a lovely weekend!
Joanne | With Risa: A Lifestyle Blog
Im seriously hoping this does become a trend! It’s so aesthetically pleasing
❤️,
love2designs.com
This table is amazing!
Paige
http://thehappyflammily.com
You might find that sanding edges, and then rubbing lighter fluid onto them makes them smoother and looking more transparent-like 🙂
Brilliant. I love the inside, but I’m not sure if they will survive, because I wouldn’t want to change them every week or so..
Great job. It is really amazing. I like it.
Gahhhh im gushing over this!! Seriously need to try this one day omg
– ❤️ love2designs.com
Trying to make this over Spring Break as a project with my kids and I think these measurements don’t quite work if it’s supposed to look like that picture. Any help?
The table width, according to the boards listed in the supplies list, together with the directions in step one seem to indicate the table’s width should be roughly 28in. But the glass/acrylic box width appears to be 14.5in. Any thoughts? Am I missing something?
Hi Shae! If you email Emma she should be able to help– emma AT abeautifulmess DOT com
About how much did these materials cost you?
I’m looking at this as a model for a terrarium, but mine would be to house a small gecko. I’m wondering any thoughts on how to have part of it be screened (for oxygen) and also be able to be removed to clean, feed, etc.
I’d love to hear any ideas you all have. Thanks and have a great day!
I love this DIY! It’s beautiful! I am wondering if you would be able to add drawers, and perhaps keep the terrarium part open to house live succulents?
Mahalo for the post! (: