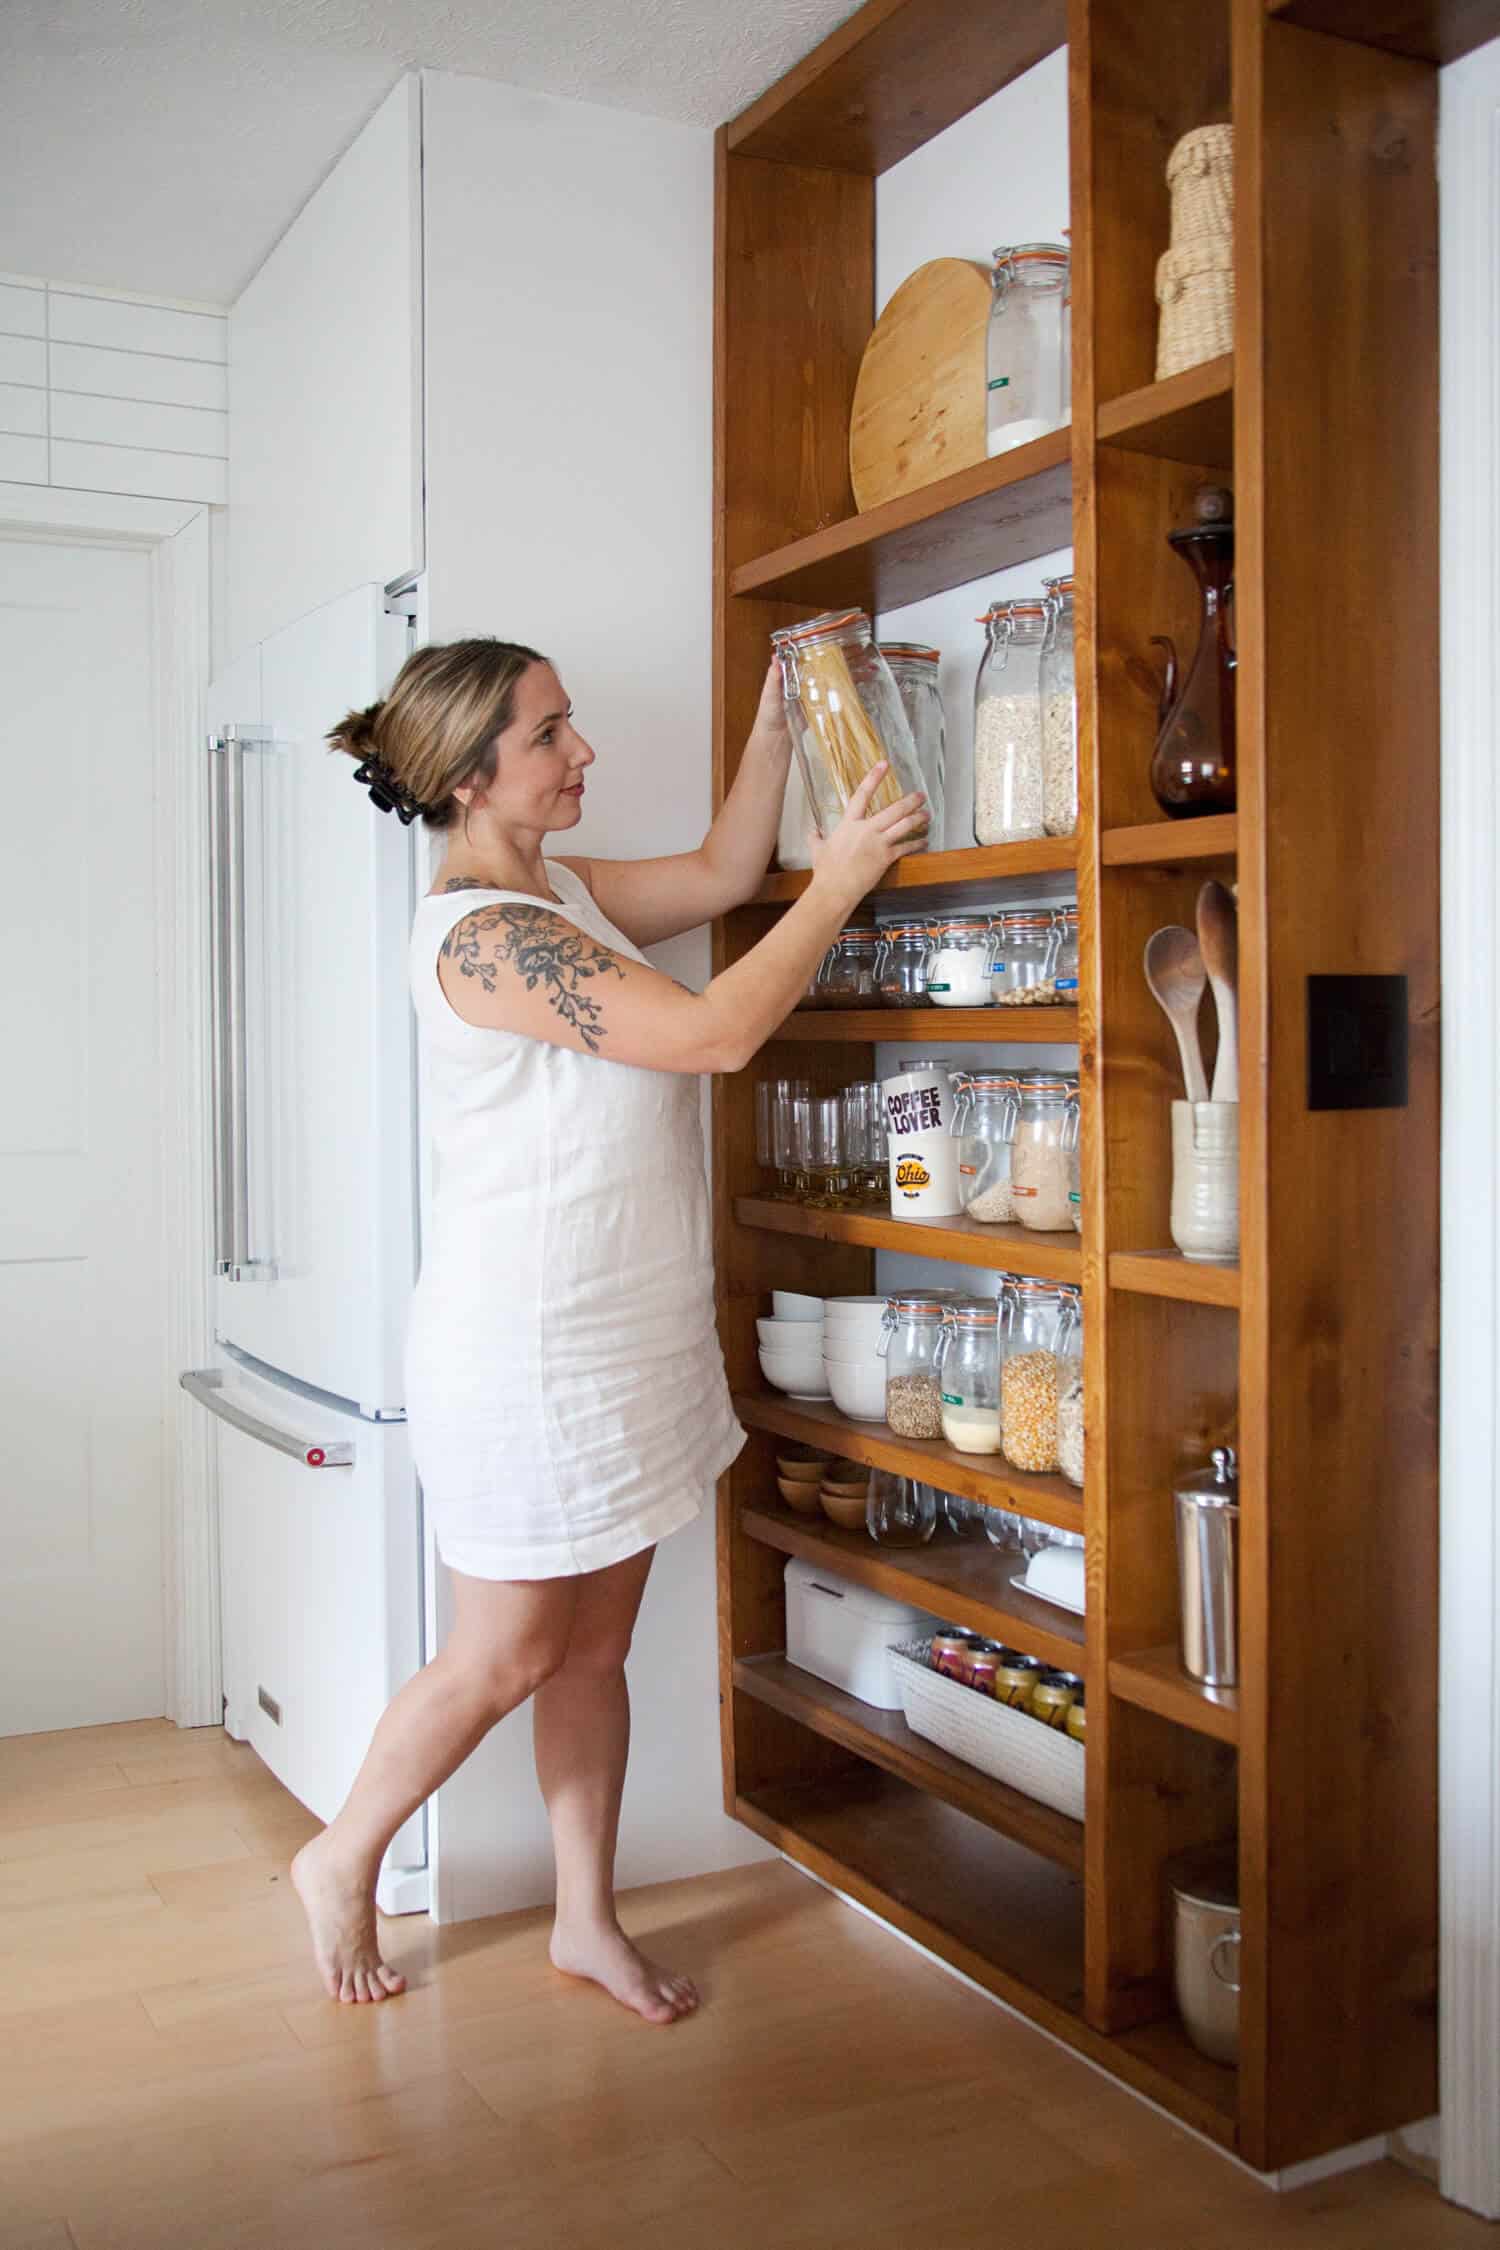
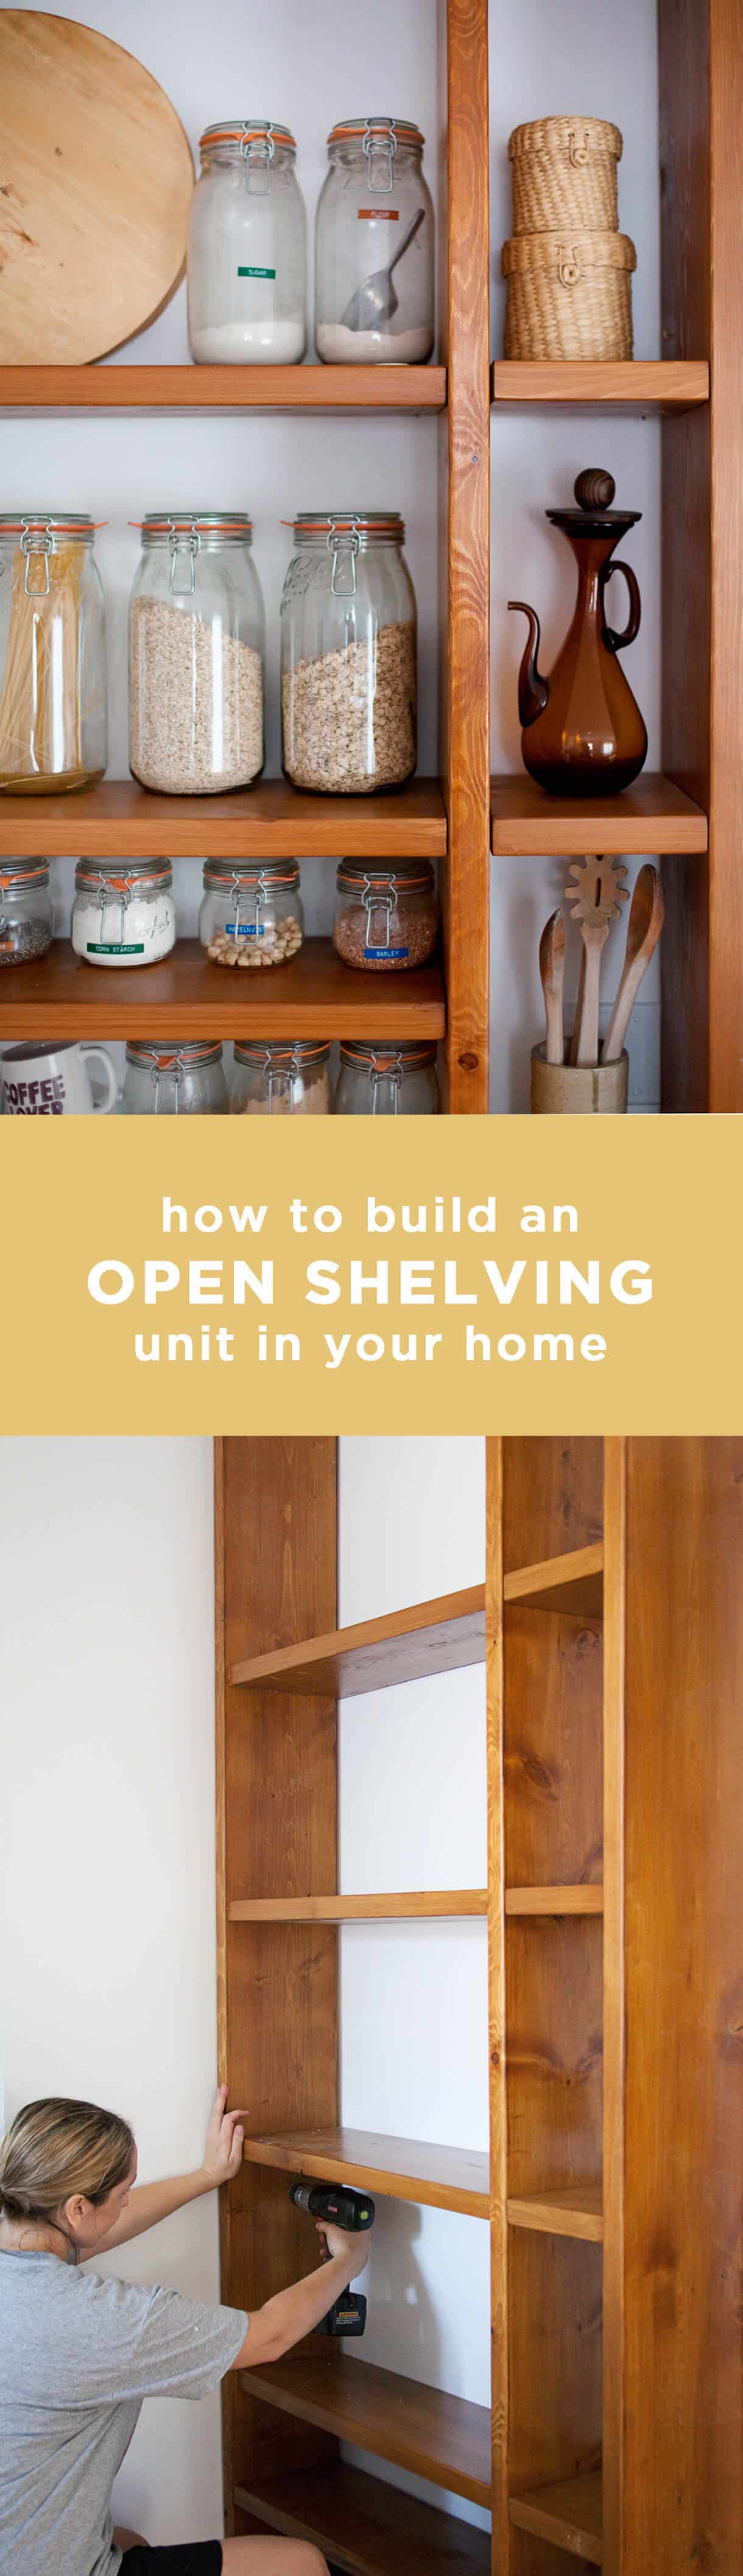
 We’re almost finished with our kitchen renovation, and I’m so excited to share this high-impact shelving project with you! Our original kitchen (see floor plan before and after below) had lots of bulky cabinets on this wall, but because we planned to enlarge the island countertop for dining, the walkway would become too crowded if we left the cabinets in their place. So I decided to remove the cabinets* and build this large wall of shelving in their place.
*The old cabinets are being repurposed in our basement as well as in our neighbor’s garage.
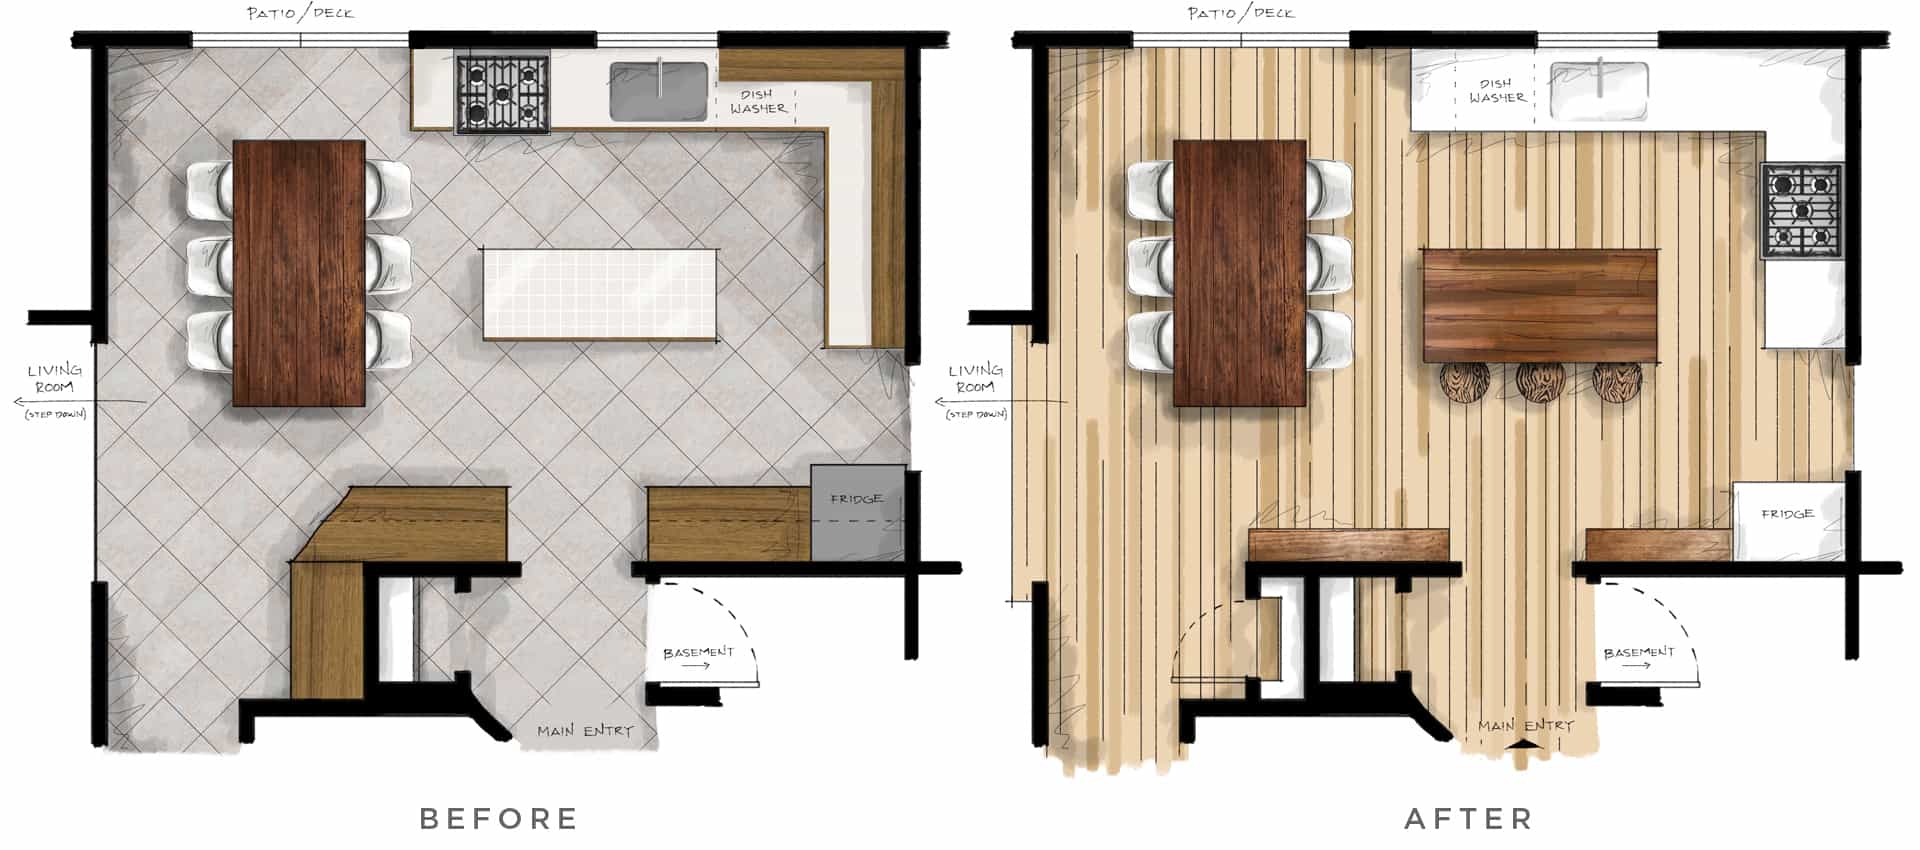
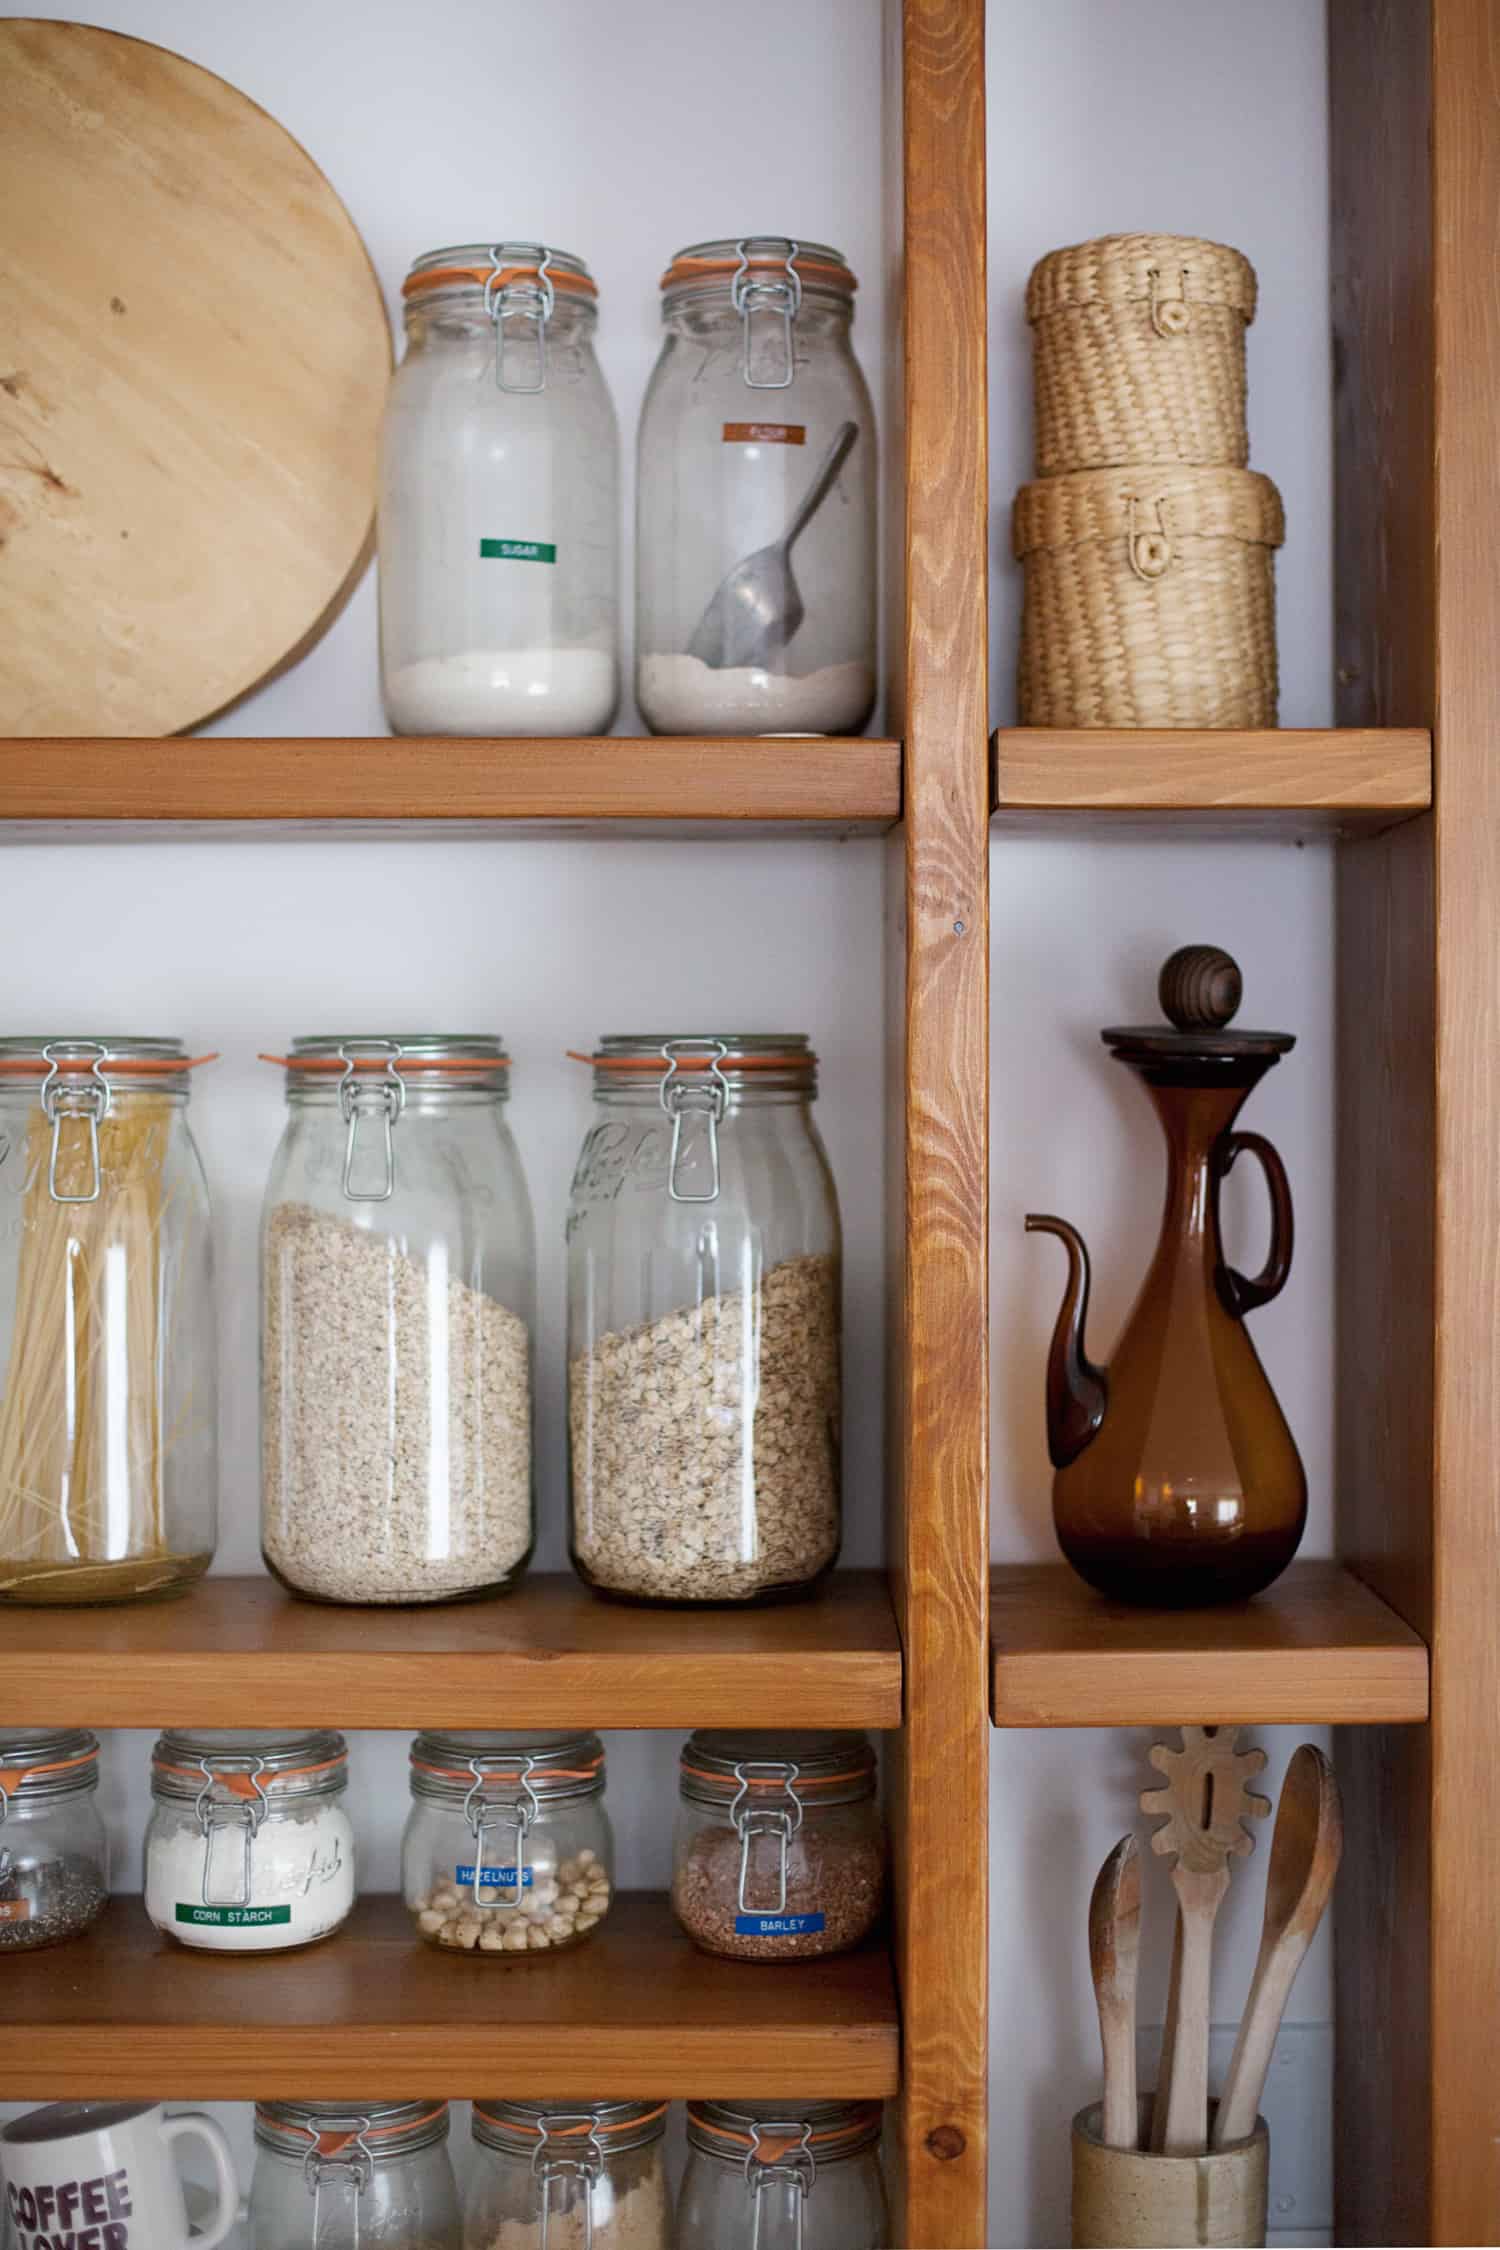
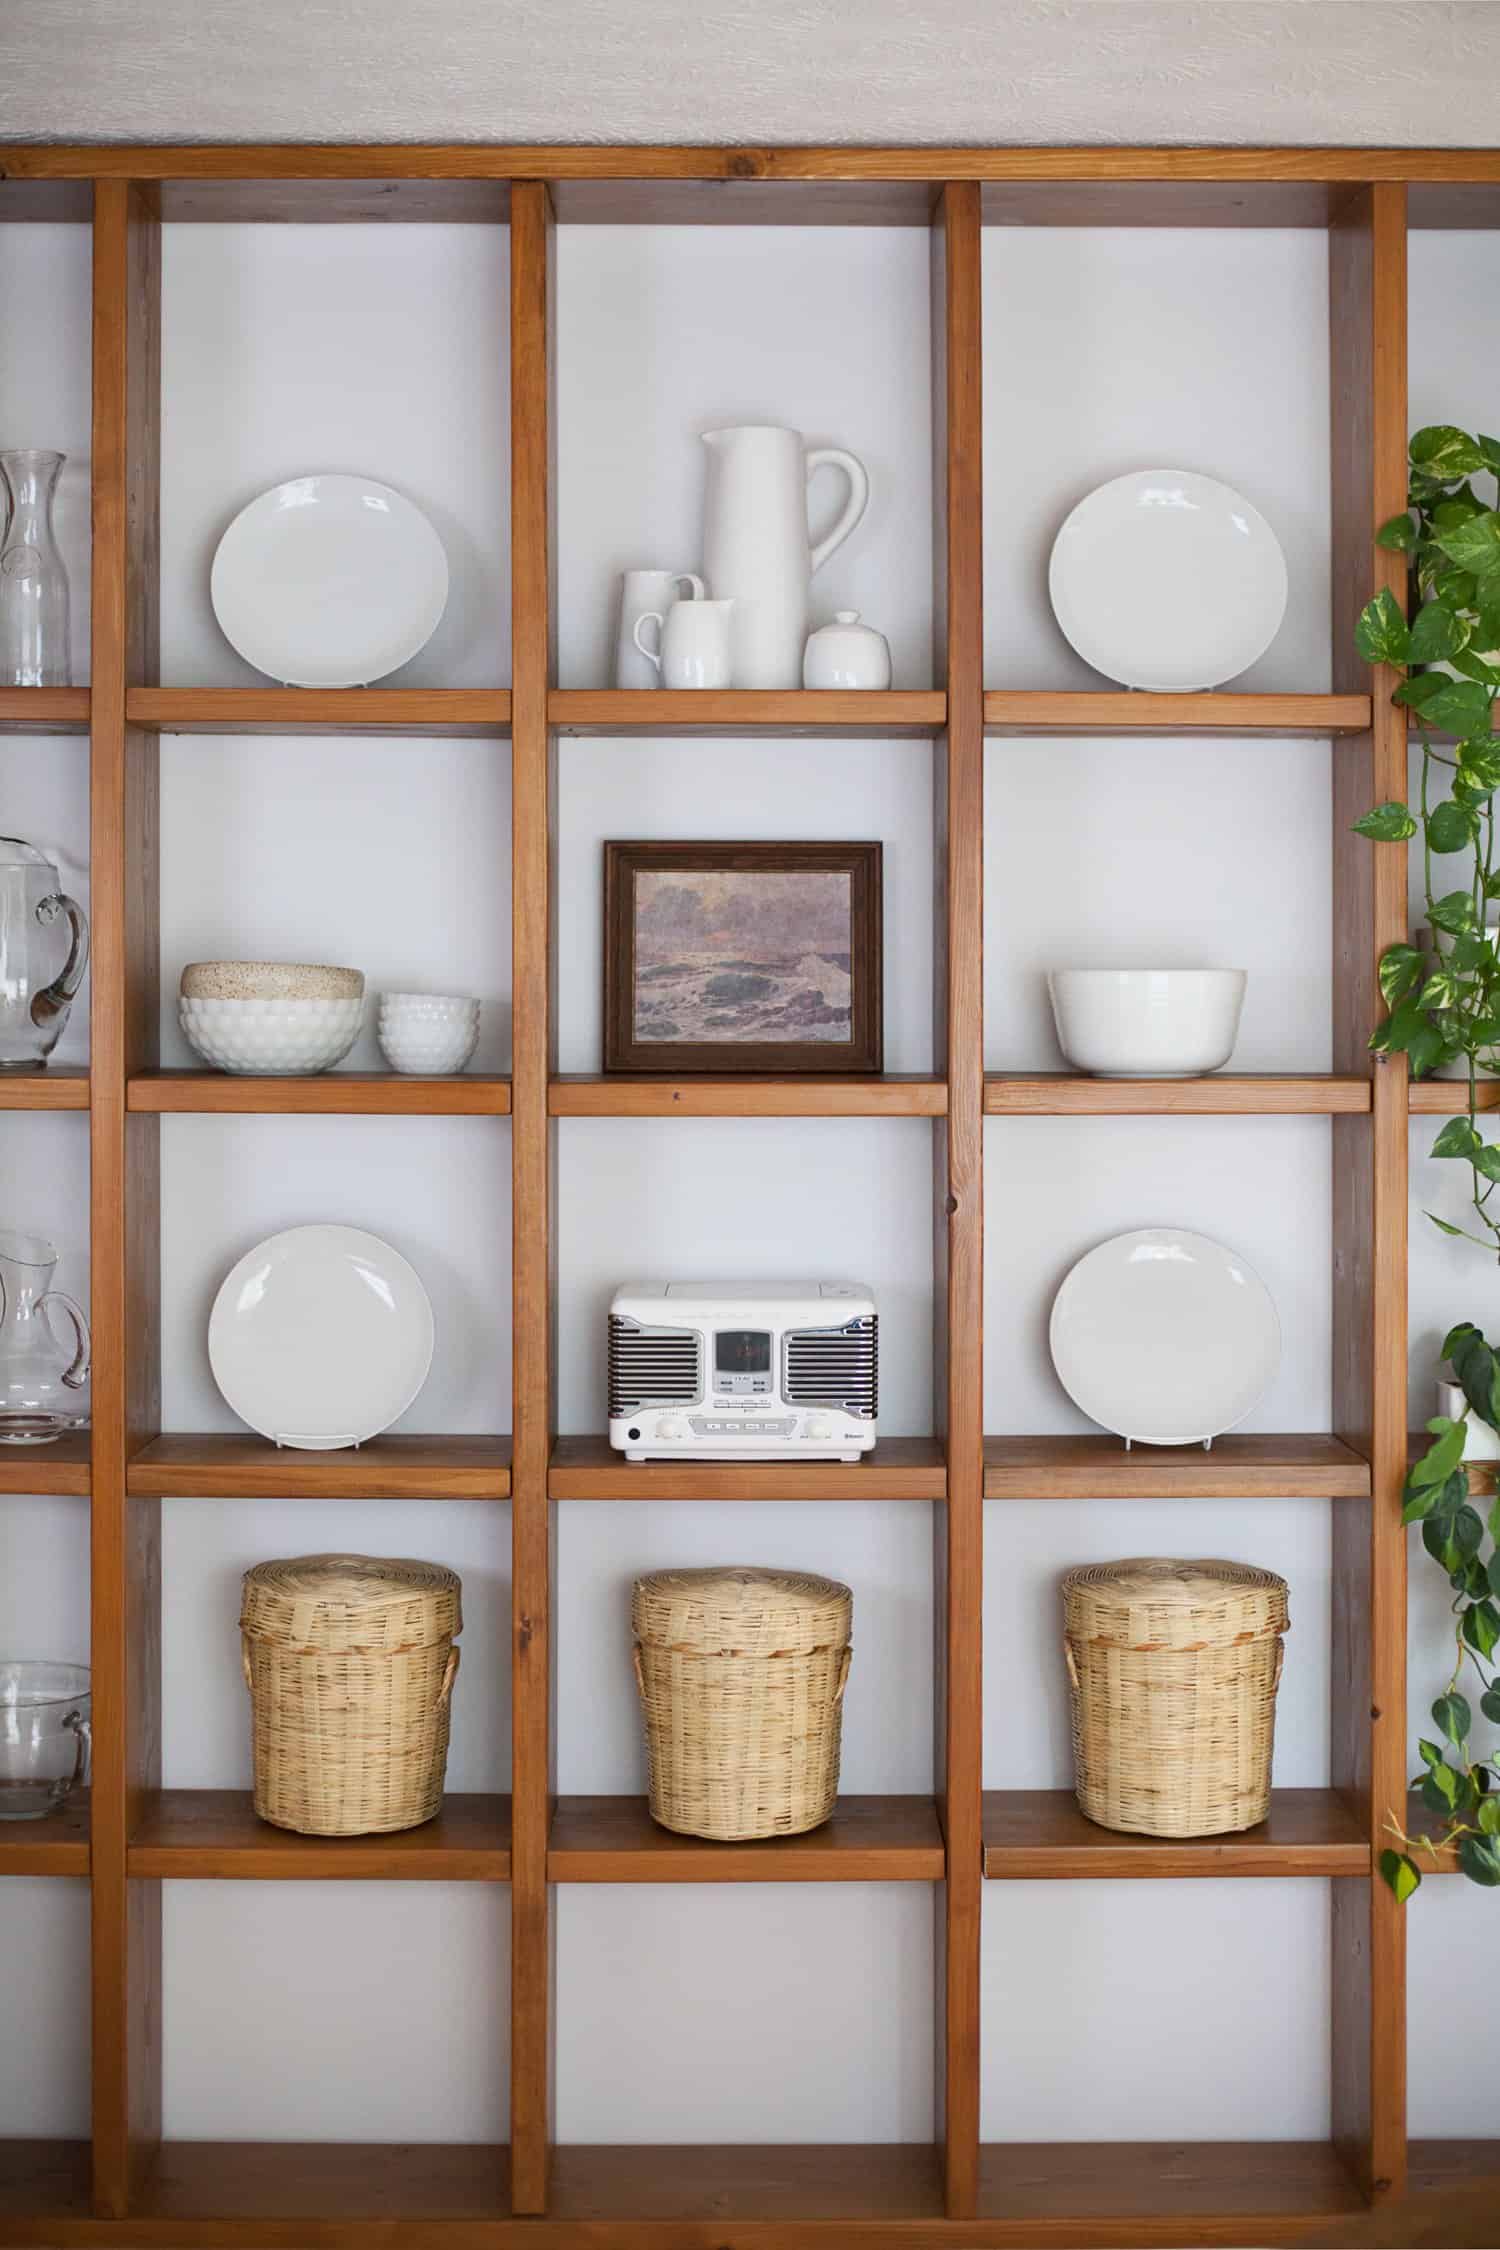
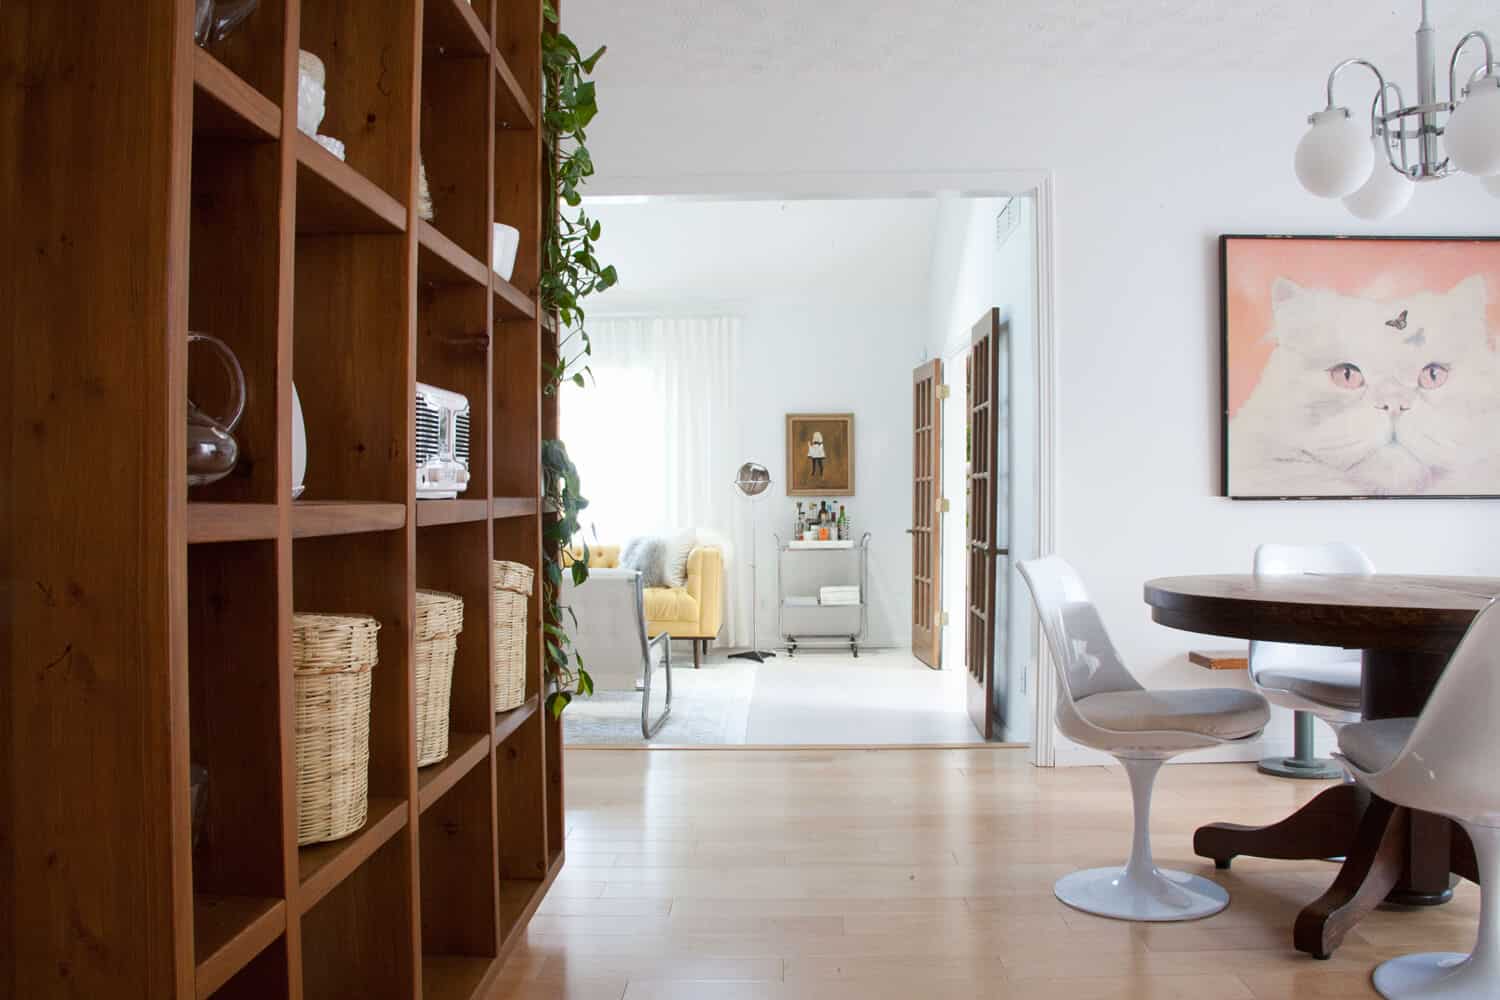
While I did lose some hefty pantry storage from the large cabinet beside the refrigerator, the new shelves provide a convenient place to store prettier things like my jars of dry goods and less frequently used serving dishes. (You’ll see some everyday dishes stored here currently because I haven’t finished the kitchen yet. They will end up on the opposite wall on a floating shelf, and more dry goods will replace them on this shelving unit.) As you can see in the floor plan above, we added a pantry around the corner from this wall of shelving. We’ll store less frequently used food and appliances in that pantry, while we’ll be storing our most regularly used food items on this wall of shelving in baskets, jars, and bread boxes.

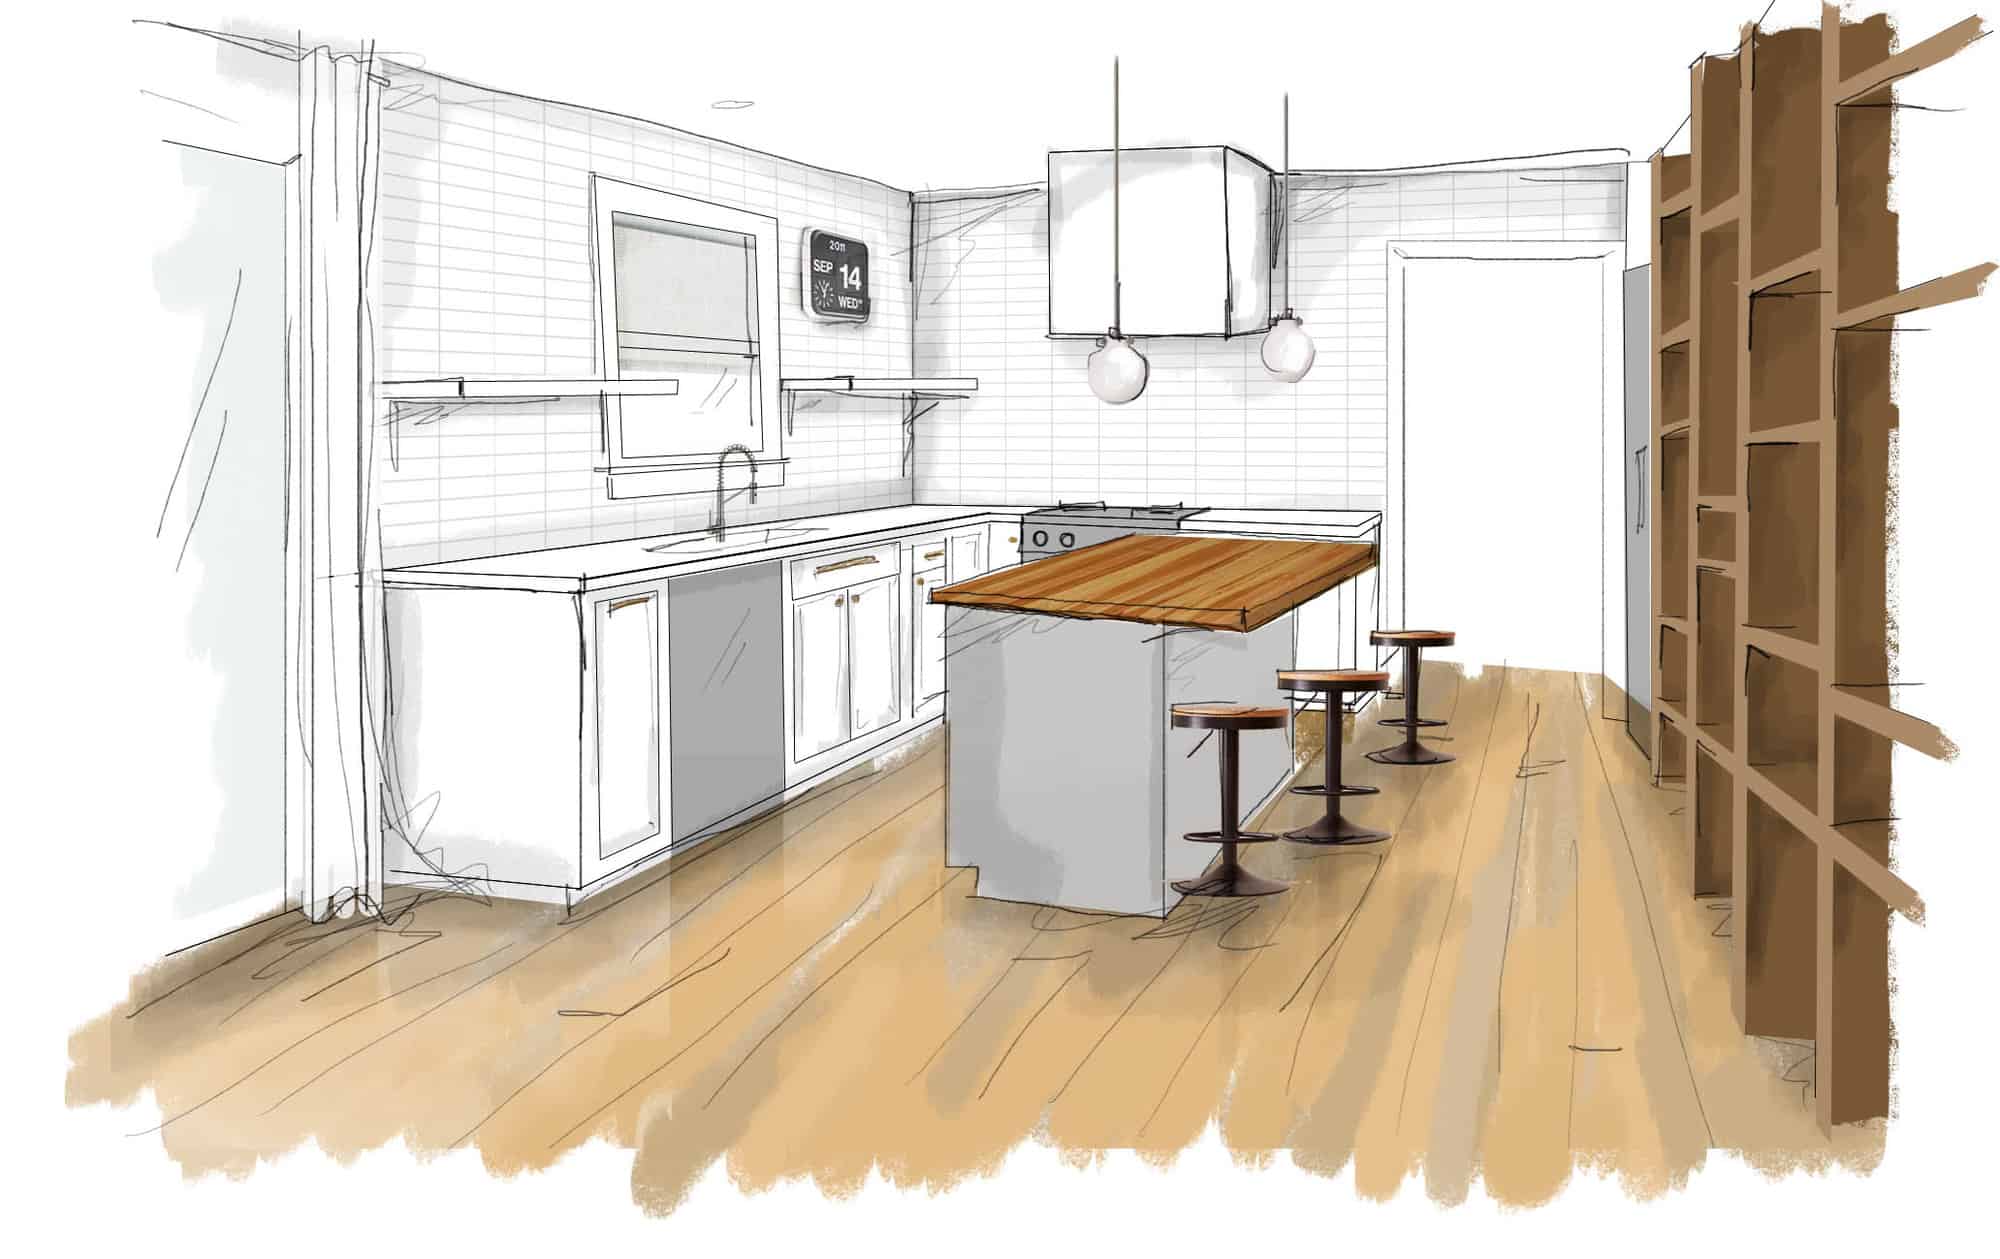
When I originally planned our kitchen renovation, I had planned on incorporating grays, whites, and wood tones, using gray on the island and possibly on this wall of shelving. (Below is the drawing I made before we began demo on the original kitchen.)
 The problem with my plan was the substantial expense of the lumber needed for such a big wall of chunky shelves. In the end, I decided to use construction-grade 2×10 boards from a local lumber yard, each 8′ board costing me only $10.33 each. Buuuut, the catch is these boards are often heavily damaged with chunks missing from the corners, unevenness, gouges and knots on the face, and, the worst of all— warping.
Lucky for me, I’ve made friends with the guys at my favorite lumber yard and they offered to pull down all of the 2x10s in stock with a fork lift and search through each individual board to find the clearest and cleanest boards for my project. They still weren’t all perfect, but I was able to work around the damaged bits by putting the rougher edges in the back facing the wall, and the nicer edges facing the room.
 CHALLENGES IN WORKING WITH CONSTRUCTION-GRADE LUMBER
I’m so glad I was able to execute this design without spending hundreds to a thousand dollars on lumber, but that’s not to say I didn’t put a lot of time and effort into making this construction-grade pine look its very best.
The sanding was by far the most time-intensive aspect of the project. In all, I spent over two days one weekend getting the uneven, heavily dented and damaged wood to be perfectly smooth. (More on that later.) After sanding, I realized I would need to rethink my usual methods of wood finishing to get the yellow pine to take on a tone more like teak. I ended up deciding against wood stain, instead using a multi-step process of conditioning, dyeing, and glazing to tone down the blotchiness and yellow tones that you typically get when staining pine.
The fitting together of the shelves was the most frustrating part of this project. I thought that I had selected pretty straight boards, but later I found out I wasn’t being picky enough. I ended up having to scrap at least two 8′ boards that had been painstakingly sanded and glazed, because I trimmed them too short when I was trying to make them compensate for the warped boards around them. (This was the biggest issue in my long vertical boards on the right section of shelves.) My advice would be to make sure your longest boards are as straight as can be, because if they are the slightest bit warped, it will give you hell later. If you must use warped boards, cut them to use for the smaller shelving sections.
You can see in the image above that the boards don’t fit perfectly in their place, but it’s good enough for me!
 PREPPING THE LUMBER
SELECTING YOUR LUMBER
I chose to work with construction-grade lumber because of its cost-saving potential, though I knew it would be tricky to work with. At all costs, avoid warped boards. It is not worth working with a beautiful piece of wood if it’s warped! If you’re trying to find lots of boards, like I was, you may end up not being able to get all of the pieces perfectly straight. But as I said before, cut the slightly warped boards into smaller pieces to use for narrow shelves.
After removing the warped boards from your options, I recommend looking for the pieces that are less chipped and raw at the corners, unless you want a very rustic look. When using 2x10s, boards with pretty corners all around can be difficult to find. Some of my boards were pretty rough with knots all over and even bark on the corners, but I situated the boards so that those edges would face the wall upon installation, and you can’t see those spots in the end.
You’ll also want to pay attention to the coloring of the lumber. Pine can have dark coloring in places, and this uneven toning only becomes even more noticeable after staining. Try to find pieces that are evenly colored, or as people in the biz say, look for boards that are clear. Also be mindful of boards that are heavily dented or have obviously uneven surfaces. This will be a huge pain for you when it comes to sanding!
SANDING
The first step to making construction-grade lumber look great is by sanding the living daylights out of it! I used a palm sander and began with 80 grit sandpaper. I sanded and sanded each board until there were no more chips, dents, or uneven spots. (This is why I recommend buying a large roll of sticky-back sandpaper, as you’ll go through loads of it and this form of sandpaper is cost-effective and easily changed.) After leveling the wood with the initial sanding, I went over each board again with 120 grit sandpaper to make it smooth and to remove scratches from the 80 grit paper. The first round of sanding was exhausting and took ages, but sanding with the 120 grit was thankfully much quicker.
Be careful when handling your wood! If you bump it into a corner, or even scratch it with your fingernail before staining, it will affect the way the wood accepts the stain. (The scratched and dented areas will appear darker, highlighting those flaws.) Treating the wood so gingerly is annoying but absolutely necessarily.
 FINISHING THE LUMBER
FINISHING STEP ONE: Apply a dye or stain to your wood.
After reading a lot about how to get pine to look its best, I decided to use a wood dye rather than stain. Wood dye is accepted more evenly by the pine, whereas stain is absorbed differently across the length of a board because of the density variances in pine. Another way to help the pine take color evenly is to use a wood conditioner.
I used Minwax pre-stain wood conditioner, let it rest for five minutes, then brushed on a coat of General Finishes light brown dye. (I used one and a half quarts of pre-stain and one and a half pints of diluted dye for all of my lumber.) After testing out the dye for the first time, I decided it was too dark at full strength, so I diluted it with water (which I could do because it’s a water-based dye). Below, you can see how I tried out different concentrations of dye and water to achieve the look I wanted, which ended up being the board second from the right. FINISHING STEP TWO: Seal the wood before applying glaze.
Apply one coat of polyurethane or polyacrylic*, then lightly sand down the wood with a high grit sandpaper, like 400-600 grit paper. This will knock down the little wood hairs that stick up after being moistened by the polyurethane, making the wood nice and silky smooth. The next time you moisten the wood, those hairs will not come up again because the wood has been sealed by the first coat of poly. After the finishing sand, you should brush or spray on one more coat of poly before applying the glaze.
*Polyurethane will slightly yellow over time, which is more of a concern when you are using it to seal white or very light colors. The yellowing is not so noticeable in medium to dark wood tones. I chose polyurethane over polycrylic because while polycrylic won’t yellow, it also doesn’t hold up as well over time because of the water-based chemical structure.
FINISHING STEP THREE: Glaze your wood to further mask the imperfections of the pine wood and to achieve the the exact color you want your wood to be.
MIXING CUSTOM GLAZES
After dyeing the wood, I began mixing custom glazes to take away from the reddish/yellowish tint of the wood (which is less obvious in the picture above, but looked pretty “off” and even a bit greenish next to the maple flooring in my kitchen). To make my glaze, I used artists oil colors mixed with liquin. The ratio I ended up liking was one 250ml bottle of liquin mixed with half of a tube of raw umber, one-third of a tube of Davy’s gray, and a touch of purple. (I mixed red and blue to make purple, but buying full tubes of blue and red is wasteful, so I don’t recommend doing that unless you already have the tubes.)
For the amount of wood I used, I needed two 250ml bottles of liquin, but when I began, I wasn’t sure how much I would need. So about two-thirds of the way through the glazing process, I had to mix up another batch. I think I did a decent job of mixing the second batch to look about the same as my first batch, but I would recommend making more than you think you will need at the outset, and storing any leftover glaze in a clean can. I still have some leftover glaze which I may use again in the future.
FINISHING STEP FOUR: Finally, after the glaze has cured for a minimum of 24 hours (yes, it does take that long to dry!), apply a final coat or two of polyurethane or polycrylic. This will protect your glaze from normal wear and tear.
 BUILDING THE SHELVES
Because your space requirements will vary from mine, I won’t be sharing specific dimensions of my space. You will need to do your own measuring and planning, but if you have any questions about specific sizes I used in areas of my shelves, I’m happy to answer in the comments below!
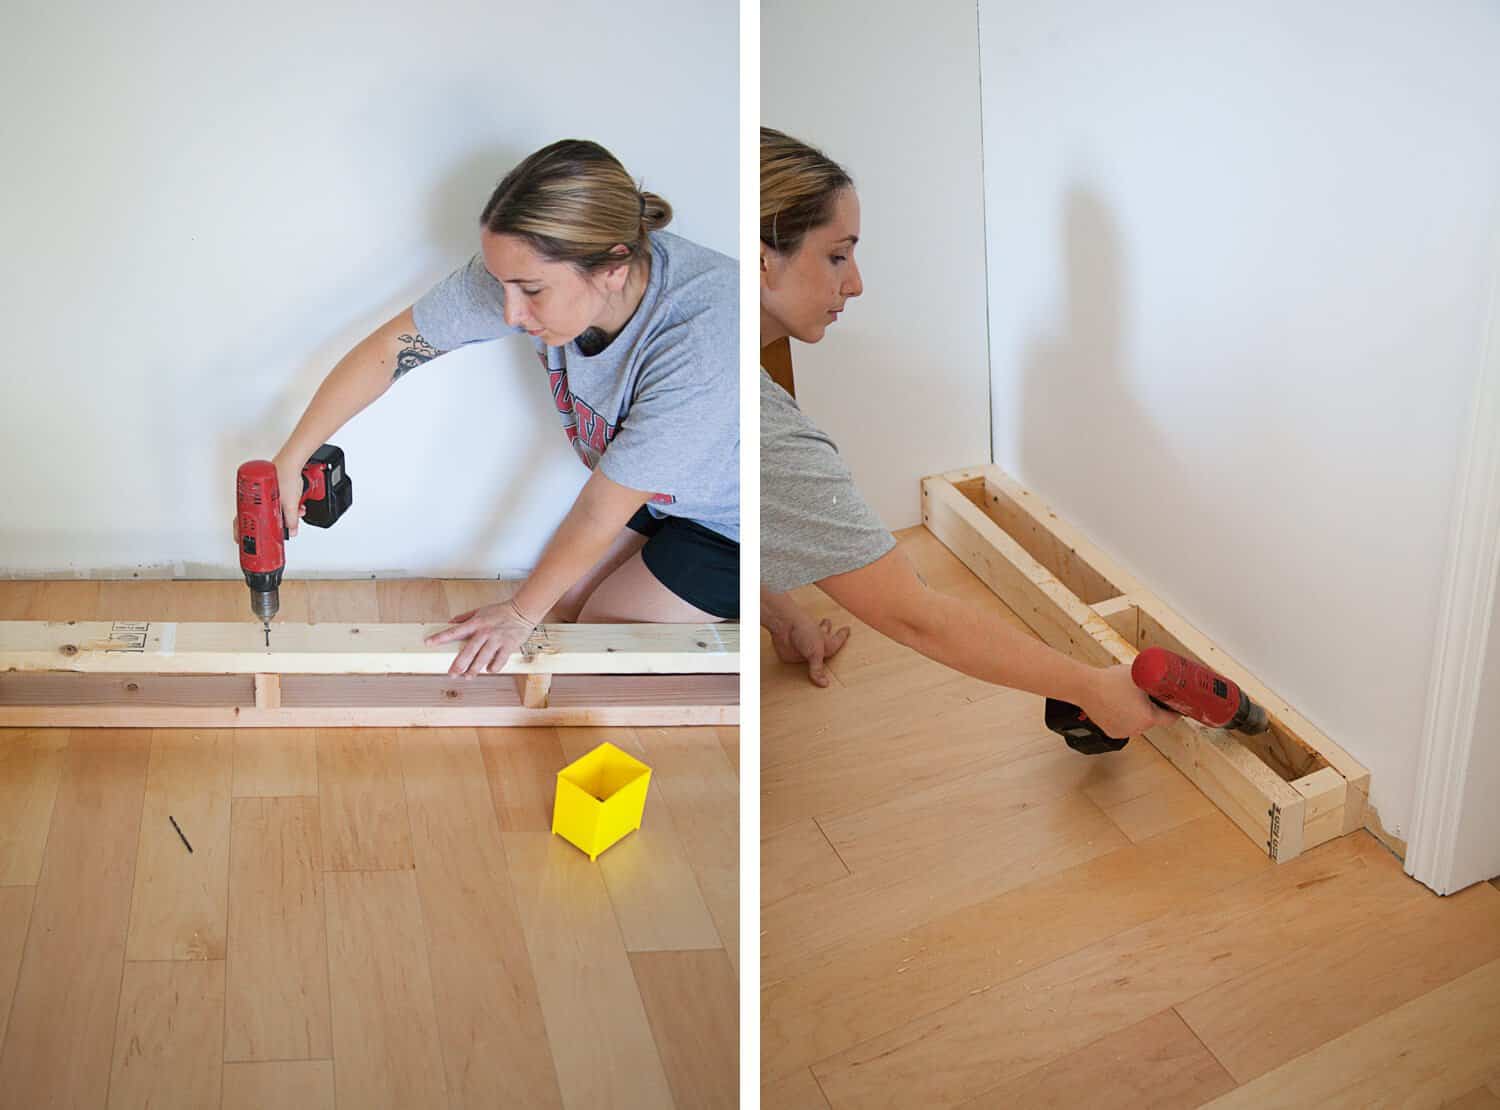
To get things started, I built a little toe-kick platform out of 2x4s (as shown above), which would lift the shelves off the ground to prevent stubbed toes, also helping to extend the flooring visually, making the shelves seem a bit like they’re floating, and less of a bulky intrusion in the room. I ended up covering the platform with painted lauan plywood, which is the same material I used on the face of our cabinet toe-kick area.
 JOINERY METHODS
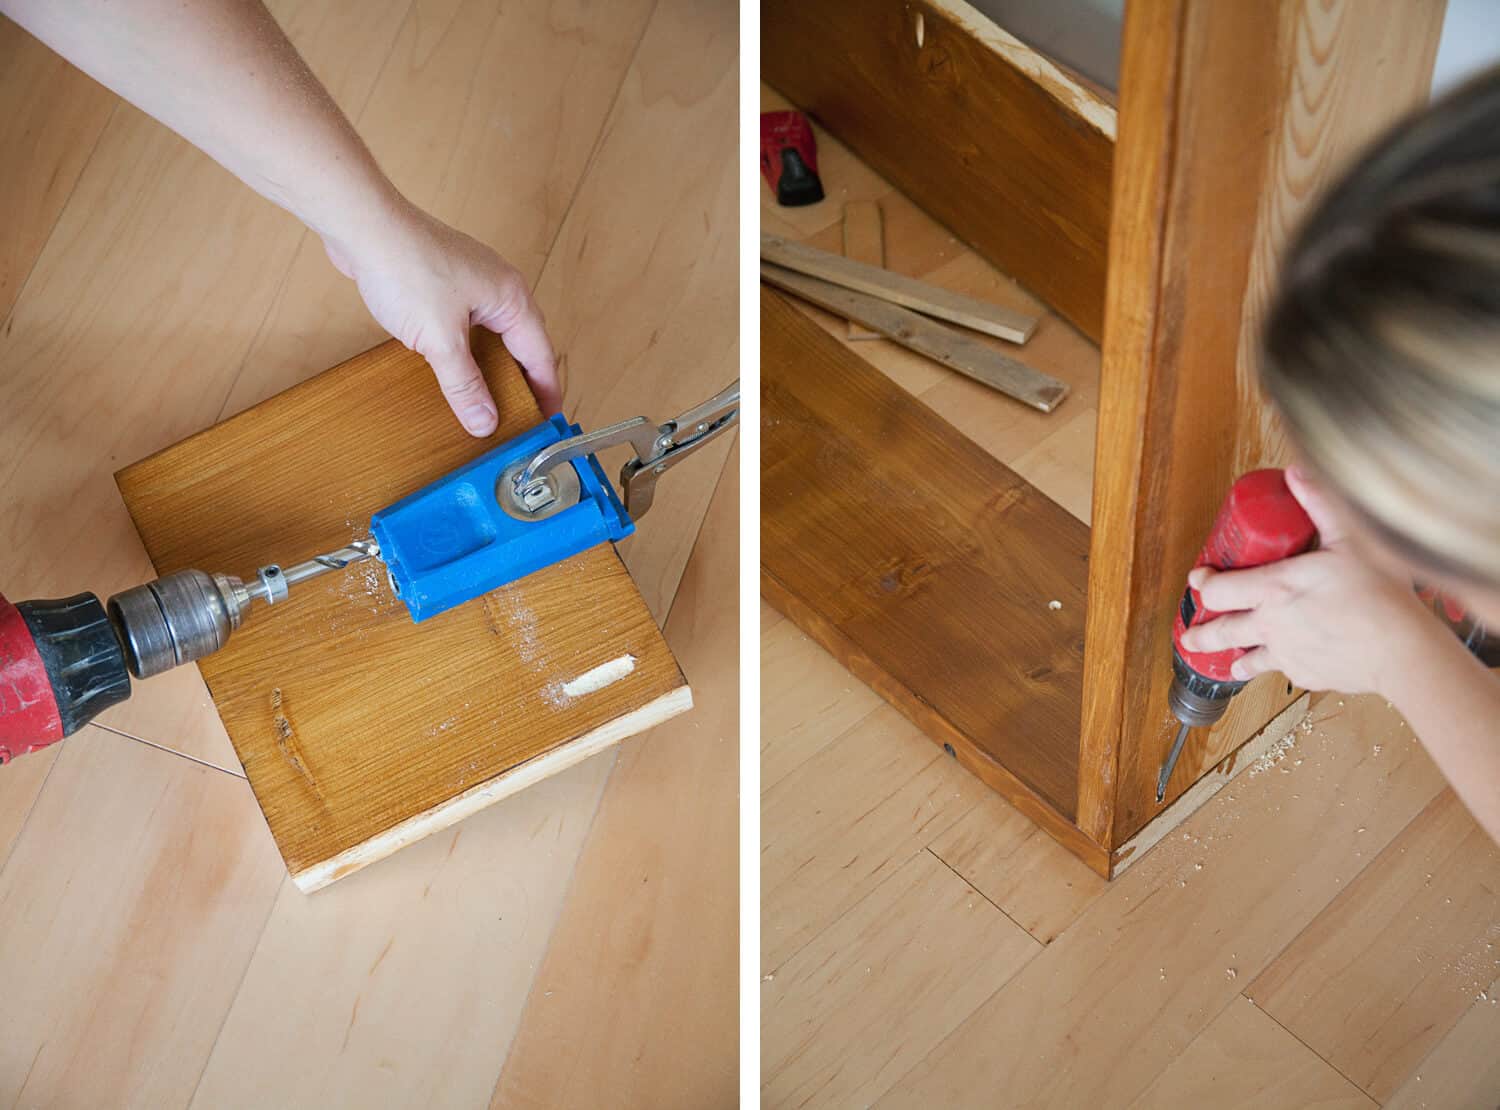
I used two joinery methods when building the shelves, and neither of them are fancy—pocket holes, and simply screwing directly through the perpendicular boards. (See images above and below.)
Pocket hole joinery is a great method for connecting wood in less visible locations. You just clamp on a jig which helps you drill precise pilot holes at an angle into the wood that you’re trying to connect to a perpendicular piece of wood. Kreg jigs are a great way to go, as there are a few jig options for smaller or bigger jobs, including clamps and even screws. (I usually just buy off-brand pocket screws from my local hardware store.) My advice is to always practice joining two pieces of scrap wood so you can mess up and learn your way around.
Typically, after drilling my pilot holes in the wood, I will clamp together the two pieces of wood to be joined before I drill in the screws. However, as you can see in the above right image, when you’re working with very long boards, this isn’t always possible. But you should still be careful to ensure that the boards are square as you connect them. (I recommended using a steel square like this for woodworking projects.)
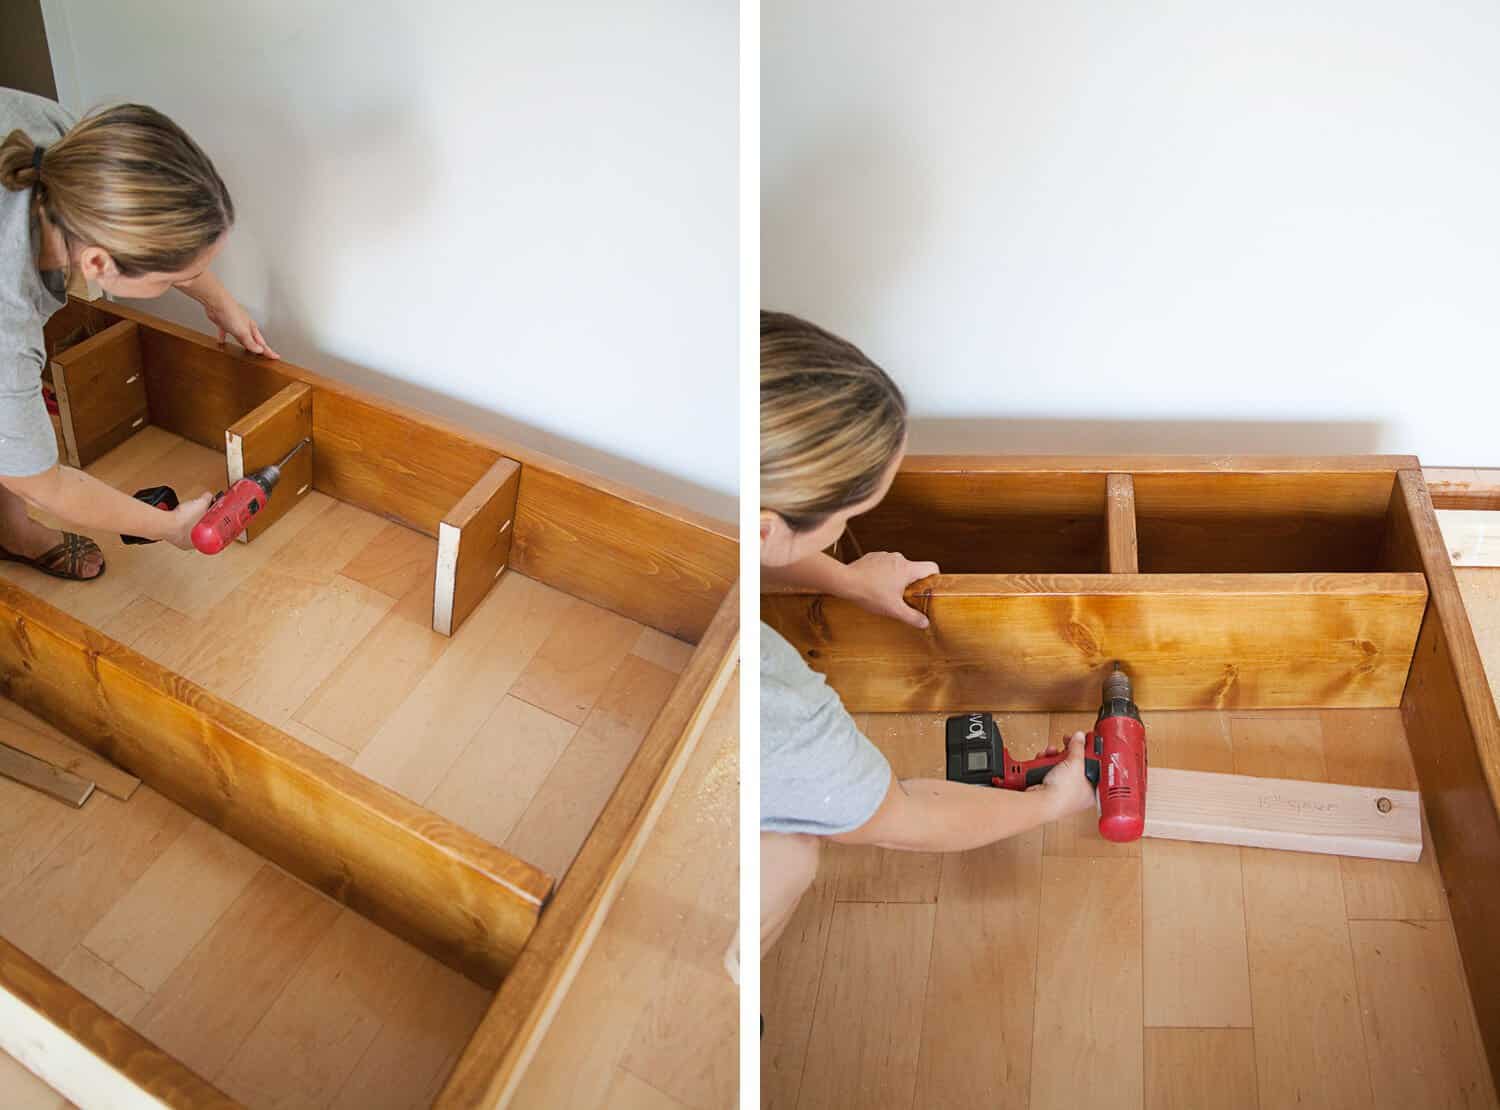 As I assembled my shelves, I made a point to use pocket hole joinery in the least noticeable places. For instance, I used pocket screws on the bottom of the bottom shelf to connect it to the verticals on either side of that section (which you can see in the image before the above one). I also worked from right to left, using pocket holes on the right side of a shelf, then placing the adjacent vertical board, and then screwing directly into that vertical board, since that screw would end up hidden by the next row of shelves. (See the above right image.)
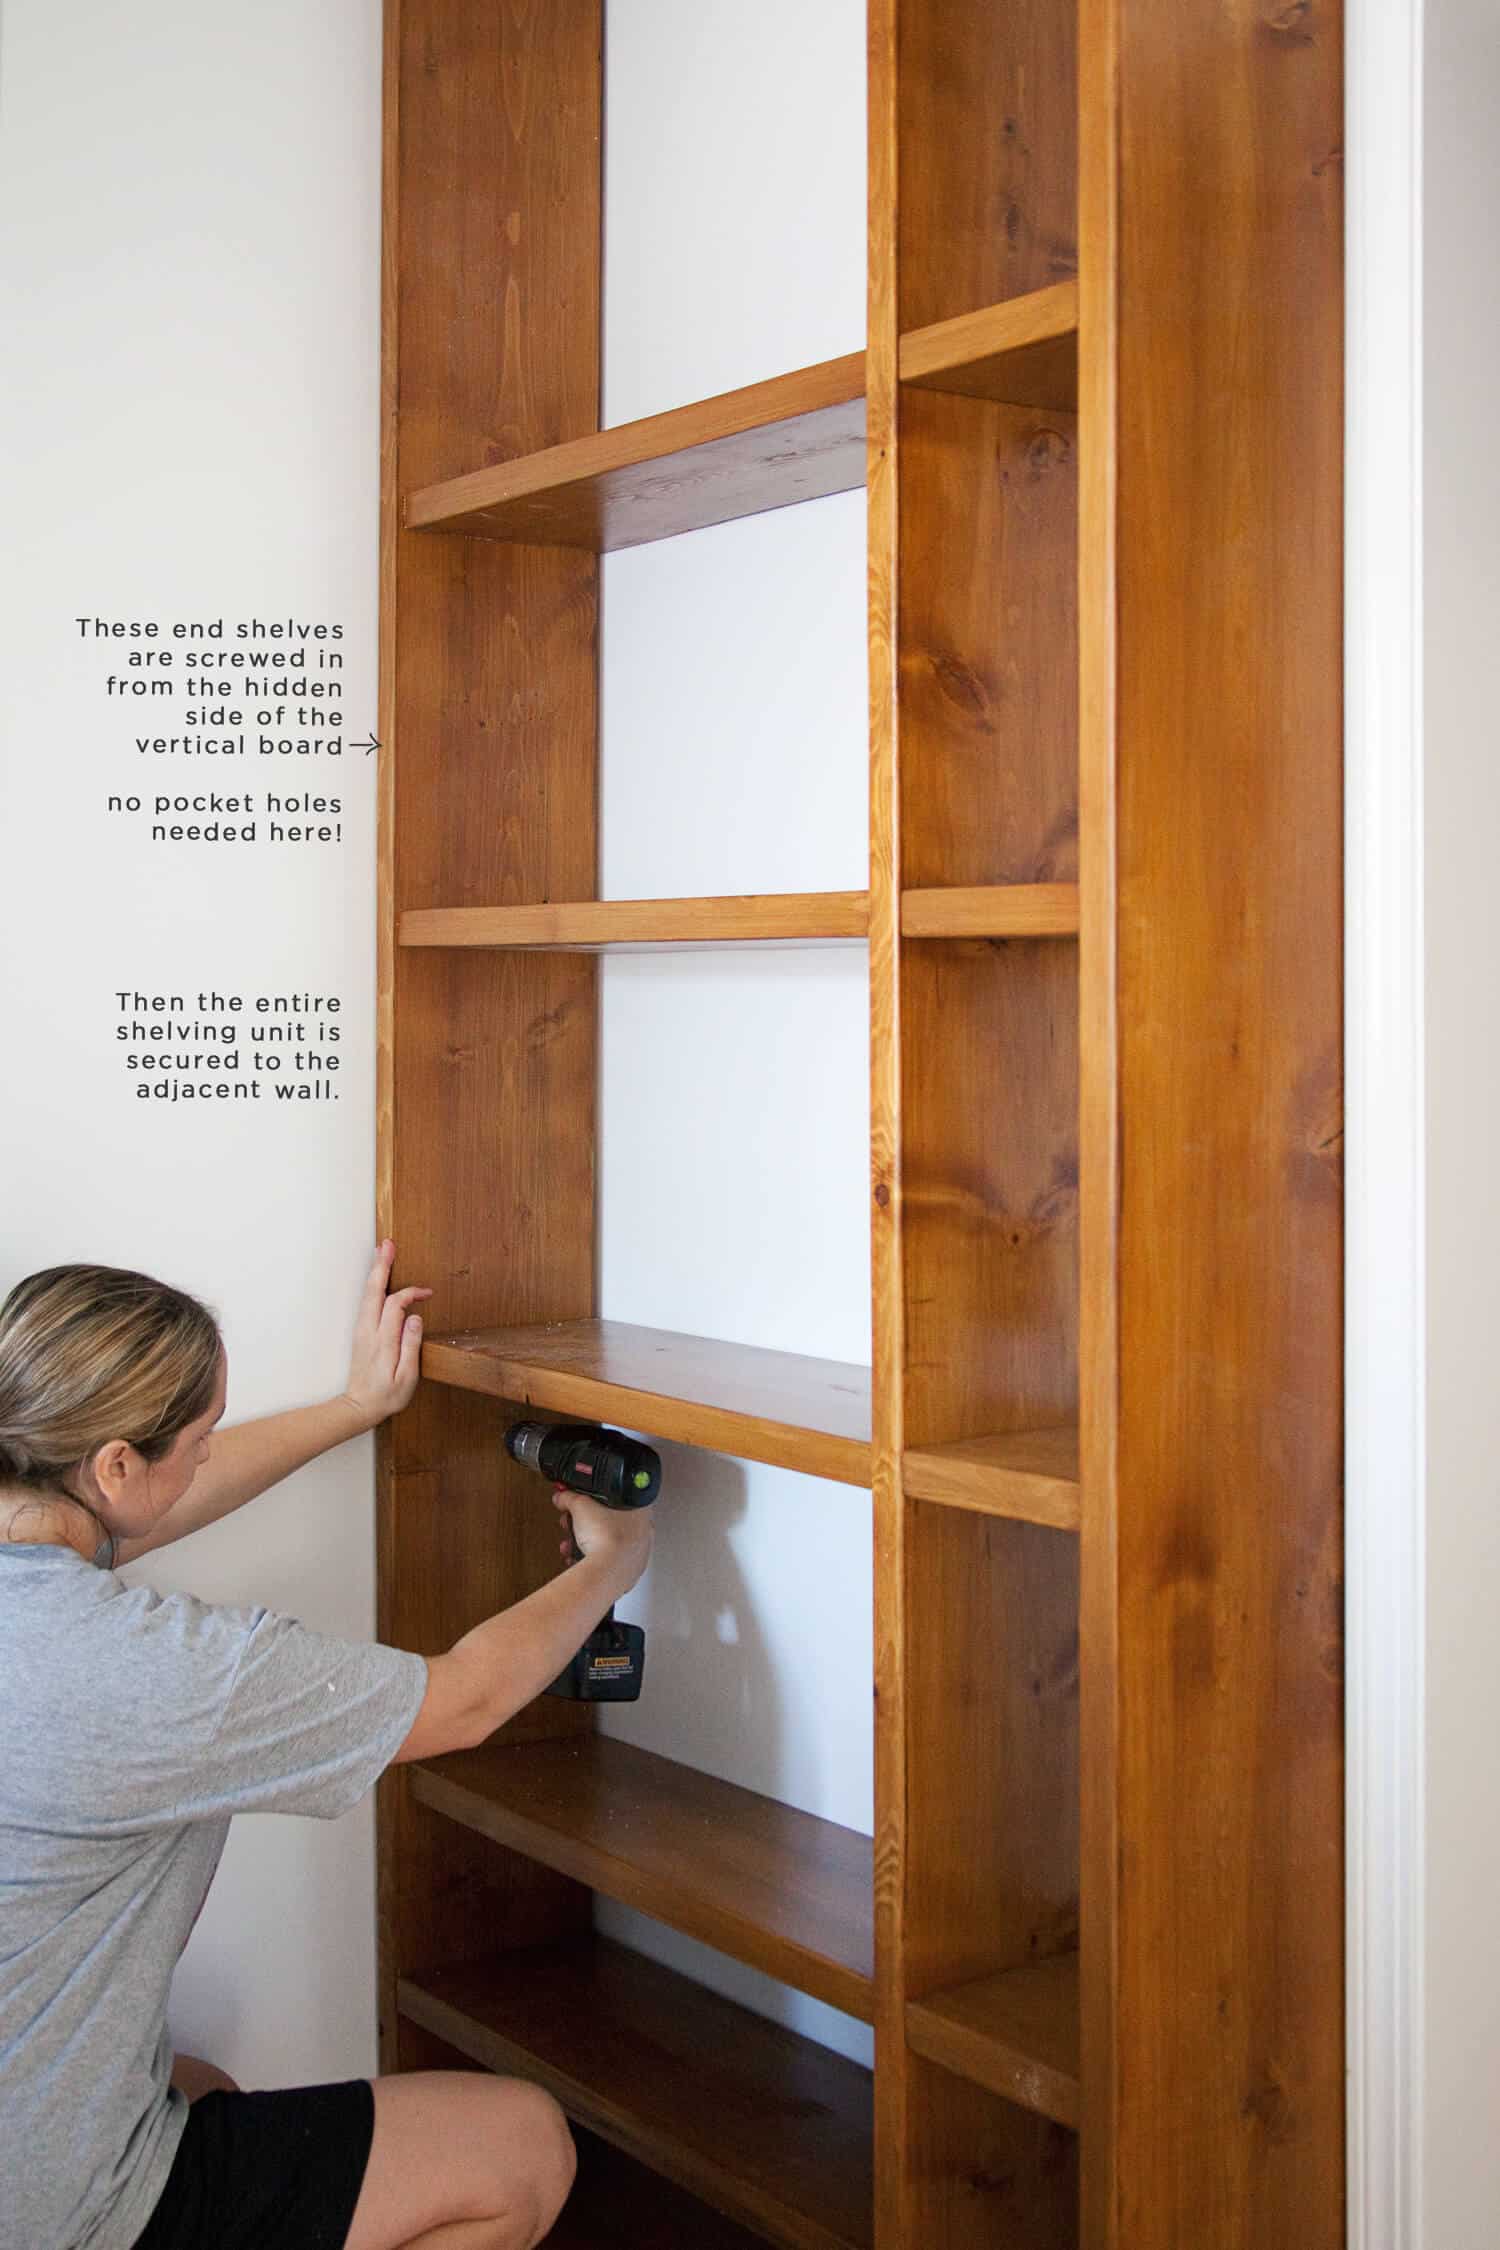
Once I worked all the way to the final left vertical board, I again screwed the shelves into place from the outside of that vertical board, so I wouldn’t have to use pocket screws on that side of the shelves. (See the image below and note that there are no visible pocket screws, because I drilled screws through the left vertical board and into the shelves.) Those screws are eventually hidden by the shelving unit’s placement against the adjacent refrigerator cabinet.
 I assembled the whole shelving unit on the floor, then had help lifting it into place. Thanks to my precise measurements, it fit very snugly between the ceiling and the toe-kick platform I had built on the floor—to the point where I had to use a sledgehammer (and a buffer piece of wood) to tap it into place. Then I screwed the entire unit into the adjacent cabinet as well as into the ceiling beams to secure it. (I countersunk those screws so they are barely noticeable.)
I built the whole unit in sections, beginning with the section beside the refrigerator, then moving on to the right side of the kitchen doorway, then joining the two sections by building more shelves above the doorway.
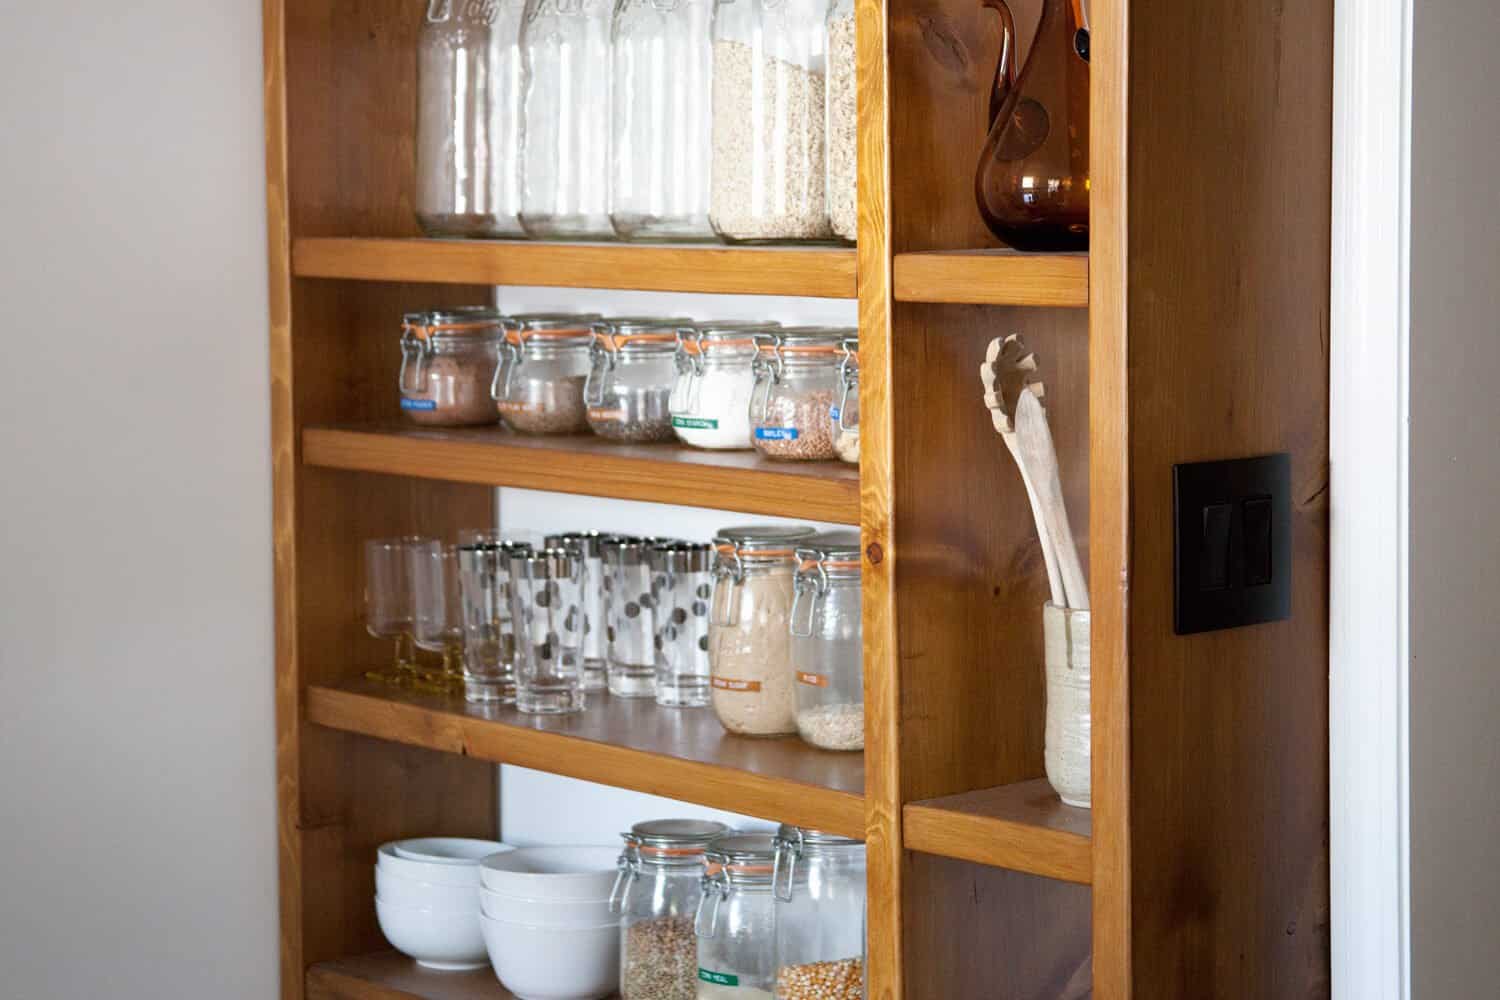 On a super practical note, I figured I should share one of the unexpected challenges of the shelving design: The two main light switches to the left of the kitchen doorway would be obstructed by the shelving unit’s placement. I had a few ideas to work around this issue, but then I learned about the shallow electrical boxes from Legrand which can fit right inside a shallow nook which would need to be routered into the face of the 2×10 board. It seems like magic, because when looking at the shelving unit from the front, you’d never know an electrical box is buried inside. But from the outside edge, you can see the two paddle switches that allow one to easily turn on and off the lights to the kitchen, without reaching around the shelf and behind my utensil crock each and every time!
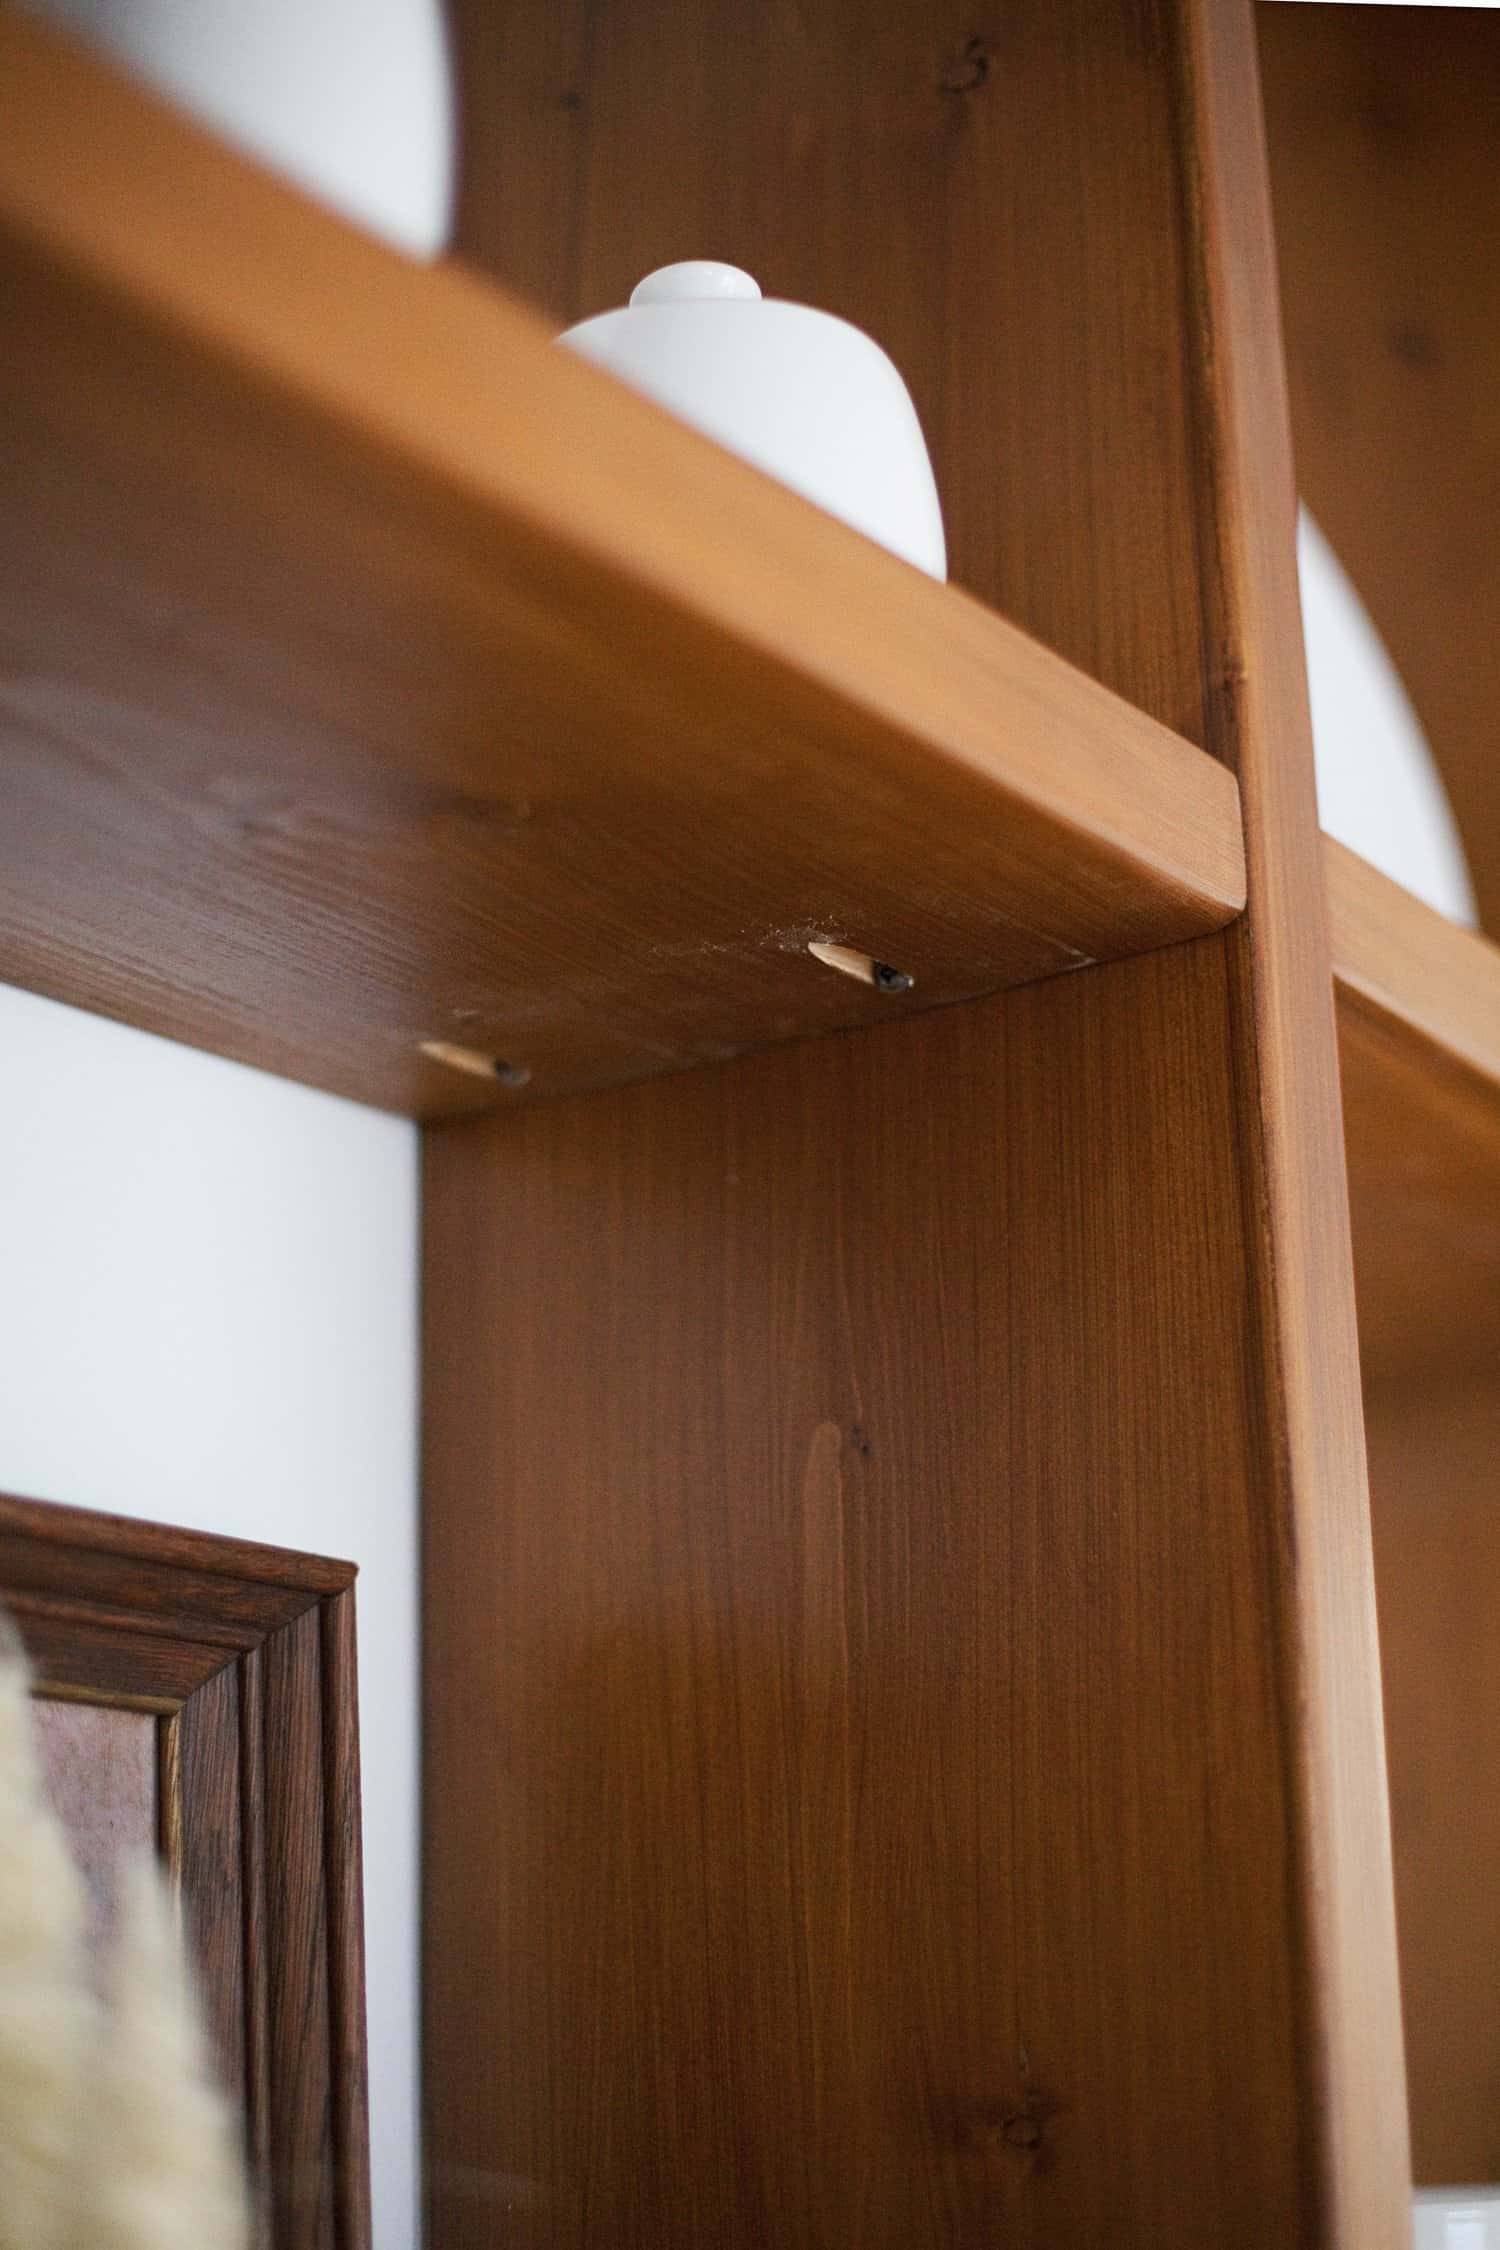
I’m so glad I found a work-around for this light switch issue! But I must add, the work involved in this solution was not a job I did myself. I gladly stepped aside and let my engineer Daddio do all of the routering and wiring involved. (He did practice on a scrap piece of 2×10 before routering the actual finished shelving unit.) Then I finished up the job by screwing a blank plate over the old electrical box in the wall, which you can see if you look carefully at one of the earlier close-ups that show my jars and utensil crock.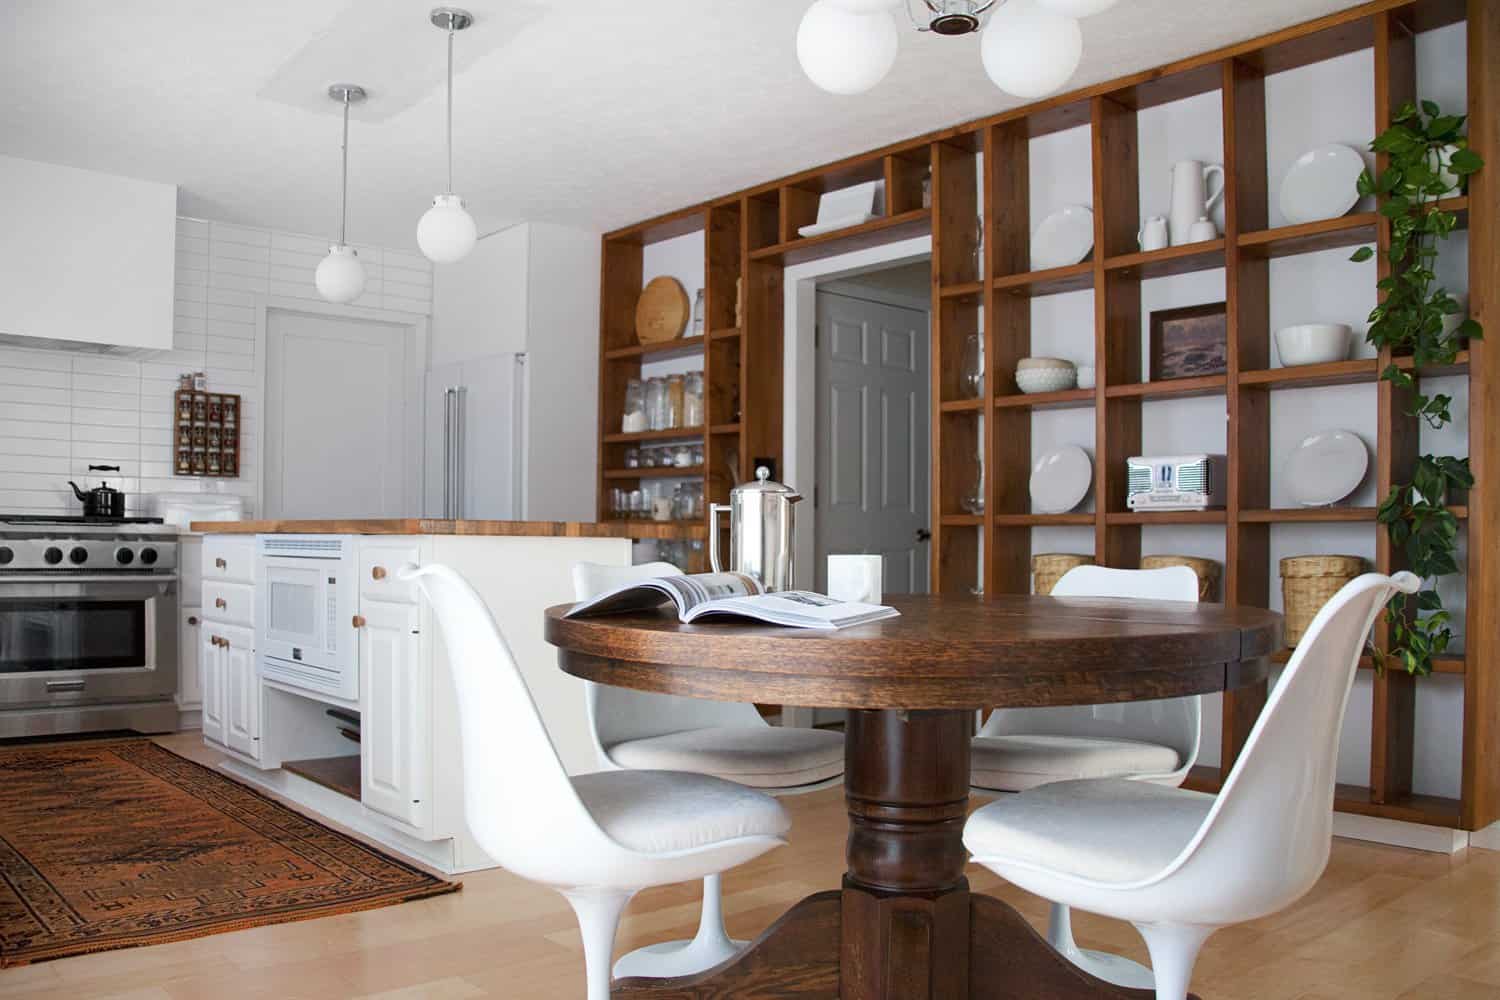 In the image below, you can see the pocket screws, which are technically visible in the shelving unit. Of course, I have the option to use stained pocket hole plugs or tinted wood filler to cover these holes, but I wanted the option to potentially move the shelves in the future, so I decided to leave the screws exposed. They are barely noticeable unless you are are child or are looking up at the shelving unit while sitting on the floor.
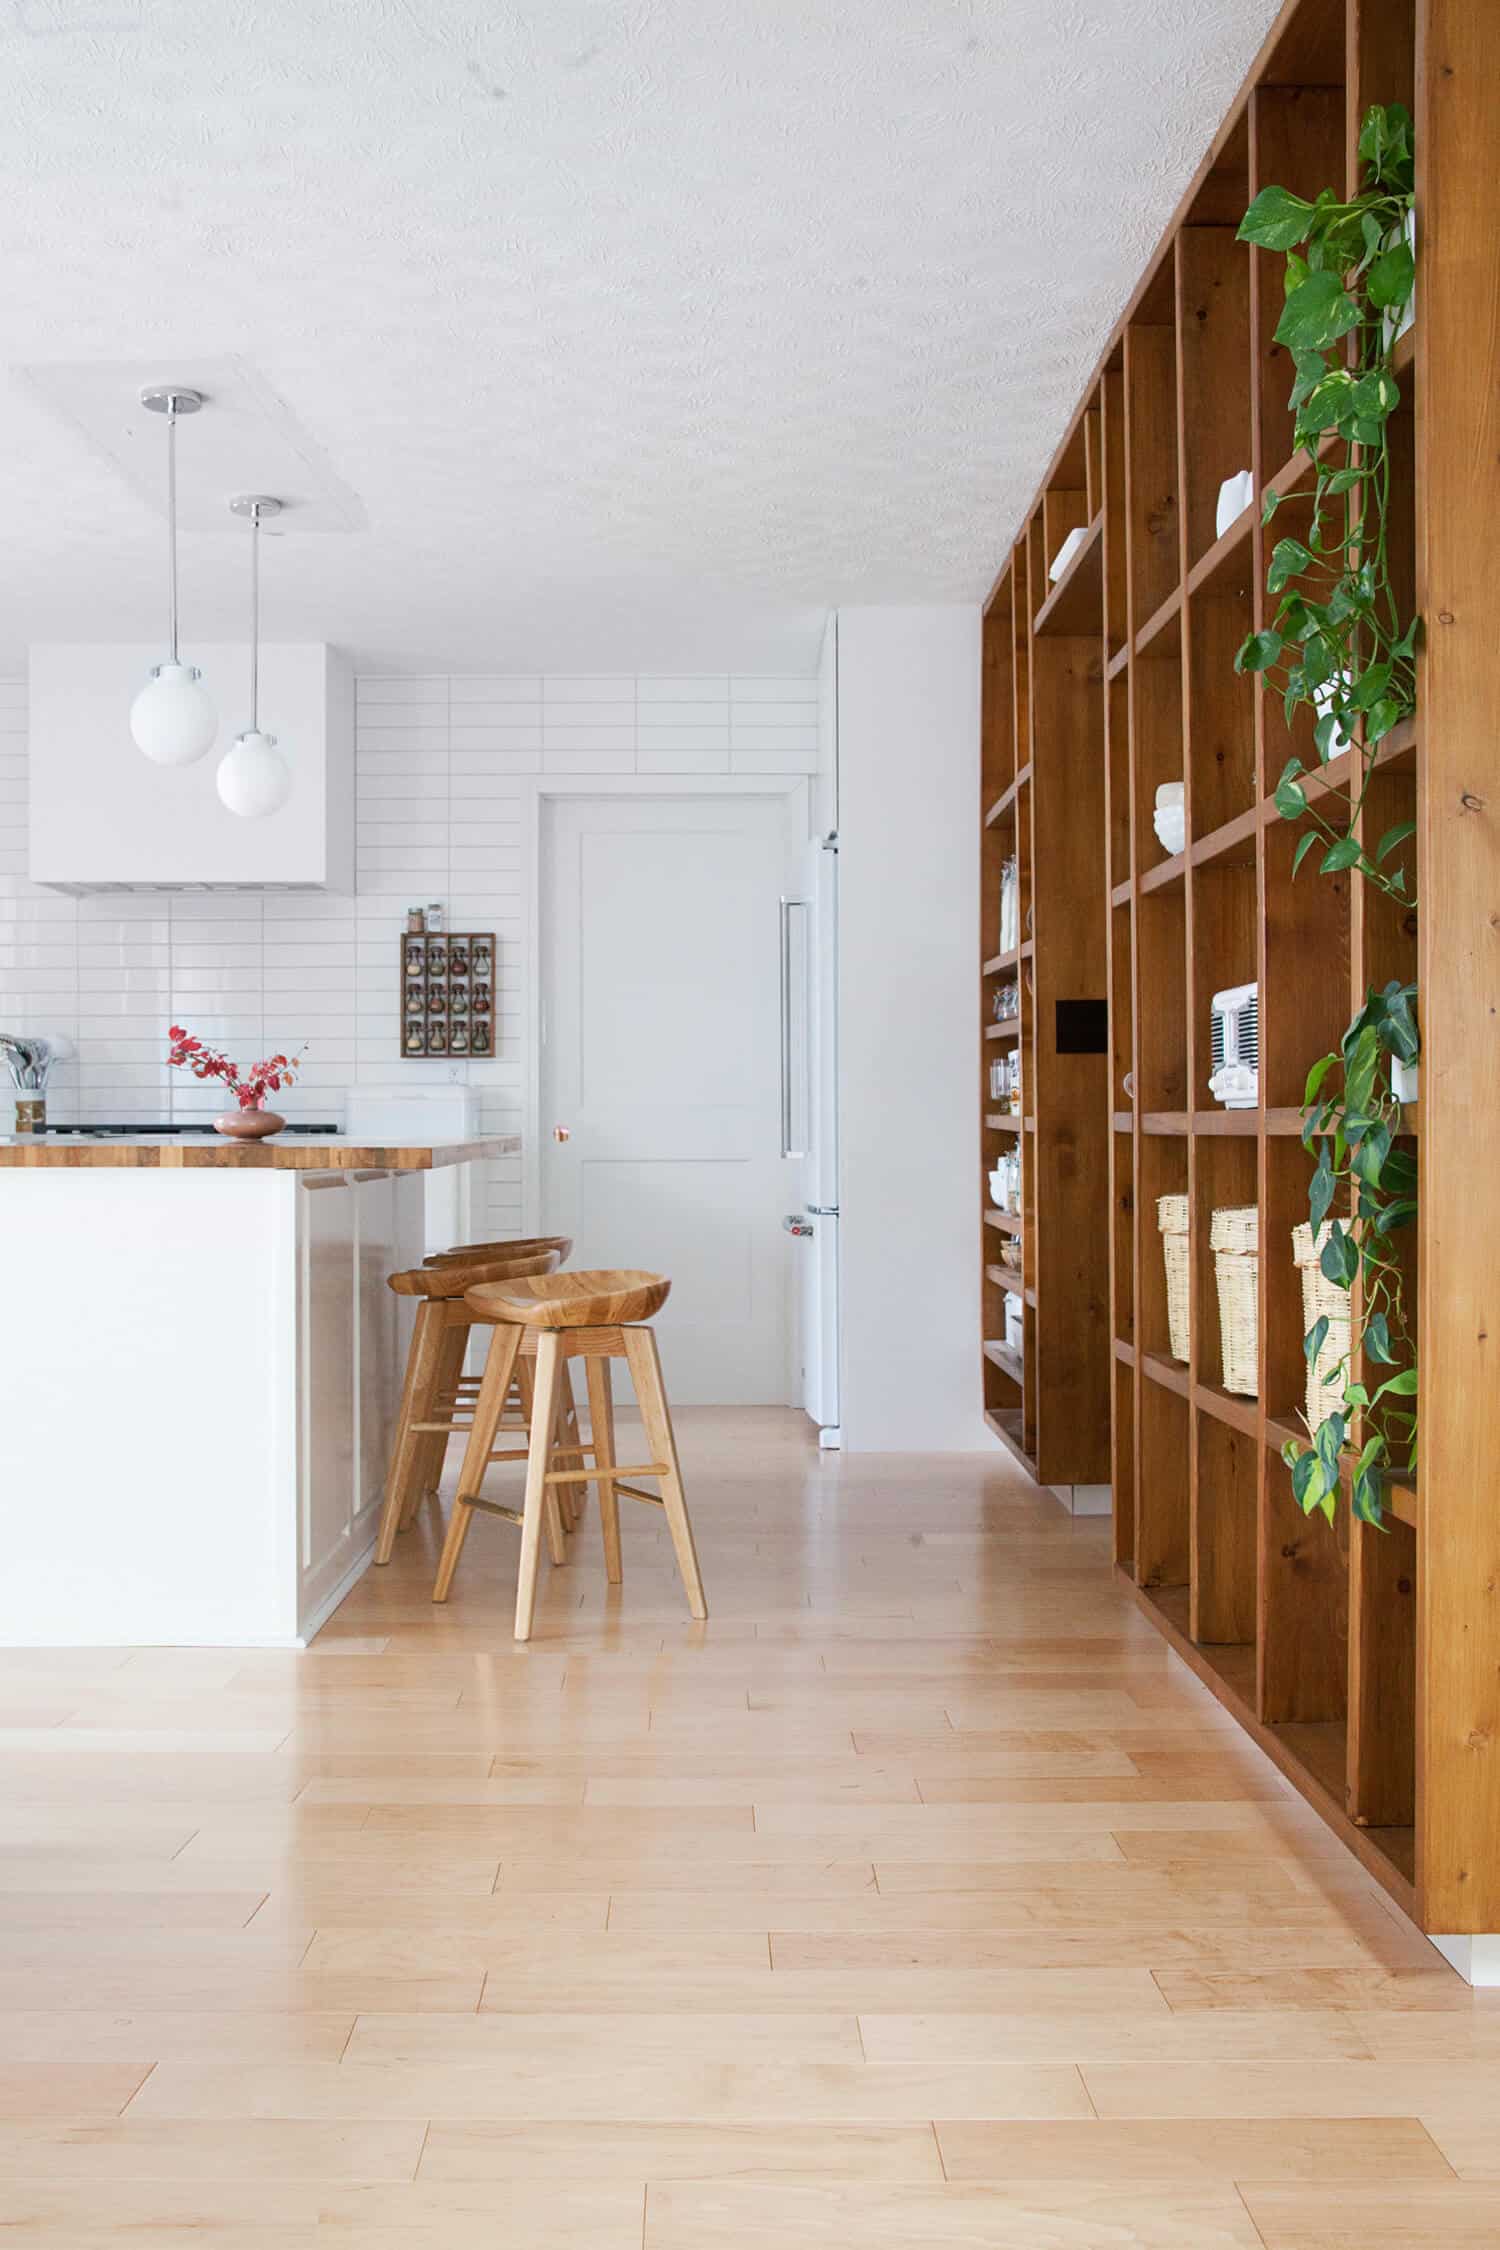
 After this project was finished, I was ready to take a bit of a break from house projects. So much work! But if I could go back in time, I would definitely do it all over again! Sure, I’d jump at the chance to hop in my time machine and not mess up those two pristinely finished 8′ boards that I had spent hours sanding and finishing … but as far as everything else goes, I’m really happy with how the shelving unit turned out, and I think it really rounds out the kitchen and dining space quite nicely!
If you all have any questions about this project, please reach out in the comments below. I’m happy to help in any way I can! – Mandi
Kitchen Material and Product Sources:
Wall paint: Benjamin Moore’s Super White
Cabinet paint: Annie Sloan’s Pure White
Wall tile: Home Depot
Tile grout: TEC Silverado
Pink sink: Thermocast
Faucet: Kraus from Home Depot
Island butcher block: Lumber Liquidators sealed with Waterlox
Flooring: Lumber Liquidators maple engineered wood
Knobs: eBay
Stove: KitchenAid from Home Depot
Refrigerator: KitchenAid from HomeDepot
Bar stools: Sold out at Target— similar here
Dining table: vintage
Dining chairs: LexMod
Cat poster: vintage
Round lidded baskets on shelving wall: Xinh & Co
Kitchen radio: TEAC
Lighting: Hinkley Congress collection
Food storage jars: Le Parfait
Flooring: Lumber Liquidators
26 Comments
This looks soooo good, and the wood works perfectly with the white walls and cabinets! I love your kitchen!
https://www.makeandmess.com/
Mandi you’re so handy, I im in awe ! Beautiful work – and I like it even better as it’s living proof that women rule !
Ha! That’s right! A woman’s place is in the kitchen…. building the cabinetry. Amiright?! 😉
Those shelves look amazing!! I never would have guessed that wood was pine. You really nailed that beautiful teak color! I wish I had room to do something like this in my kitchen, but this project is way above my skill level so maybe that’s for the best.
OMG THIS IS AMAZING. Well done!!!!! Totally transforms your kitchen and now I’m itching to transform mine! (don’t tell hubby) 😉
Looks great! Where is the white refrigerator from? Thanks!
This is a counter-depth KitchenAid refrigerator from The Home Depot. We love it! Stylish and loooots of storage.
Oh my gosh, that is beautiful! I would seriously consider adding this to my next kitchen.
Mandi! I am so impressed with your construction and woodworking skills. This shelving looks beyond amazing and I’m inspired to take on a big project like this on my own now! Thanks for sharing!
Thank you! And that’s so nice to hear that it encourages you. Just a few years ago I wasn’t very comfortable with a power drill, much less making something like this. But each project teaches something new and gives me more confidence! You never know what you can do until you try! 🙂
The wall looks crazy neat. And it’s so well constructed too, just like store-bought. Never would’ve thought it was DIYed. Great job! 🙂
Charmaine Ng | Architecture & Lifestyle Blog
http://charmainenyw.com
I am in the process of renovating my kitchen! and I am considering to get a pantry space. This is perfect ! I am sending this link to my husband for final approval !! yayayaa
Thanks for the great post!
http://www.simplenchic.com
Wow, great job! Such a different to the space with cool wood shelving. I love how you did it all yourself – awesome!
http://www.shessobright.com
I love diy!!!
https://thepinkpineappleblog.blogspot.com/2017/12/milan-fashion-week-day-1.html
Those shelves are beautiful! I’m obsessed!
Paige
http://thehappyflammily.com
Wow what an amazing DIY! Don’t know if I would have the confidence to tackle this just quite yet, but has definitely given me inspiration!
You’re a total boss, Mandi!
That is an AWESOME project – and the most amazing thing is that you did all the work yourself!! Very inspiring, for sure! Gorgeous kitchen!!
Best ABM DIY since Laura’s cat house – AMAZING work!
Looks really beautiful…..
You have a creative mind…
While I’m not in the market to build shelves myself, I GREATLY appreciate the care and detail you put into this post. I actually feel like I would have the confidence to accomplish this. You answered all the questions I didn’t know I had AND in my budget!!! Great job!
Hi, I would like to know what software do you use to design those sketches. Thankss :)))
Where’s the messy part!? Ha!
Beautiful work…thanks for the detailed post!
I needed a little inspiration to kick start my project. 🙂
I love this! Would you consider your coloring and finishing techniques from this project and apply it to the diy dining table?
Amazing! I like how the colors are blending in with the rest of the kitchen. This shelving looks space saving and practical!
Hello,
Do you do you the sanding outside? I live in NY so I don’t have a back or frontyard so trying to figure out the best place to do the sanding and dying.
Thank you.