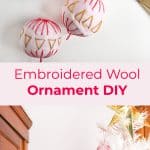
 This post was 100% inspired by the wool dryer balls I bought online last month! I had the pack of six sitting in my studio for a week before I finally remembered to use them, and one day it just hit me that they would make the perfect base for embroidered ornaments. I ordered some cotton candy colored wool roving from one of my favorite wool suppliers on Etsy, picked out some embroidery thread, and searched for some pattern inspiration online. I ended up with some lovely handmade ornaments that are not only adorable, they won’t break when a toddler (or cat) swats one off the bottom branch!
 Supplies:
-8 oz of merino wool roving per 8-10 large balls
-4-6 skeins of embroidery thread in coordinating colors
–sharp tapestry needle
–1 pair of hosiery (not shown)
–peppermint or fir needle essential oils (optional)
-scissors
-washing machine
 For 8 ornaments, you’ll be using about 8 oz. of wool roving. Separate your roving into 8 separate sections, but don’t use scissors to cut them. Instead, gently pull them apart so the fibers separate naturally. Each section should give you about 1 oz. of wool.
 Pull your first bundle of roving gently apart until you have three or four separate 2′ lengths. Then widen these by gently pulling them apart widthwise so that you can see through them. The wispier the strands, the easier they’ll blend with the others and felt together.
 Hold one end of your first strand and fold it over on itself twice. Then firmly pinch in the sides and fold it over on itself again. Keep pinching the sides in and folding it over on itself to create a firm ball shape. It won’t be perfectly round at this point, but do your best.
 Once you’ve rolled all of it up, add another strand of wool and keep rolling in the same direction. If it is getting too tubular, try using thinner strands.
 Roll a third strand in a different direction and a fourth strand in another direction. Keep adding thin strands (1/3 thinner than the one shown in the photo above) the fuller your ball gets.
 It should look something like this when you’re done. When it gets felted, it will shrink in size a bit. So keep that in mind.
 Repeat the process until you’ve rolled all of your ornaments.
 This is the fun part! Cut the leg out of one end of some inexpensive pantyhose. Bunch it up like you’re going to put it on, but instead, put your first wool ball inside. You don’t want to shove your ball down the whole length of hose because it’ll pull your wool away from your ball and create a funny shape. Once your first ball is in place, tie a knot. Then bunch up your hose, add in your second ball, and tie another knot. Repeat until you run out of room or balls.
Depending on your washing machine, you’ll want to use a small amount of detergent (soap or powder is fine) and set your washer to a hot setting. Throw your balls into the washer. The hot water and hose will agitate your wool and cause it to felt and shrink. If you’ve ever accidentally washed a favorite wool sweater in warm water or had it thrown into a dryer, you’ll know what happens next!
When your washer is finished, stick the tube of balls in the dryer with some towels or something else to help agitate it even more. The heat will continue the process of felting and will help your balls to dry quicker. This can be a 30-50 minute cycle depending on whether or not you’re drying other things too.
Remove the balls from the dryer and gently cut the pantyhose knots off. There should be fibers sticking through the hose. You’ll also have to gently pull the hose off of the balls. Remove all of the hosiery and discard. If you’re not interested in adding embroidery, you can simply thread a needle with some embroidery yarn to create a hanger, and you’ll have a lovely minimalist set of ornaments to mix in with your other shiny bulbs. Or bypass the ornament bit and you have your first set of wool dryer balls!
 However, you’ll never regret the hour it took to add that next level of loveliness in the way of starbursts and triangles. Thread your needle with 6′ of embroidery thread and tie a single knot in one end. Stick your needle into the felt and out about 1″ away and gently pull your thread until the knotted end pulls into the felt ball. This will hide your knot. Then start your star or triangle and keep adding more until you run out of thread. Finish your last line by stitching down into the felt and back out somewhere about 1″ away and then pulling your thread tight before cutting it as close to the felt ball as possible. When you release it, it should pull back into the felt ball. Stitch a hanger into your ball and you’re set!
I was inspired by a mix of mid-century starburst patterns and simple Scandinavian stitches. If you really want to delve into beautiful but simple patterns to add to your ornaments, you may want to flip through this book, Modern Folk Embroidery.

 If you’d like a scented experience, try adding a few drops of peppermint or fir needle essential oil to each ball before they dry in the dryer. You’ll come home to a beautiful tree and the fragrances that feel most like Christmas, even if your tree is artificial. –Rachel
Credits: Author and Photography: Rachel Denbow. Images edited with New A Beautiful Mess actions.
9 Comments
This is lovely x
Jessica — NinetyCo
The felt wool looks a bit like pink human hair when loose, haha! Anyway, this is a really cute idea for a softer look!
Charmaine Ng | Architecture & Lifestyle Blog
http://charmainenyw.com
I love this DIY! I love these decorations normally but now I can make them myself!
http://thatsmagsforyou.com
I ordered wool dryer balls 3 years ago and haven’t looked back! When I saw the first image that’s what I thought of first, so I’m glad you said it was an inspiration. They turned out so darling.
I love the duality of this project – you can make a set of ornaments for you and a set of dryer balls to gift!
What an extraordinary idea, and they look so beautiful! Well done!
https://www.makeandmess.com/
These are ADORABLE! Love the colors!
These look so cute! http://www.likehanna.com
So so so lovely, I love soft ornaments I know that might sound weird but they always just feel warmer and cosier
– Natalie
http://www.workovereasy.com
these are cute 🙂 I have a baby cousin that’s going to start destroying things soon, so these would be great and non-breakable XD