
That said, studios are ‘SPENSIVE! Like, whoa. So to counteract those big purchases, we’re doing as much DIY decor as we possibly can.
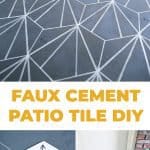
His studio has its own entrance in the back of our home. His clients and collaborators do typically use that entrance and park in the back when entering his space. So we decided to upgrade his entry as much as possible the #DIY way… starting with this faux ceramic tile. It’s actually just paint and Sharpie markers!
I’m really excited to share how YOU can do this DIY tile yourself, but first a fun before and after shot–

We recently had our entire exterior painted white, and it made a HUGE visual impact (I keep saying it’s the best renovation money we spent). The concrete slab is covered by a ceiling, so it doesn’t get too much wear and tear (ice, snow, rain, etc.), even though it’s an outdoor space. We initially planned to tile this small area, but after getting a quote, we decided to try a DIY option and saved THOUSANDS.
Can I get a high five?
OK, so the pattern we chose was heavily inspired by this Mission Stone & Tile pattern. I had a HUGE crush on it, but it wasn’t in our budget to get the real thing. You can see from the link that the tile can be laid in different patterns, unlike how we did it, which was more uniform. I love it both ways!
First, the concrete slab was painted with Valspar Anti Skid Porch & Floor in premixed Dark Grey from Lowe’s. Using a roller, this goes pretty quickly! As you can see, the paint is more bluish than grey. I was disappointed at first, but ended up really liking the color as the project went on.
Tip: Even though the color is premixed, I would suggest still getting it shaken at the paint desk.

First, start by tracing a 12″ hexagon on poster board using a ruler. Then with an X-acto knife and a straight edge, cut out the hexagon to make a stencil. The more perfect you can get the hexagon, the better. Aim for clean edges!
Next, start in one corner of the area, lay the hexagon down, and trace around it with an Oil Based Sharpie Paint Pen (we used white). Repeat the process by moving the hexagon stencil over and keep tracing, connecting it to the previous one.
As you can see in the last photo, we used two sizes of paint pens. A typical Sharpie size for the hexagons and the XL size for the lines within each hex. The oil based pens are extremely durable. We had to SCRUB the floors after the painters were done painting the walls and the white lines did not fade or wash off at all. We were unsure at first if a seal would be needed, but it was definitely not needed for our project.


I am so so happy with how this came out! For under $50, this painted floor really adds a LOT of personality to Jeremy’s space. It’s definitely not boring anymore!
If you guys try something similar, I would LOVE to see your versions tagged with #ABMathome on Instagram. And if you haven’t seen Laura’s painted patio DIY, you gotta see that as well. XOXO! Elsie
44 Comments
Looks great!! Where did you get the plain white planter with the cactus in it??
Such a nice design and so creative! I would have never thought to do something like that 🙂
These are the kinds of posts I love! The ABM team is so creative and yet, still practical. Thanks for always sharing great (and beautiful) projects!
Wow this is soooo cool! Great job! Your ideas are always so inspiring 😀
xx Caroline
https://carolinespassion.wordpress.com
Wow! This looks amazing!
Suz | http://www.prettyflorals.co.uk
This is a really easy way to make an outdoor space look super modern and retro at the same time!
This looks so good! http://www.hannamarielei.com
Oooh. Love this! What’s the paint color for the door?
Hi Rhiannon,
It’s from Lowe’s I think. I used to always get them but now they don’t carry them anymore. I love the simple look too!
xx- Elsie
Thank you so much!!!!
xx- Elsie
Thank you Allison! I’m so glad it’s practical to you.
xx- Elsie
Thank you so much Caroline!
It’s one of my favorites!! xx- Elsie
Thank you so much Suz!
xx- Elsie
Just curious what the square footage is on your home? Also, it is a on a slab, correct? No basement?
Hi Stephanie,
If it’s ok I don’t feel totally comfortable sharing the size. It has a walk-out basement (that’s where this space is located).
xo! Elsie
Elsie, would love to know if you added detail trim to that (awesome!) yellow door or if it was existing/bought that way? It would be great to see a tutorial if it is in fact a DIY!
I absolutely love these tiles. Such a fun visual impact!
This looks great! I love it!
Paula- http://www.livingpaula.com
I love it!
http://www.petiteandhungry.com
Wow – high 5! Looks great.
Charlie x
When I saw a sneak peek on Instagram, I seriously thought it was the real deal! And I was really super jealous, lol. SO excited to find out that it’s a budget-friendly DIY – it looks really, really good.
Genius Elsie – I love it!!!
I never imagined that sharpee pens could be used that way too! I love the pattern so much.
http://annescribblesanddoodles.blogspot.com
The pattern is just beautiful! I wonder how long it will last when you paint it with a Sharpie!
https://www.makeandmess.com/
This is…. amazing! I’m in the middle of a guest bath remodel and really wasn’t looking forward to installing flooring. Totally doing this! Thanks for the inspiration!
Neat idea I love it!
I love this! I would love to see an update in a year or so to see how it held up!
Awesome post 🙂 I could see myself doing something like this with an appropriate floor/wall space. Great idea glad its holding up well 😀
Wowzers! Major kudos! This is one of the least expensive but wowie good transformations I have seen in a long time!
Love the simple yet elegant design! Really livens up the space =o)
http://www.dreamofadventures.com/
What is the door colour?
Yellow is a hard 1 to pick. We have a yellowish and red brick house, and I’m having a hard time with the front door. I tried blue, but I think it’s too bright/light 🙁
I’m think yellow , and I love the yellow you chose.
Thx!
This is one I would LOVE an update on maybe 6 months down the road. It looks gorgeous, but I would still fear sharpie paint pen is too good to be true!
This is so fun! Nicely done! I love seeing the inspiration that brought you to his alternative!
I am in love with this floor! Such a clever diy. It’s an expensive look for way less.
High five! Such an improvement.
Vivi- http://www.avecvivi.com
Pure genius! I have a concrete slab patio which is not covered from the elements but, I’d love to do something like this even if in a different way. It looks beautiful!
So I love this but….I live in Northern Indiana! If my covered porch has a little exposure on occasion is this a bad idea?
This looks great and I’d love to try it in our courtyard! How has it held up over time? Our floor gets a lot of traffic, so curious about how it handles wear and tear. Do you regret not sealing it? Thanks in advance for any tips 🙂
Has the line work you did stood the test of time?
Hi! I would like to know the same. Has it held up through the seasons as well as natural wear and tear from foot traffic. I’ve been loving this look since you posted it and am considering giving it a try! Thank you 🙂
As a professional Tilers for over 30 years, just want to say what a great technique! Most of my customers want the real thing, but the cost savings using your detailed method would be enormous. DIY is ever so popular for obvious reasons, and these types of projects dont require much outlay but have maximum impact. Great post!
Genius.
I have a question: how is the grey paint holding up? The guy at Lowes seemed very sketical when I purchased the supplies to paint our carport patio–he shared that he didn’t think it would stand the test of time.
My questions: Have you had any chipping, wear or tear?
Would you be willing to post an updated 2018 image?
Thanks in advance!!
Claire
This is in a covered area, so it is holding up perfectly. If it isn’t covered it’s normal to need it to be touched up once every spring (so just save your paint). Laura and I have both done a lot of projects like this and I feel pretty confident with that advice. She just posted about hers here- http://abeautifulmess.com/2018/05/how-did-that-hold-up-vol-4.html