 I love giving handmade gifts. I really do. There’s something so special and meaningful when you get to hand over something you created with imagination and heart. That being said, I don’t always have the time to whip up something for every occasion! That would be nice, but really isn’t all that practical. We’re all busy. Let’s cut some corners where we can so we can still deliver that handmade “I was thinking of you” vibe!
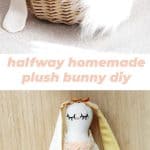
This little bunny won’t cost you much time or money, but I can guarantee a little one’s eyes will light up at the sight of her! The trick is to buy a plain doll, and then transform it into something lovely!
**I should mention before we get started, the doll I used has wire inside the body. If you are giving your doll to a very little one, you might want to avoid the wire and avoid buttons for eyes/on clothing.
 Supplies:
-pre-made cloth doll (you can order one here)
-half a yard of chiffon or tulle
-muslin and contrasting fabric
-lace trim and ribbon
-embroidery floss and needle
-scissors
-iron
 Remove the existing eyes from your doll if it came with them. Choose what type of face you’d like, and embroider that on. If you can’t slide your knots into the doll’s seams, start your knots where the ears will be sewn on. That way they’re covered!
 Fold a piece of your chiffon or tulle in half and cut. My fabric piece was 9 1/2″ x 23″ while folded. Repeat this step one or two more times (I used two pieces), depending on how sheer your fabric is.
 Take your layers of fabric and either run a basting stitch (sewing machine) or running stitch (hand stitch) across the top portion of your layers. This will connect them. Gently start gathering your fabric to create the top portion of your doll’s dress.
 Once your fabric is rouched or gathered, tie the ends of the thread together. If you don’t care about making the clothing removable, you can stitch the dress directly to the doll. I knew my daughter would be all about switching out clothes, so I left mine detached. Plus, another great gift idea is to make more clothing for different holidays. Win, win!
 To make the shawl, simply cut a length of lace trim that fits around your doll’s shoulders. Match up the edges and sew together! This should slip right over your doll’s head.

 For the ears, cut a length of muslin and your contrasting fabric the same size. I made mine 12″ long for a 14″ doll. If your contrasting fabric has a pattern, make sure the printed side is pressed up against the muslin so when we flip it, the pattern will be properly represented. Stitch around the outer edge, leaving the top portion open. Cut small triangles around the curved points to achieve a smoother edge.
 Now it’s time to flip your ear right side out! If you’re having a hard time with this step, try using a chopstick! It works wonders. Once your ears are right side out, use an iron to press them flat. Steam is a big help with getting a crisp edge.

 Fold the outer edges of your ear opening into itself. Sew the ears on your bunny, making sure to hide your embroidery knots from before. Add a bow or a flower crown, and you’ve completed your halfway handmade doll!


 This really did end up being such a quick and easy project with the doll already being made. Of course, if you’d prefer to make your own, I have this pattern from a previous doll that you are welcome to use!
What do you think? Are you a creative who likes to make every element by hand, or do you use shortcuts when you can find them. I like to do both, and I believe they both have their pros and cons. Either way, happy sewing! xo. Katie
18 Comments
Is it weird that I really like the look of the premade cloth doll untouched? It’s so cute!
Charmaine Ng | Architecture & Lifestyle Blog
http://charmainenyw.com
It is not weird. I have several of the untouched plain dolls in my decor. I love them!
Totally not weird! I actually bought two of these and left one untouched!
Love this SO, SO much Katie!
It’s magical.
Thanks so much, Elsie! <3
Yey, I love Katie’s tutorials! This doll is so pretty, love her long flowing ears and that embroidered face is so cute!
http://victoriaspongepeasepudding.com
this is so lovely – I also love to create gifts only own and your idea will be on my todo list soon 🙂
Have a great day,
Doris
This is so, so adorable!! Love handmade children’s toys, and it’s perfect for an Easter basket!
http://www.wonderlandsam.com
So cute. I bet you could use two ties for the ears if you could find matching ones.
I like it
I am in love <3 What a cutesey little thing!
Awww that is so so cute! xo
Melodie
http://www.happymelodie.com
THIS IS AMAZING!!! I’ve just bought a range of the dolls in different sizes, (although they were harder to track down and more expensive here in the UK. ) I might make a whole bunny family! Thanks! 🙂
This is just super cute, I love how you did the eyes!
https://www.makeandmess.com/
This is so cute! I want to make one for my daughter!
Paige
http://thehappyflammily.com
This is so cute! I remember my mom making these kind of plush bunnies when I was little. xo
Antonia || Sweet Passions
Love this idea so much! I am a rag doll maker and always trying to con up with new faces. These ready made one will be great as testers. I see all the time. Thanks for the inspiration!
I remember getting something like this as a child and loved it. Great DIY http://www.likehanna.com