
 I’ve been so happy to see a resurgence of all things ’70s in the design world, especially when caned furniture began popping up everywhere! Sometimes it can be frustrating when a style you like begins to trend, because it often leads to an oversaturation thanks to places like Target, and, well … people like us bloggers! But you’ve got to admit—having so many options available that align with your personal style sure is convenient. Sometimes, though, I still feel the need to get crafty and make my own furniture and home accessories, like these easy caned candle holders.
Caning is the flat reed material (from the rattan family) that is cut into thin strips and woven into an intricate webbing like you see here, or sometimes done in a simpler webbing like a basic mesh. You can buy caning at most fabric shops and at many online retailers like Amazon or caning specialty shops. I happen to have a set of vintage Cesca chairs with caned seats that have somehow withstood the test of toddler knees, but I’m still leery of using the material anywhere that will see a lot of wear and tear. Caning is a fragile material that will give way after repeated direct pressure, so I thought layering the caning over glass would be a great way to keep it from getting beat up.
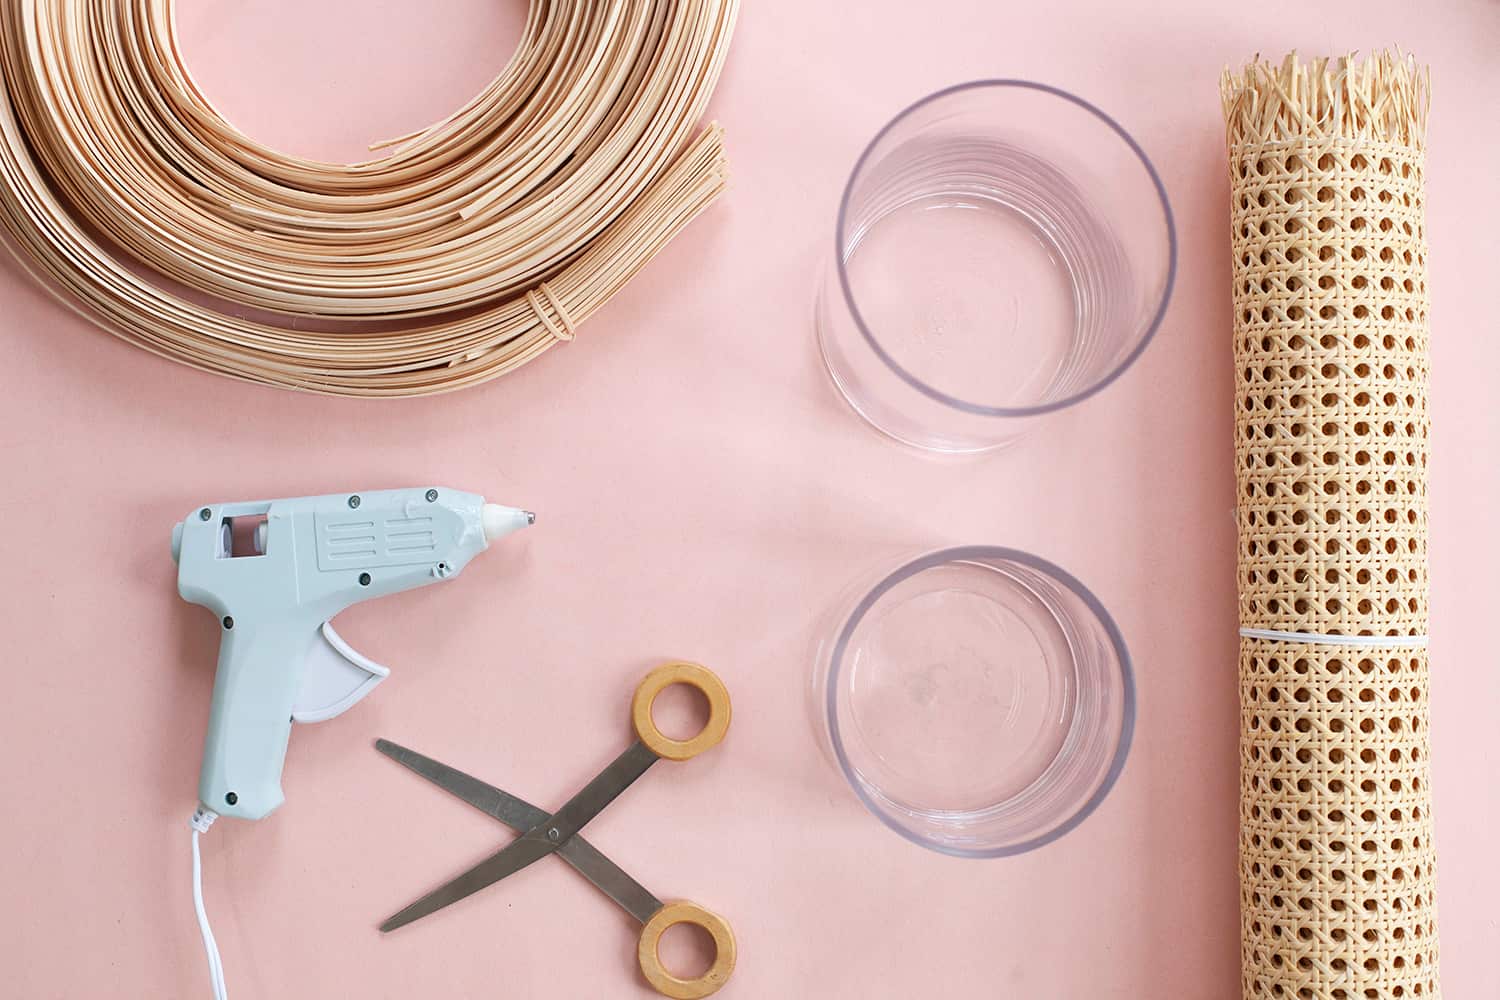 Supplies:
–Glass hurricane candle holders
–Hot glue gun + hot glue sticks
-Caning in style of your choice (this is the caning I used)
–Flat oval reed in 1/4″ width
-Sharp scissors
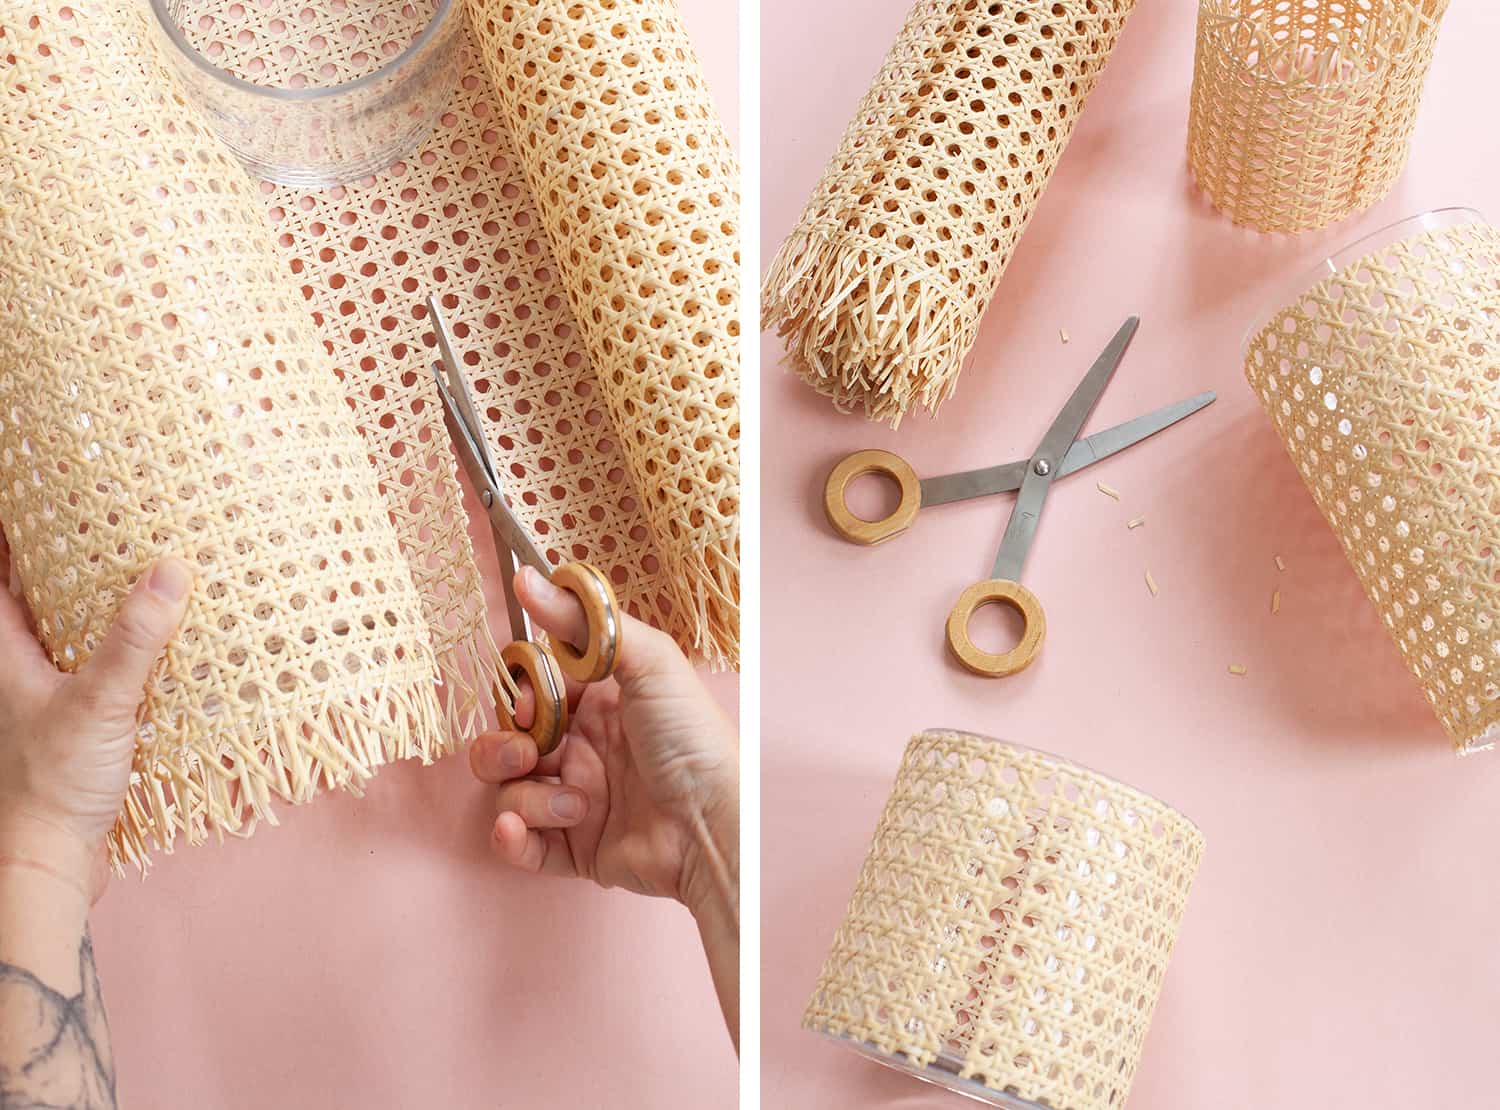 Step One: Cut a section of the caning to fit the circumference of your hurricane. My caning came rolled up, so it very easily wrapped around my hurricanes without my having to hold it in place.
Step Two: After the width of the caning is cut, trim each piece to the height of each hurricane.
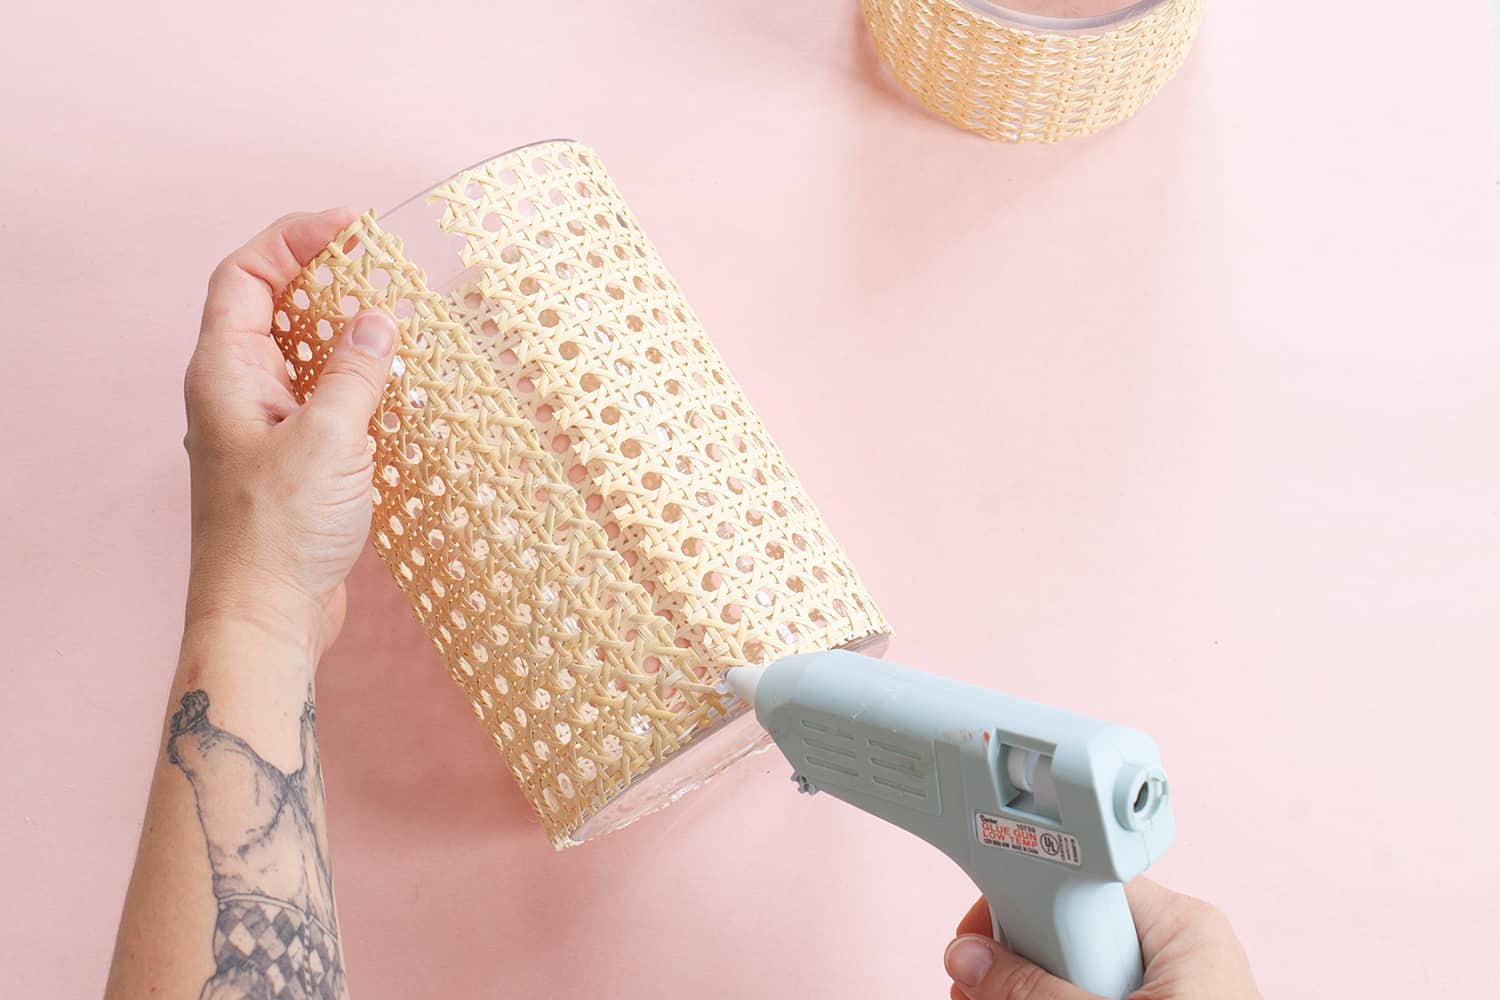 Step Three: Use a hot glue gun to attach the caning at the seam. Don’t overdo it on the glue, or it will seep out and become visible.
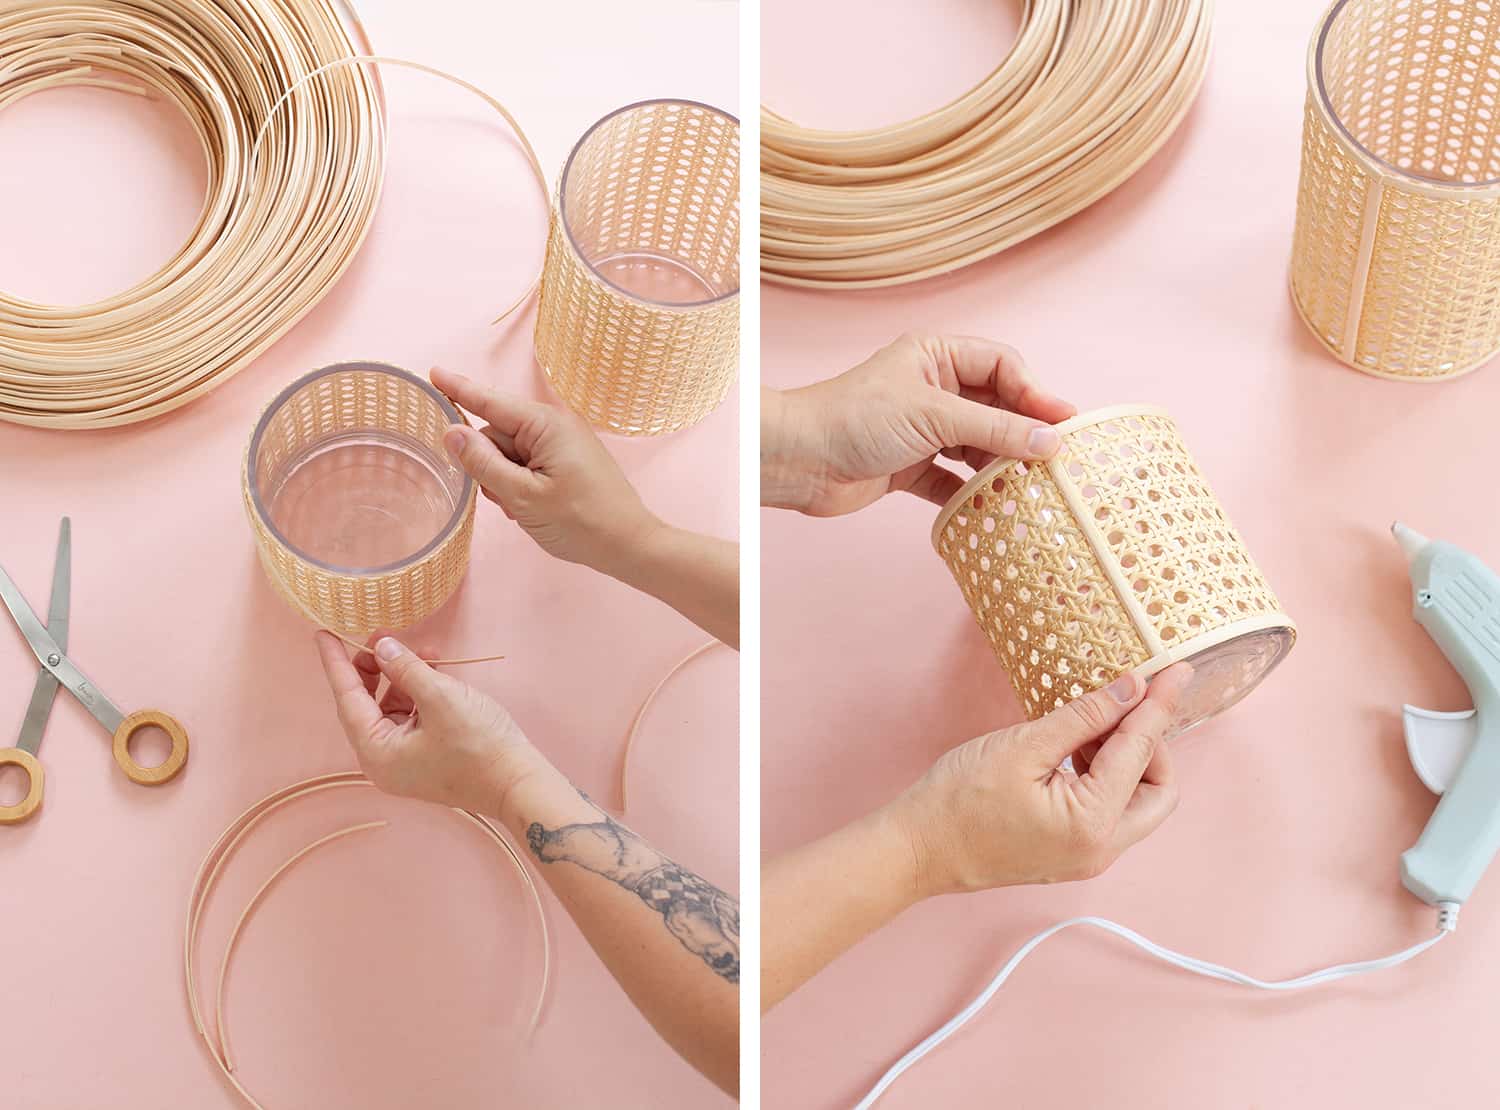 Step Four: Trim pieces of flat reed to wrap around the top, bottom, and along the seam of the caning. You’ll need three pieces for each hurricane. Trim them a bit longer than what you think you’ll need at first. You can trim them more precisely in the next step.
Step Five: Use hot glue to attach the flat reed across the top and bottom of the hurricanes as well as along the seam. As you get to the end of each strip, trim the edges to fit perfectly in place. You may want to use masking tape to hold the glue in place as you work your way around the perimeter of the hurricane.
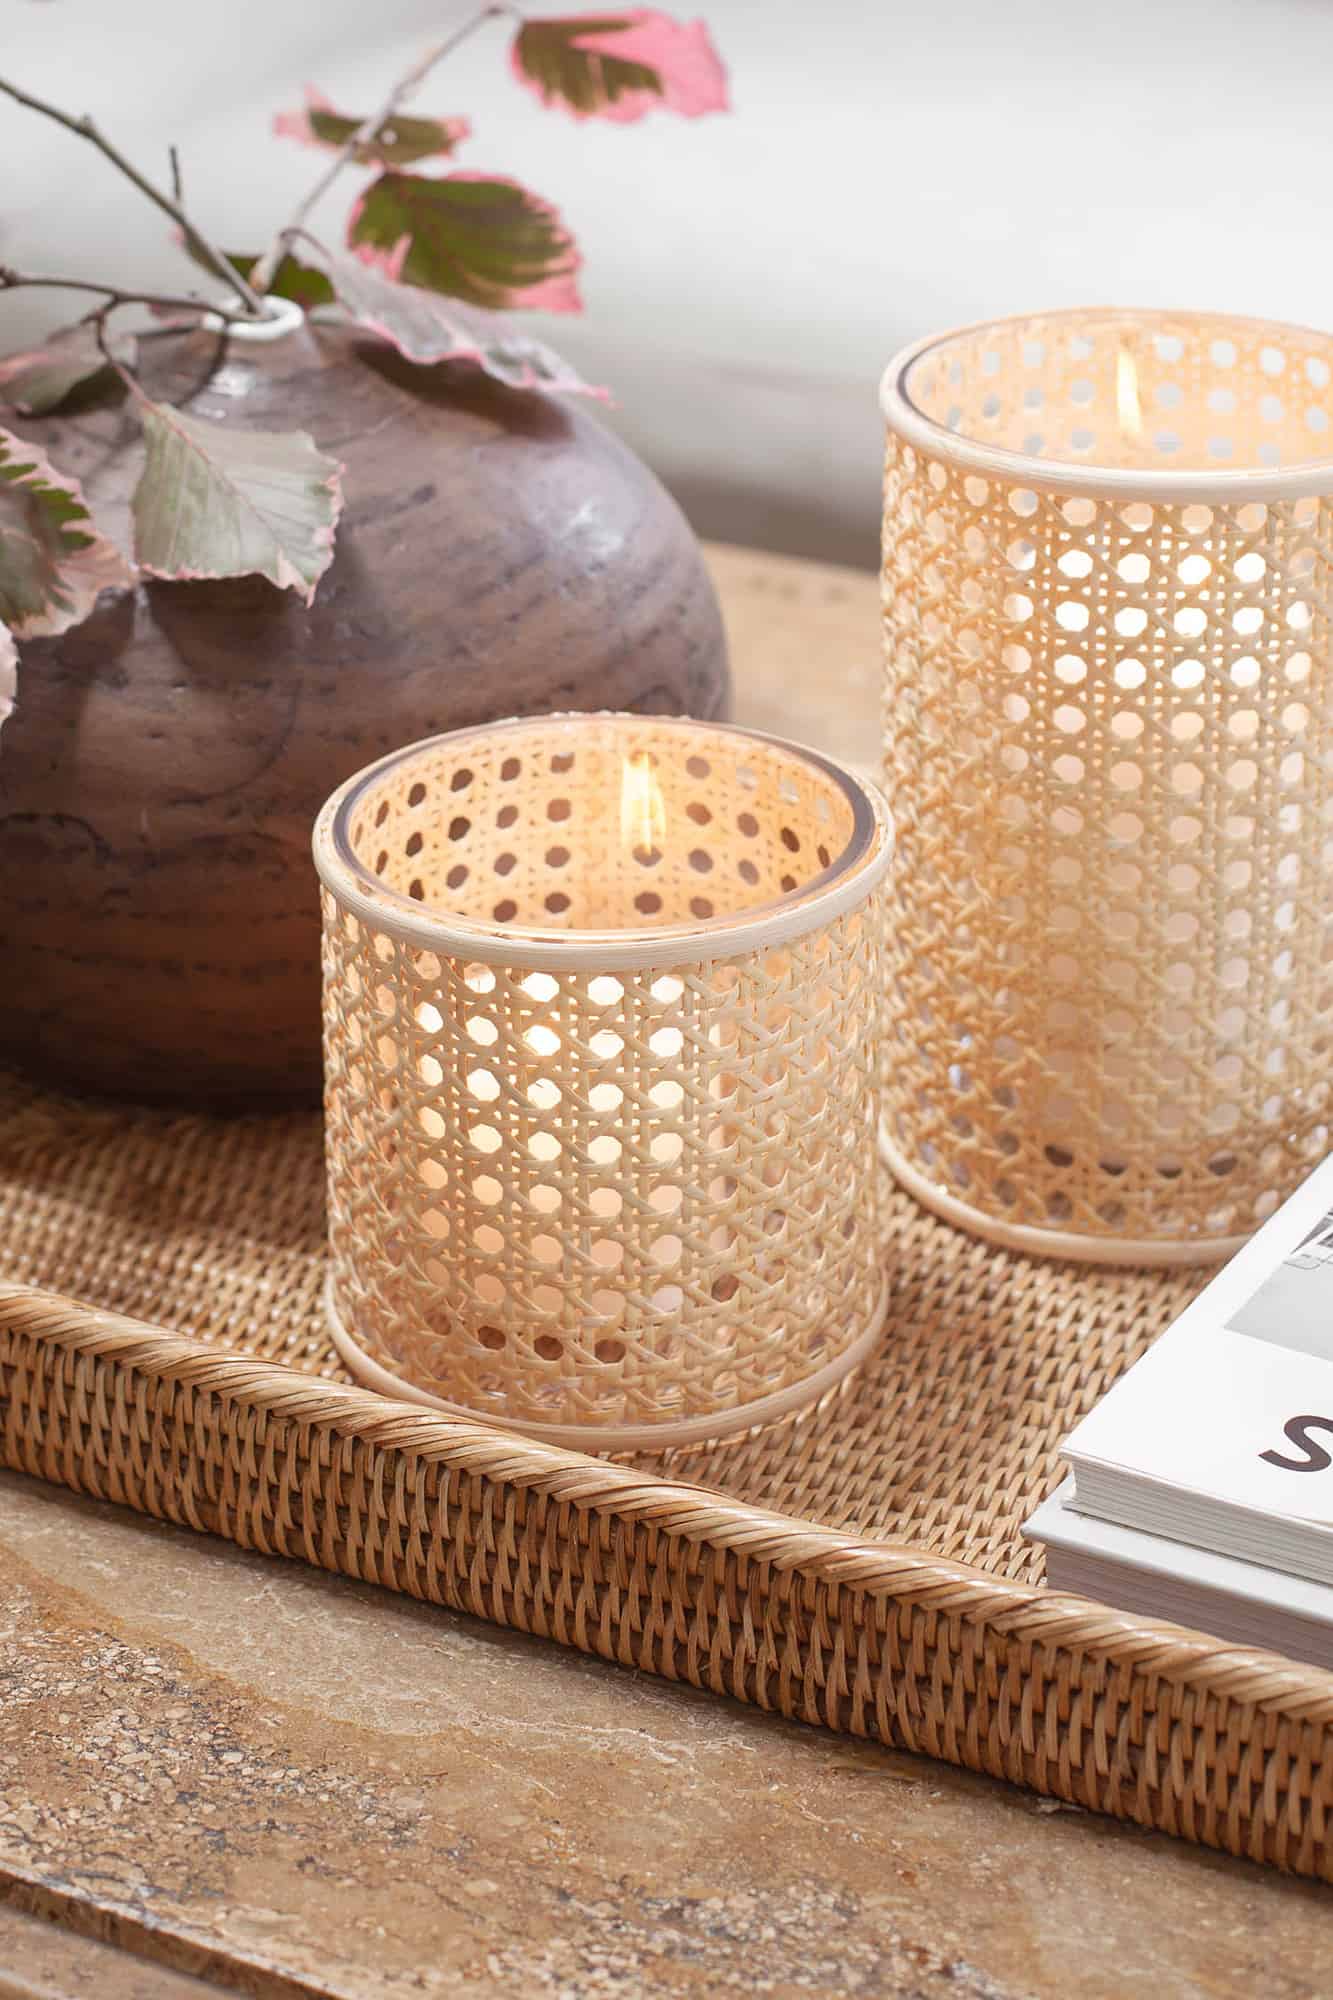
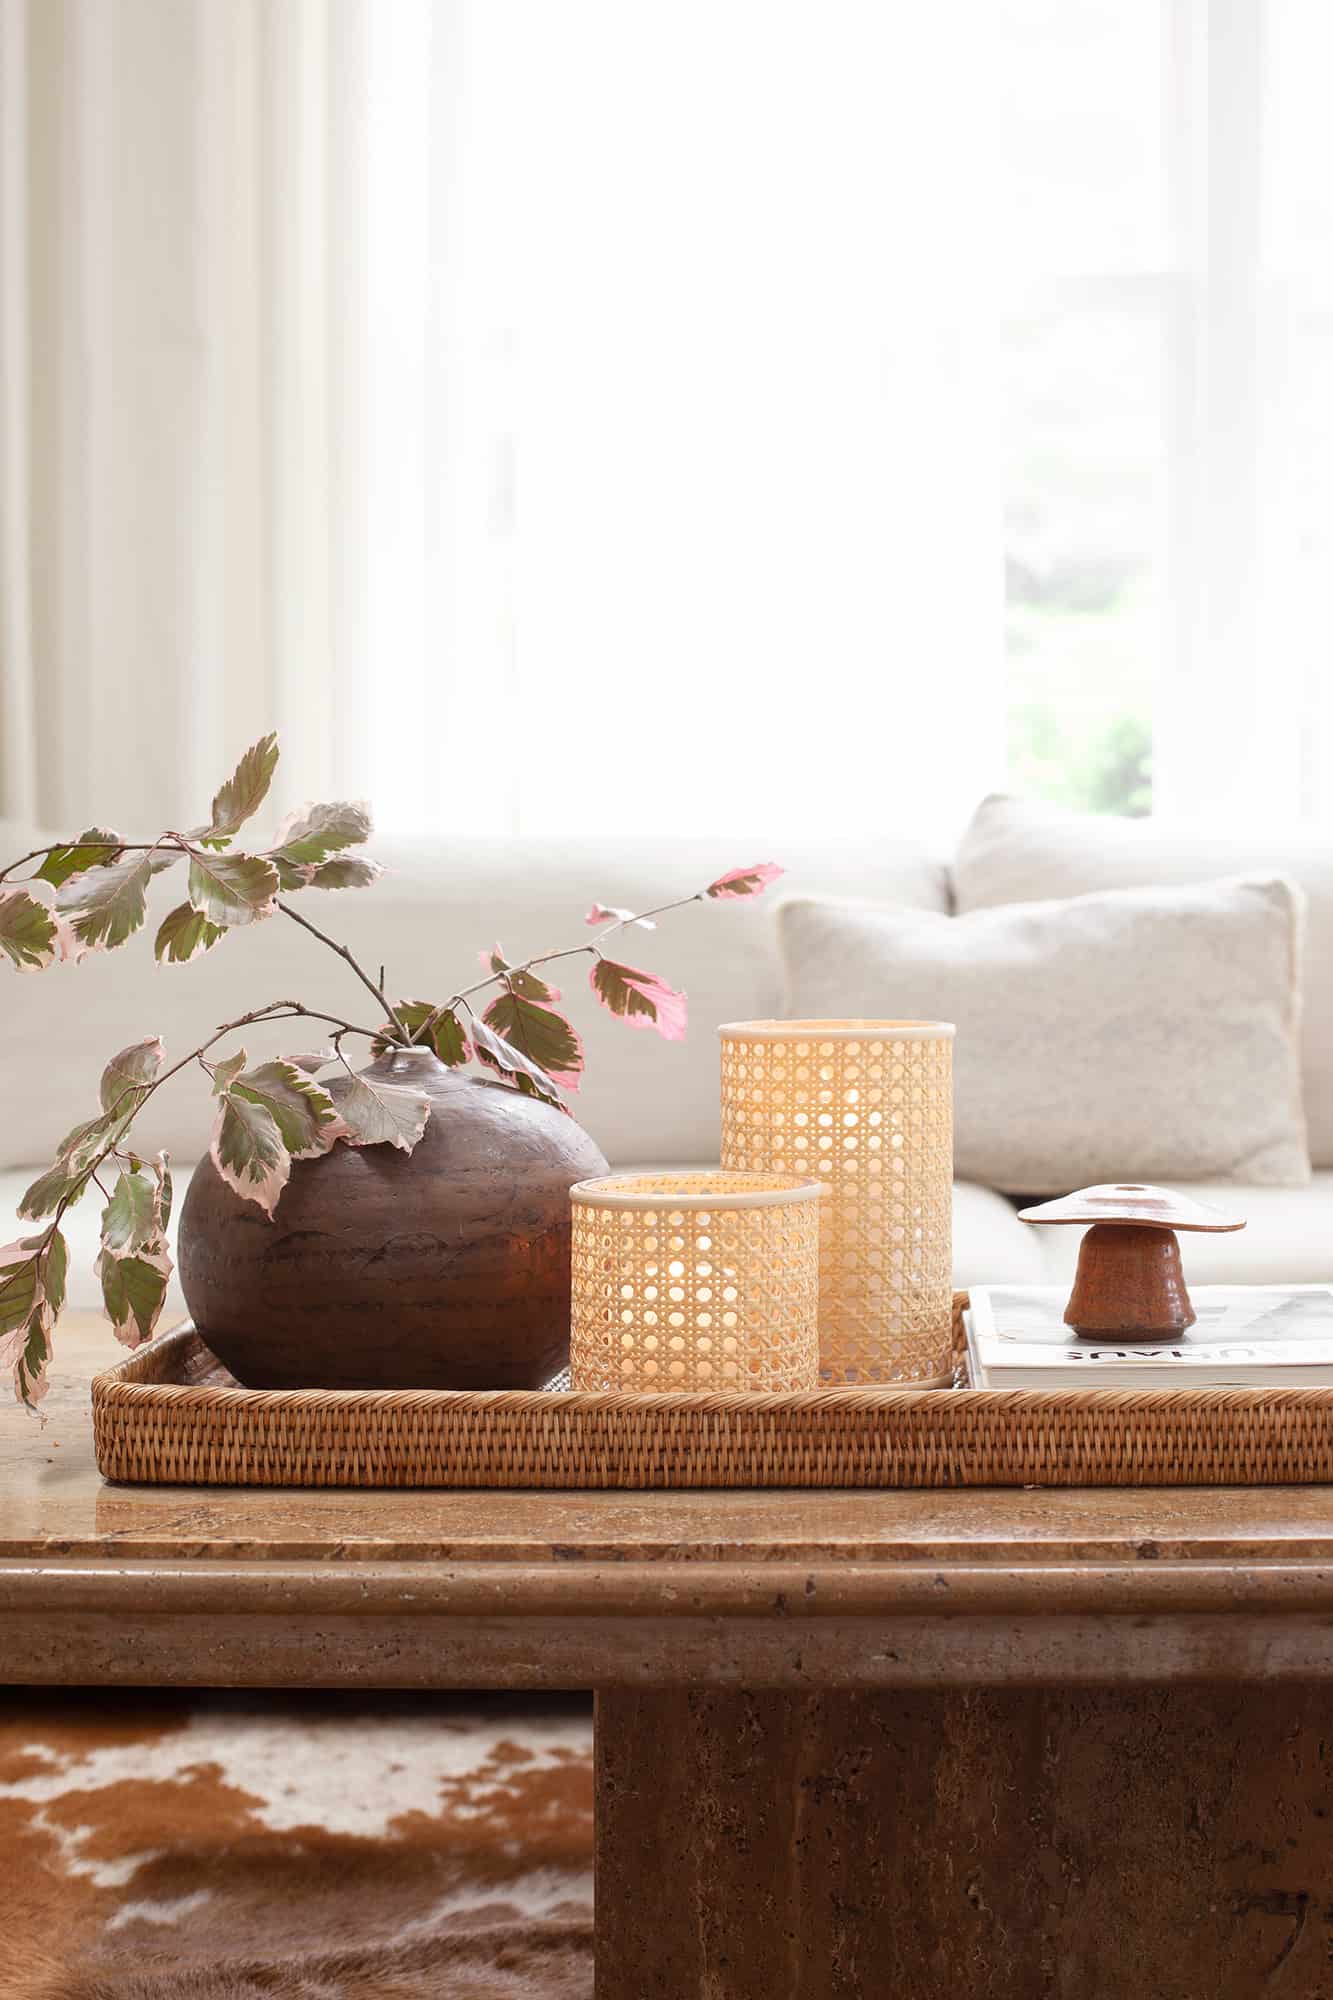 I love the texture and warmth that these candle holders add to my coffee table display! I think it would be really fun to utilize the rest of my caning to make an entire set. They’d make a dramatic dining table centerpiece, don’t you think?
 You didn’t think I’d finish this post without dubbing this project with the most obvious pun ever, did you? These hurri-caned candle holders are so easy to make, and would be a great craft night with friends. Everyone bring your own jars and cane puns! – Mandi
16 Comments
Wow, this is gorgeous! Another DIY to add to my favourites! 😀
Charmaine Ng | Architecture & Lifestyle Blog
http://charmainenyw.com
These turned out really cute! Simple and stylish! I may have to make a set for my patio dining table.
I’m usually not the most crafty person but these look so cute, I had to read and it seems so easy to do. Thanks for sharing!
Cool, I am not usually a fan of 70’s style but I sure love these. Thank you for such an easy wonderful looking DIY.
I firggin love this!
I bet these cast really cool light around from the cane design. Totally wanting to make some to help complement the bent wood with cane backing rocking chair I grew up with and have now.
P.S. The cane material can be quite durable around kids. When I was 6-10 I used to turn our rocker over and pretend it was a treadmill (aka I would walk on the cane backing, ha ha!). The fact that it’s still kicking today is pretty impressive considering.
Oh my gosh that’s amazing! Totally something my kids would do. Ha!
Cute! Would be neat to try with some “pre-loved” caning too!
That’s a great idea! Love it! I’ll keep this in mind if I ever need to have our caned chairs repaired.
beautiful,I firggin love this!
wow so creative! good tips
wow really nice!!!!
Love how a few simple touches turned into a trendy piece! I may need to make a quick run the craft store!
Jem | arise + create
What a nifty idea!
Beautiful candle holder, specially made with cane. The holders are so elegant that no one will have any issue placing it in their house. It can be placed anywhere in the house because it is very minimal and elegant.
Hi there! I absolutely LOVE this DIY but am having trouble gluing the reed at the very end, any tips? Did you glue the reed to itself or to the glass (or just to the cane) mine keeps popping off and it’s driving me nuts! Thanks so much again for sharing : )