")
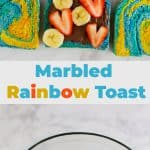
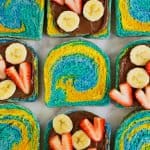
We partnered with Nutella® for this post. If you’ve been reading this blog long, you probably already know that I am a long-time fan of Nutella. But, who isn’t? And I think spreading a little over some rainbow marble toast and topping with fresh fruit sounds like the most fun breakfast ever. Right?! It might be so fun that you need to make a loaf for your next brunch get-together with friends and make a colorful toast bar complete with all the good stuff: Nutella hazelnut spread, cut fresh fruit, and maybe sliced avocado for those who want to go the avocado toast route. There’s always one in the group, right? You could use this bread in all sorts of ways really… this is just my #1 suggestion. 🙂

")
")
Random side note: this was unintentional, but I sort of think this loaf turned out to look kind of like Van Gogh’s Starry Night in a way. So… #art
🙂

1 1/4 cups warm water
a big pinch of sugar (1/8 teaspoon or so)
2 1/4 teaspoons active dry yeast
3 1/2 cups all-purpose flour
1 teaspoon salt
3+ colors of food dye (liquid or gel, but I’ll tell you which I prefer below)
First stir the sugar in with the water. Then sprinkle the yeast over the top of the water and let that sit and activate for a few minutes.


Divide the dough into three or more equal parts, depending on how many colors you want to use. I would recommend at least three, but you could use more if you like. Place the dough section on a cutting board or covered surface dusted with flour. I also recommend wearing gloves during this part. Add the food coloring to the dough and knead it in so the color gets well dispersed throughout. If you’ve ever colored fondant before, this will be a very similar process.

Both work well though, so if you already have one or the other at your house, don’t be afraid to use it. Oh, and if you want to mix two colors together, I would recommend mixing them in a small bowl or something first and then kneading that into your dough as it will more evenly create the color you are going for.


Place in a lightly buttered loaf pan, cover, and allow to rise for another hour.
Then bake at 400°F for 25-28 minutes until the top has lightly browned. Allow to cool before slicing.

")
P.S. You know Marvin, the little boy I mentioned in the opening story? Well, later that year (again, fourth grade), he became my first ever boyfriend. Was it the bread? I don’t know. Maybe?
Credits // Author and Photography: Emma Chapman. Photos edited with the NEW A Beautiful Mess actions.
Marbled Rainbow Bread
Ingredients
- 1 1/4 cups warm water
- a big pinch of sugar 1/8 teaspoon or so
- 2 1/4 teaspoons active dry yeast
- 3 1/2 cups all-purpose flour
- 1 teaspoon salt
- 3 + colors of food dye, liquid or gel
Instructions
-
First stir the sugar in with the water. Then sprinkle the yeast over the top of the water and let that sit and activate for a few minutes. The yeast should start to foam a little bit, like in the photo above. That’s how you know it’s working. The sugar in the water just gives the yeast a little something to get it going. Think of it like a cup of coffee in the morning—not necessary, but it certainly helps to get things started.
-
In a large bowl stir together the flour and salt. Pour the yeast water in with the flour mixture and stir until just combined, so the mixture is like a loose dough. We’re going to knead the color into the dough, so you only need to stir it enough here so that it’s combined.
-
Divide the dough into three or more equal parts, depending on how many colors you want to use. I would recommend at least three, but you could use more if you like. Place the dough section on a cutting board or covered surface dusted with flour. I also recommend wearing gloves during this part. Add the food coloring to the dough and knead it in so the color gets well dispersed throughout. If you’ve ever colored fondant before, this will be a very similar process.
-
I tried both gel and liquid food colors because I was curious if one would be easier to work with. I actually had assumed the gel would work better, as that’s usually what works best in fondant or frostings. But I actually liked working with the liquid food dye a little better. It’s easier to spill, so do take care to cover your surfaces and wear gloves (an apron doesn’t hurt either), but I thought it blended into the dough a little better. For the teal and blue doughs (above), I used gel coloring, but the yellow was a liquid coloring.
-
Both work well though, so if you already have one or the other at your house, don’t be afraid to use it. Oh, and if you want to mix two colors together, I would recommend mixing them in a small bowl or something first and then kneading that into your dough as it will more evenly create the color you are going for.
-
Once you have colored all of the dough, roll each section into a small log or thick snake (think elementary school pottery class). Then twist them all together and roll into a ball. Again, this is pretty similar to the marbled clay ring dishes I linked above, but you just don’t flatten it like you do for the bowls. Just leave it in a ball, place in a lightly oiled bowl, cover and allow to rise in a warm spot for an hour or until doubled in size.
-
Gently deflate the dough (it will have risen by this point) and shape into a loaf. If you can shape in a way so the darker colors are on the outside, I would recommend it because the crust will brown as the bread bakes, so it will be more noticeable on lighter colors. But this is just something to try if you can, no big deal if not.
-
Place in a lightly buttered loaf pan, cover, and allow to rise for another hour.
-
Then bake at 400°F for 25-28 minutes until the top has lightly browned. Allow to cool before slicing.
24 Comments
Wow, this is gorgeous! I’m sure this would be such a kick with kids….but honestly I want to pull this off for every future themed party I have! Red and green for Christmas? Pink and purple for mother’s day? Combinations are endless!
Love that idea! Would be totally fun to match the bread colors for the holiday!
The idea is very beautiful 🙂
This is so pretty! I tried the clay marble ring dish, so I definitely want to try this. My 4 year old daughter would love if I did pink and purple.
This looks soooo cool, and it makes breakfast so much more fun!
https://www.makeandmess.com/
This is amazing! It’s perfect for little kiddies – or anyone actually. Would really impress!
Charmaine Ng | Architecture & Lifestyle Blog
http://charmainenyw.com
I LOVE this. I bet if I brought it over to family’s house they would be so freaked out though lol. Like I can just imagine my grandma’s reaction to technicolor marbled rye…
http://colleenwelsch.com
Ha! The freakiest colors are probably blues and teals (like I did). You should make a loaf, take it over, and say NOTHING. See what people do. 🙂
This is so cool and pretty! I normally find toast somewhat boring (except for avocado toast) but this really makes me to eat them more <3
http://www.myblackcloset.com/
This actually looks divine! I can’t wait to try it out, so fun and pretty to look at, and hopefully yummy too, especially with strawberries and nutella!
Vicki x x
https://therecklesslifestyle.blogspot.co.uk/
This is so cool! I’ve never seen such colorful toast.
I love colorful break
xx
The pink pineapple
New post:http://thepinkpineappleblog.blogspot.com/
LOVE the marbled bread- what a neat idea!
– Greta
http://www.mintyfrosting.com
Looking at that I so wish I could eat bread 🙂
such a cool idea! and can we all please acknowledge, that this toast looks like a piece from Van Goghs “Starry Night”? which makes me think about all the other painting-inspired-toasts one could bake…mhm! challenge accepted! 🙂
– claudia
So fun, Emma! Xo
Carrie
w
Hi, I am a long time fan of your blog and used to love Nutella too – but for two years now I avoid eating Palm oil cause I can’t stand the damage that it does to our nature!! Here in Germany we have very good alternatives though, so it doesn’t hurt that much!
Love Lisa
This is a great dish, I know how to make pies but they are not as good as yours!
It is a healthy and yummy breakfast to have.
Thanks for sharing.
Wow, that toasts are great! I want to eas them! http://www.sexy.co.uk
Wow. This is more like Van Gogh inspired bread. Brilliant colors.
This looks like such a fun thing to do although my now “organic” mind takes over and I just could not use the food coloring in anything that I would eat or make for my kids. I think I would have tried some blueberries for color and maybe some strawberries for another color or some beet juice for a different color. Again the idea is fun although with all of the health issues that come along with the food coloring and additives I would need to find alternative coloring agents for mine. Thanks for sharing this idea!!!
Is it bread Or Cake? It’s Looking Very Attractive & delicious, I will try it at my girlfriend home.
look beautifull and delicious 🙂
cooking recipes