")
I’ve seen it done with food coloring, but was curious how it would work with ink instead. I wanted something a little more permanent so I could possibly use it on other surfaces besides paper in the future.
")
-shaving cream
-inks (I used re-inkers from Studio Calico, but any type of bottled ink will work)
-a toothpick
-a flat tool like a spatula
-some plain white card stock
-rubber gloves are optional but recommended (I completed this project with some ink stained hands that lasted for 24 hours—oops!)
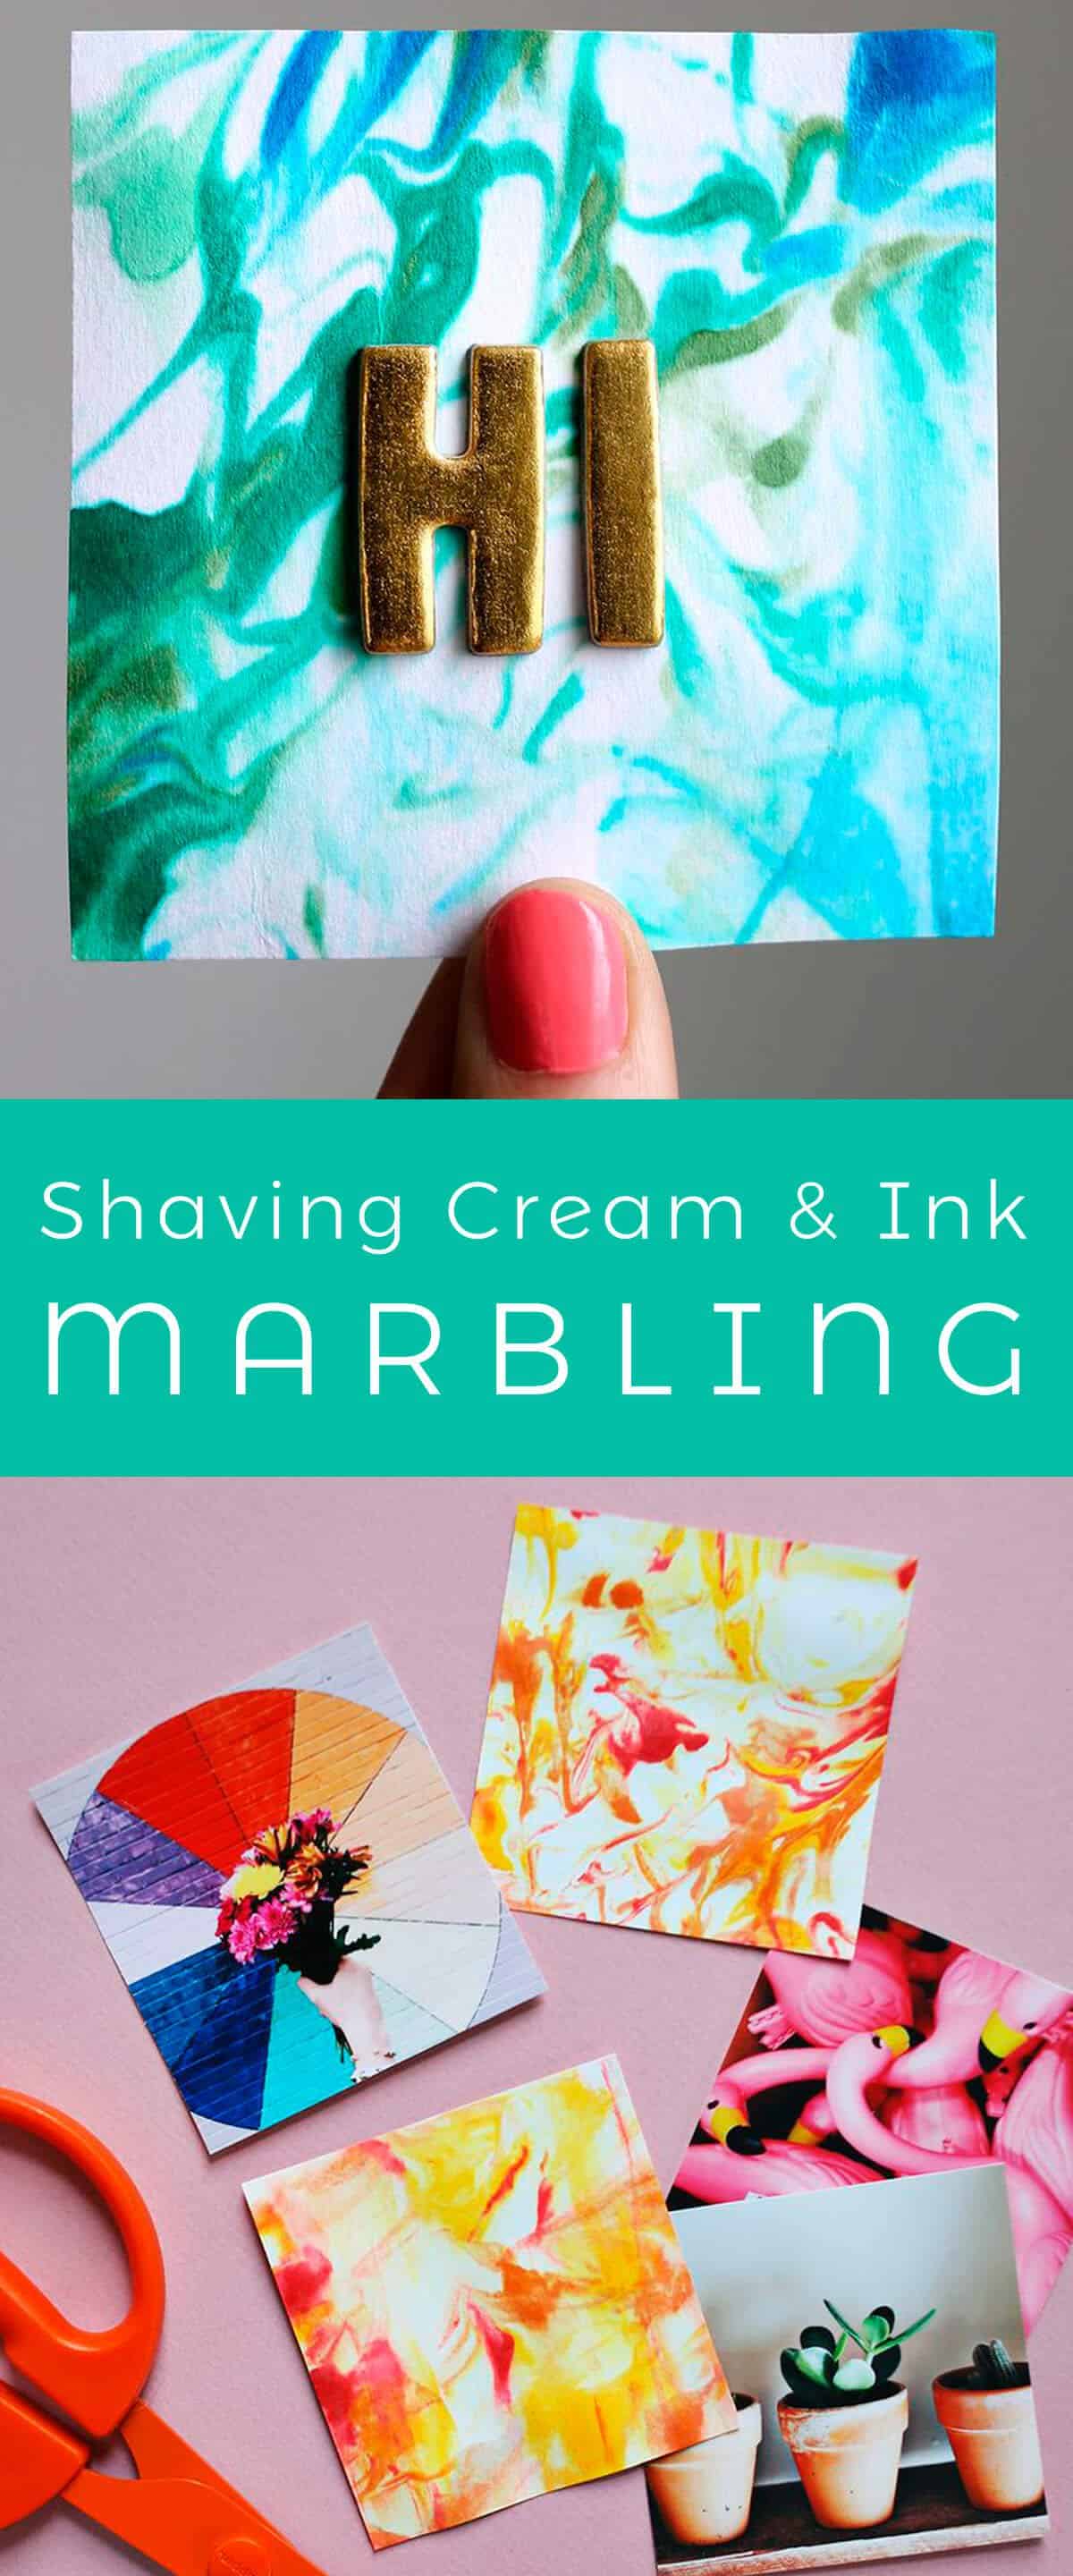
Step 2. Use a large plate or small baking dish to spray shaving cream on, creating a surface of shaving cream bigger than your paper.
Step 3. Use a spatula to shape the shaving cream a bit, creating a semi-flat surface.
Step 4. Pour drops of ink all over the shaving cream. Use as many colors as you like!
Step 5. Use a toothpick to marble the ink by simply drawing random designs all over the shaving cream and ink.
Step 6-8. Press the paper down onto the shaving cream. Don’t be shy, really press it down in there!
Step 9. Remove the paper. It should look like this. Time to scrape off the shaving cream. Find a sink or trash can and a spatula!
Step 10. Scrape off the shaving cream to reveal these beautiful patterns! Don’t run water over the paper, it will lighten the ink more than you want. Just scrape the shaving cream off and let it dry!
")
")
Credits// Author: Elsie Larson. Photography: Elsie Larson and Emma Chapman. Photos edited with A Beautiful Mess Actions.
63 Comments
What a fun idea! However, I’m a fan of ice-cream, I would’t resist myself to throw it for some DIY.
If you are passionate about Fashion and Luxury news, and you want to know a sharp opinion about them, I invite you to read my blog 🙂
http://mgluxurynews.com/posts/
very cool ideas, love it! can’t wait till the summer so I can start scrapbooking and using all of your ideas!
http://www.modeography.com/2015/03/valentines-day-outfit/
This technique is so cool! I’ll definitely be giving it a try 🙂
I LOVE THPICTURES
http://thepocketstyle.blogspot.com/
It’s umbelivable – such a great idea!
Ann | http://annrobiefashion.com/
Wow this brings a whole new perspective on scrap-booking and making cards for me. I’m off to make cards. Thanks
Oh my gosh, FUN! I HAVE to try this with my classroom sometime!
Circus & Bloom
♥♥♥
Oh my gosh, FUN! I HAVE to try this with my classroom sometime!
Circus & Bloom
♥♥♥
wow this looks stunning!
http://inspiremeland.com
Betty
But since you’re using shaving cream, does it leave the paper smelling like the shaving cream? I will definitely try this idea! I loved the result, but my only concern is the smell.
excellent idea and beautiful colors!! i love that it is conservative with the ink..so many marbling techniques become a tremendous waste of ink/paint and materials!
http://bunnyandfawn.blogspot.com/
Very pretty finished http://www.hannamarielei.com
Hello Fellow Blogger! I am excited to tell you that I have
nominated you and your blog for the Most Versatile Blog Award! I have enjoyed reading
and admiring your posts and I hope that you continue to have success. Thank you
for allowing me to share this honor with you and I hope you have a great day!
Check out your nomination on my blog @ http://wildheart-gypsysoul.weebly.com
This looks sooo good…so nice idea!I will try it for sure…Thanks for sharing it ^_^
xoxo Aftodite ~ BubblyBeauty
Oooh interesting, what a cool idea. I don’t have ink, so perhaps I could try this with food coloring & shaving cream.
:] // http://www.itscarmen.com ▲
Neat idea! Definitely gonna try this.
http://www.bluelabelsboutique.com
SAVED!
Love this, so creative. Will try it out next Sunday 🙂
With love,
Hayley ♥
http://thelifestylemenu.co.uk/
Awesome. I gotta try that on business cards (ran out of…)!
Thx for sharing!
This is why shaving cream rocks.
What’s in my handbag 2015 + CARTIER GIVEAWAY
Can’t wait to try this technique out!
Girls! this is amazing!
Shaving cream ; )
I will try, yes i need to try this for my project life album
love this… so pretty, and easy to do…
Hems
agoldentulip.blogspot.com
You are so creative! That looks great 😀
http://pinchblack.blogspot.ro
Oh my goodness this sounds like the coolest idea! I’ve got to give this a try in future artworks. x
http://www.eippek.blogspot.co.uk
This one is definetely saved! The outcome is really nice.
Woho – super tempted to try this, what a cool idea!
Love this idea!I definitely am going to give that a shot!!!
Creates such beautiful textures!
I’d love to try this on Fabric! :3
Would food coloring work or does it have to be ink?
Just tried this with fabric dye and fabric- works a treat! 🙂
Yes! I love marbling with nail polish. I’ll have to try this!
The nail polish marbling DIY has never worked for me – I don’t know what it is, but I can not get the hang of it!
This technique seems much easier, and I love the way yours turned out! I’m tempted to try it out in a canvas board.
M.
I do this project with my preschool art class! Such a fun project for them to get messy with.
wow it looks supercool
author of sentikidukan.com
Interesting…now i can’t wait to make these cards!
Funny:-)
So now shaving foam has a total different meaning to me:-)
Looks so nice!
I’ve been wondering – when are you revealing the April book club selection? Always good to get heads up so I can try to reserve at my library!
LOVE this idea! I thought “Oh, might get complicated!” But NO! Looks so simple to do, but so fun & unique. May need to try this if I have a dinner party and need name plates. 🙂
http://StephanieLists.com
Looks pretty! Very good idea.?
Cool little project!
Definitely going to try this out! Excellent idea!
I might have to try this! I had never heard of marbling like this or with nail polish, I have always done it with liquid starch and acrylic paint. It always came out pretty, but if the paper didn’t get rinsed properly, the starch left unattractive spots.
I did this with my middle school class last year! We used acrylic paint instead of inks. We did this in the fall, so cut out leaf shapes from cardstock and marbled them with fallish colours. The kids loved it because it was messy, but very cool effect. Yes, the room will smell like shaving cream while painting, but I didn’t find the dried finished products to smell strongly. A great project for all ages!
Aahhh I love this so much! Keeping track of all easy home-made art projects for a new apartment. This might be first order of business!
Love this, so fun! And it looks doable even for those of us less skilled at crafts 🙂
You can get unscented, but yes- it does. 🙂
-Elsie
Food coloring works too! 🙂
-Elsie
Hooray!!
xx- Elsie
Emma is taking a break from the book club.
xx- Elsie
Please let me know how you go with food colouring as I too was thinking of using the same thing… xo
Ooohh…how cute. Nice spring colors
http://www.lovelysharice.com/shop/
Hi,
I would love to try this. Do you have such option for marble print in cloth? It would be a great option for summer scarf.
realy a fantastic idea. i gona try it nowwwwwwwwwwwwwwwwwwwww
Such a cute idea! I love the effect that it gives 🙂
Navellina
these are so cute!
xx nikki
http://www.dream-in-neon.com
How fun! This looks so cool. And easy! Thanks for sharing!
We use food coloring when I do this project with the kids in a chemistry club I volunteer with and the results are great! We then turn their marble creations into name tags 🙂
Wow, it almost looks like whipped cream with food coloring =)
Juju Sprinkles
http://www.jujusprinkles.com
These are so cute! I especially like that first blue one with the gold letters, so cute!
Such a lovely idea! And the result is so amazing!
Thank you! xoxo
Step 10. Scrape off the shaving cream to reveal these beautiful patterns!
… Waste not, want not, keep for your legs or your guys face. Beautiful patterns everywhere 🙂 ha ha. This is awesome, Thank You!
https://adorablest.wordpress.com/
These pics are amazing. i will share them on my blog here:http://ozgebasak92.livejournal.com/
Hey girl! These are awesome! I love love love your idea about the business cards. I am planning to do it myself. What kind of paper did you use? Did you notice any curling or wrinkling to the paper integrity? Do you think at 125 lb cotton or 130 lb linen would hold up to this without losing structural integrity? I am concerned my cards will wave or crimp? What is your experience??