 I remember the first time I saw a Juju hat in an issue of Domino magazine. It was fuchsia, and I was instantly in love! I didn’t know what it was or where one would even obtain one, but it was one of those design elements that I knew I wanted to incorporate into my own space some day. Here I am a handful of years later with a DIY version that is easier than it looks! No messy hot glue guns to ruin half of your feathers… just the right supplies and a little bit of patience. I’ll even show you a short cut if you’re handy with a sewing machine!
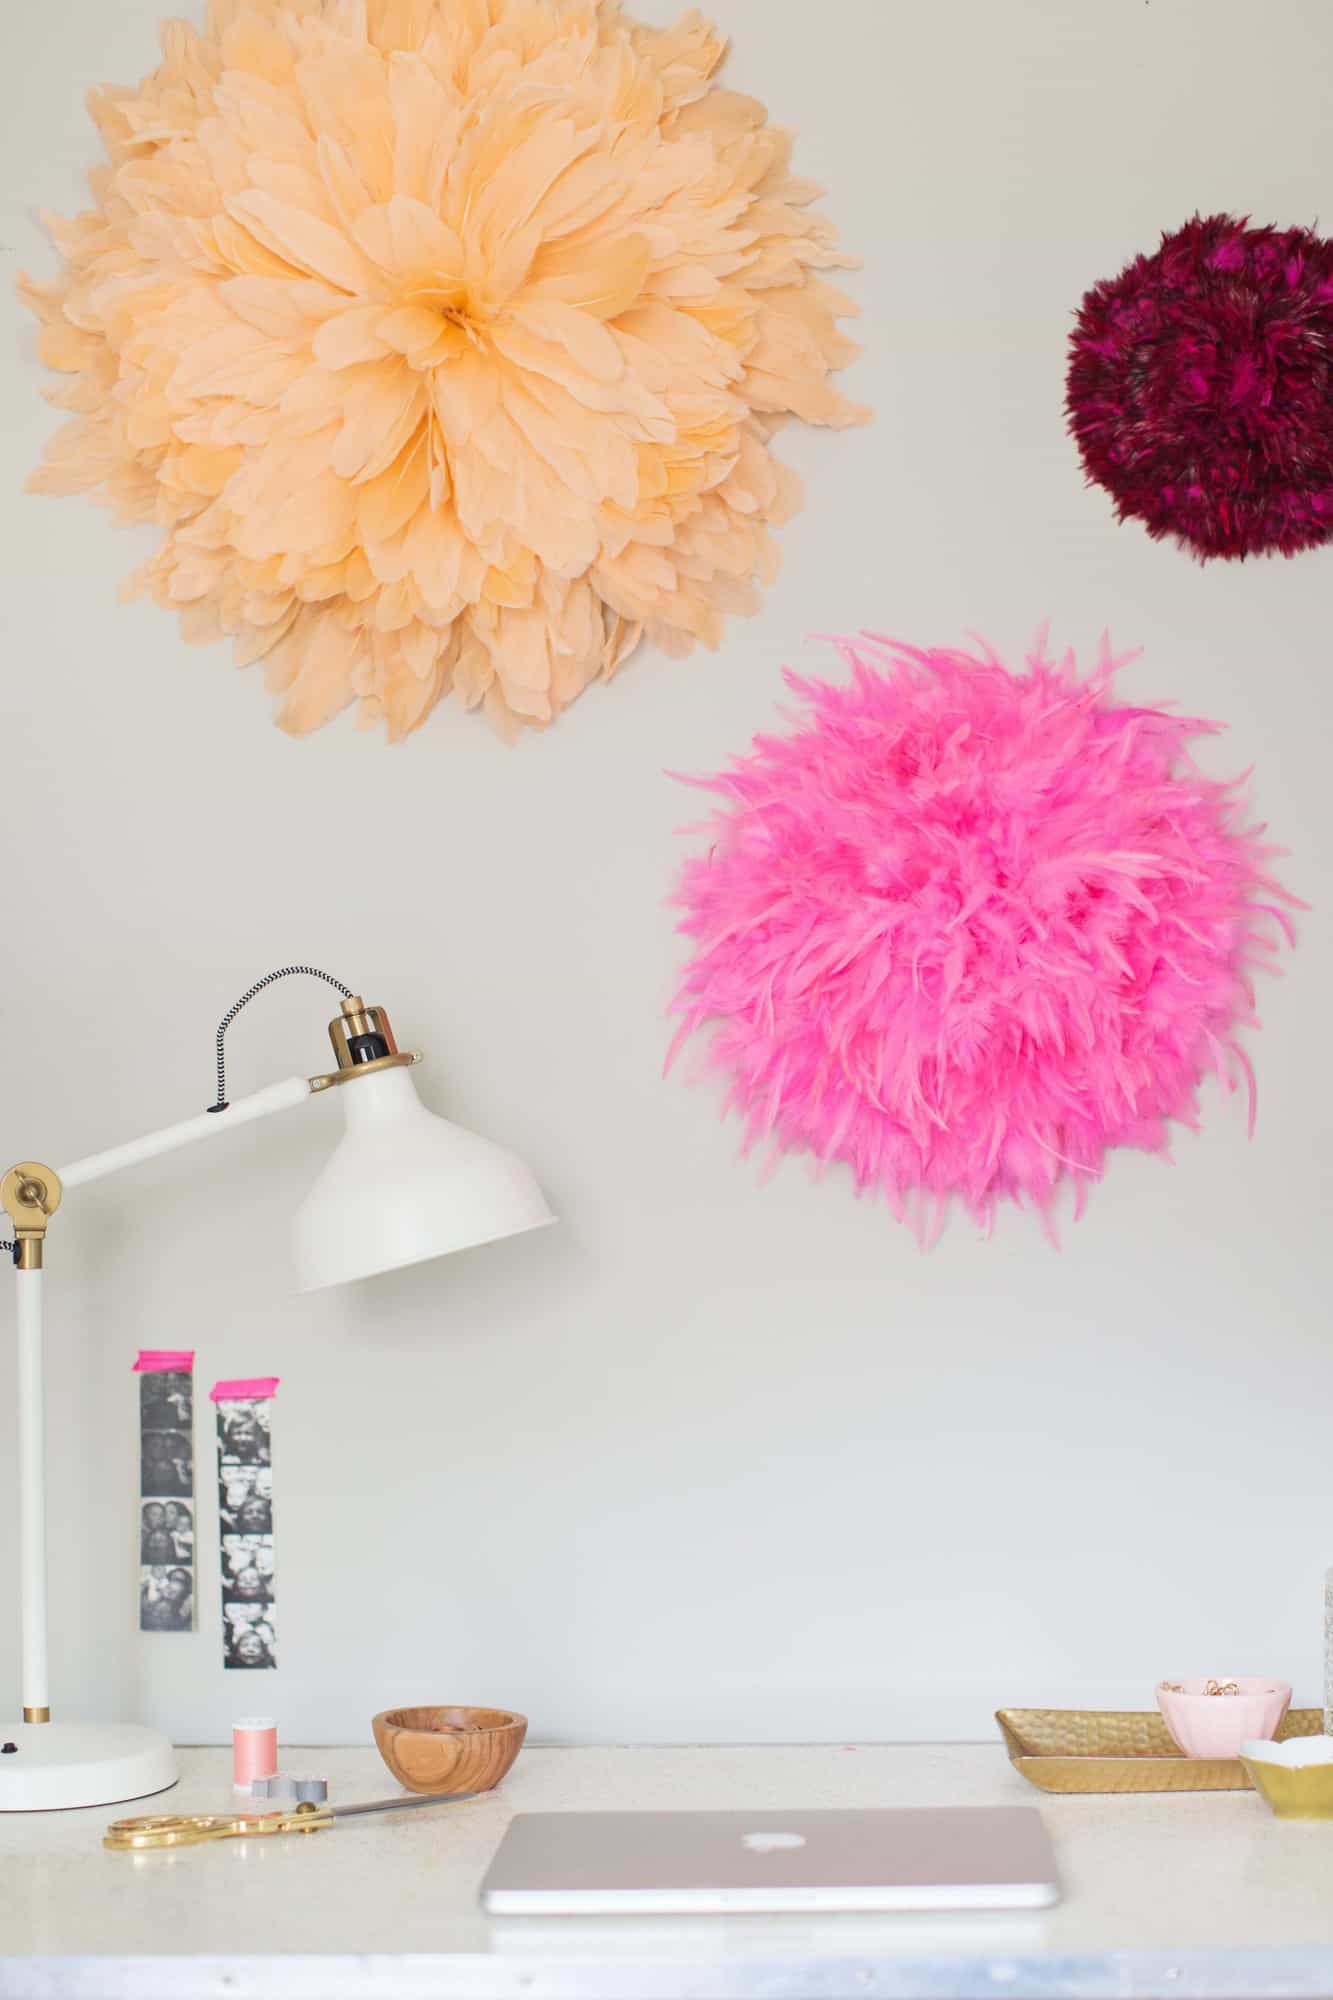
Juju hats, or Tyn hats, were worn by royal dancers during Bamileke tribal ceremonies. They symbolized prosperity and were created from natural or dyed chicken and wild bird feathers. These feathers were stitched onto a base that could be pulled open with a strap and folded neatly with the feathers inside when not in use. They are still handcrafted and imported from Cameroon and can be found in a variety of sizes with prices ranging from $80-$500+. I created three different sizes to display as a set but used three different styles of feathers to show the variation in the types of feathers available. This is another one of those DIYs that can be an affordable alternative to purchasing one online.
 I used three different sets of feathers that I found on Amazon. The peach Juju hat is made from 5″-7″ dyed goose feathers and is probably my favorite of the feathers because it’s so full and textured. It has a big impact and works best for medium or large Juju hats but would likely look awkward for a smaller 12″ hat.
The hot pink feathers are black hackle feathers from Touch of Nature and the pink featured showed up a lot brighter than in the photo. They have a ton of movement and texture and would work great for medium sized Juju hats.
The darkest feathers are chinchilla saddles feathers from Zucker Feather Products and are much shorter. They were a lot brighter online and photograph darker than in real life. They were also harder to fluff up and get a lot of movement from. They worked well for a smaller Juju hat but probably wouldn’t work well for a larger size.
Search for ‘feather trim’ and ‘yardage‘, and then keep an eye out for your favorite color(s). You don’t want loose feathers unless you don’t plan on having a life for the rest of the summer. Be sure they are stitched in satin (or something similar). When you order online, keep in mind that you might have to make a return or exchange due to color variations within dye groups.
 Supplies:
24″ Juju Hat:
-4.5 yards of stitched peach goose feathers (5″- 7″ long)
16″ Juju Hat:
-2 yards of stitched hot pink feathers (2″- 4″ long)
10″ Juju Hat:
-1 or 2 yards of stitched berry red chinchilla saddles feathers (3″ long)
also
-12″ circular woven placemat per Juju hat. You’ll cut them down for the medium and smaller hats (found in Target dollar spot).
-thread in coordinating color to feathers
-2.5″ embroidery needle
-straight pins
-scissors
-1 paperclip per hat
-sewing machine (optional)

 Starting from the outer edge, wrap your feather yardage around your placemat to get an idea for how much you want to space out your next ring of feathers. You can cut these into circles or just continuously wrap it into smaller circles until you get to the center. Don’t cut anything until you’ve decided!
For the largest hat, place your satin ribbon near the edge of your woven placemat. Pin it in place every 1″ or so. Be sure not to stretch this too thin as you pin and stop to check your placement every 6″ or so. Only pin the first outer row for now. If you are cutting yours into separate circles, overlap your ends about 1″. If you’re doing a continuous strip, just let it hang down while you attach this part.
 Thread your needle and hand stitch the satin edge with a wide stitch through the placemat. This can feel tedious and wear our your fingers, but it will ensure your Juju hat doesn’t fall apart and won’t risk getting hot glue all over your feathers. Be sure to remove your straight pins as you stitch past them.
Shortcut: If you’ve got a sewing machine, you can easily stitch your feathers down to your mat, but be sure you’re careful as you move your feathers onto your machine. You can do this for the first few layers, but it gets harder to stitch the layers closer to the center. That’s when you can switch back to hand stitching or even use felt or gorilla glue in the center. More on that soon.
 Place your next row of satin onto your placemat about 1″ closer to the center than your last row. Repeat your pinning and stitching. These first two layers should have your feathers with the right sides facing you. You’ll want to cut them off after you finish your second layer.
For your third layer of feathers, flip your feathers with the wrong sides facing you so that the curve of the feathers adds some dimension to your Juju hat. Then continue on with the rest of your layers of feathers with the right sides facing you.
 Once you get close to the center, it’s going to be trickier to get those feathers splayed as well without things spreading too thin or bunching in the center. Get those as tightly gathered as you can and hand stitch them down. Then cut your strip and tuck the satin under before stitching it down.
 Cut off 4-7 separate feathers and maybe even trim about 2″ – 4″ off the bottom of your feathers. Glue them down in the center so that they cover the center bald spot and splay out towards you. I used felt glue and made sure not to touch the feathers for about 24 hours.
 For your 16″ Juju hat, start about 1.5″ down from the outer edge of the placemat. Space your layers of feathers out about 1″ from each other or less depending on the type of feathers you use. You can turn up your third layer of feathers for more dimension on this one as well.
 Do the same with the 10″ size except start about 3″ down from the outer edge of the placemat. Don’t reverse your third layer of feathers on this one as they’re packed in tight and won’t splay nicely. There will be less movement on this type of feather, but they are dense and beautiful. You can trim about 2″ off the outer edge of your placemat when you’re done.
To attach them to your wall, simply slip one half of a folded paper clip through the weaving on your placemat and hook the other half over a nail or hook.

 These hats add so much texture to my studio work station! I literally want to run my fingers through them every time I sit down. If you’re not into bright colors or are looking for a more neutral option, these are also gorgeous in natural shades. Search around for your favorite colors and be sure to check that they have enough yardage available before you order so you can sit down and make your own Juju hat next weekend. Which room of yours needs one of these? –Rachel
Credits//Author: Rachel Denbow. Photography: Rachel Denbow and Janae Hardy. Photos edited with A Beautiful Mess actions.
29 Comments
Hi,
I love this idea!! I want to make it on my bedroom wall above my bed but would like to make a bigger one say 35-40″ diameter. Do you have any recommendations on what I can use as the base?
Thank you!
Gigi
You can order your handmade Juju hats by Bamileke craftsmen now from our online shop https://www.africanjujuhats.com
I tried the link but it didn’t work. Please give a correct one, thanks!
Great Idea. Last Sunday i made 3 with my Niece
Love love love! I saw this a couple of years ago DIY’ed by LoveMaegan, but this tutorial is a little simpler and I like the placemat idea! Off to Target dollar spot as we speak!
Oops, i didn’t get these were hats at first! They work very great as wall decoration as well 🙂
xoxo,Biene
http://lettersandbeads.de
I’m glad I’m not the only one feeling a bit ‘rubbed the wrong way’ about this project.
There is so much cultural importance behind these hats that the thought of people making them at home just because they look pretty without understanding or supporting the artisans who create them bothers me a lot.
Thanks for bringing up these points! I felt super funny about this project, too.
Wow! I’ve looked at these for years. Thanks for the instructions.
Thanks for bringing this up, Courtney! I was also concerned about this. It’s great that Rachel gave a little bit of cultural context, but it would be even better to share a Cameroonian writer or designer’s thoughts about these objects, what they mean, and how people from other backgrounds can most respectfully appreciate them (which might mean not imitating them for purely decorative purposes).
So fluffy!
So pretty!
http://my–socalledlife.blogspot.com.au/
There is an interesting and thoughtful discussion of the use of ceremonial pieces for home decor in the comments on this post: http://www.thejungalow.com/2014/04/bamileke-design-and-using-ceremonial-pieces-for-home-decor.html
I appreciate the need to save money, but I think it is worth considering all the implications when you’re taking on a DIY of another culture’s art.
Wow, they look so amazing! I wonder if I can succeed at this DIY, I’d really like them over my wall.
xx | www.recavi.com
IKEA!
This looks good! x
http://jessicawoods.fr/blog/
These are adorable! I love the peach one so much!
Unrelated question – where is your desk lamp from? I am on the hunt for a gold & white one!
These turned out really well! I’ve never heard or seen such hats before and I have to say I am hooked! Thanks for introducing them to me!
http://annescribblesanddoodles.blogspot.com
What a great DIY!
Love these!!!
Love this! I have been thinking of doing a DIY juju hat for ages. I am having trouble finding the peach feathers. I searched goose feathers and your suggested search terms and can’t find anything that looks like that. Can you link me or tell me exactly what to search for to purchase those?
So pretty! Sorry if this is a dumb question, but are they actually hats for wearing or just wall decor? Lovely either way!
I am SO excited to see this DIY and I cannot wait to make my own. Thanks!
Love the idea! Will definitely be trying this one one of these weekends coming up. I’ll post the result on my blog! Thanks for sharing!
Lena
http://zoyaandme.com
GENIUS!!!!!!!!!!!!
This is soooo genius! Thanks for posting, i know what im doing this weekend!
These hats are so creative! Thanks for sharing such a perfect decoration tip with us here at HQ:)
xo,
The Newsette
www.thenewsette.com
Wow, they look incredible! I like the yellow one!
https://www.makeandmess.com/
Amazing DIY!
www.mcarolina.com.br