 If you’re not really interested in learning to weave but love the textured wall hangings you’re seeing all over the Internet, I’ve got the perfect weave-hack project for you. You can use this latch hook rug canvas and hook to get the same shaggy wall hanging style. It won’t necessarily be any faster but it won’t require some of the tools and skills you’d need if you were wanting to weave the same thing. Plus you can customize the size of your wall hanging very quickly.
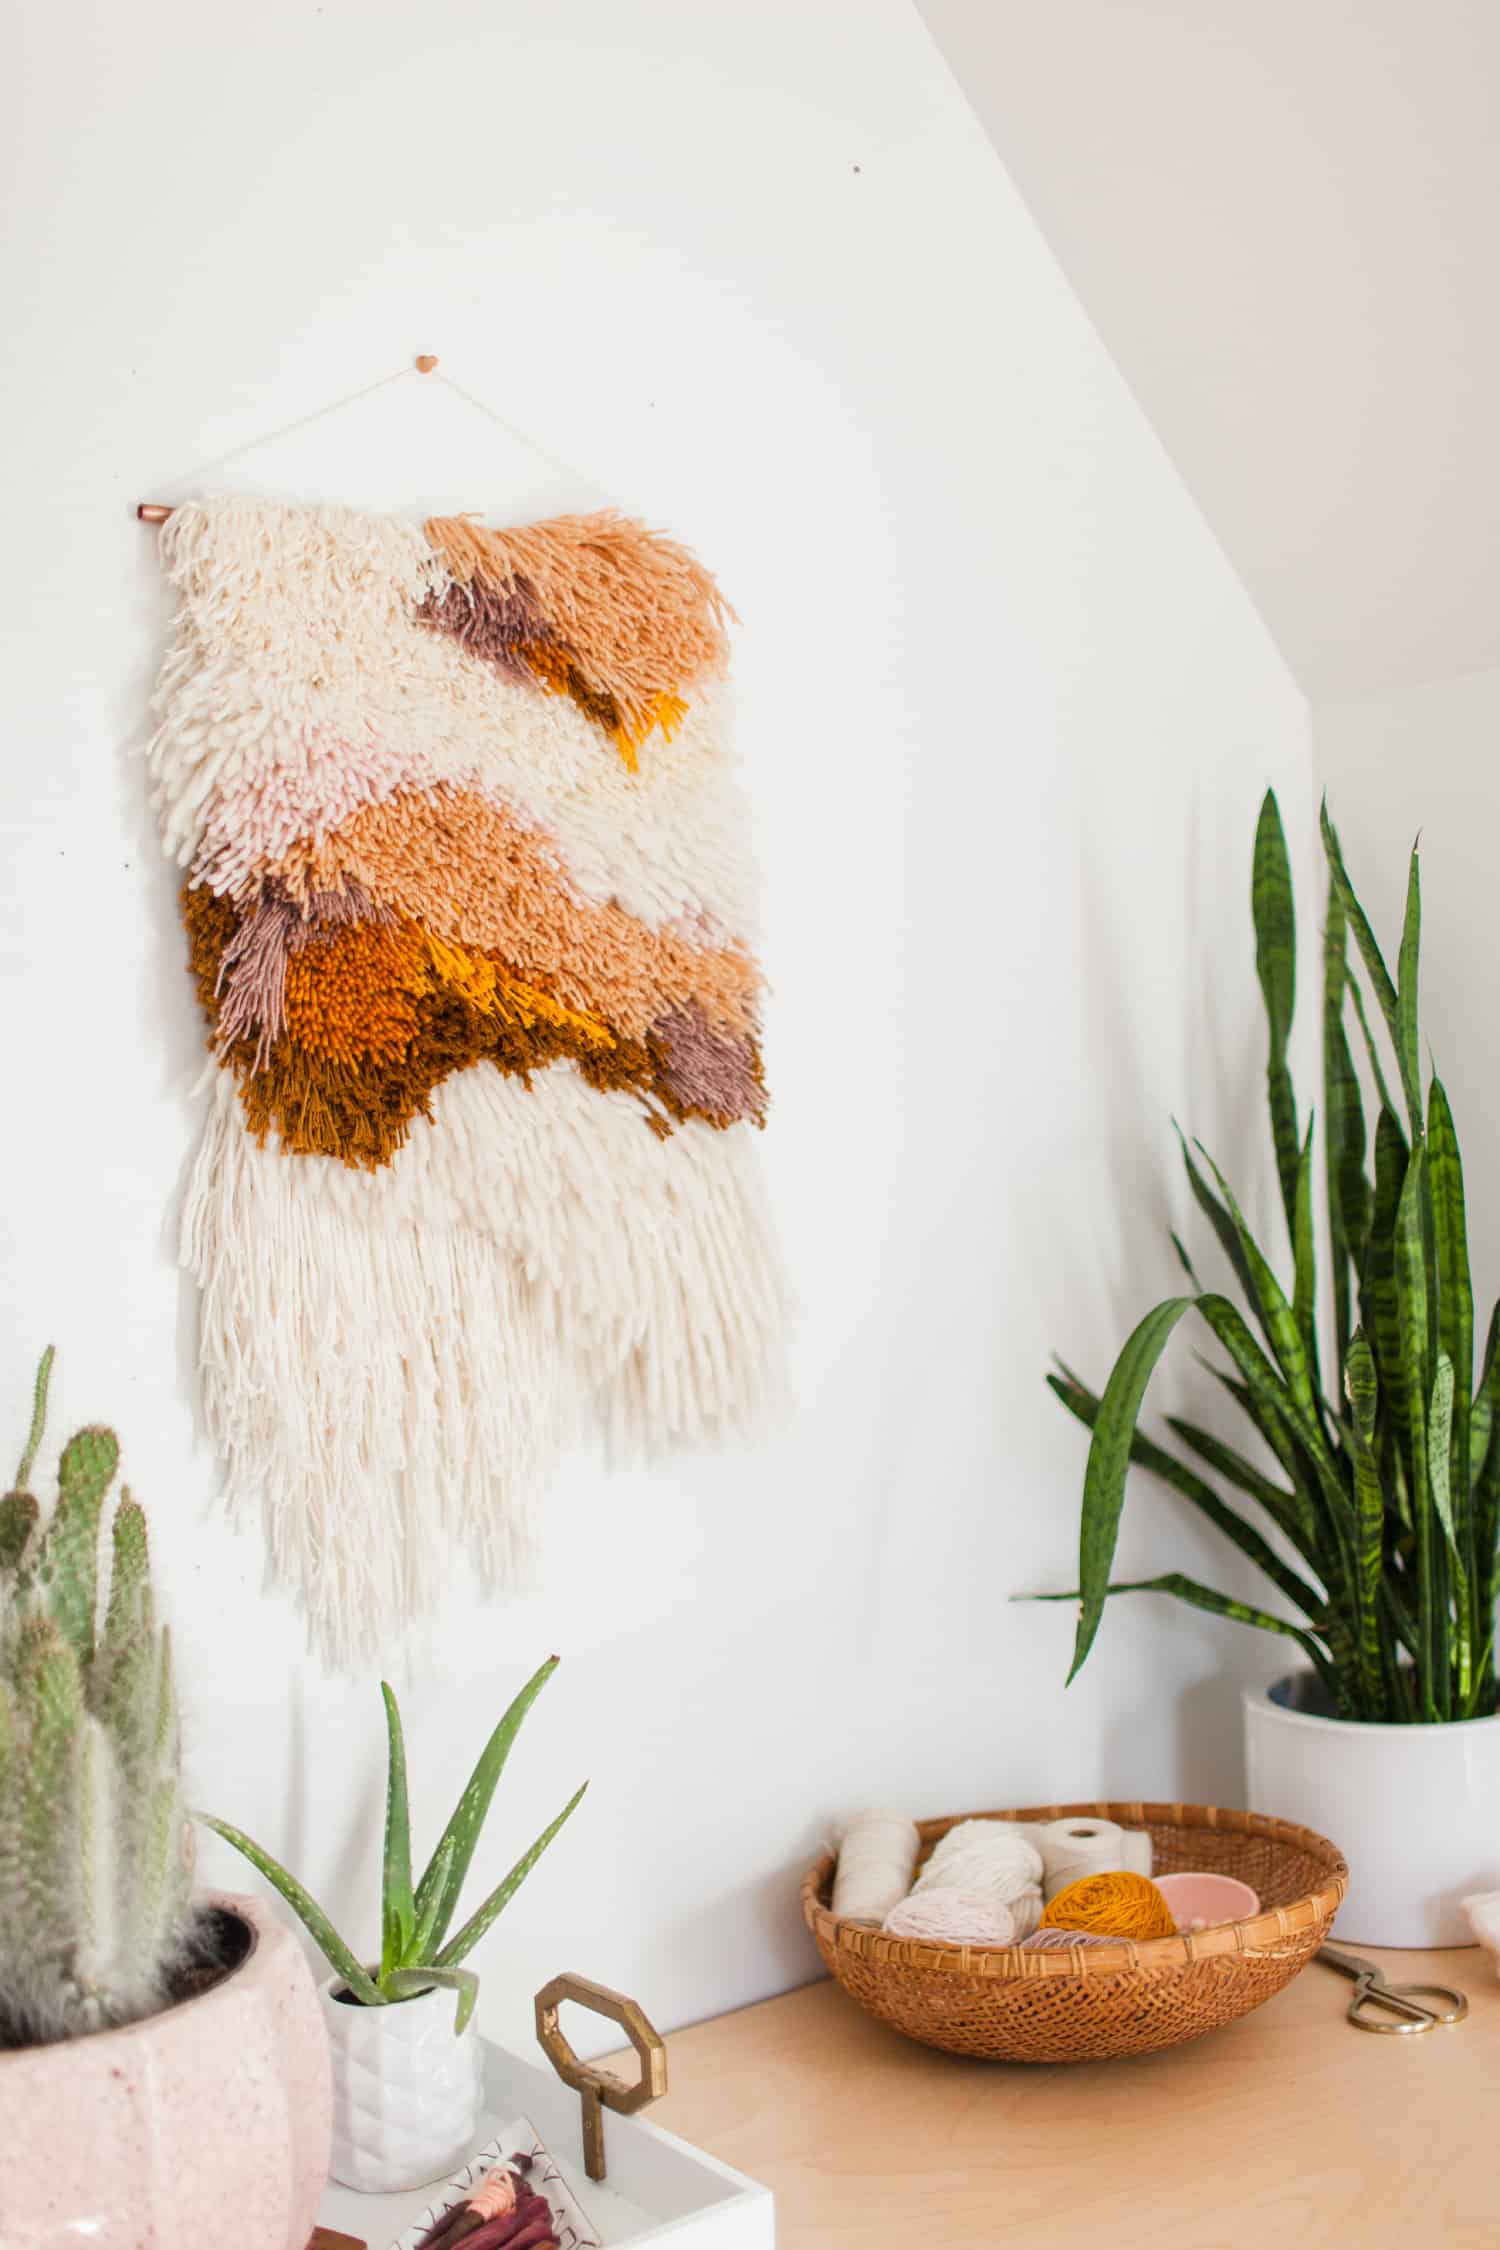
It’s a great way to destash your yarn pile if you’re a knitter or crocheter and you can use this tutorial to skip the wall hanging and just make your own rug! I love how my shaggy wall hanging turned out and all of the fluffy texture it adds to my studio space. Get the details for making your own below.

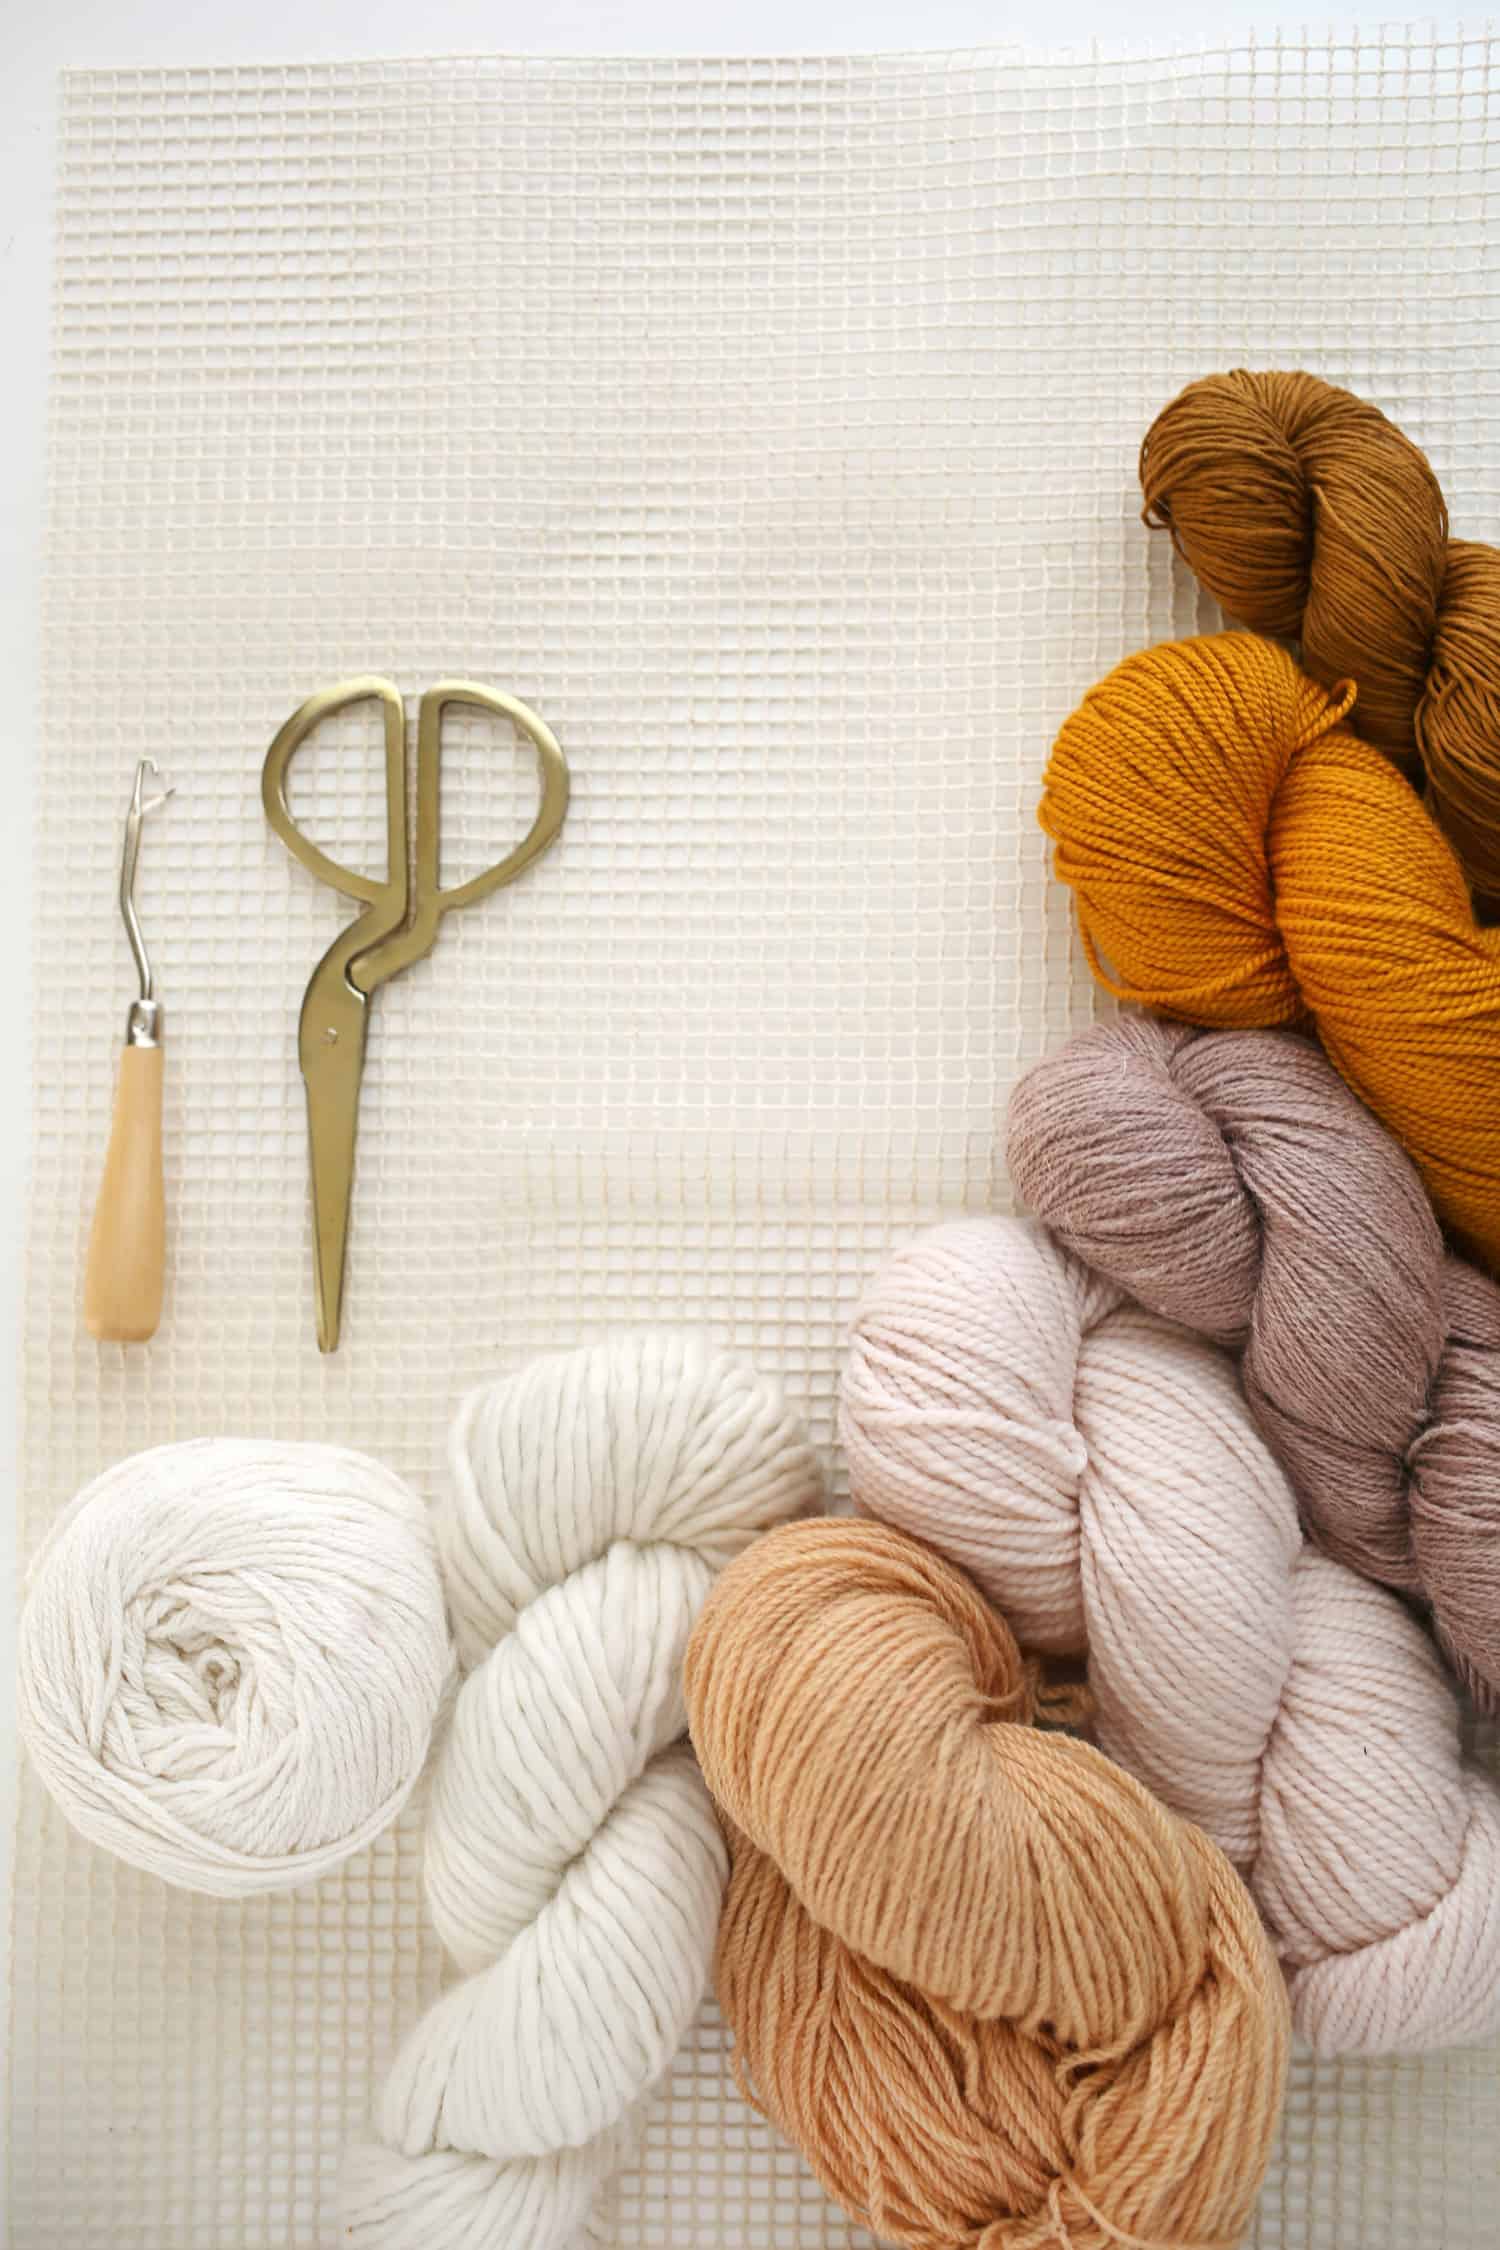 Supplies:
-24″ x 30″ latch hook canvas
–latch hook
-seven or eight skeins of yarn in various colors. I used a variety of thicknesses and also used both wool and cotton.
-scissors
-dowel or stick as wide as the canvas
You can sketch out your design first or just freehand it. You can even trace your color block shapes with a marker onto the canvas to make it easier! Once you’re comfortable with your design, start cutting your yarn into strands. The strands on the bottom of your canvas should be the longest and then you can cut them to a more consistent length. The lengths on the bottom of mine varied from 14″-24″ long and I used scrap cardboard that measured 7″ and 12″, respectively, as my base and just wound my yarn around them over and over before making a cut at one end. Keep cutting your strands as you go. The rest of my strands were about 5″ long and then I trimmed them once I was finished adding them all to my canvas.

 Step One: Cut your latch hook canvas to your preferred size. I cut mine to measure about 14″ x 28″. The bigger your size, the more yarn you’ll need. Then place two strands of yarn under your hook.
Step Two: Hold all four strand ends in one hand so that they are just about at the crook of your latch hook. Then slide the hook under one of the single strands on your canvas so that it comes up again. Make sure you slide it through past the latch.
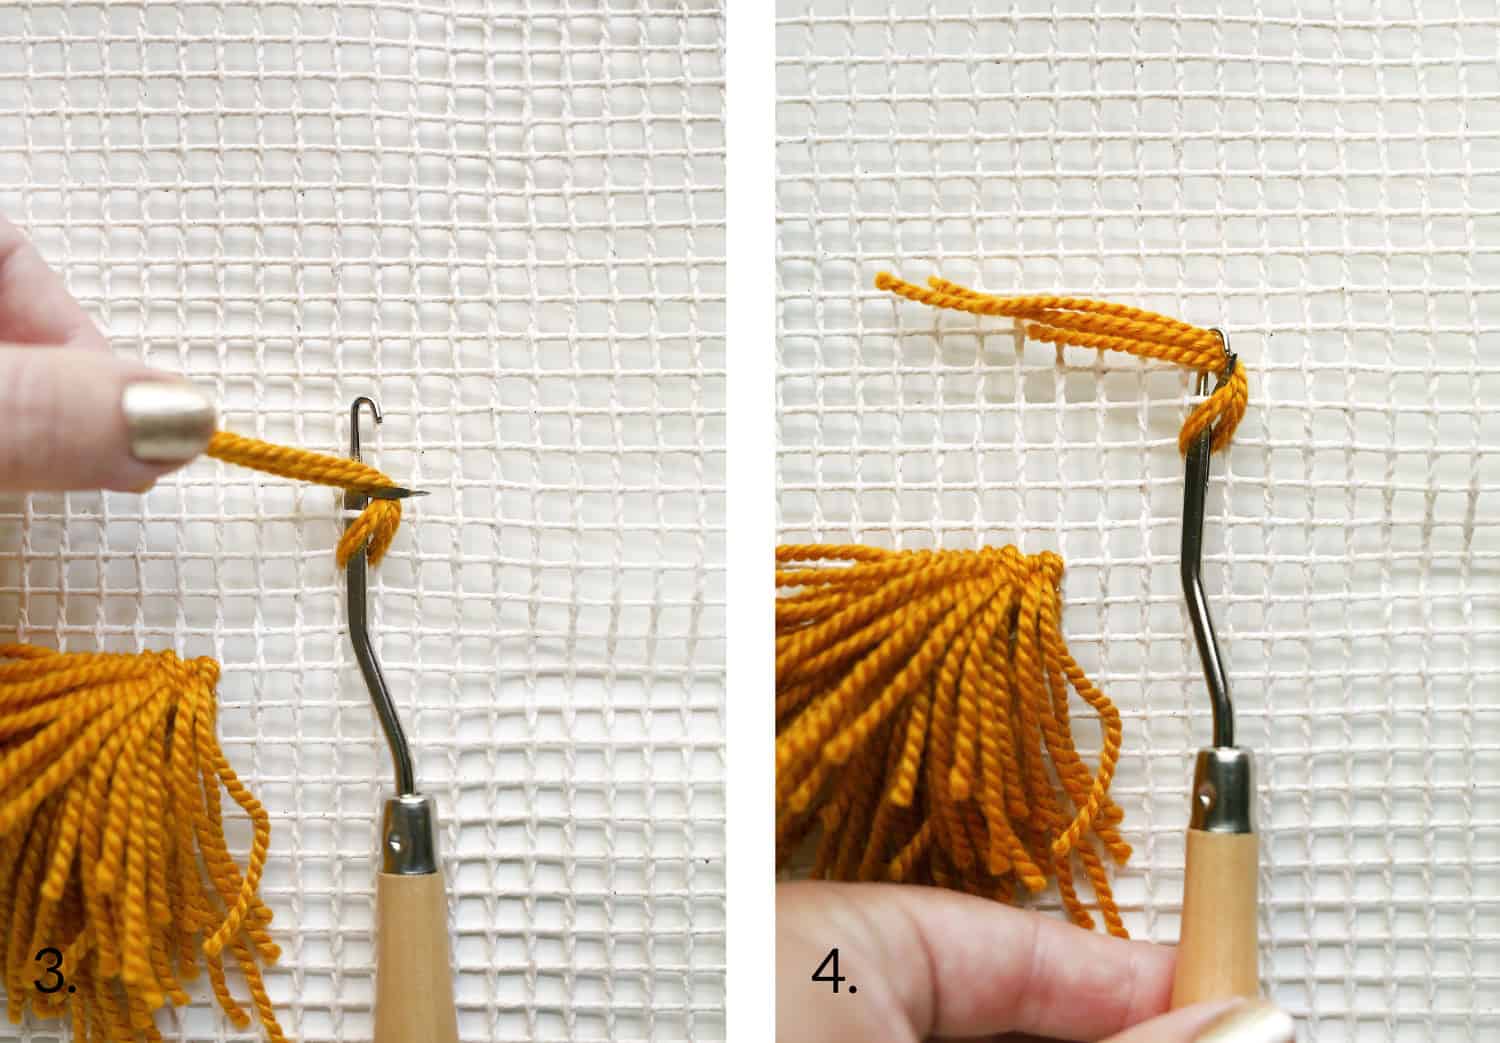 Step Three: Wrap your four strands to one side of the latch.
Step Four: Gently pull the handle toward your body to close the latch with the yarn inside the hook.
 Step Five: Keep gently pulling toward you so that your ends continue to pull through.
Step Six: This is how it should look when you are finished. One down, one million to go! Just kidding. But not really.
I usually work on a fiber project from the bottom up, but I knew I wanted to use a lot of whites on this one. I added three spots of color as my focal points and then filled things in from there. I just wound my yarn and cut strands as I went instead of counting them out beforehand. No one needs that kind of pressure.
 Work on one color block at a time or mix it up and fill it in from one side to the other. Adding in different shades of the same color can help blend your design, but contrasting colors work well together, too.
 This project will likely take you more than a few hours to complete if you fill a space as big as this one, but you could easily cut your canvas down to a 6″ x 10″ size and make a smaller version of this.
 Once you’ve worked your way to within 2″ of the top, call it a day. You’ll need that space to fold a hem pocket.
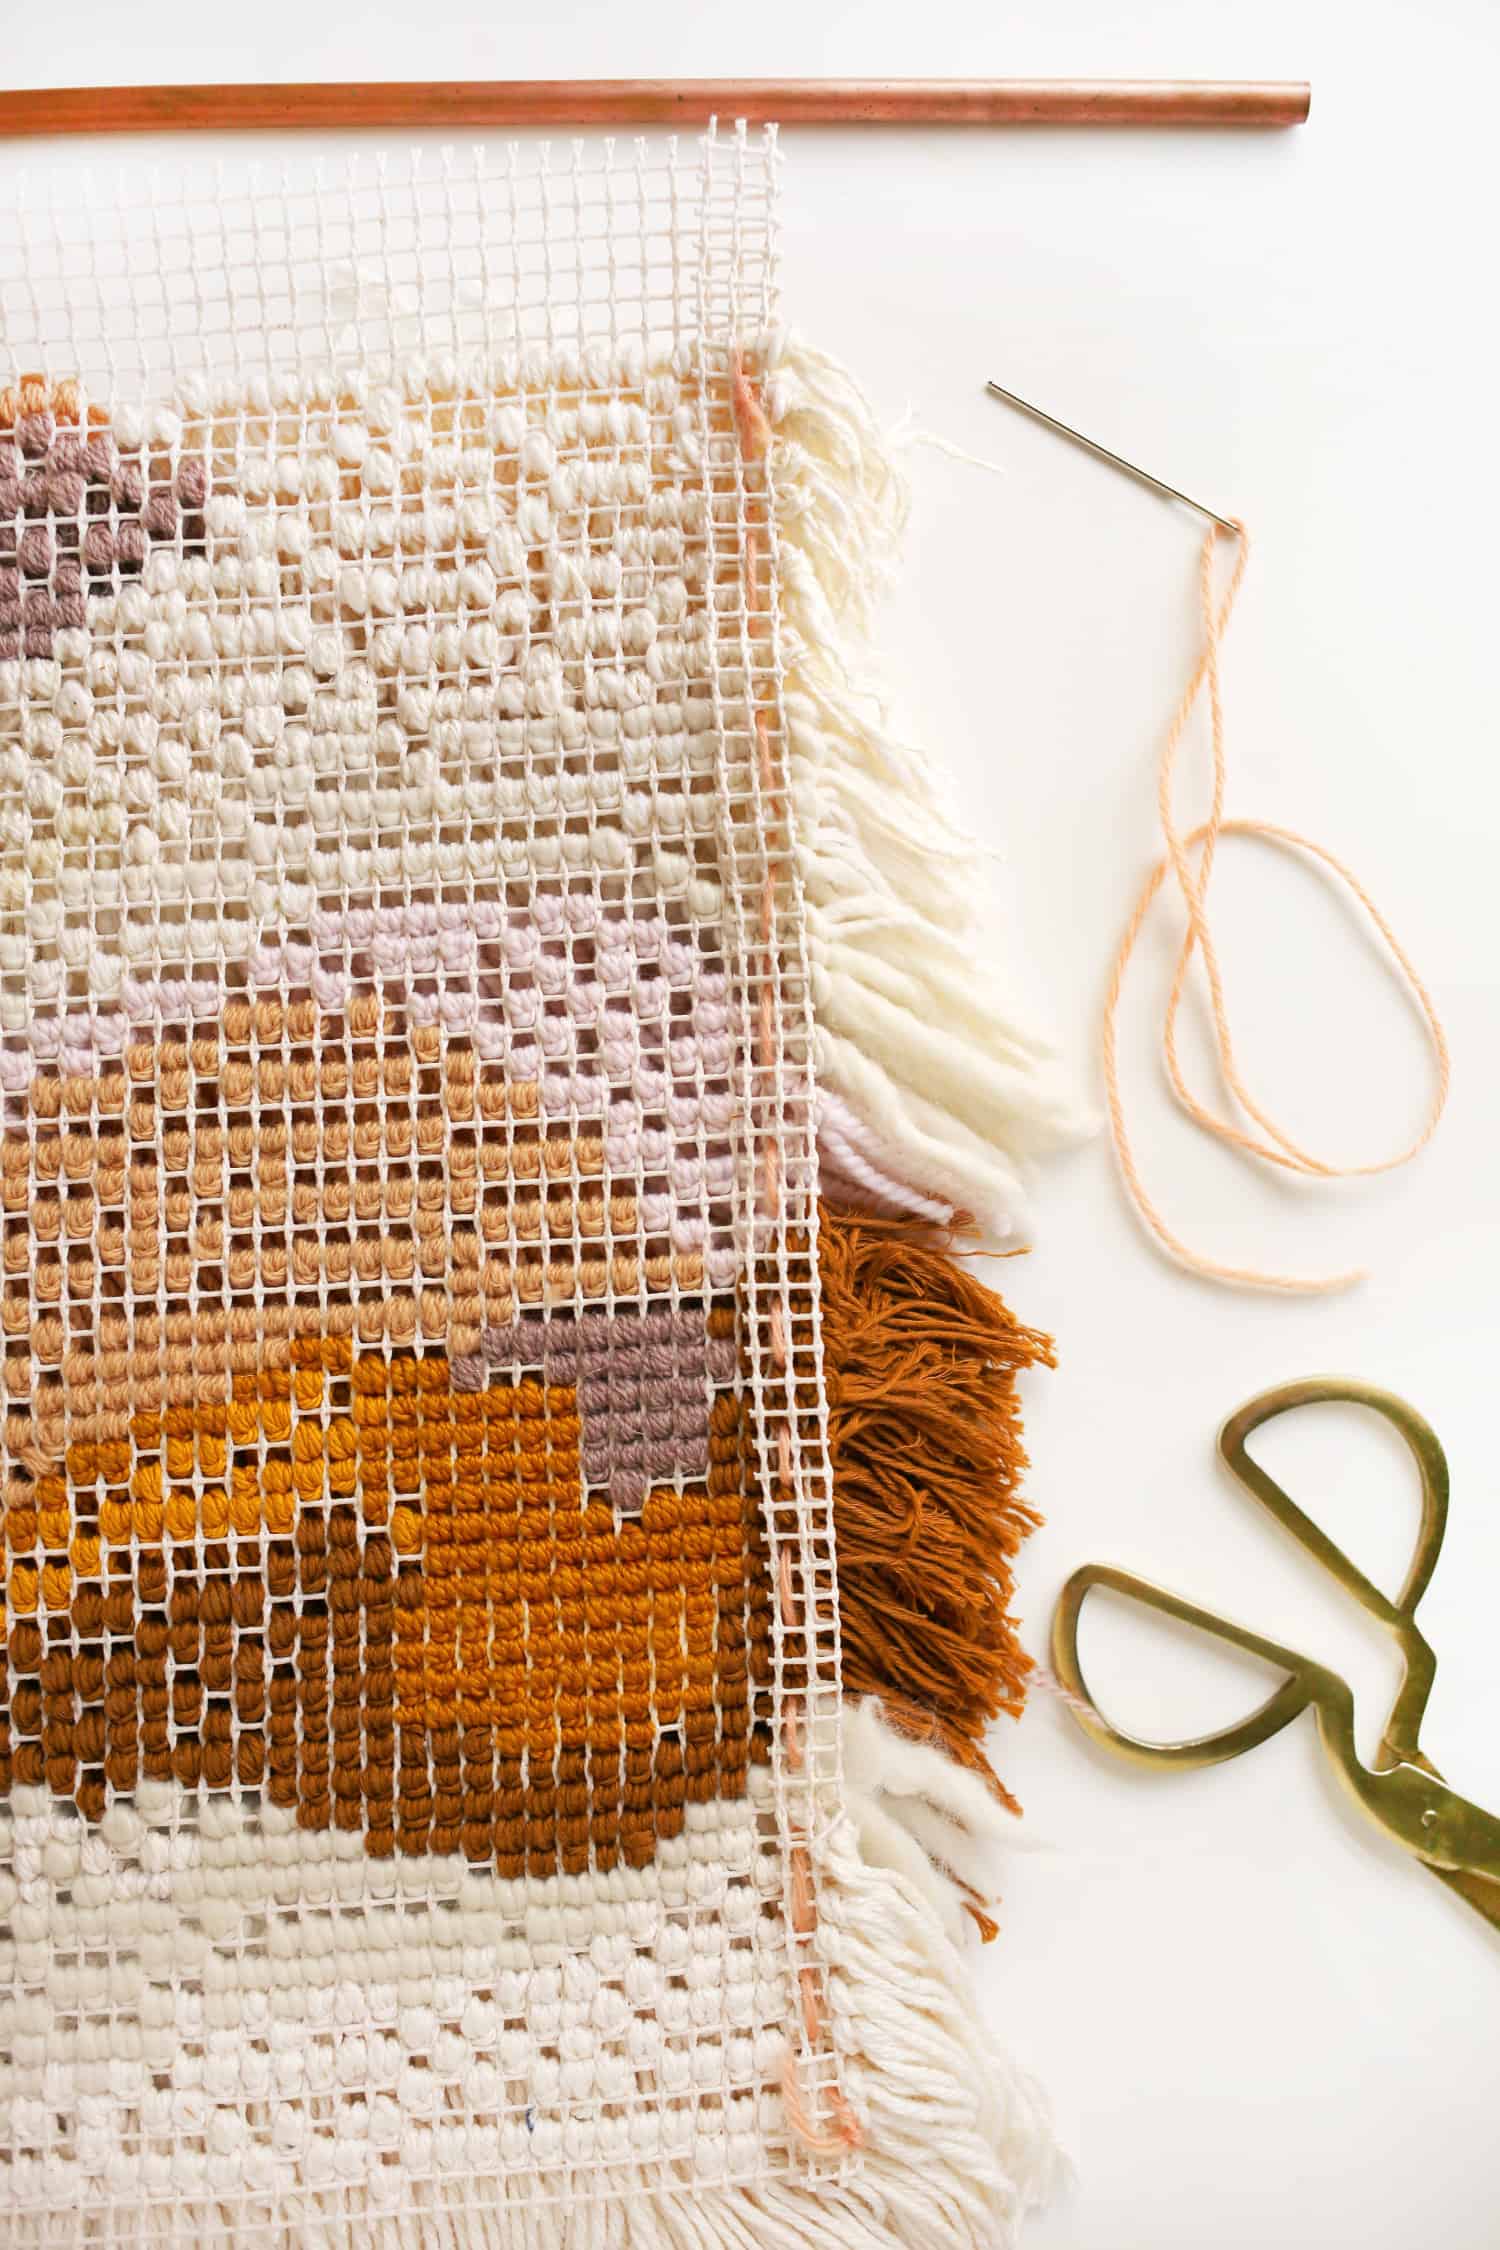 Flip your wall hanging to the other side and fold in your sides about 1/2″. Then use some of your yarn to stitch this down with a running stitch and tie a knot at the beginning and end. This will add a nice edge and make sure your strands cover it up nicely.
 Then fold the top of your canvas down so that there isn’t any bare space showing from the front. Use more yarn to stitch it to the main canvas with a running stitch and secure on both ends with a knot. Then add your copper pipe or dowel by slipping it through the space you just created and then add a hanger by slipping it through your copper pipe or tying knots on each end of your dowel.
 The final step is hanging it up and brushing things out with your fingertips. Then feel free to trim up rogue ends or whole sections to get the shape you want.
If you love this look and have been wanting to explore weaving, my book DIY Woven Art is a great resource for beginners and even intermediates! You can find it here. – Rachel
20 Comments
Weaving would be perfect for my Mum to try! She’s really into handicrafts and sewing and stuff like that!
Charmaine Ng | Architecture & Lifestyle Blog
http://charmainenyw.com
Very timely post for me. Several years ago I gave my Aunt a latch hook kit to occupy her time and she loved working on it. However she never finished and now is in very poor health. I want to finish it for her and have never done latch hook before. It was good to see how to do it. That’s a beautiful wall hanging, I love all your work!
Thank you! It’s really thoughtful of you to want to finish it for her. It’s really so easy, just repetitive. Also, kind of therapeutic.
-Rachel
Great post i love decoartion is so creative
New post:http://thepinkpineappleblog.blogspot.com/2017/08/haute-couture.html
Blog:http://thepinkpineappleblog.blogspot.com/
This is such a fun little project! I love how it turned out!
http://www.themoptop.com
Thank you! I love it, too!
I love this! I’m looking for a larger piece for a weird wall so I think I’ll give it a try.
Beautiful piece! It adds great texture and interest to the space. I loved making latch hook creations as a kid. I remember it being so relaxing and I’d love to give it another shot. Thanks for the inspiration…will have to check out your book, too.
http://www.rogiandco.com/
I love textile art so much. This seems so easy and I love the colors!! I tried doing wall weavings but it looked terrible, haha! I’ll have to give it another go, this color palette is screaming my name!
http://sarahmichiko.com
That looks so awesome, I would love to touch it to be honest! Looks fluffy and soft!
https://www.makeandmess.com/
Are you sure you wouldn’t rather have it on the floor? Looks soooo fluffy 😉
Wow, I am utterly obsessed with this post! I did a lot of latch hook crafting when I was a kid – making little, rather unattractive, rugs with shapes and a pattern guide – and now I can finally use it! I’m making this ASAP and will post the result on my blog!
http://www.shessobright.com
I found one of those tools in a box of my grandma’s sewing stuff, but never knew exactly what it was for! thanks for the enlightenment! 😀
wow such great post it,s very helpful blog
https://www.chappal.store/
Thanks for the post. That looks so awesome. I will definitely try this.
Awesome result! I love this!
http://www.terradaflor.com/
Just love this piece of artwork! a great decoration on wall! I will try it myself with my own twist. Thanks for sharing!
Love the colors! I have a latch hook I started nearly 20 years ago. Ya think I should finish it? 😉
OMG this is amazing!! My partner and I are moving in August & I’m looking for all kinds of ways to do some DIY decoration. Definitely going to try this, I love the way it looks!!
Timing is everything – need to fill every moment of my time, as I have recently been confronted with a marital change. Would you be able to tell me the different kinds of yarns you used for this piece, which, by the way, is absolutely fabulous. I went to purlsoho.com, but the widths of the yarns are difficult to ascertain from looking at them on the website. I love the idea of using varying widths. Thanks so much – Wendy