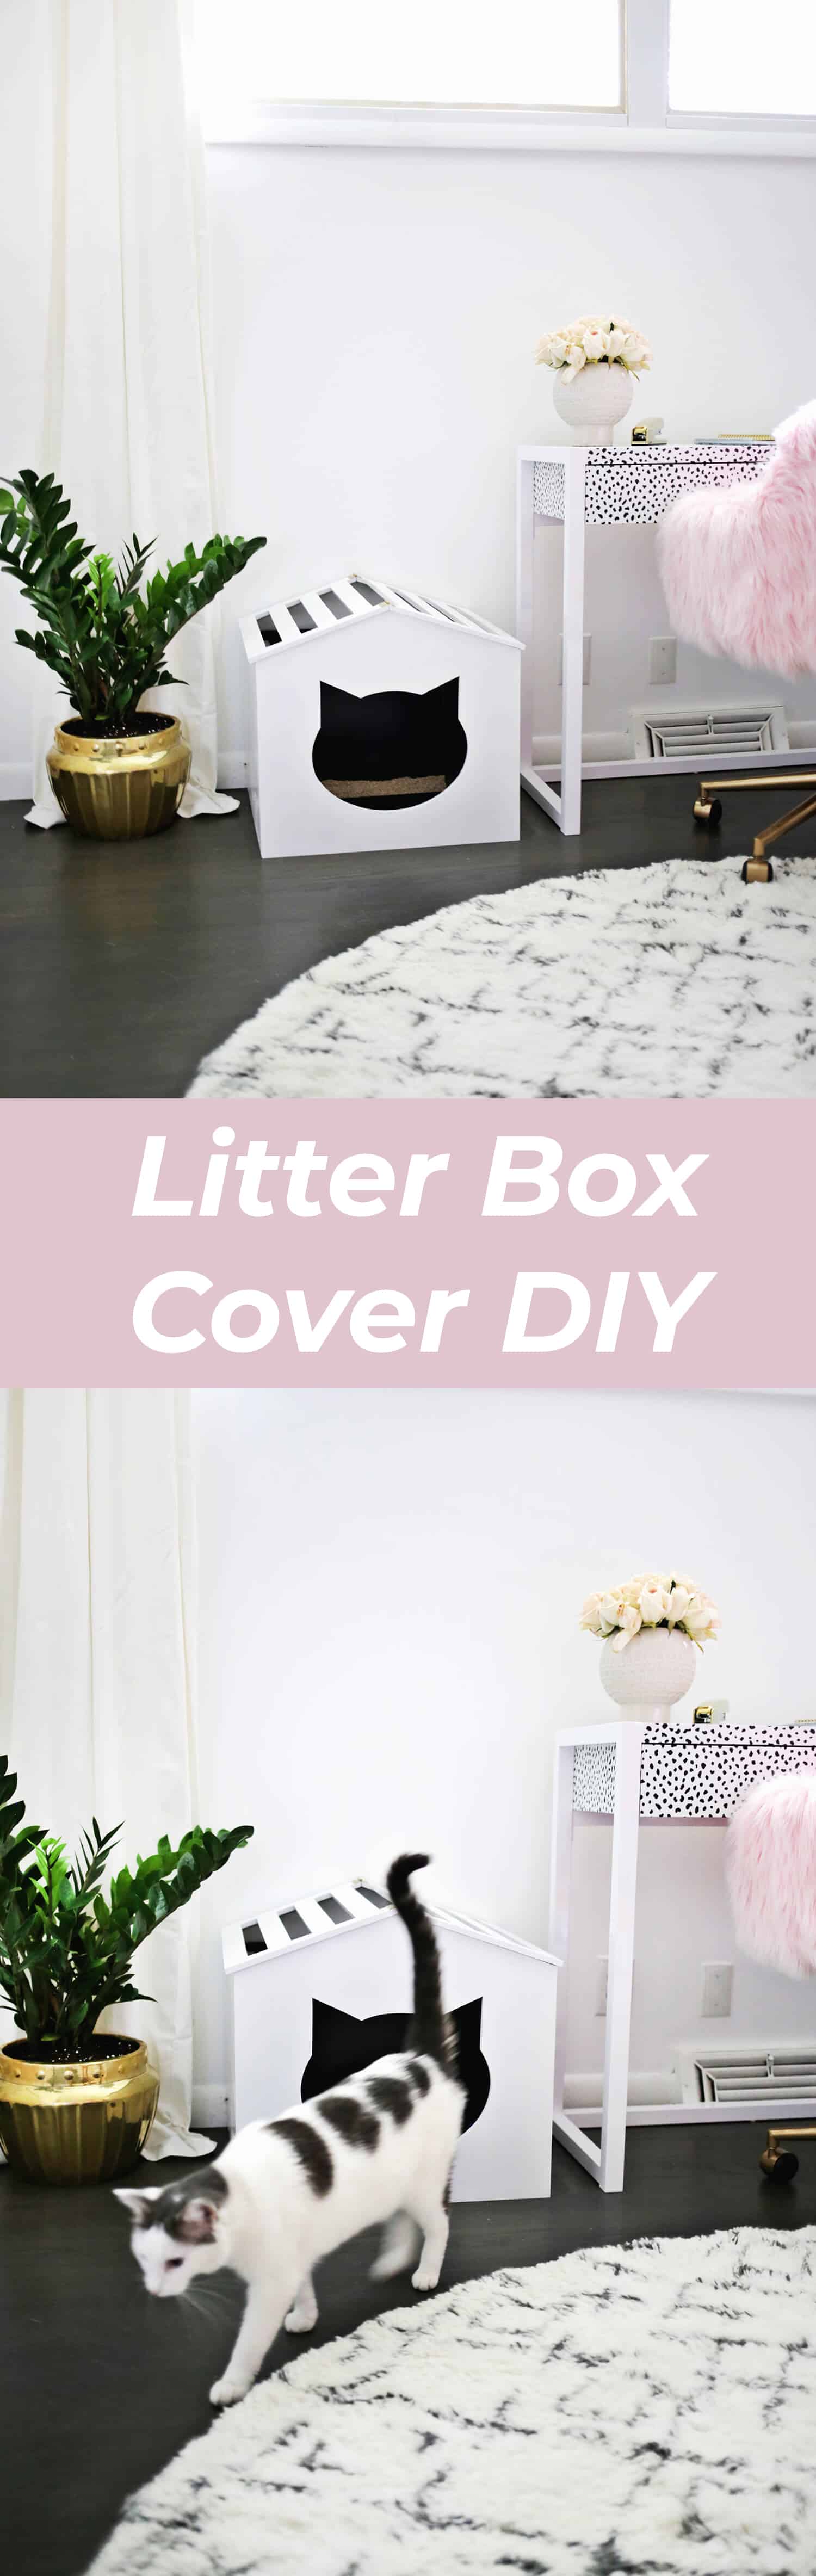
") First of all, let me just say a resounding you’re welcome to all you fellow cat owners out there. I know how tough it can be to love the adorable little kitty that naps on the couch with you but not always love the rest of the kitty gear that comes with that furry little face. So far, I’ve done my best to upgrade versions of cat essentials with a color-blocked scratching post, junk food kitty toys, a hand-stamped cat collar, and even a mini Palm Springs scratch house to make the feline essentials fit in (rather than stand out) from our home decor. Now, while all these things have really helped integrate our human and cat worlds, there is still one area I haven’t gotten around to making aesthetic improvements in—the litter box. I think I didn’t feel the need for a litter box cover in our last house because we had a separate laundry room where we could keep all those kitty necessities, and it was rather hidden under a shelf in a corner. At this house, however, the laundry is actually in the garage with no kitty access to the house. So we have to do the dreaded “litter-box-in-the-middle-of-the-room” scenario. Ever since we moved last year, doing a DIY cover has been on my to-do list. So here we are!
First of all, let me just say a resounding you’re welcome to all you fellow cat owners out there. I know how tough it can be to love the adorable little kitty that naps on the couch with you but not always love the rest of the kitty gear that comes with that furry little face. So far, I’ve done my best to upgrade versions of cat essentials with a color-blocked scratching post, junk food kitty toys, a hand-stamped cat collar, and even a mini Palm Springs scratch house to make the feline essentials fit in (rather than stand out) from our home decor. Now, while all these things have really helped integrate our human and cat worlds, there is still one area I haven’t gotten around to making aesthetic improvements in—the litter box. I think I didn’t feel the need for a litter box cover in our last house because we had a separate laundry room where we could keep all those kitty necessities, and it was rather hidden under a shelf in a corner. At this house, however, the laundry is actually in the garage with no kitty access to the house. So we have to do the dreaded “litter-box-in-the-middle-of-the-room” scenario. Ever since we moved last year, doing a DIY cover has been on my to-do list. So here we are! ")
Supplies:
-sheets of 1/2″ thick plywood (one big enough to fit your 4 sides or several smaller sheets)
-1 1/2″ wide boards for your rooftop (I used 6 boards that were about 30″ long.)
-nails
-wood glue
–jigsaw
-miter saw (optional but needed if you want a top that opens)
–2 small hinges
–cat shaped opening template
-wax paper
-paint
To determine the size that your box cover should be, you’ll need to first measure the length and width of your litter box to make sure it will fit. Take the measurements and use the guide above to find what size your panels should be (don’t forget you need two sides and two front pieces). The above dimensions should give you a pretty snug fit with about 1/4″ of perimeter space between the litter box and the cover, but you can always make the cover bigger if you want (you just don’t want it smaller than your litter box obviously).
") Draw out your dimensions for all four sides onto your plywood sheets and use a jigsaw to cut out your sides.
Draw out your dimensions for all four sides onto your plywood sheets and use a jigsaw to cut out your sides.
") Determine how big you want your cat-shaped opening to be and print out your template the correct size. You’ll probably have to print it on multiple pages and tape together unless you have a large printer. Remember that you want the opening to be big enough for the cat to use, so make sure they have room to get through it comfortably (I made mine about 12″ wide). Trace the opening onto the center of the front panel 2-3″ from the bottom of the panel.
Determine how big you want your cat-shaped opening to be and print out your template the correct size. You’ll probably have to print it on multiple pages and tape together unless you have a large printer. Remember that you want the opening to be big enough for the cat to use, so make sure they have room to get through it comfortably (I made mine about 12″ wide). Trace the opening onto the center of the front panel 2-3″ from the bottom of the panel.
")
") Drill a few holes (at least the width of your jigsaw blade) into your traced cat shape so you have an opening to get the jigsaw into. Use the entry holes to cut out your shape.
Drill a few holes (at least the width of your jigsaw blade) into your traced cat shape so you have an opening to get the jigsaw into. Use the entry holes to cut out your shape.
") Sand the edges of each of your panels to remove any rough spots.
Sand the edges of each of your panels to remove any rough spots.
") Match up your panels so that the sides are between the front and back panels with sheets of wax paper underneath to catch any extra glue. It’s helpful to have an extra set of hands for this part (thanks, Todd!) when trying to get the pieces squared up. Use wood glue and tape to keep the pieces in place while the glue sets (a few strategically placed boxes would work as well).
Match up your panels so that the sides are between the front and back panels with sheets of wax paper underneath to catch any extra glue. It’s helpful to have an extra set of hands for this part (thanks, Todd!) when trying to get the pieces squared up. Use wood glue and tape to keep the pieces in place while the glue sets (a few strategically placed boxes would work as well).
") Once the glue is set, use a few nails to hammer your box together from the front and back panels.
Once the glue is set, use a few nails to hammer your box together from the front and back panels.
") If you have access to a miter saw, you’ll take your 1.5″ boards and use the saw to cut four of them at the correct angle so they meet together at the peak of your roofline (on the front and back) with a 1/2″ overhang on the bottom edges. While I’m sure there are more technical ways of figuring out what that angle is before cutting it, I just use scrap pieces of wood and keep cutting angles and adjusting until I find the right one. It’s actually pretty fast that way and my dimensions ended up needing a 25° angle to meet up correctly. Center your 4 boards, and then measure the distance between the front and back boards and cut 8 more boards that will fit in between them.
If you have access to a miter saw, you’ll take your 1.5″ boards and use the saw to cut four of them at the correct angle so they meet together at the peak of your roofline (on the front and back) with a 1/2″ overhang on the bottom edges. While I’m sure there are more technical ways of figuring out what that angle is before cutting it, I just use scrap pieces of wood and keep cutting angles and adjusting until I find the right one. It’s actually pretty fast that way and my dimensions ended up needing a 25° angle to meet up correctly. Center your 4 boards, and then measure the distance between the front and back boards and cut 8 more boards that will fit in between them.
If you don’t have access to a miter saw, you can use your jigsaw to cut 8-10 of the 1 1/2″ boards that will run from the front of the roof to the back (with about 1/2″ overhang on both sides). Just space them out evenly across the roof and nail into place after painting. You won’t have the option to open the roof this way, but it will look pretty similar and you can just clean the box from the front opening instead.
") Space your 8 boards equally over some wax paper between your 4 angled boards and use wood glue to adhere into place. I glued them together over a cutting mat so I could use the lines below to make sure the pieces were squared up correctly.
Space your 8 boards equally over some wax paper between your 4 angled boards and use wood glue to adhere into place. I glued them together over a cutting mat so I could use the lines below to make sure the pieces were squared up correctly.
") Paint your cover and your roof pieces your desired color, and then attach the two roof halves with your hinges once the paint is dry. Decide which half of the roof you’ll want to open for cleaning purposes. Then glue or nail the other half of the roof shut for stability when opening the roof. Place your cover over your litter box and admire your hard work!
Paint your cover and your roof pieces your desired color, and then attach the two roof halves with your hinges once the paint is dry. Decide which half of the roof you’ll want to open for cleaning purposes. Then glue or nail the other half of the roof shut for stability when opening the roof. Place your cover over your litter box and admire your hard work!
")
")
")
")
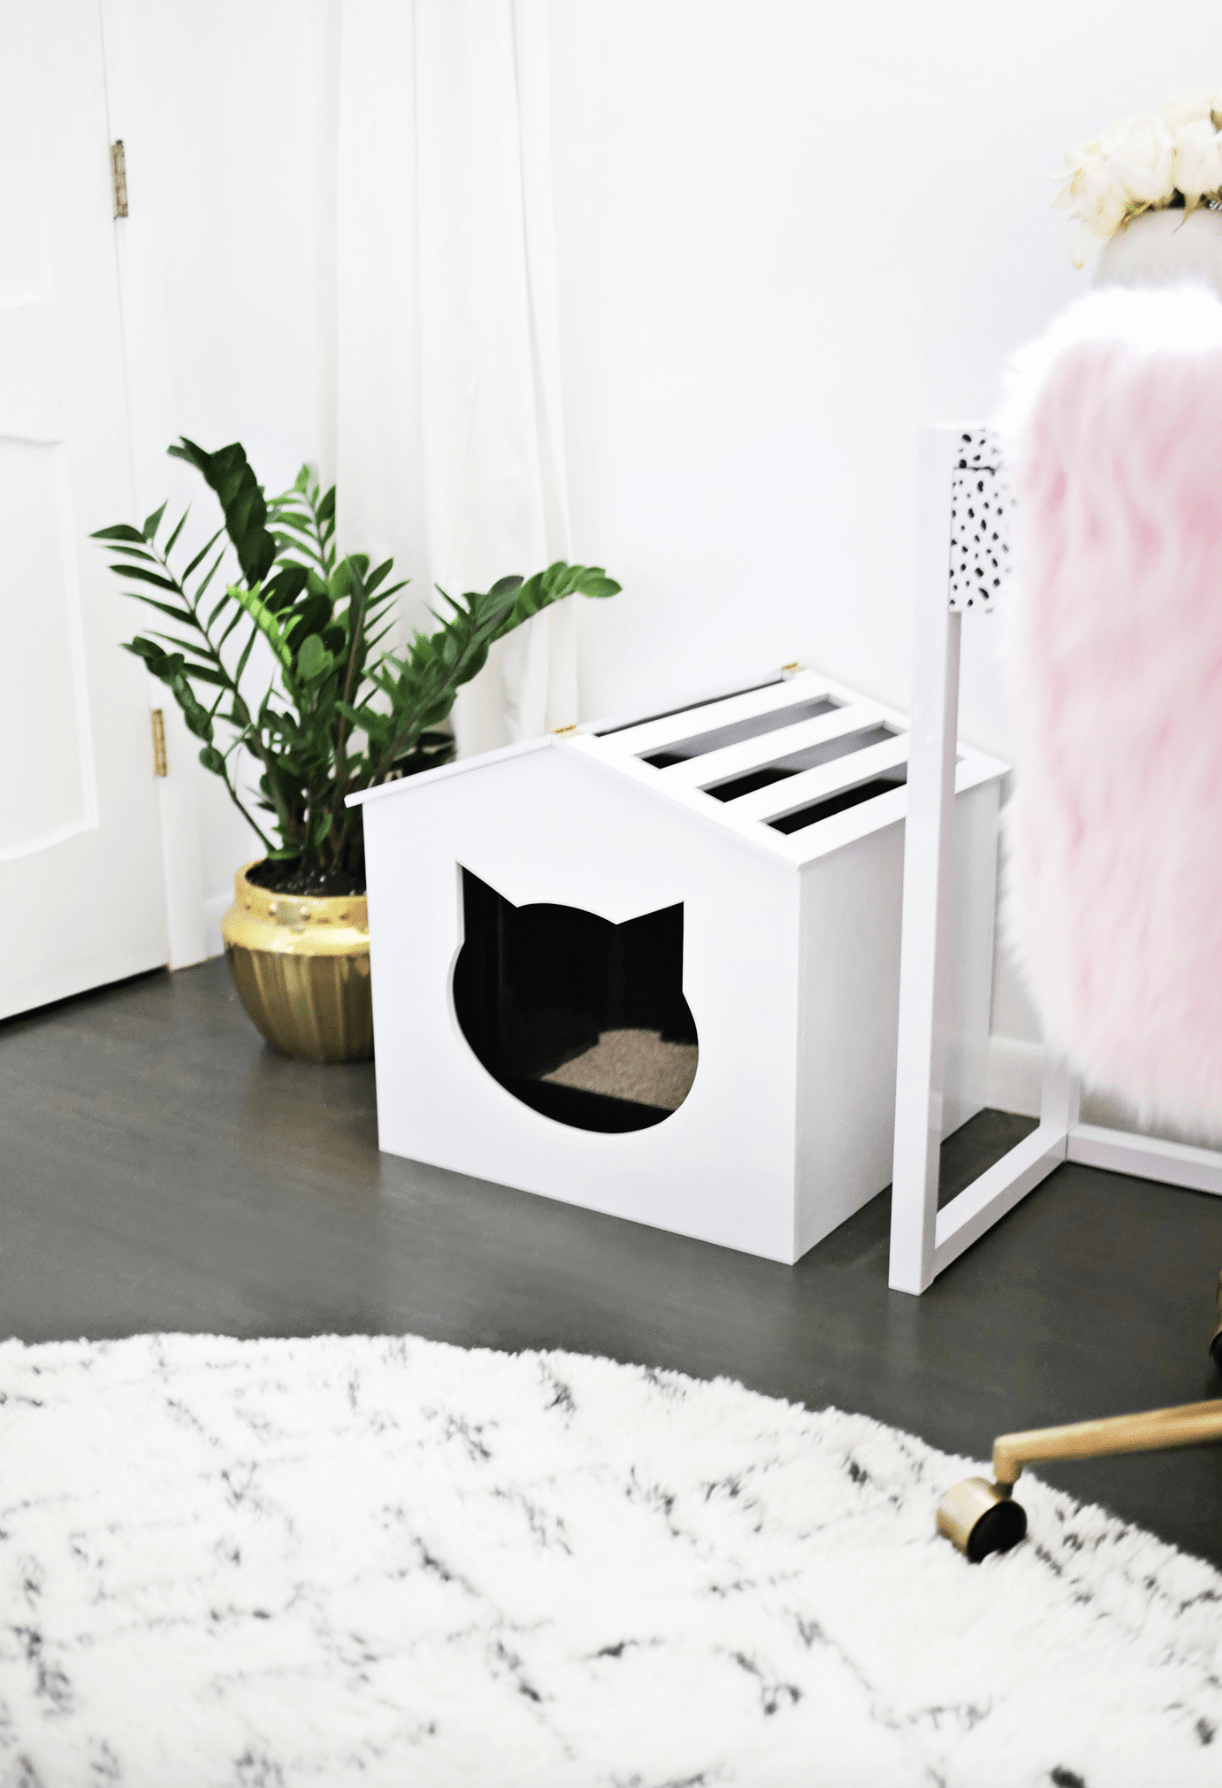
") It looks SOOOOOO much better if you ask me! You can also add as many or as few slats to the roof as you want to expose more or less of the litter inside from the top view, but some cats don’t like to be totally closed in from above (while others don’t mind it), so use your cat mama judgement on that one. Either way, this is a giant visual improvement for us, so I’m thrilled with how it came out, and it got, ahem, used pretty quickly once it was put out. So I think the cats like it too. If you’ve been looking to improve your litter box situation, then this may be just the solution for you! xo. Laura
It looks SOOOOOO much better if you ask me! You can also add as many or as few slats to the roof as you want to expose more or less of the litter inside from the top view, but some cats don’t like to be totally closed in from above (while others don’t mind it), so use your cat mama judgement on that one. Either way, this is a giant visual improvement for us, so I’m thrilled with how it came out, and it got, ahem, used pretty quickly once it was put out. So I think the cats like it too. If you’ve been looking to improve your litter box situation, then this may be just the solution for you! xo. Laura
Credits // Author and Photography: Laura Gummerman. Photos edited with the NEW A Beautiful Mess actions.


37 Comments
I see your litter box on the inside looks like it has high sides. Would you mind linking to the one you used? 🙂
Laura, I made this box cover over (Canadian) Thanksgiving weekend with my dad. It was a bit of a bonding project, a bit of a birthday gift to myself, and an awesome learning experience.
We only had hand tools, so the roof is solid with 1-inch ‘polka dot’ cut outs… and we left the roof “natural” as the plywood sheet was actually quite nice with few knots.
THANK YOU for the inspiration, and the templates! My kitty Vera has been using the box, without issues. Can we share our own projects with you? I can’t wait to tackle another one of your ABM projects.
You ladies are wonderful. xo
This is such an amazing idea! Absolutely loving it.
Anika | anikamay.co.uk
omg this is amazing! i definitely need to do something like this for my cat
this is so so sooo cute! i love it 🙂
Love this! I’d use plexiglass on the top to still let the light in, but keep the dust out of the rest of the house.
Omg stoooopppp…. this amaaazziinggg!!!! I love it so so so much!
Adorable! I bet my cats would love it 🙂
I made a hole at the back of a simple IKEA cabinet to put my litter box in and I use it as a night stand in my spare bedroom. I had the same issue of “placement” since I live in a small 2 bedroom condo. I wanted the box to be completely enclosed because, although I clean the litter box everyday…..when Mr. goes number 2……….he really smells like a dude cat! So that hack has worked very well for me.
This is the cutest idea! I don’t have a cat, but when I do get one, I’ll definitely have to do this! xo
McKenzie | therosynook.com
This is so cute!!!!
Love it!! My husband made a wooden box for our cat but she likes to pee outside the litter box. We really need a new version. I’m going to send this link to him!!
Yay!!
Laura 🙂
I just have a litter mat in front of each of their boxes usually, that helps a lot!
Laura 🙂
Yes! A cover is totally necessary when it has to be in plain site, hope you get to make one!
Laura 🙂
Yes, litter box bullying can totally be a thing for multiple cats! We’ve had problems with that in the past, but adding more than one box helped and I think Mac just kind of stopped being so protective of the boxes eventually. Hope you can figure your situation out!
Laura 🙂
Aw, well here you go! Hope you love it!
Laura 🙂
Yay! Perfect timing!
Laura 🙂
Aw, thanks Jill!
Laura 🙂
Laura, you are a crafty genius! I don’t have a cat yet I’m compelled to make one. It’s too darn cute.
This is so perfect, I wish I had a cat so I could build this!
https://www.makeandmess.com/
Aw this is so cute! My cat would love, but i’m sure i would love this even more 🙂
Es precioso, realmente una monada, me encanta como le das siempre ese toque dorado que tanto me gusta.
This is such a cute idea!
Petal Poppet Blogs xo
So cute!
That’s so adorable! Love the cat face entrance.
www.SpotandGather.com
So creative, and the result looks ADORABLE! It’s so pretty that it perfectly disguises the litter box, haha. I don’t own cats but this is brilliant.
Have a great week!
Joanne | Life in Blue Skies
Amazing! I’m making one (well, actually, 2) right away! This will change mine and my cats’ lives!
So cute…. now if you can design something to catch all the cat litter once they step out of the box. 😉
I loooooove this!!! I have two cats and no good place to put their box in this apartment so this would be perfecto! Your post made this crazy catlady sooo happy!!!
LOVE THIS. Since I moved in with my partner, my cat and his dog have really struggled to get used to sharing a home. I have to make sure that my cat Lola has a safe space to which she can retreat…where she also has access to all the essentials. So I can’t keep the litter box in the bathroom and the catfood in the kitchen like I want to. The *living room* (ack!) now houses her food, water, and litter box. We basically keep the windows open ALL THE TIME, scoop obsessively, and put a chair in front of the litter box. I’ve been looking into end-table-esque litter box covers. This is cuter than any options I’ve found.
This is so adorable!!
http://www.angelicabbie.com
This is genius and so cute!! I’m a dog person, but I’ve sent all your cat diy’s to my favorite cat loving friend-she’s going to love this one!! Almost makes me consider getting a cat…almost;)
This is super cute, but having an enclosed litter box caused major box issues for my cats. One would ambush the other as she left the box, and years after we got rid of the enclosed box, one cat still doesn’t use the box consistently (and acts terrified when she does). Of course all cats are different, so this could work perfectly for other cats.
But if it doesn’t, maybe you could consider adding a cat door/tunnel/whatever to the garage instead.
This is so funny! I messaged a couple days ago you asking for this exactly and here it is! Funny how that works out! You killed it btw!
This is actually so amazing, and it’s like you read my mind. Just last night I was like, ‘I HAVE to do some diy to this litter box situation’, and BOOM there you are. Thanks so much!
Mac and Charlie have the raddest kitty life! They need their own Instagram! I love every cat project you make, Laura.