 It feels so good to finally finish this entryway makeover that I had been planning for close to two years! When we first moved in a year and a half ago, we ripped up all of the flooring on the first floor of the house and replaced it with engineered maple. I had purchased enough to use in our entryway too, thinking I wanted a consistent flow through the entire house. But then I thought: Nah, let’s do something fun in here!
After about a year of postponing this project over and over, so many of my original plans had changed. But I’m so glad that we took the time to really carefully consider this area before gathering materials and getting it done. We love the way it turned out, and now our entryway is a lovely space to welcome guests into our home.
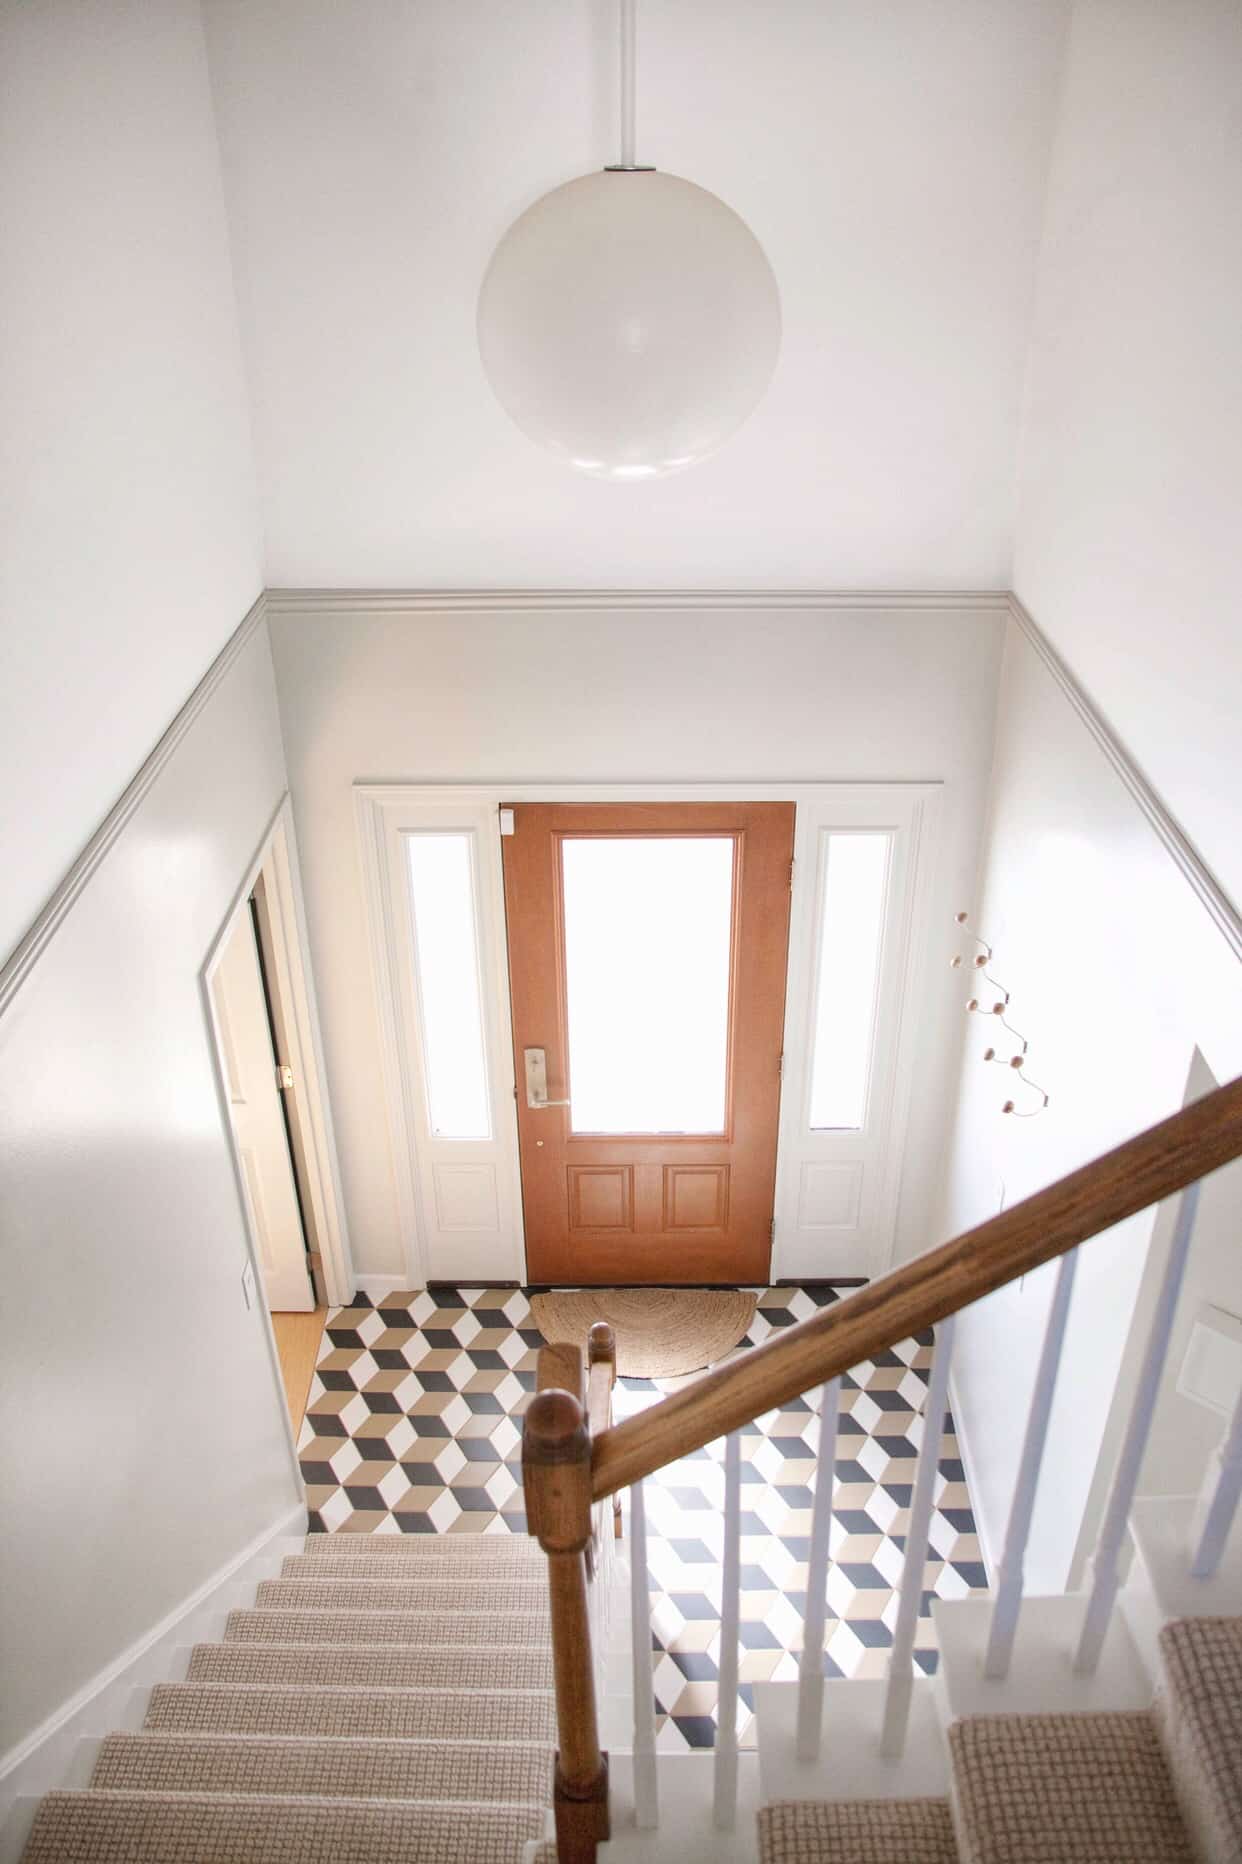
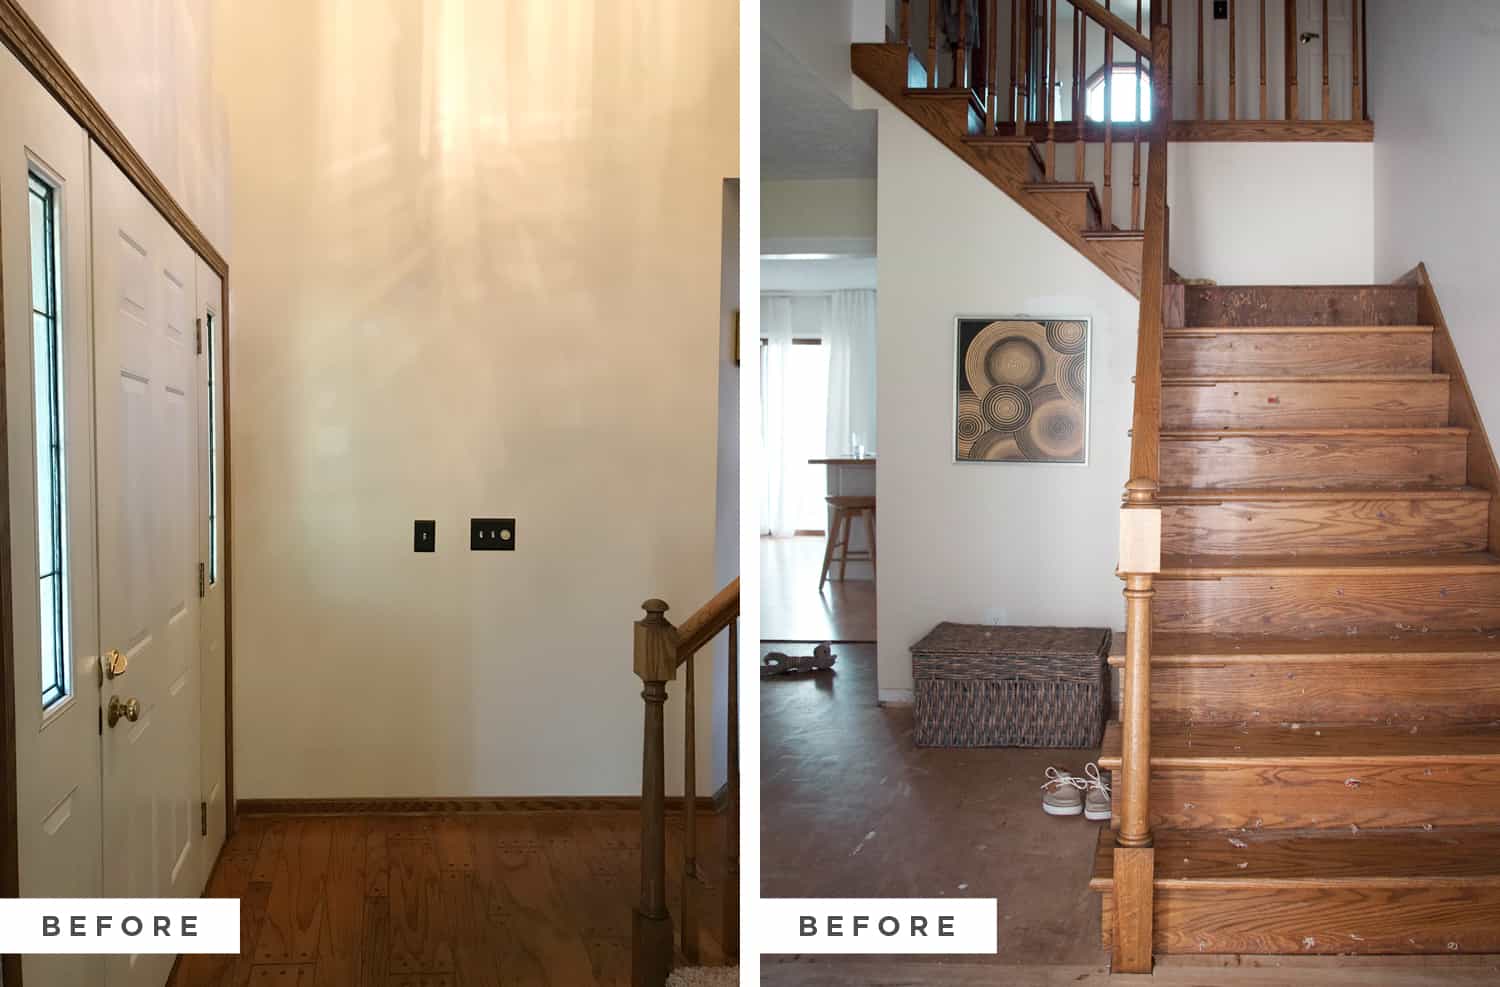
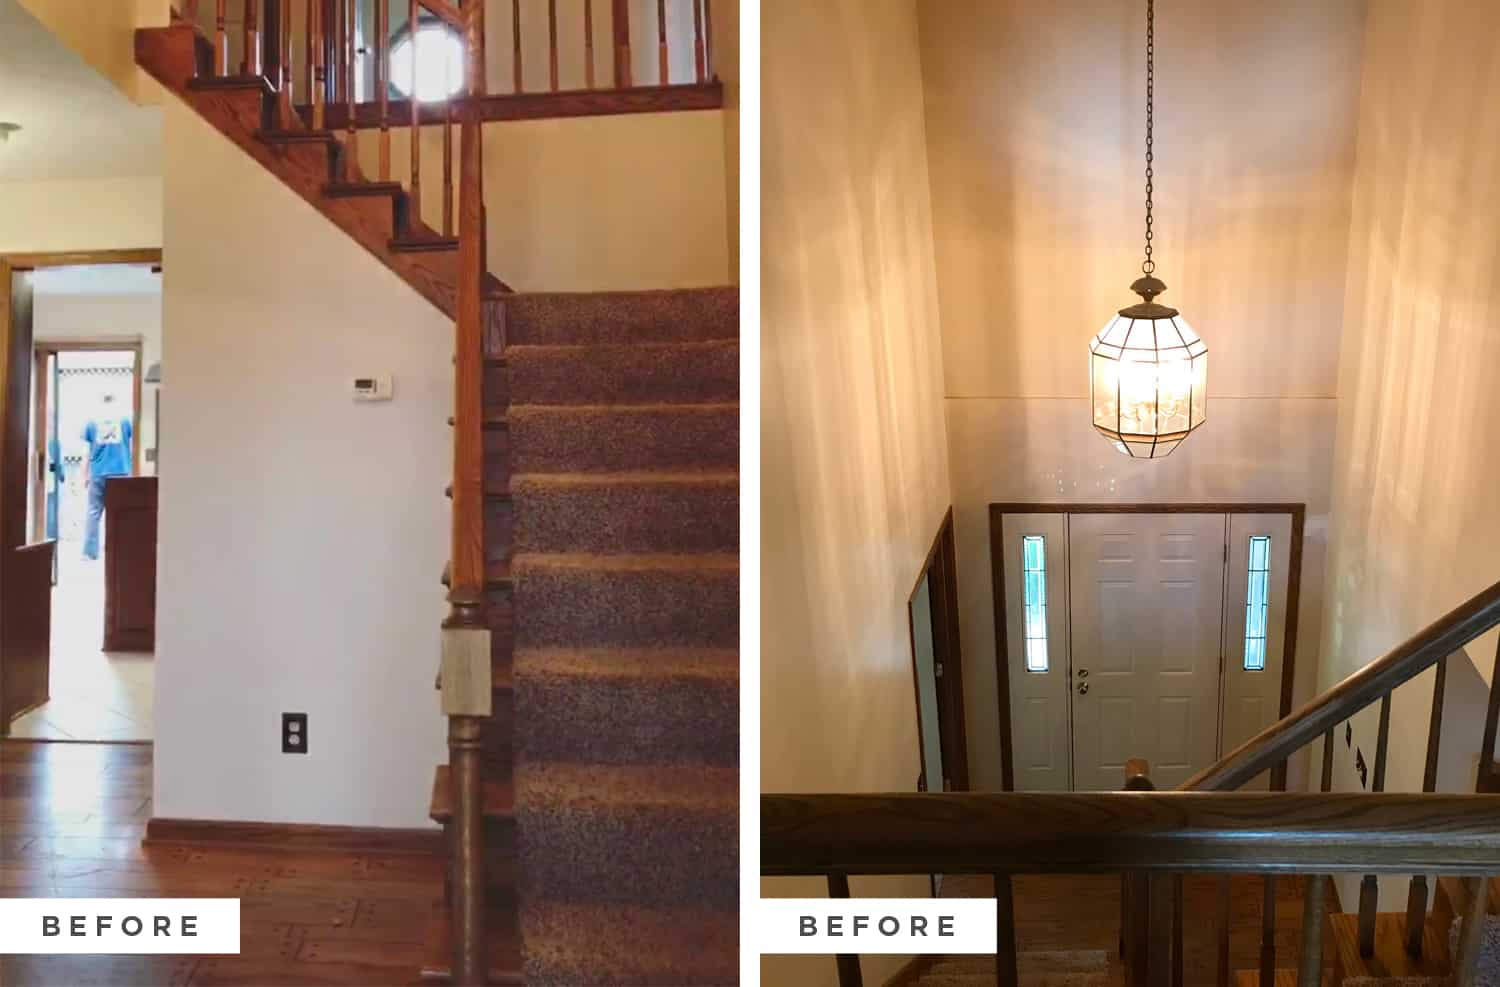 The original entry space just felt dark, boring, and unwelcoming. There was a thin veneer type of wood flooring, oak trim, and oak stairs covered in brown shag carpet. The combination of a brass ’80s-style lantern and a builder-grade door didn’t do much for the style of the space, much less let any decent light into the entry.
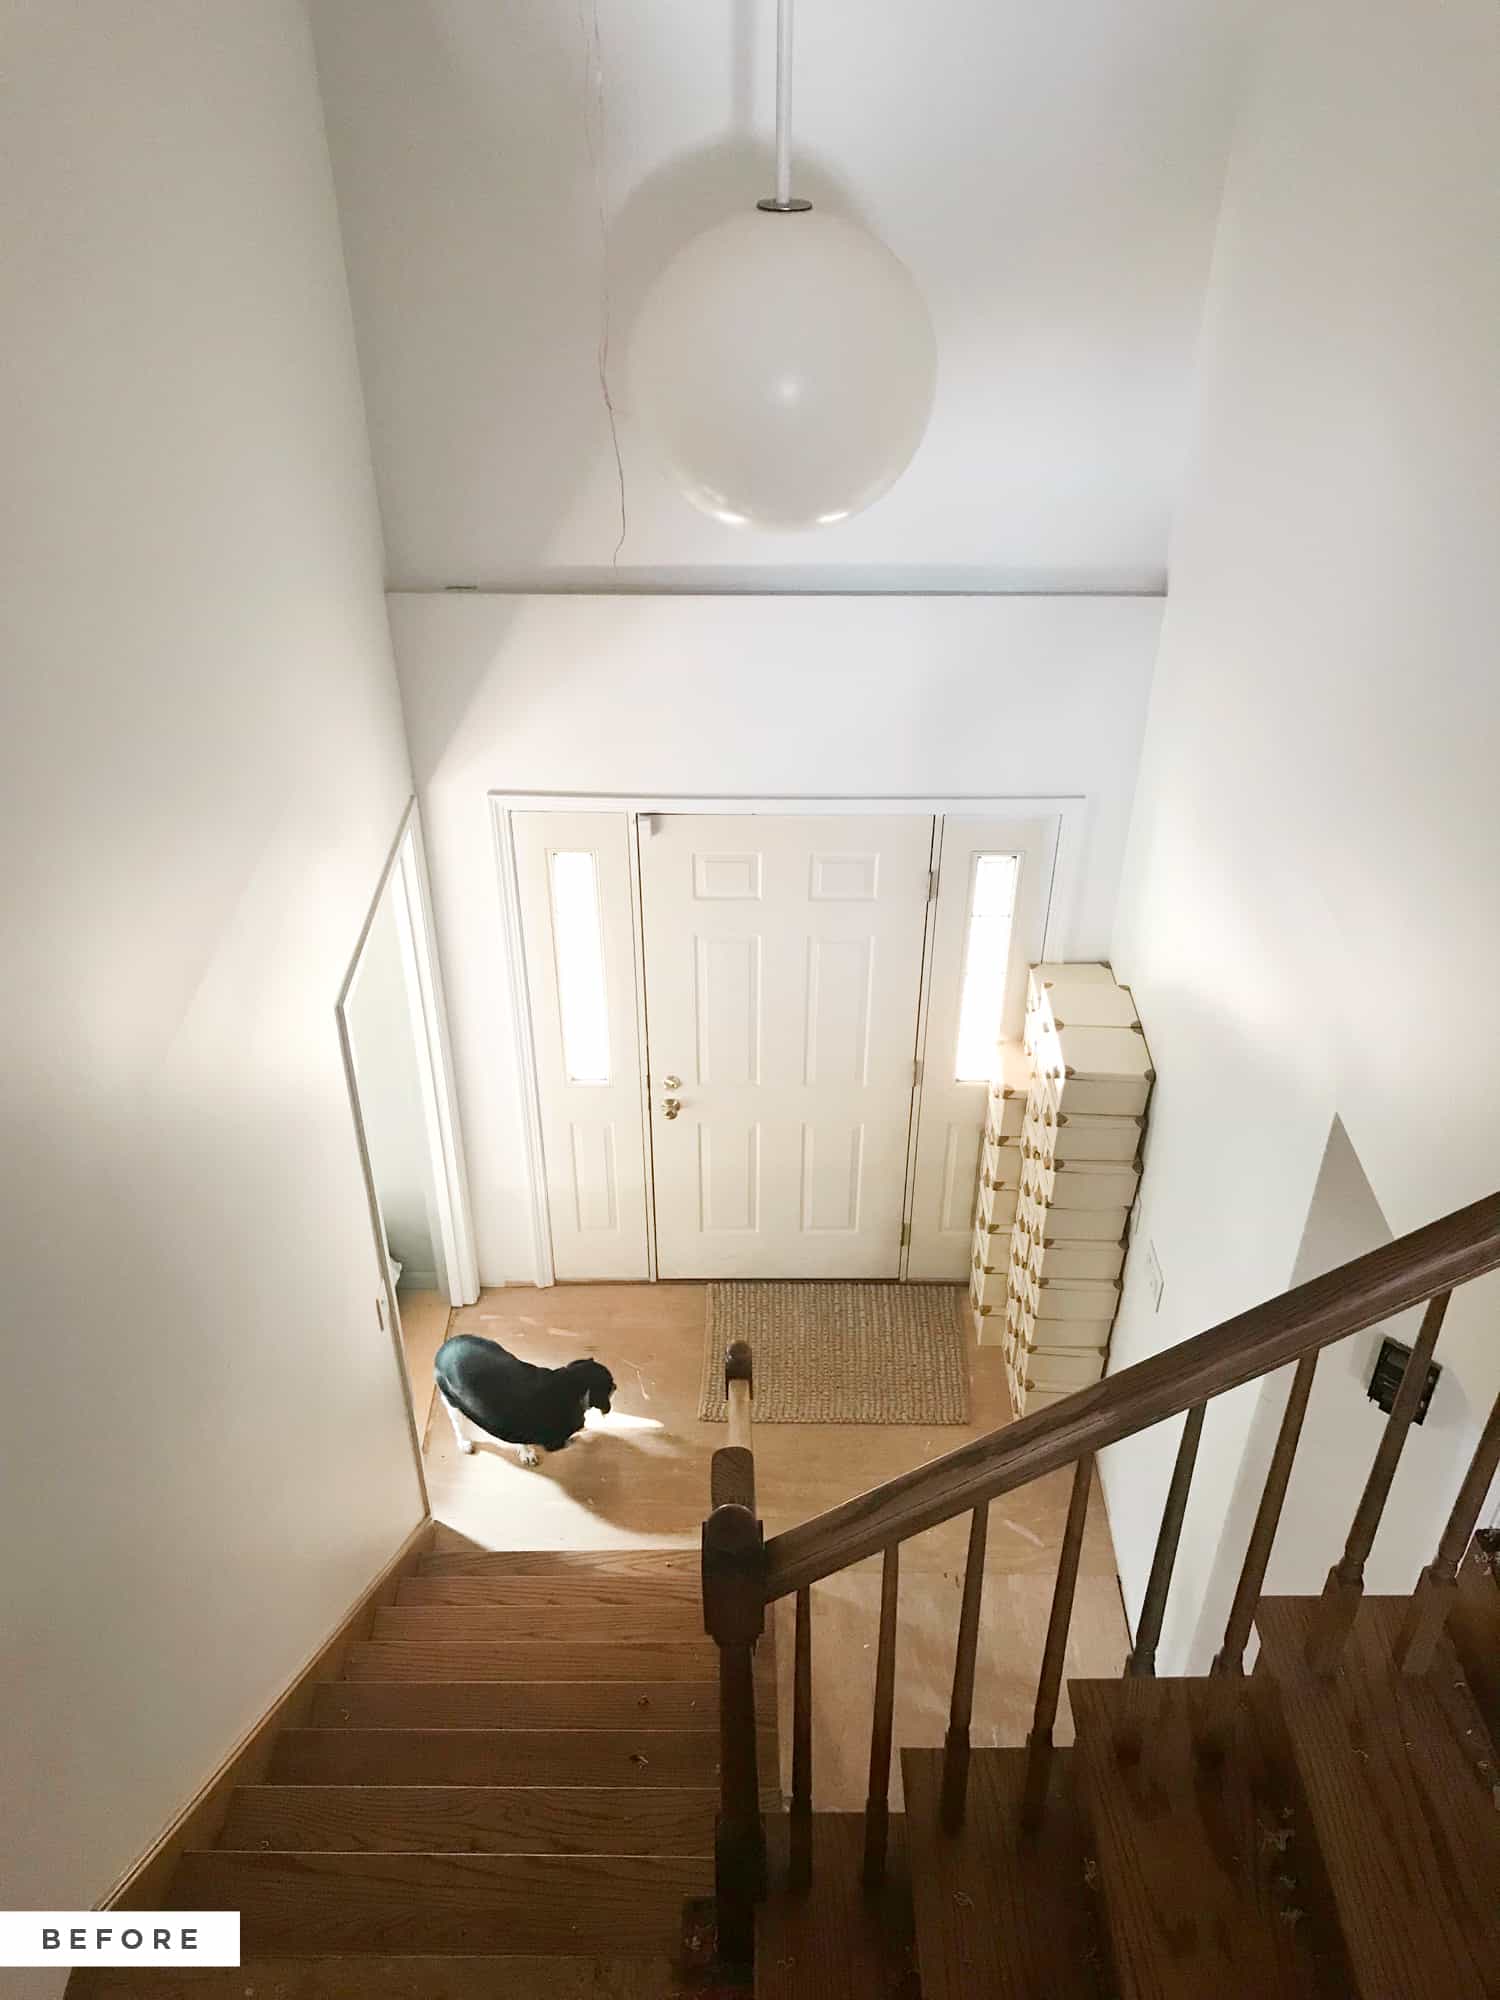 The walls were stark and awkward as well. Originally they were painted a buttery white (which we painted over upon moving in, as seen above), and soared up so many feet without anything to visually break it up—unless you count the weird ledge on the drywall above the doorway. Unfortunately, there was no chance to add a window to this awkward area, because the slanted roofline of the exterior interfered with any potential placement.
All of these existing design issues inspired each of the elements I chose for a fresh makeover. Read on to learn about why I selected each replacement item for the space, plus some tips and tricks for painting wood stairs!
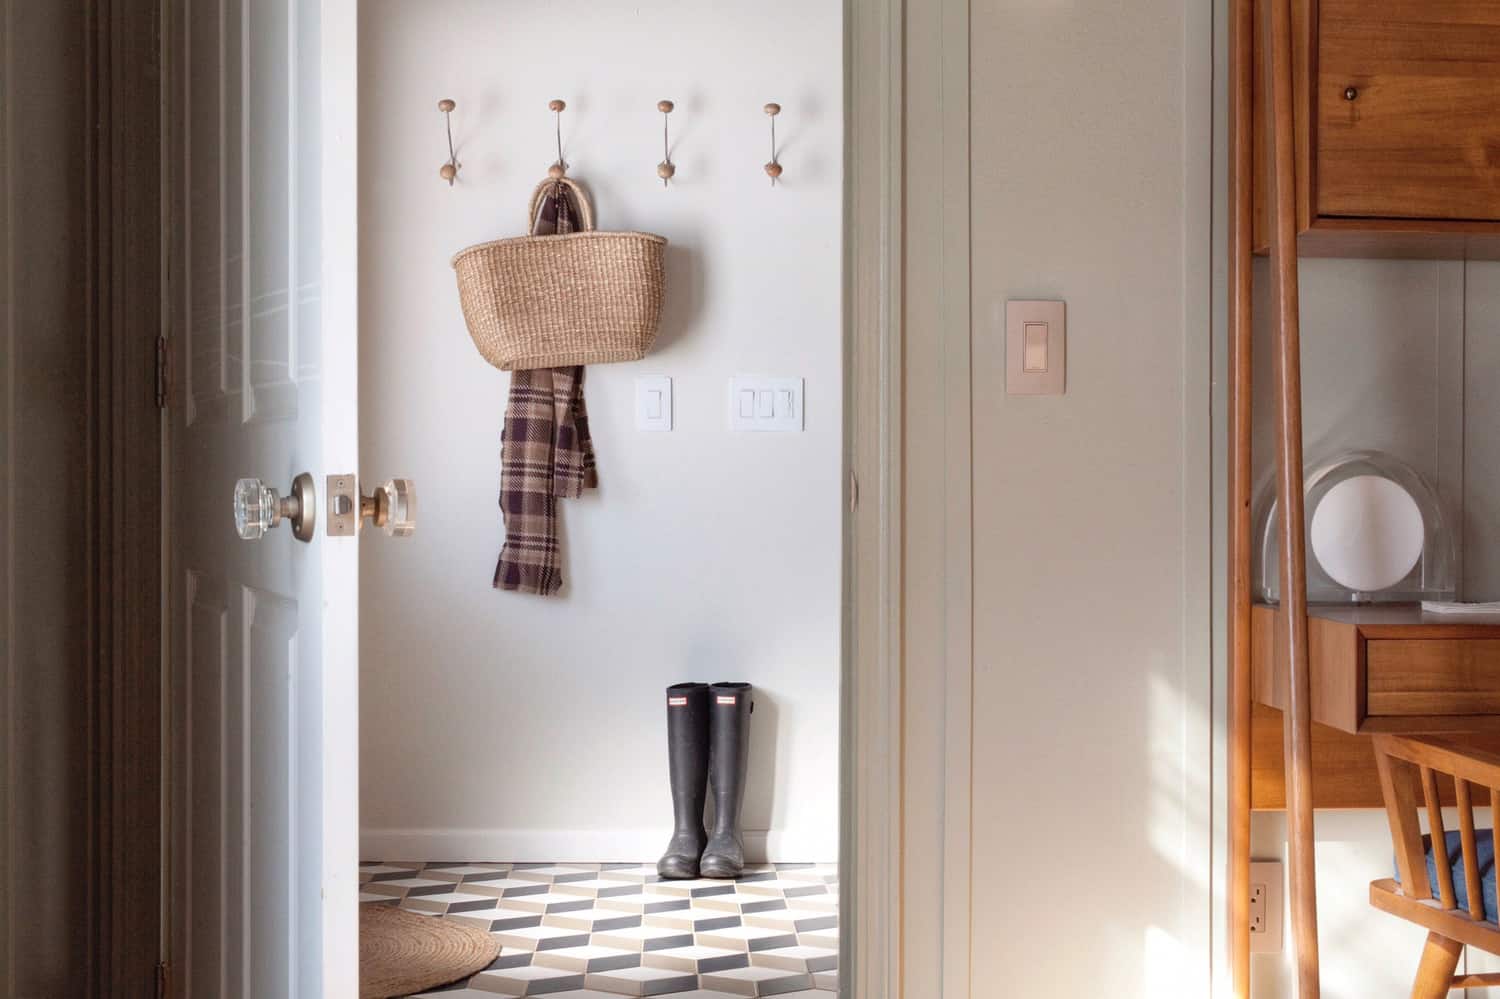
 The most dramatic design choice in the entryway makeover is definitely the gorgeous tile! I created a tumbling block pattern with the Costa Allegra diamond tiles from Bedrosians, which is infinitely more interesting that plain engineered maple would have been. It’s also a great choice for an entryway that will be subjected to a lot of wet, snowy, and muddy shoes from guests.
I think that an isolated entryway is the perfect chance to make a bold decision choice with flooring, and I’m so glad I took the risk! It’s such a fun look that we enjoy seeing every day, but it doesn’t overwhelm us in the same way that it might in the kitchen, where we spend much of our time together as a family.
After deciding to go bold with the flooring, I knew that I would want the other elements in the makeover to be more subtle so as not to overwhelm the small space with too much visual interest. Plus, I just love the floor so much, I wanted it to be the star of the show!
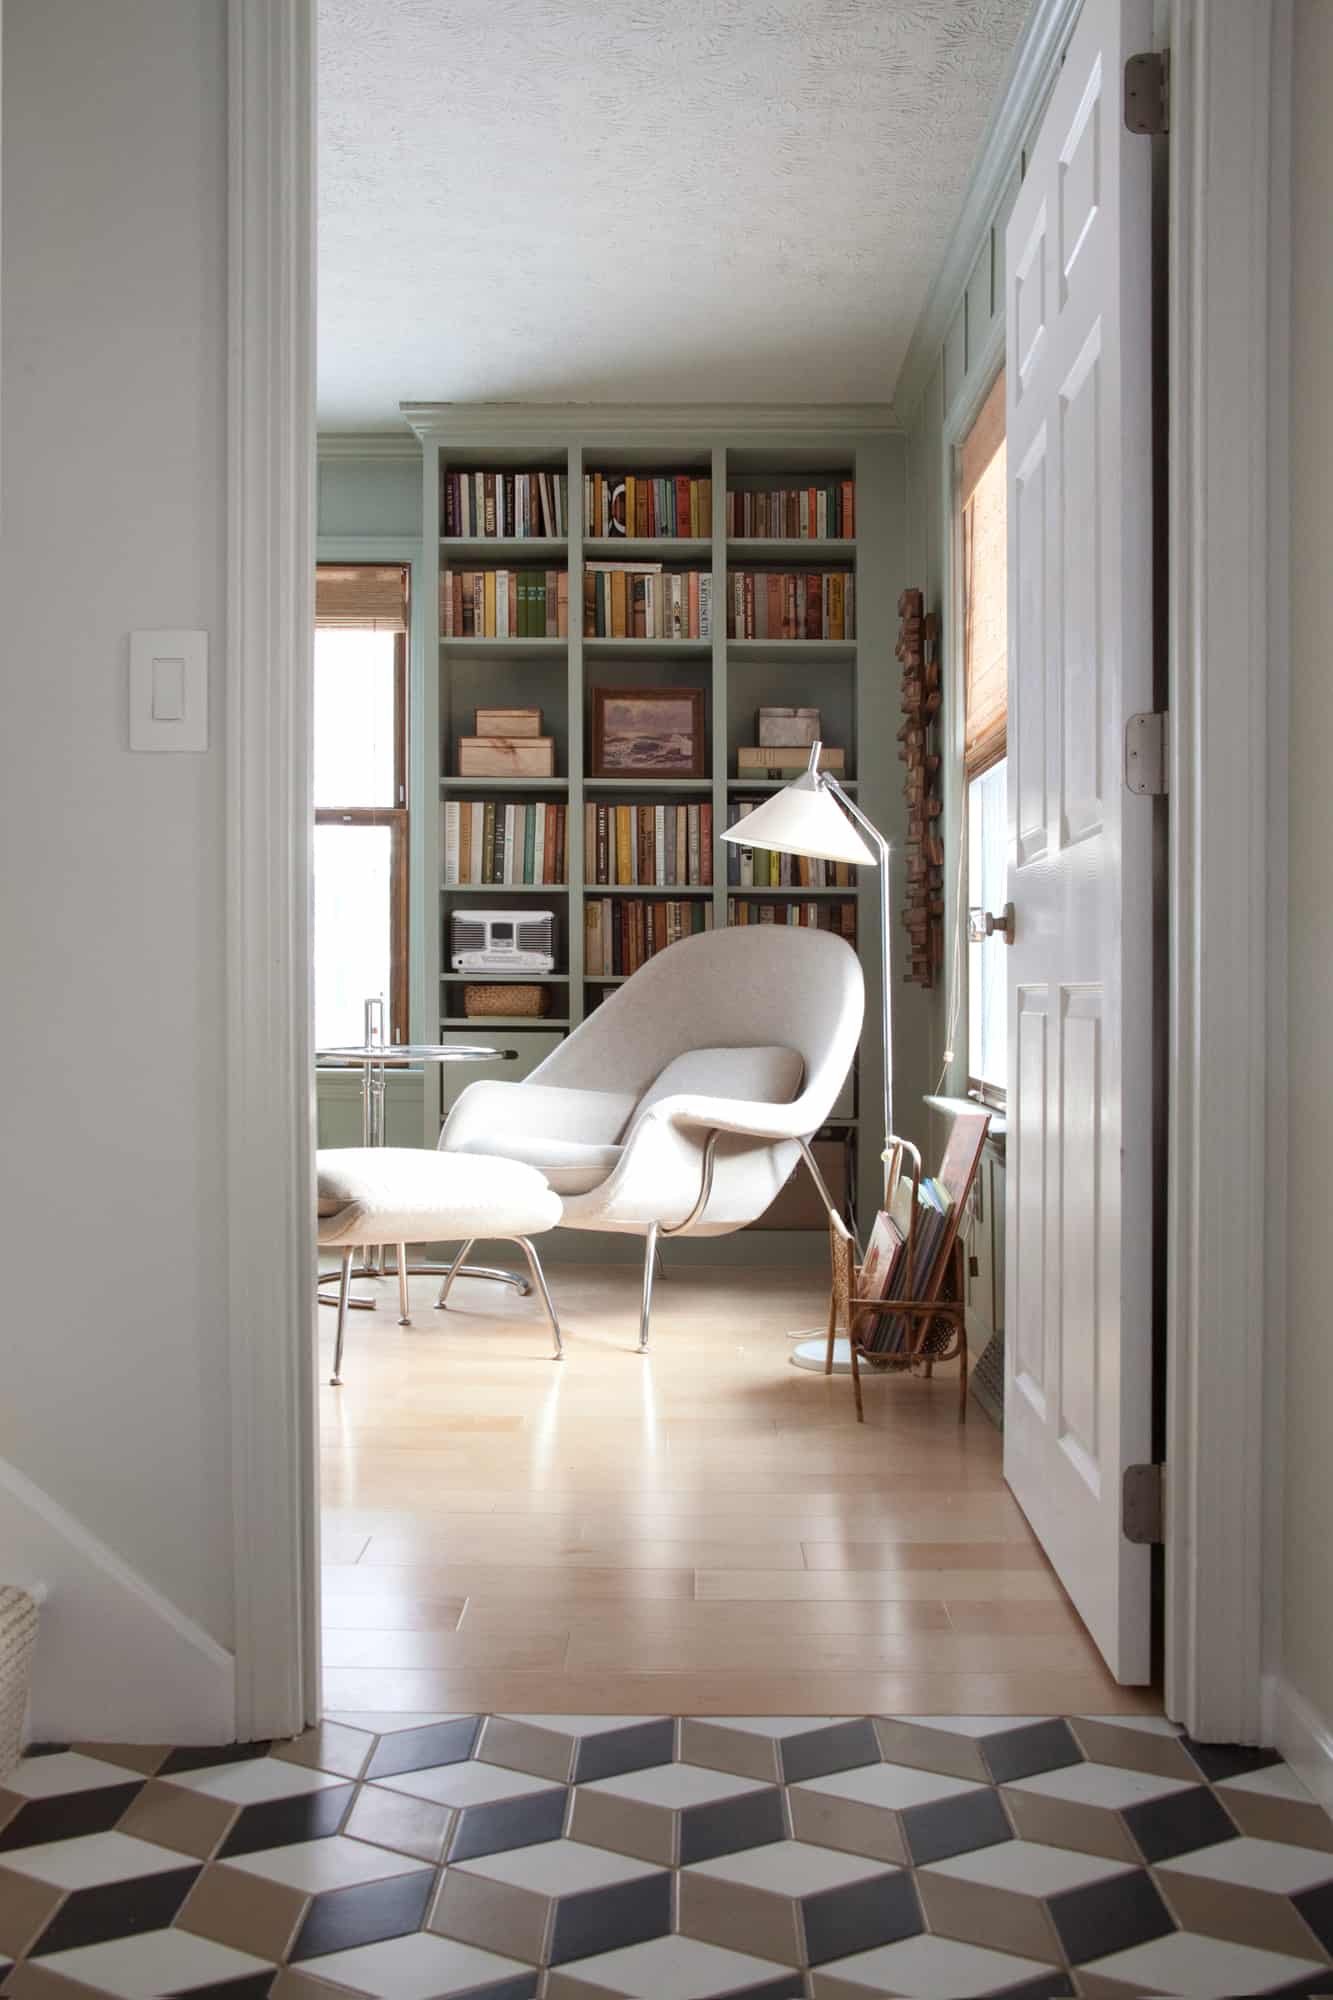
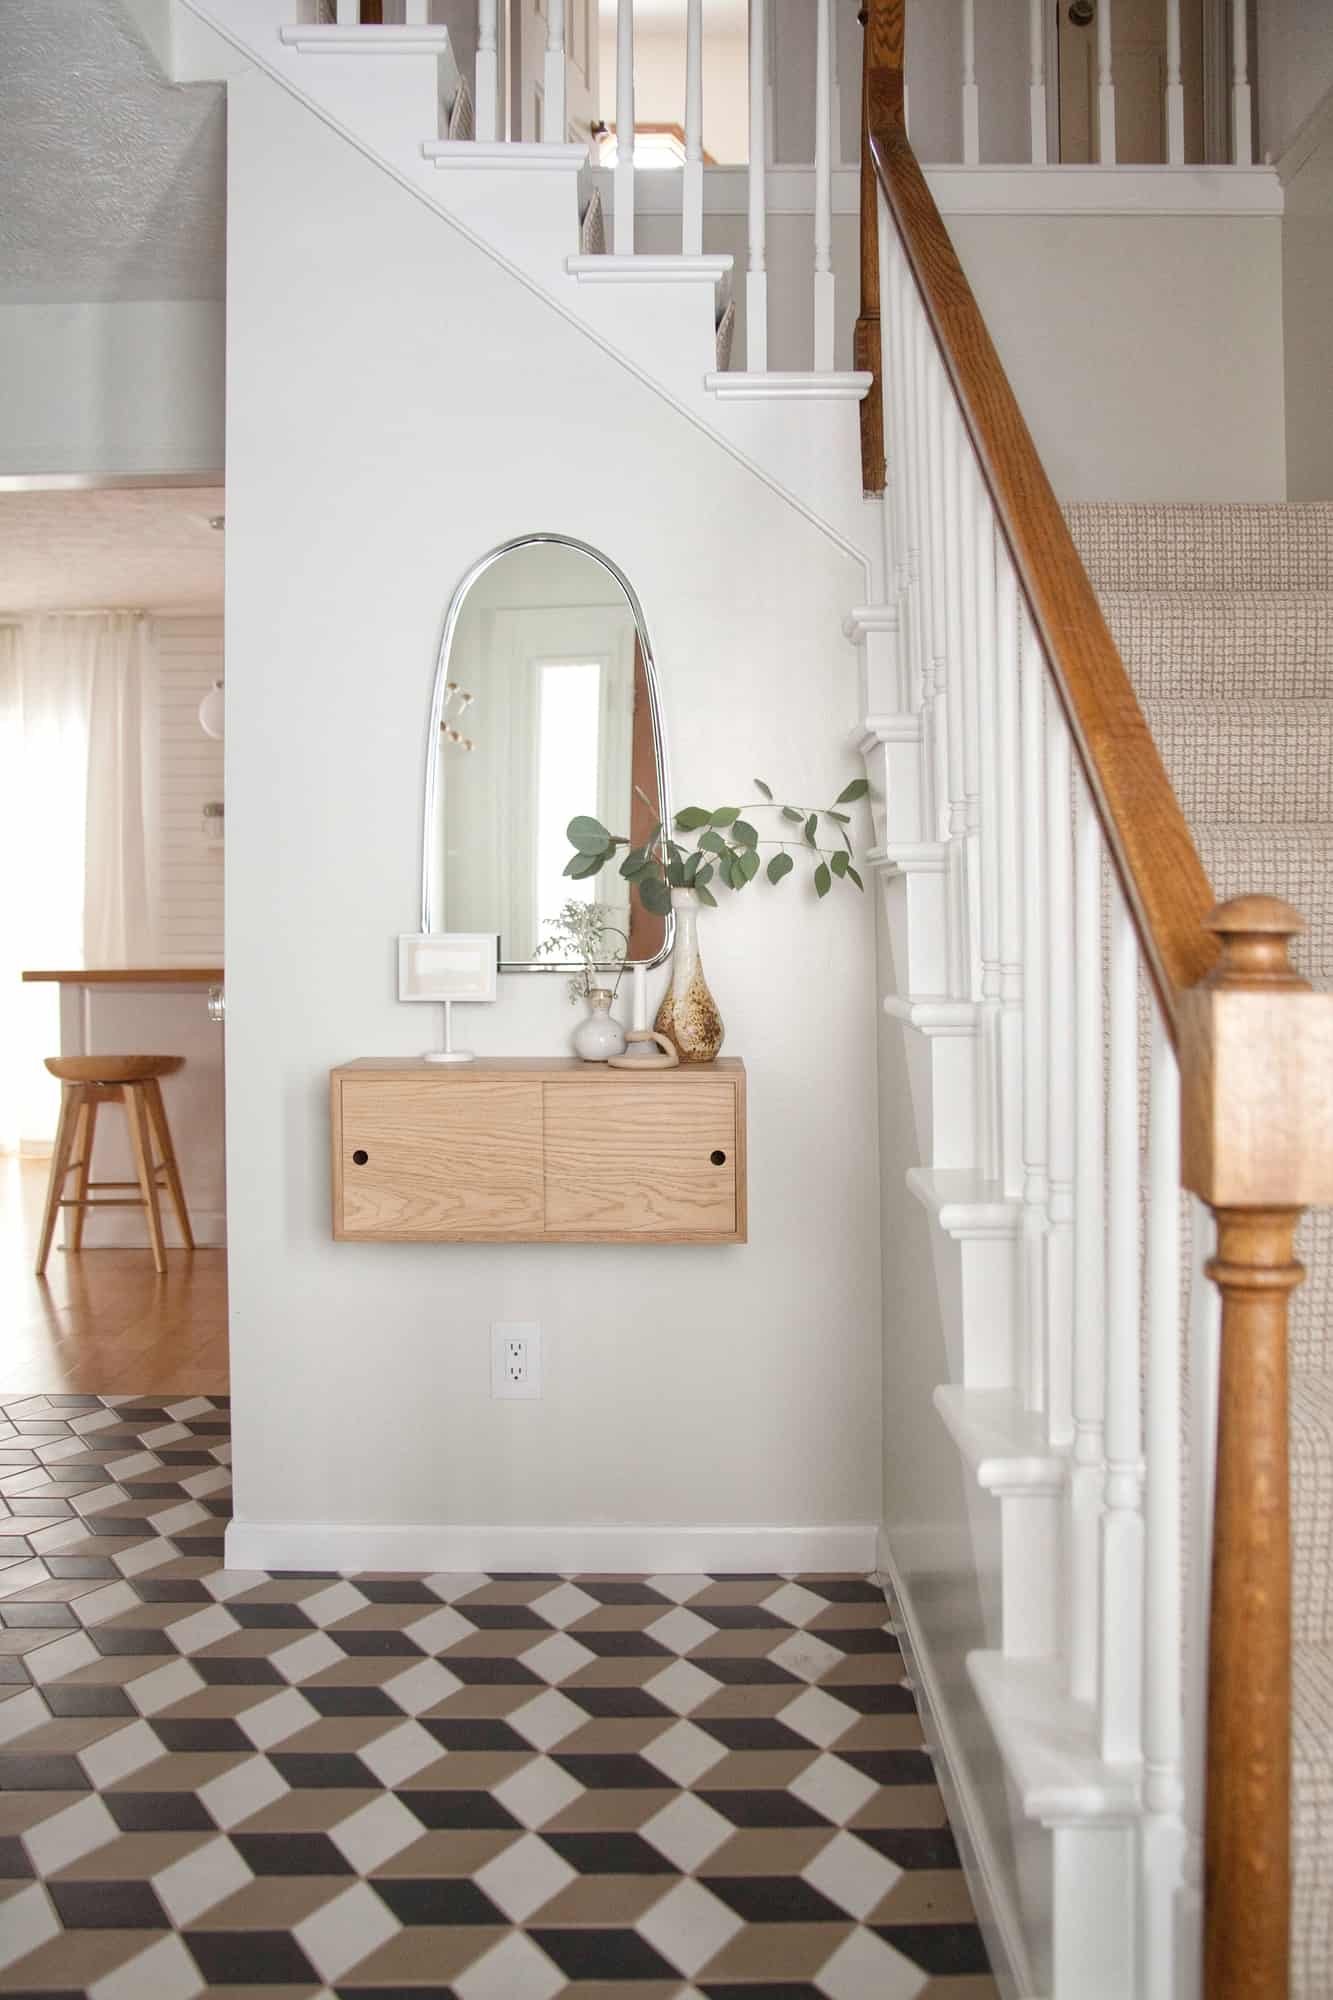 When we first moved in, we had a painter cover the buttery walls with Benjamin Moore’s Super White—the same white we used throughout the rest of the house. But it left the entry feeling even more cavernous and uninteresting. I knew I had to break up the expansive walls somehow, so I decided to instal moulding along the height where the ledge is on the doorway wall. Below the moulding I painted the walls Benjamin Moore’s Winter Orchard, which is a soft, greenish white that transitions nicely to the adjacent greenish/gray study. The transition between the greenish white lower walls and the bright white upper walls is certainly subtle, but the difference adds some interest to the space and breaks up the boring expanse of wall space.
One of the most difficult choices of this makeover was whether or not I should paint the stairs. The oak really was beautiful, and it ties in with many other wood elements in my home, like the large shelving wall I built in our kitchen, and the wood and glass doors we have in my office and living room. I had considered leaving the risers and stringer unpainted, and only painting the treads white. But in the end I decided I really wanted to brighten up the area by painting it all white. The decision also happened to be less work than cutting in around the risers would have been. Yay for less work!
As you can see, I did decide to leave the beautiful stained oak on the balusters and railing to give contrast and warmth to the bright stairway. Those oak elements now tie in nicely with other wood details in the space, like the hooks on the wall, the floating cabinet, and our new wood-look front door.
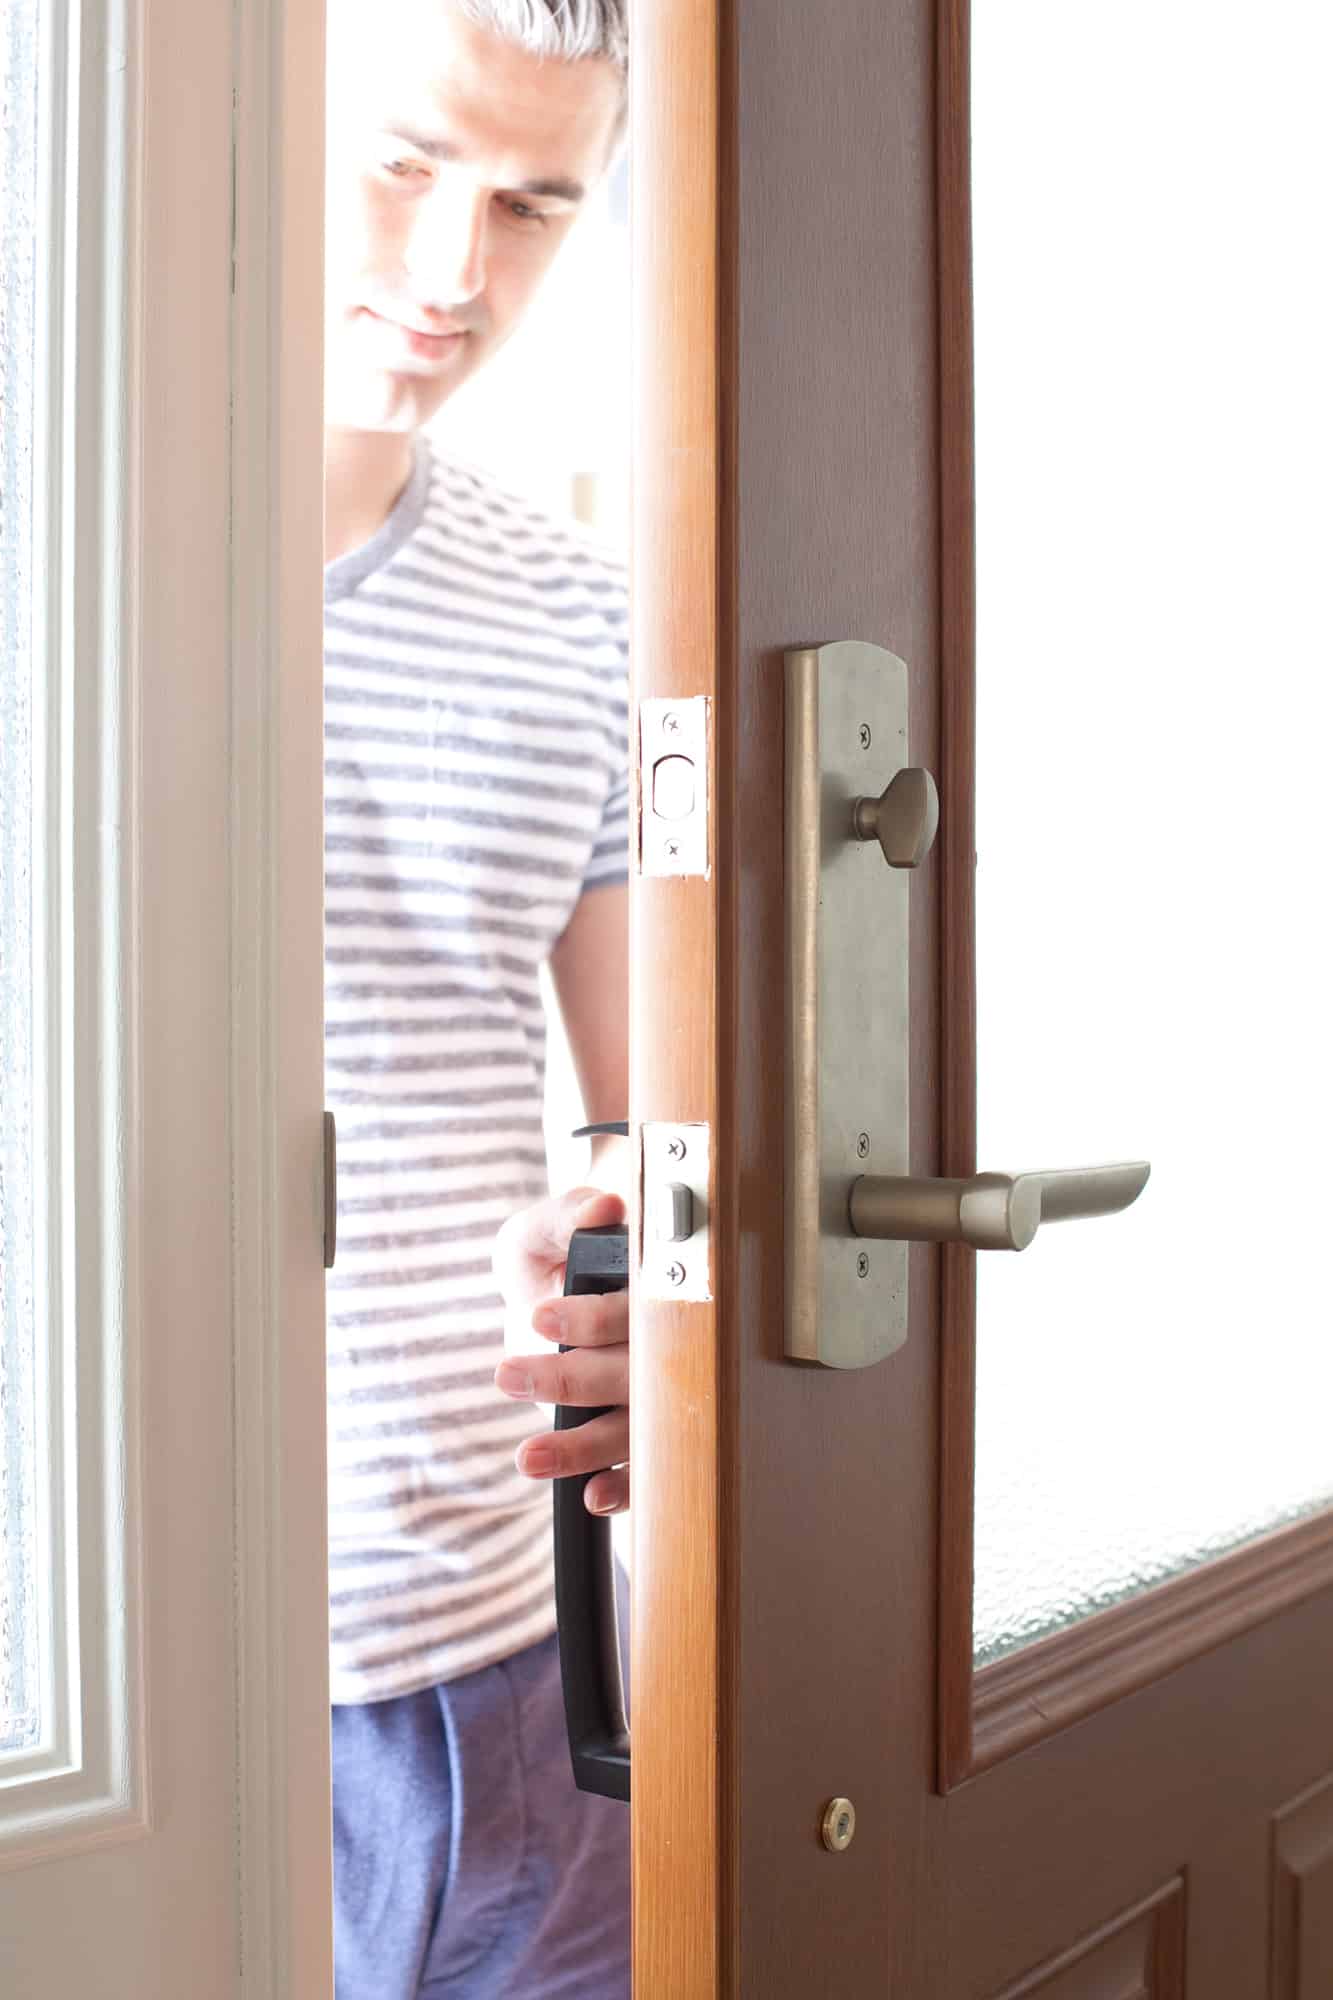
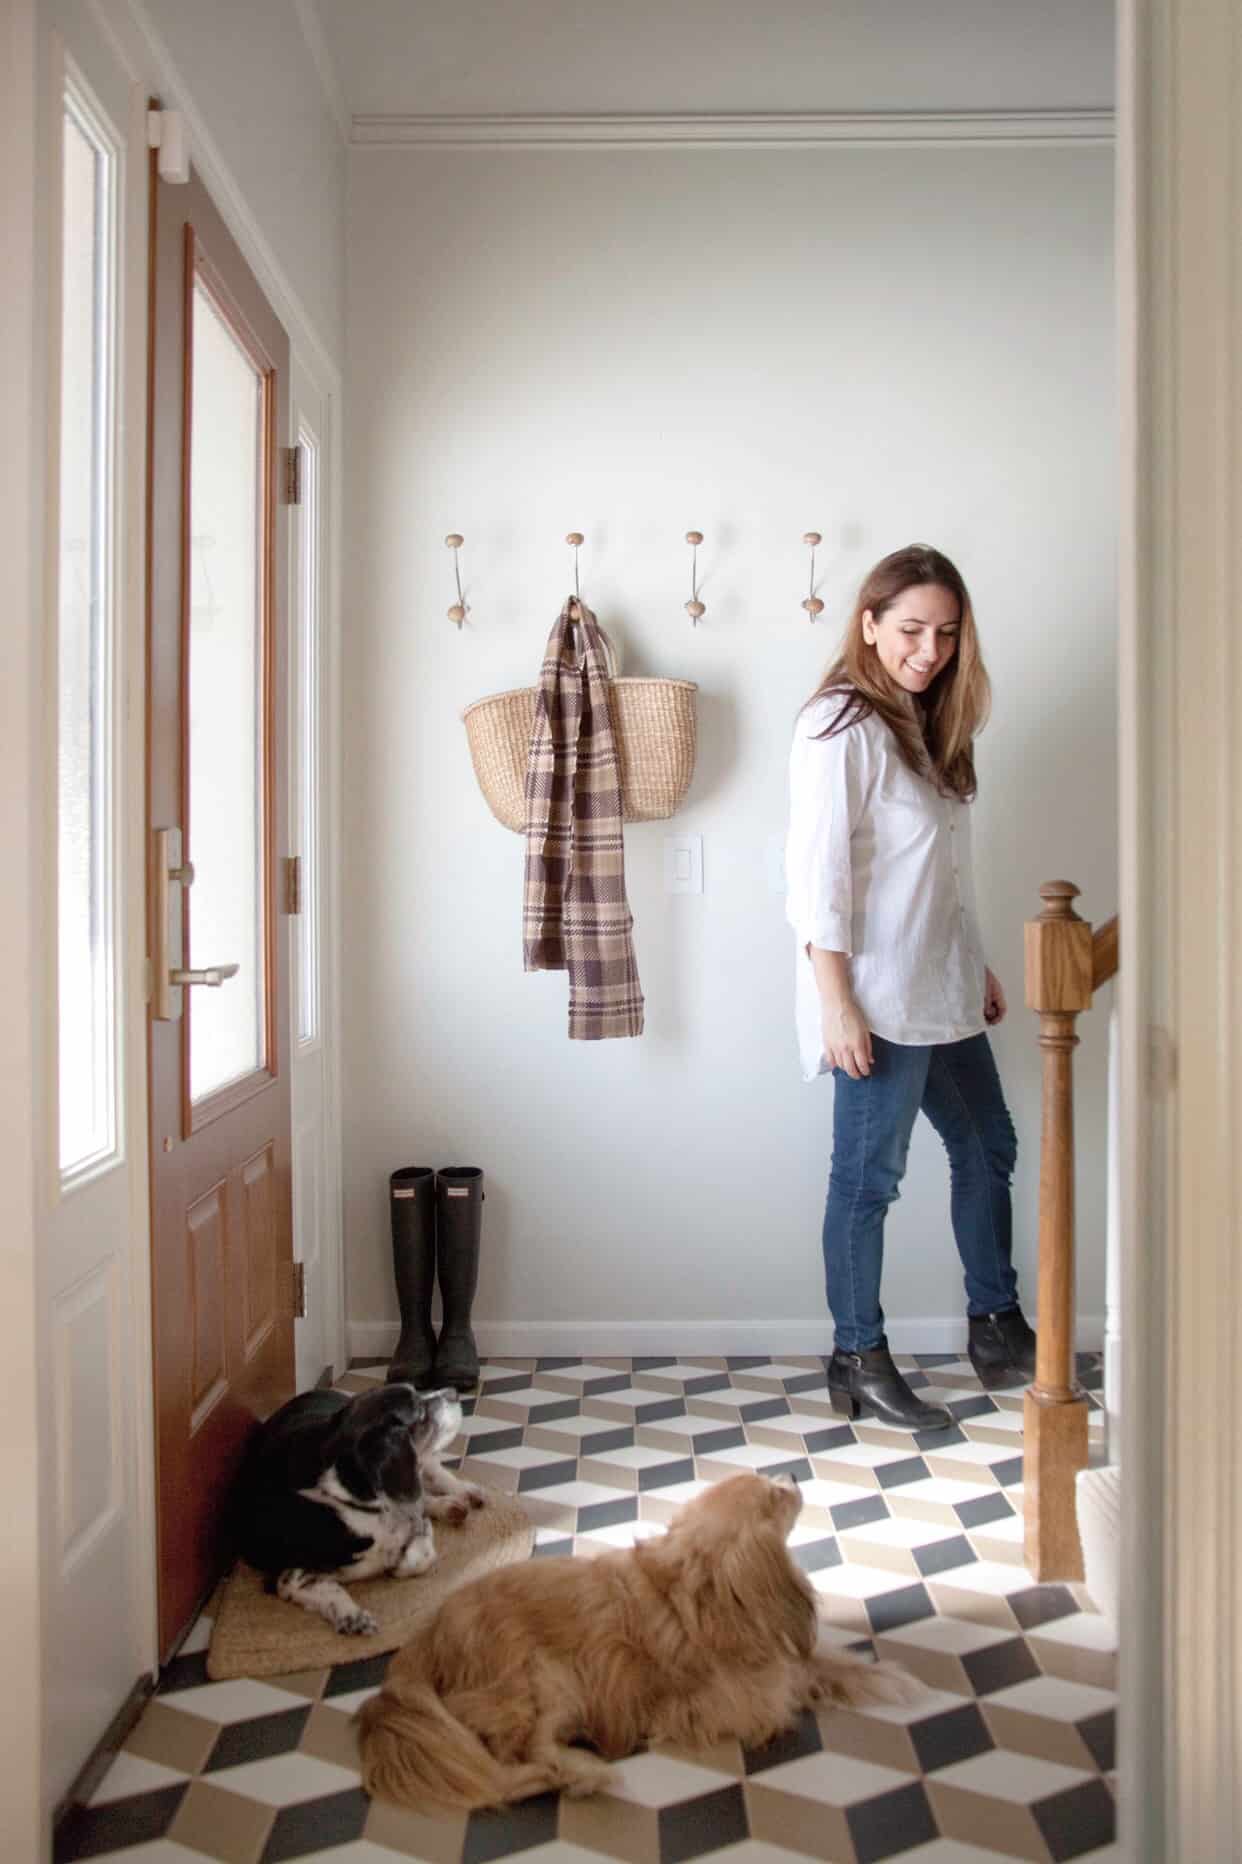 I was excited to replace the door with a new fiberglass mahogany door from Therma-Tru, which has a lot of textured glass to let in quite a bit of daylight light, while still affording us privacy. I chose the granite textured glass, which allows us to see the shadow of a figure at the door, but gives us almost complete privacy from the inside of our home.
I’m definitely glad I decided to go for a door style with a lot of glass! There was so much light pouring into the entryway after our new front door was installed, that I found myself worried that someone had left the front door open!
The new door has made such a dramatic difference in the visual atmosphere of the entryway, but the increased insulation of the fiberglass door has been amazing as well. I love having the look of wood without worrying about how well the door holds up against our crazy Ohio seasons.
 Painting the railing and stairs wasn’t a quick job, but it ended up being less tedious to do all of it at once, rather than taping off or cutting in around risers or treads.
To prep the area, we sanded down the finish of the spindles, risers, treads, and stringers with 100 grit sandpaper. Doing this provided a rough finish to help the primer adhere to. Sanding can be laborious and dusty, so I used a palm sander to speed things up on the stairway portion and wore a breathing mask to protect my lungs.
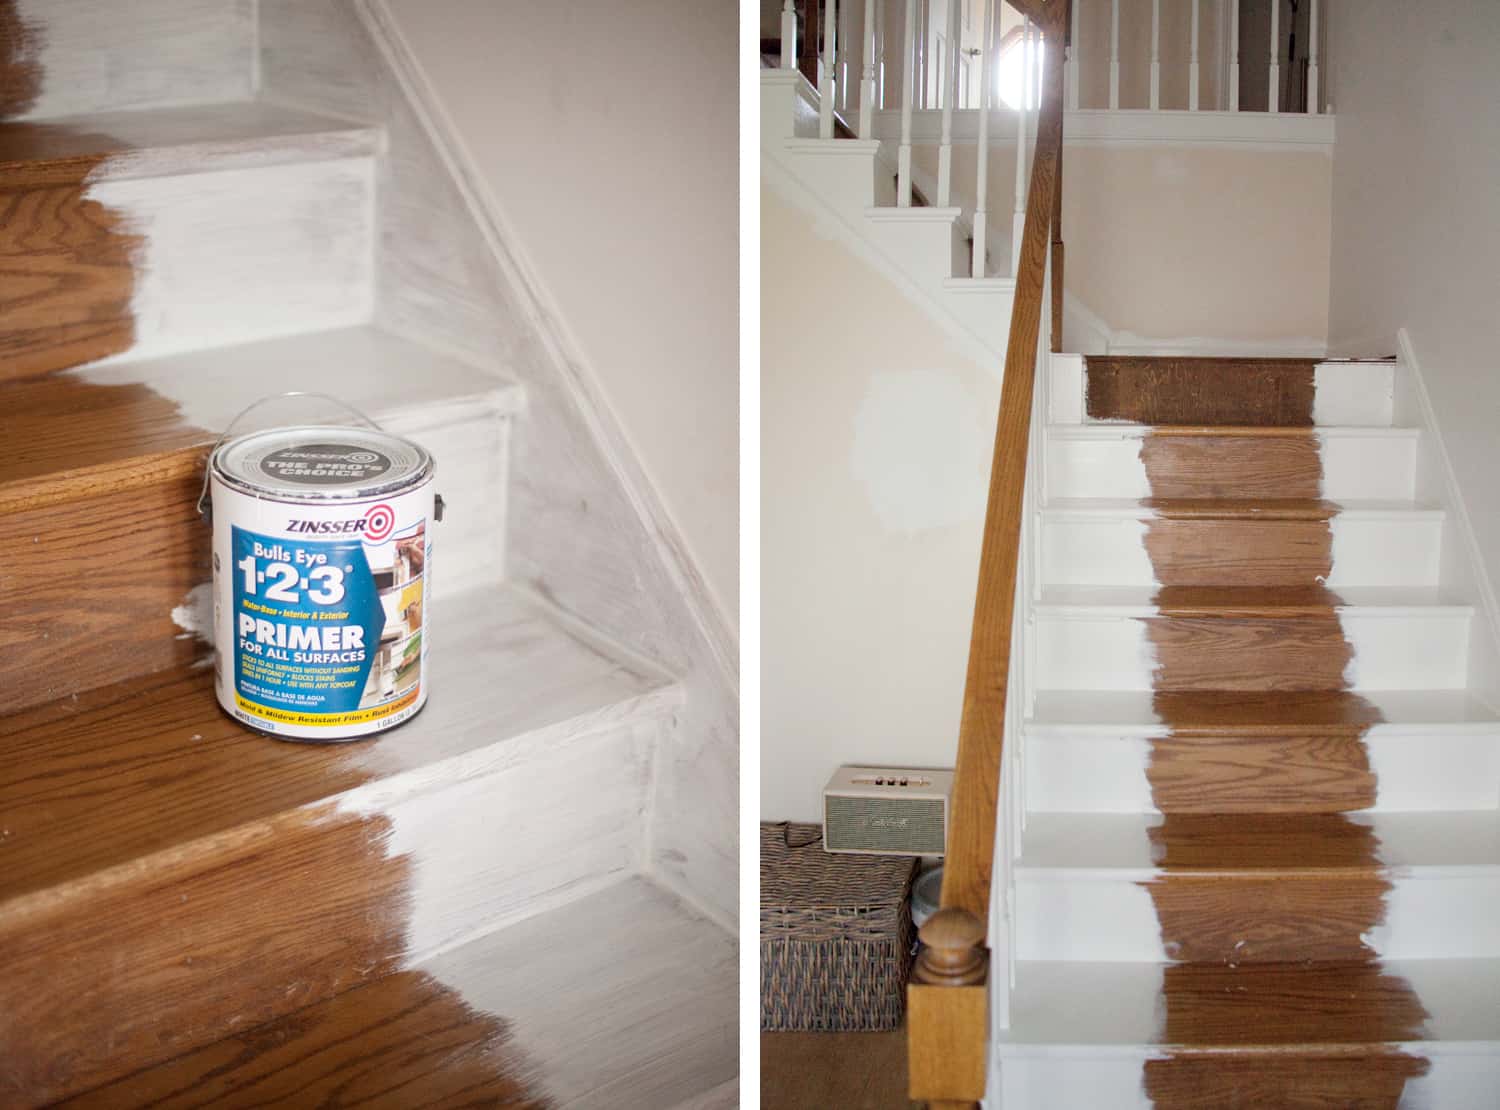 After the wood was sanded, I brushed on two coats of my favorite primer. Some people recommend using oil-based primer on wood such as oak, because it seals in the tannins of the wood which might otherwise leak yellowish tones into your paint job. But I found that two coats of the water-based Zinsser 1-2-3 primer did the job well too!
It’s important not to coat the primer or the paint on too thick, especially on the spindles, because it can leave the appearance of drips or globby brush marks on the finish. Painting on thinner coats certainly takes more time, but it’s worth it in the end!
I chose a semi-gloss finish for the paint so that it would be easy to wipe clean. Semi-gloss does show flaws more than satin, eggshell, or especially flat paint because of its shine, which is yet another reason to not brush your paint on too thick. I highly recommend investing in a high-quality paint for any project, but especially on areas that will receive wear and tear such as a stairway.
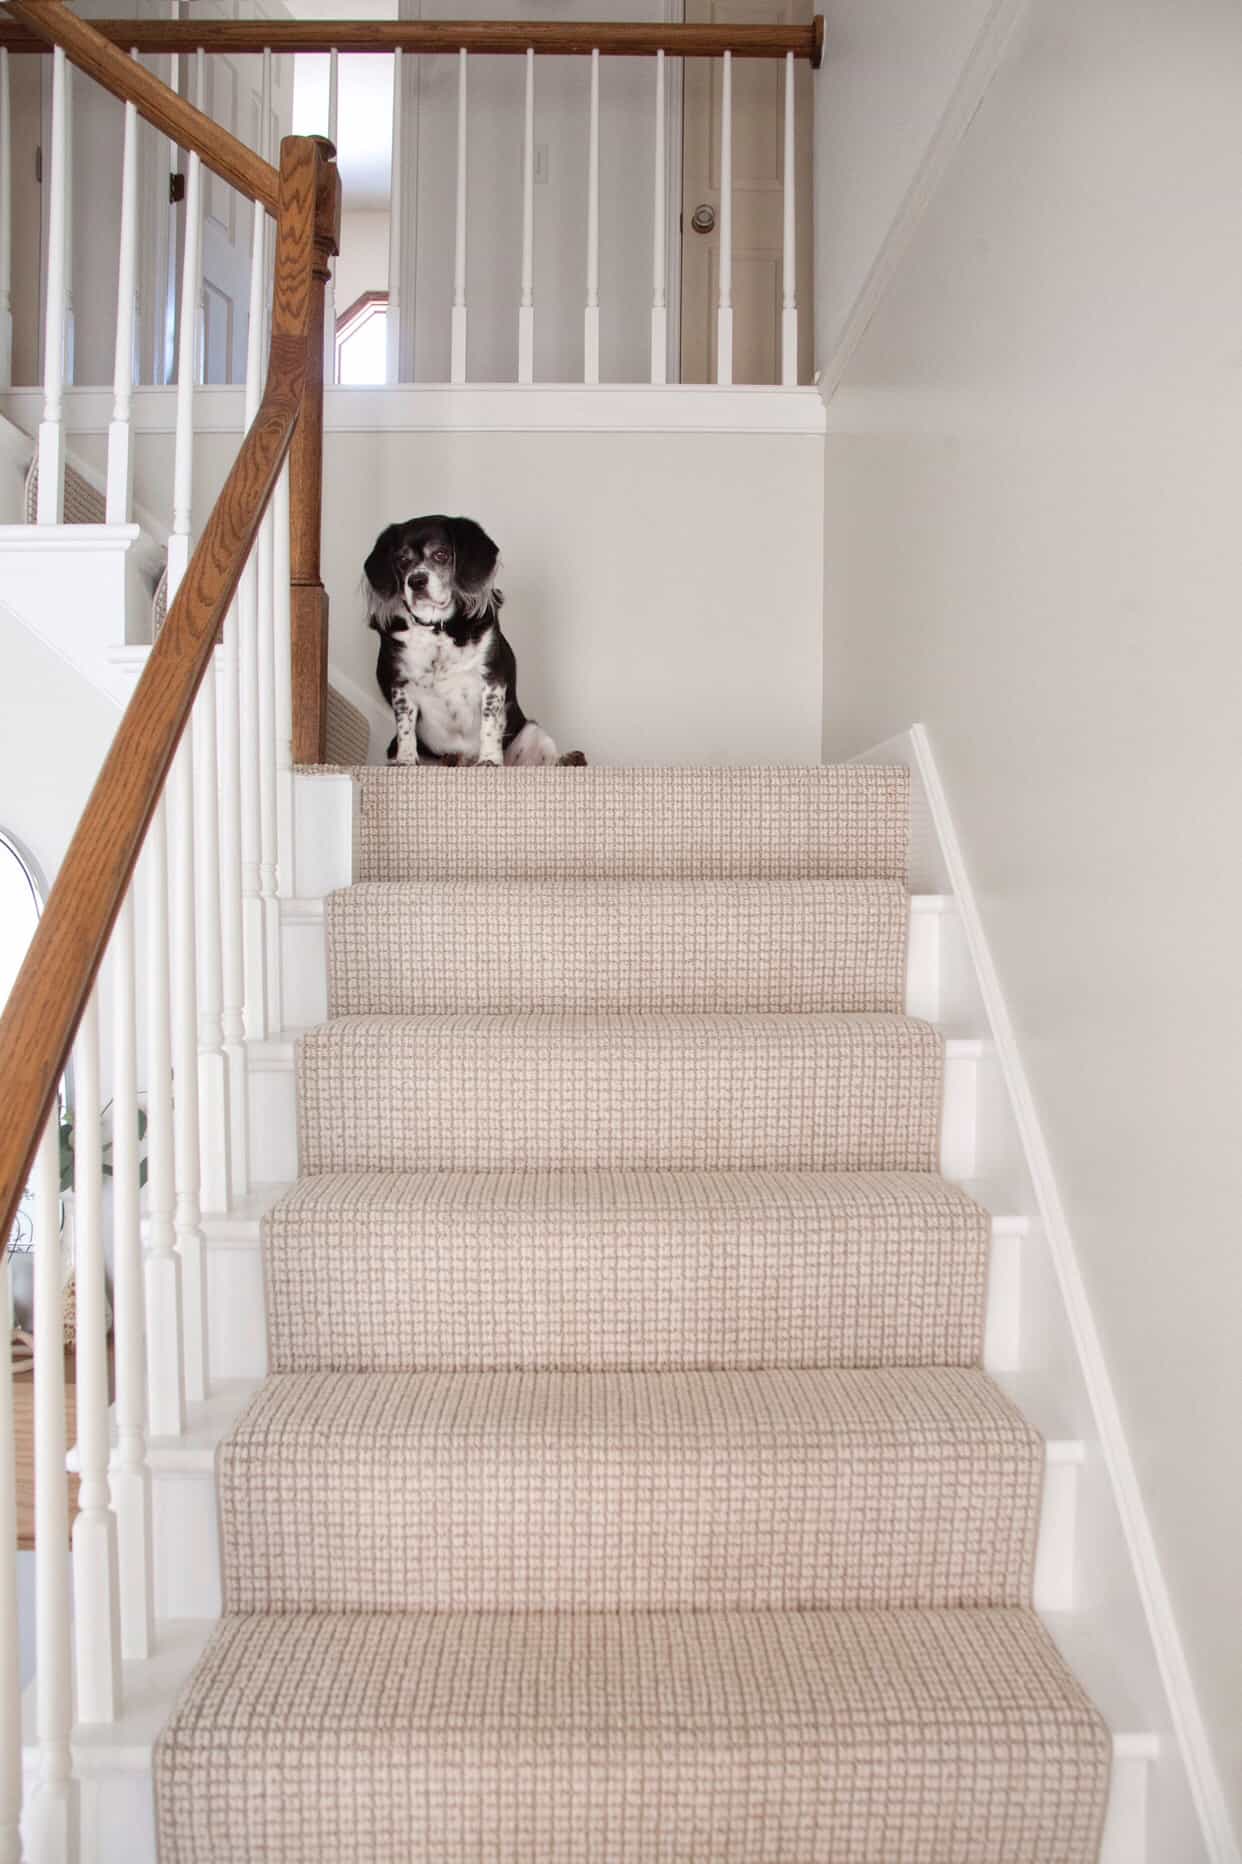 A lot of people were surprised that I decided to replace the stairway carpet rather than leaving the bare wood, but it was a very easy decision for us to make! We are usually barefoot or wearing socks in our home, and as accident-prone people, we didn’t like the idea of leaving the stairs bare and slippery. My poor dog actually fell down the stairs several times after we pulled up the old carpet! Plus, a high quality carpet just feels so nice underfoot. So, we knew we wanted carpet, but deciding what carpet to install involved a lot of consideration.
I had thought about installing a vintage Turkish runner on our stairs, but decided against it for two main reasons. The biggest reason was because I wanted the patterned tile to take center stage, and a vintage rug would probably compete and feel a bit busy in here. Also, with two small children and two medium-size dogs, I thought it would be smart to select a carpet that wouldn’t wear and would clean easily. So I began looking at Stainmaster options, knowing they would hold up really well in a high-traffic area.
You can check out my planning blog post here to read all about the carpet styles I considered, but in the end I chose from STAINMASTER® in the berber style called St. Lucia. I was torn between doing a medium brown color in order to emulate the look of a natural jute rug, but I decided to go with “Fog” instead, because I really wanted this space to feel light and bright.
The carpet we chose has a loop construction (like berber), rather than a cut pile, so it won’t get smashed down with foot traffic. The carpet is also engineered to be tough against the snagging of pet claws and rowdy children. I love that it has the practicality of berber, but the texture gives it the natural look of a jute rug with the comfort of high quality nylon.
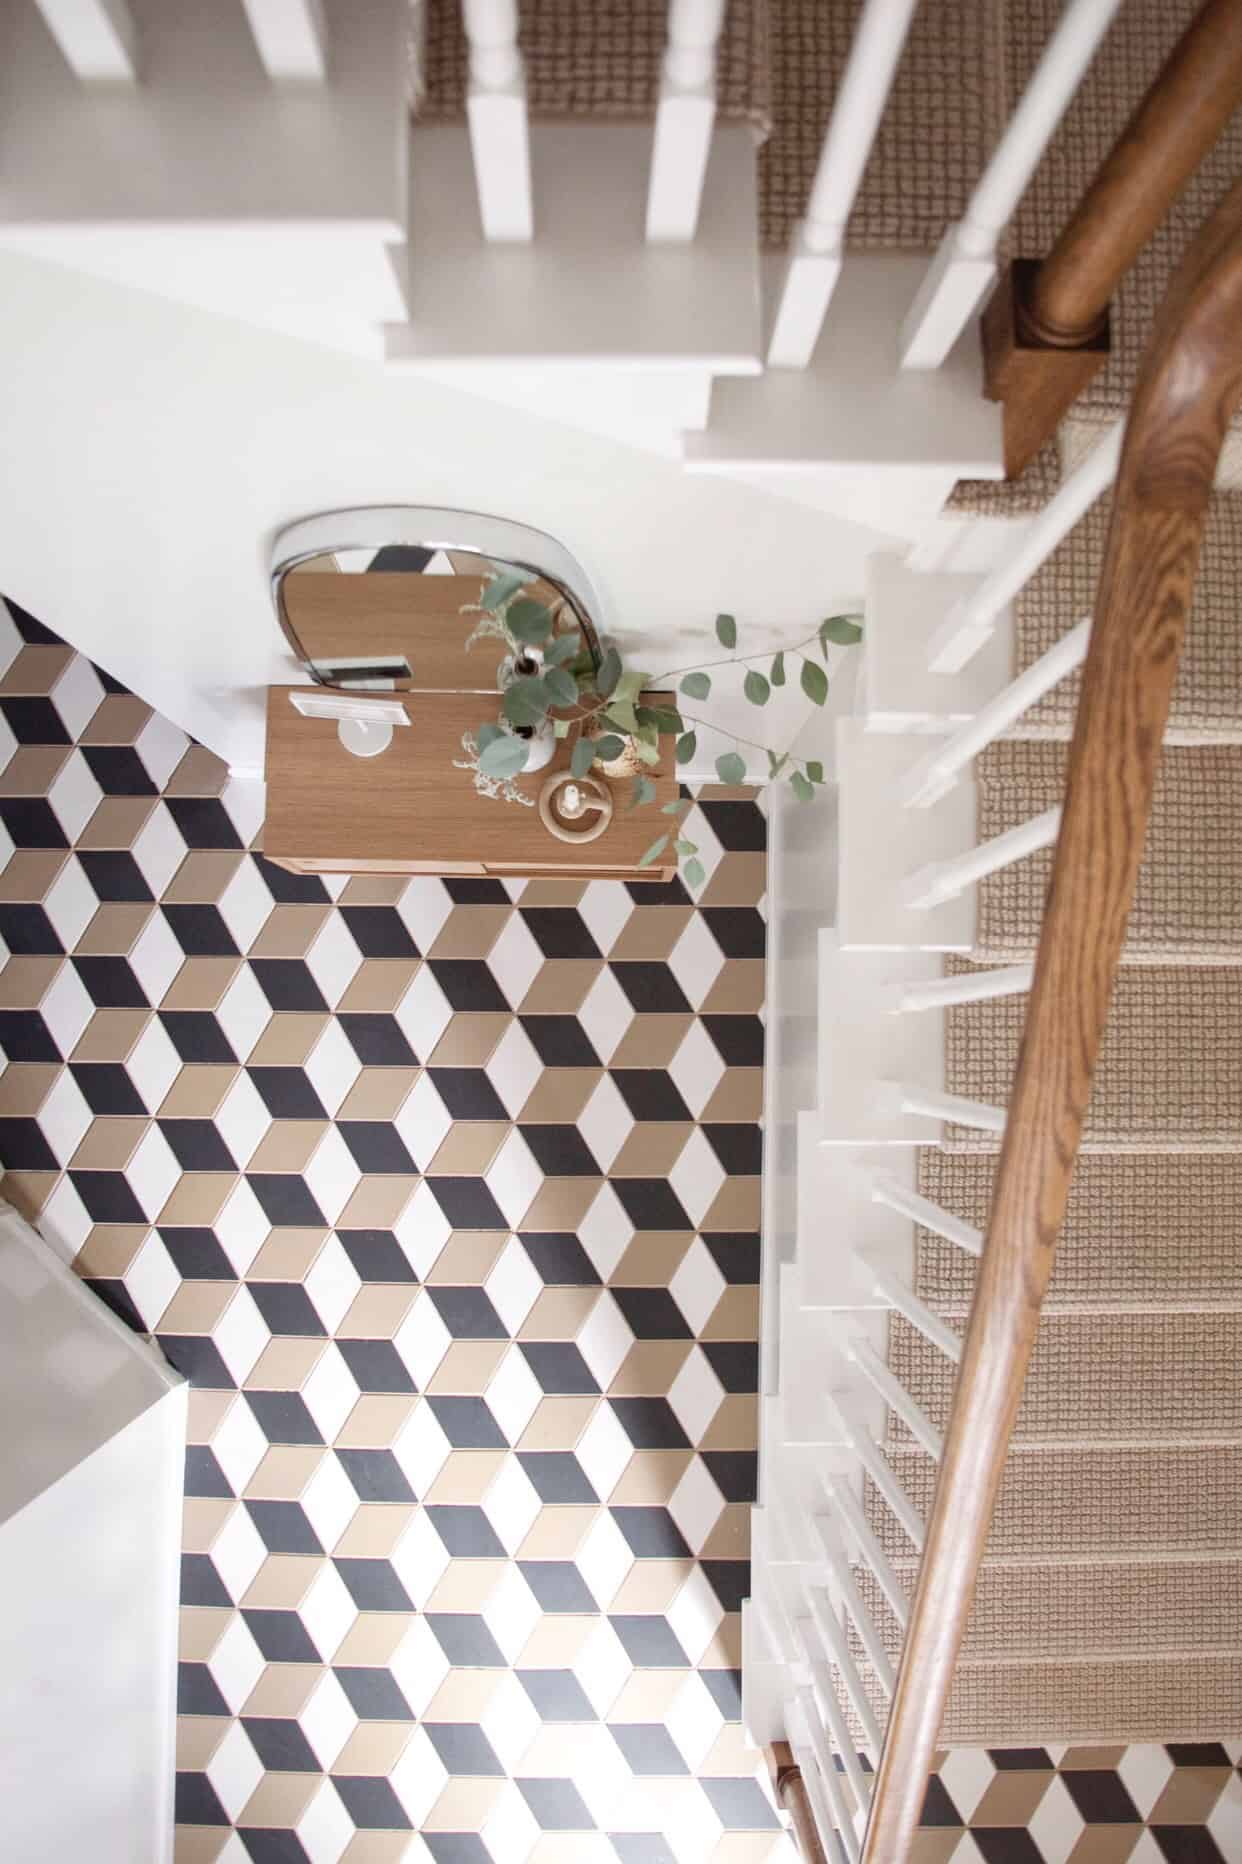 The Macadamia colored carpet still contrasts with the white of the stairs, but it doesn’t make a bold statement that might compete with the tumbling block pattern of the tile. I love how balanced and simple the space feels, yet still is interesting and cozy!
 There are several doorways that lead from our entryway to other rooms, like the study, my future office (which is currently an embarrassing dumping grounds for tools and supplies), the basement, and a coat closet. I didn’t have room in the budget to replace all of our builder-grade doors, but replacing the knobs with fancy Emtek knobs made such a huge difference!
I chose a modern disc crystal knob for each of the doors made in a tumbled white bronze rosettes. The finish works nicely with satin nickel hardware, but feels so sophisticated. Rather than using the crystal knob on our front door, I chose a more substantial entry set in the same tumbled white bronze finish. Emtek offers the ability to split styles and finishes from the inside to the outside of the door, so I chose a different look for the outside.
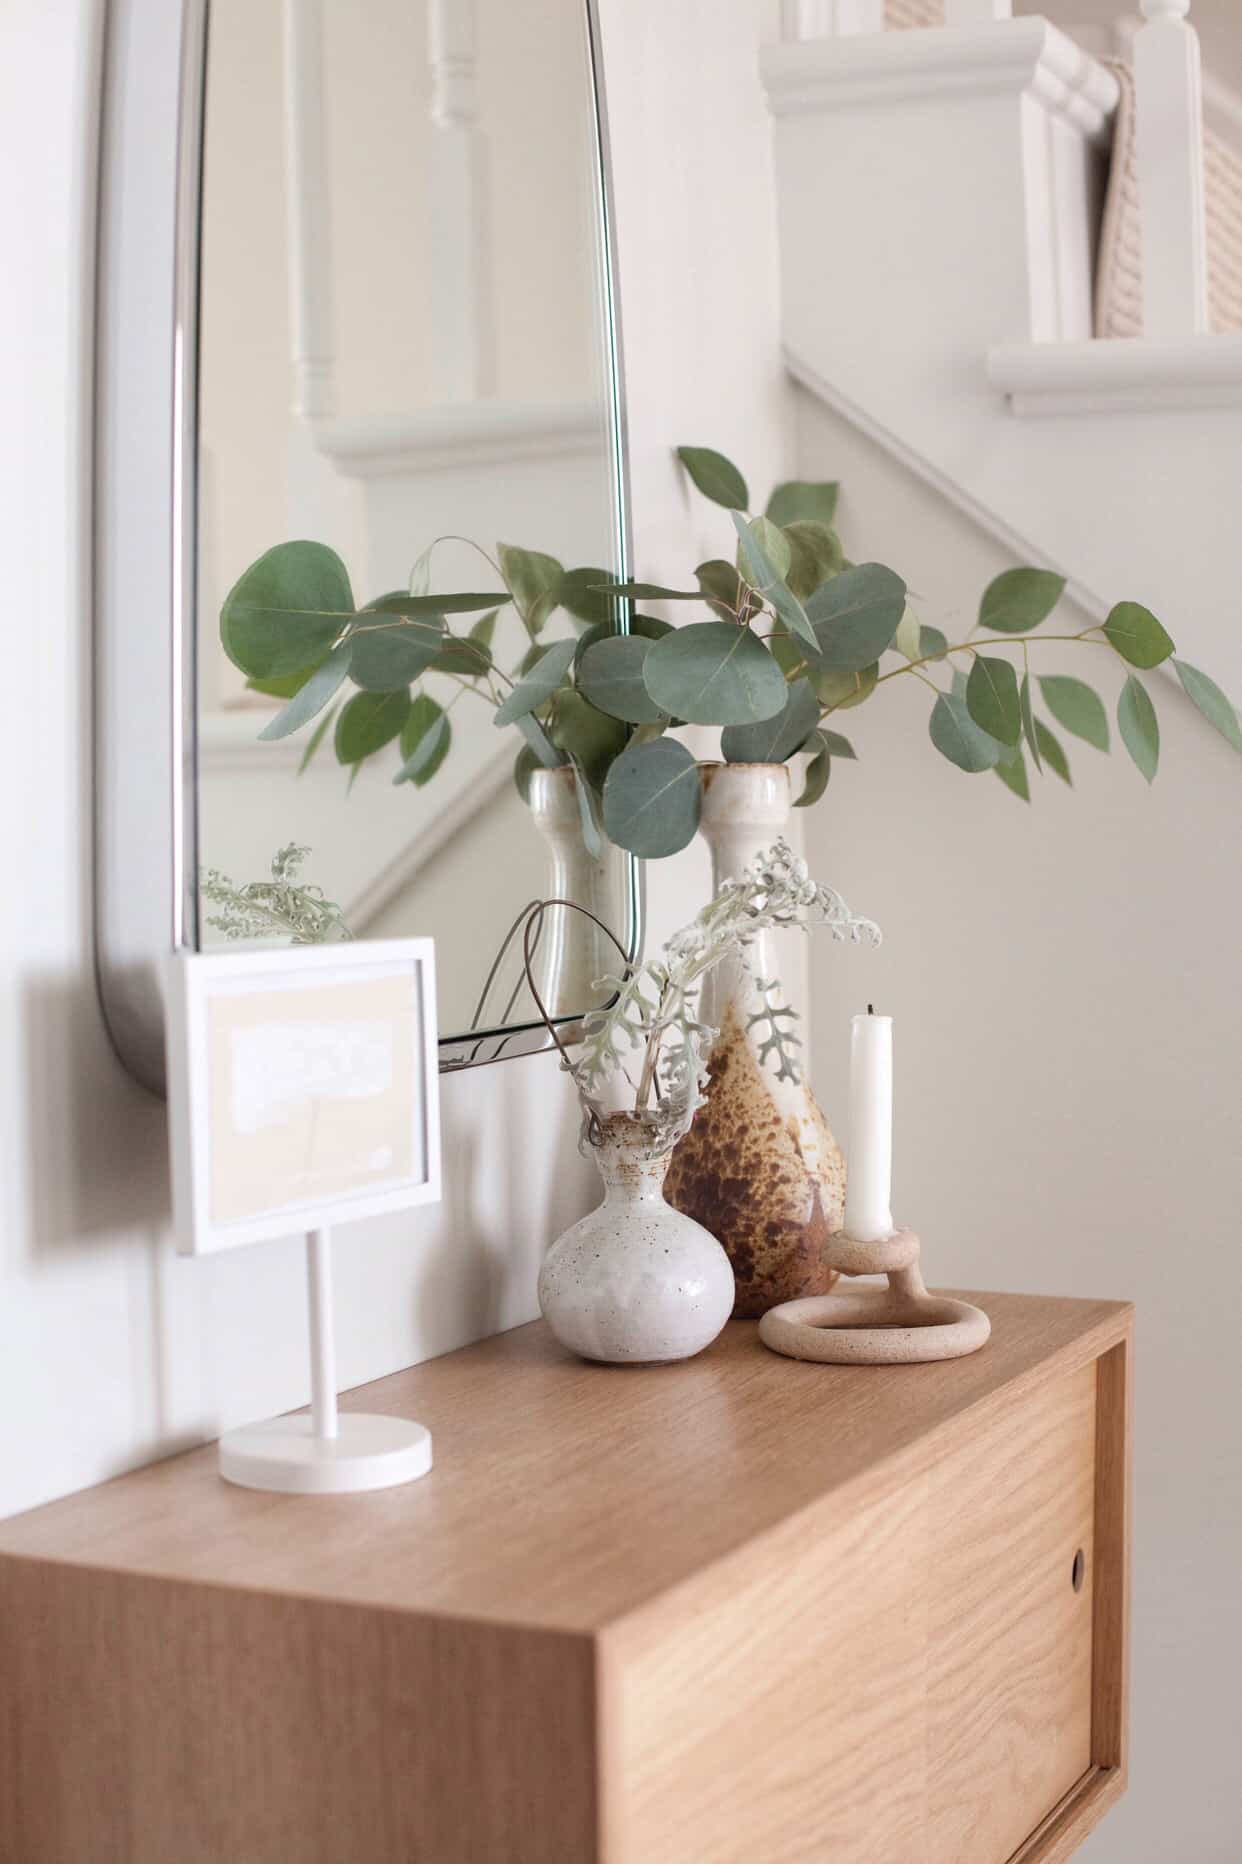 There was very little space to decorate and accessorize in here, but I did find room to hang a floating cabinet and a series of wall hooks. They add the perfect combo of usefulness and style. I can’t wait to finally have a little surface area to decorate for each season of the year!
This project has felt very drawn out and honestly, quite exhausting. But it feels so good to have the space finished! I just love opening our new front door and inviting guests into a space that isn’t subfloor and patched up drywall. So gratifying!
If you’re curious about any of the sources for the things you’ve seen in this post, I added links below. Let me know if you have any questions! – Mandi
Material Sources:
- Tile: Bedrosians Costa Allegra in Riverway, Driftwood, and White Sand
- Wall paint: Benjamin Moore Super White and Winter Orchard
- Carpet: STAINMASTER®
- Front door: Therma-Tru Fiber-Classic Mahogany
- Entry knob set: Emtek Brighton
- Door knobs: Emtek
- Wall mount cabinet: Etsy
- Wall hooks: Etsy
- Mirror: Wayfair
- Globe pendant light: All Modern (no longer available)
- Rug: Wayfair
- Ceramic candlestick holder: Anthropologie
- Pedestal picture frame: Target
6 Comments
I’m jealous! I wish my entryway looked like this. It’s beautiful, Mandi! 🙂
Charmaine Ng | Architecture & Lifestyle Blog
http://charmainenyw.com
There is a timelessness and understated beauty to your entire home, Mandi. It doesn’t brag for attention, but the loving attention to detail is evident. I have enjoyed everything you’ve shared and appreciate that your decor isn’t trendy but borrows from several styles in a modern way.
Wow, it looks gorgeous! Every detail is simply stunning x
Shannon | https://shannonmichelle1.blogspot.com
The floor looks absolutely amazing! You did such a great job tying it all together. Thanks for the inspiration as I’m about to take on the project of remodeling my first home!
Those tiles are so gorgeous! And I love the white you used for the stairs, it’s so fresh and pretty yet absolutely timeless.
It is beautiful!