 I shared a little about our recent vacation to Norway earlier this week, so if you read that then you already know why we choose to go to northern Norway in the winter: hoping to see the northern lights!!!! Before we went, I had read a few articles online about the Aurora Borealis and generally what to expect (or not expect). I also read from other photographers about their experience photographing this natural phenomenon because, as a photo junky myself, I was really hoping that if we were lucky enough to see the lights that I could get a great photo that I could display in our home from the trip. After reading a bit more about it, I knew I would need to pack my tripod because a long exposure was going to be key to capturing the lights. We had also bought a drone to use on the trip (not for the lights, although I suppose you could?), so we packed that as well.
 Trey and I NEVER check bags, we’ve both had bad experiences with it before. And most of the trips we go on aren’t super long (except for one month-long trip, but we drove there), so it’s not too hard to pack just a carry-on bag. But since I had extra camera gear, the drone, and snow boots to pack, we decided that we would probably need to check a bag. And you know what happened? THEY LOST IT FOR MOST OF OUR TRIP.
Sigh.
Thankfully, the host of our Airbnb was (extremely) gracious and let me borrow a camera, tripod, and snow boots. (!!!!!!!!!) I am still thanking the universe for this kindness because although I would have enjoyed the trip no matter what, I would have missed my chance to photograph the lights as we only saw them the first night we were there. And I would have been extremely cold and uncomfortable on our hike.
Even though I was incredible thankful for the borrowed camera (a Canon 500 with the kit lens and a tripod), as any photographer reading this knows, it’s a bit uncomfortable using a different camera for the first time. Even if you know exactly what settings you want, figuring out how to find the right menus and buttons might be a little different from your camera, so it takes a little bit to get the hang of it. So I was pretty nervous to use an unfamiliar camera to photograph something that was bound to be challenging anyway.
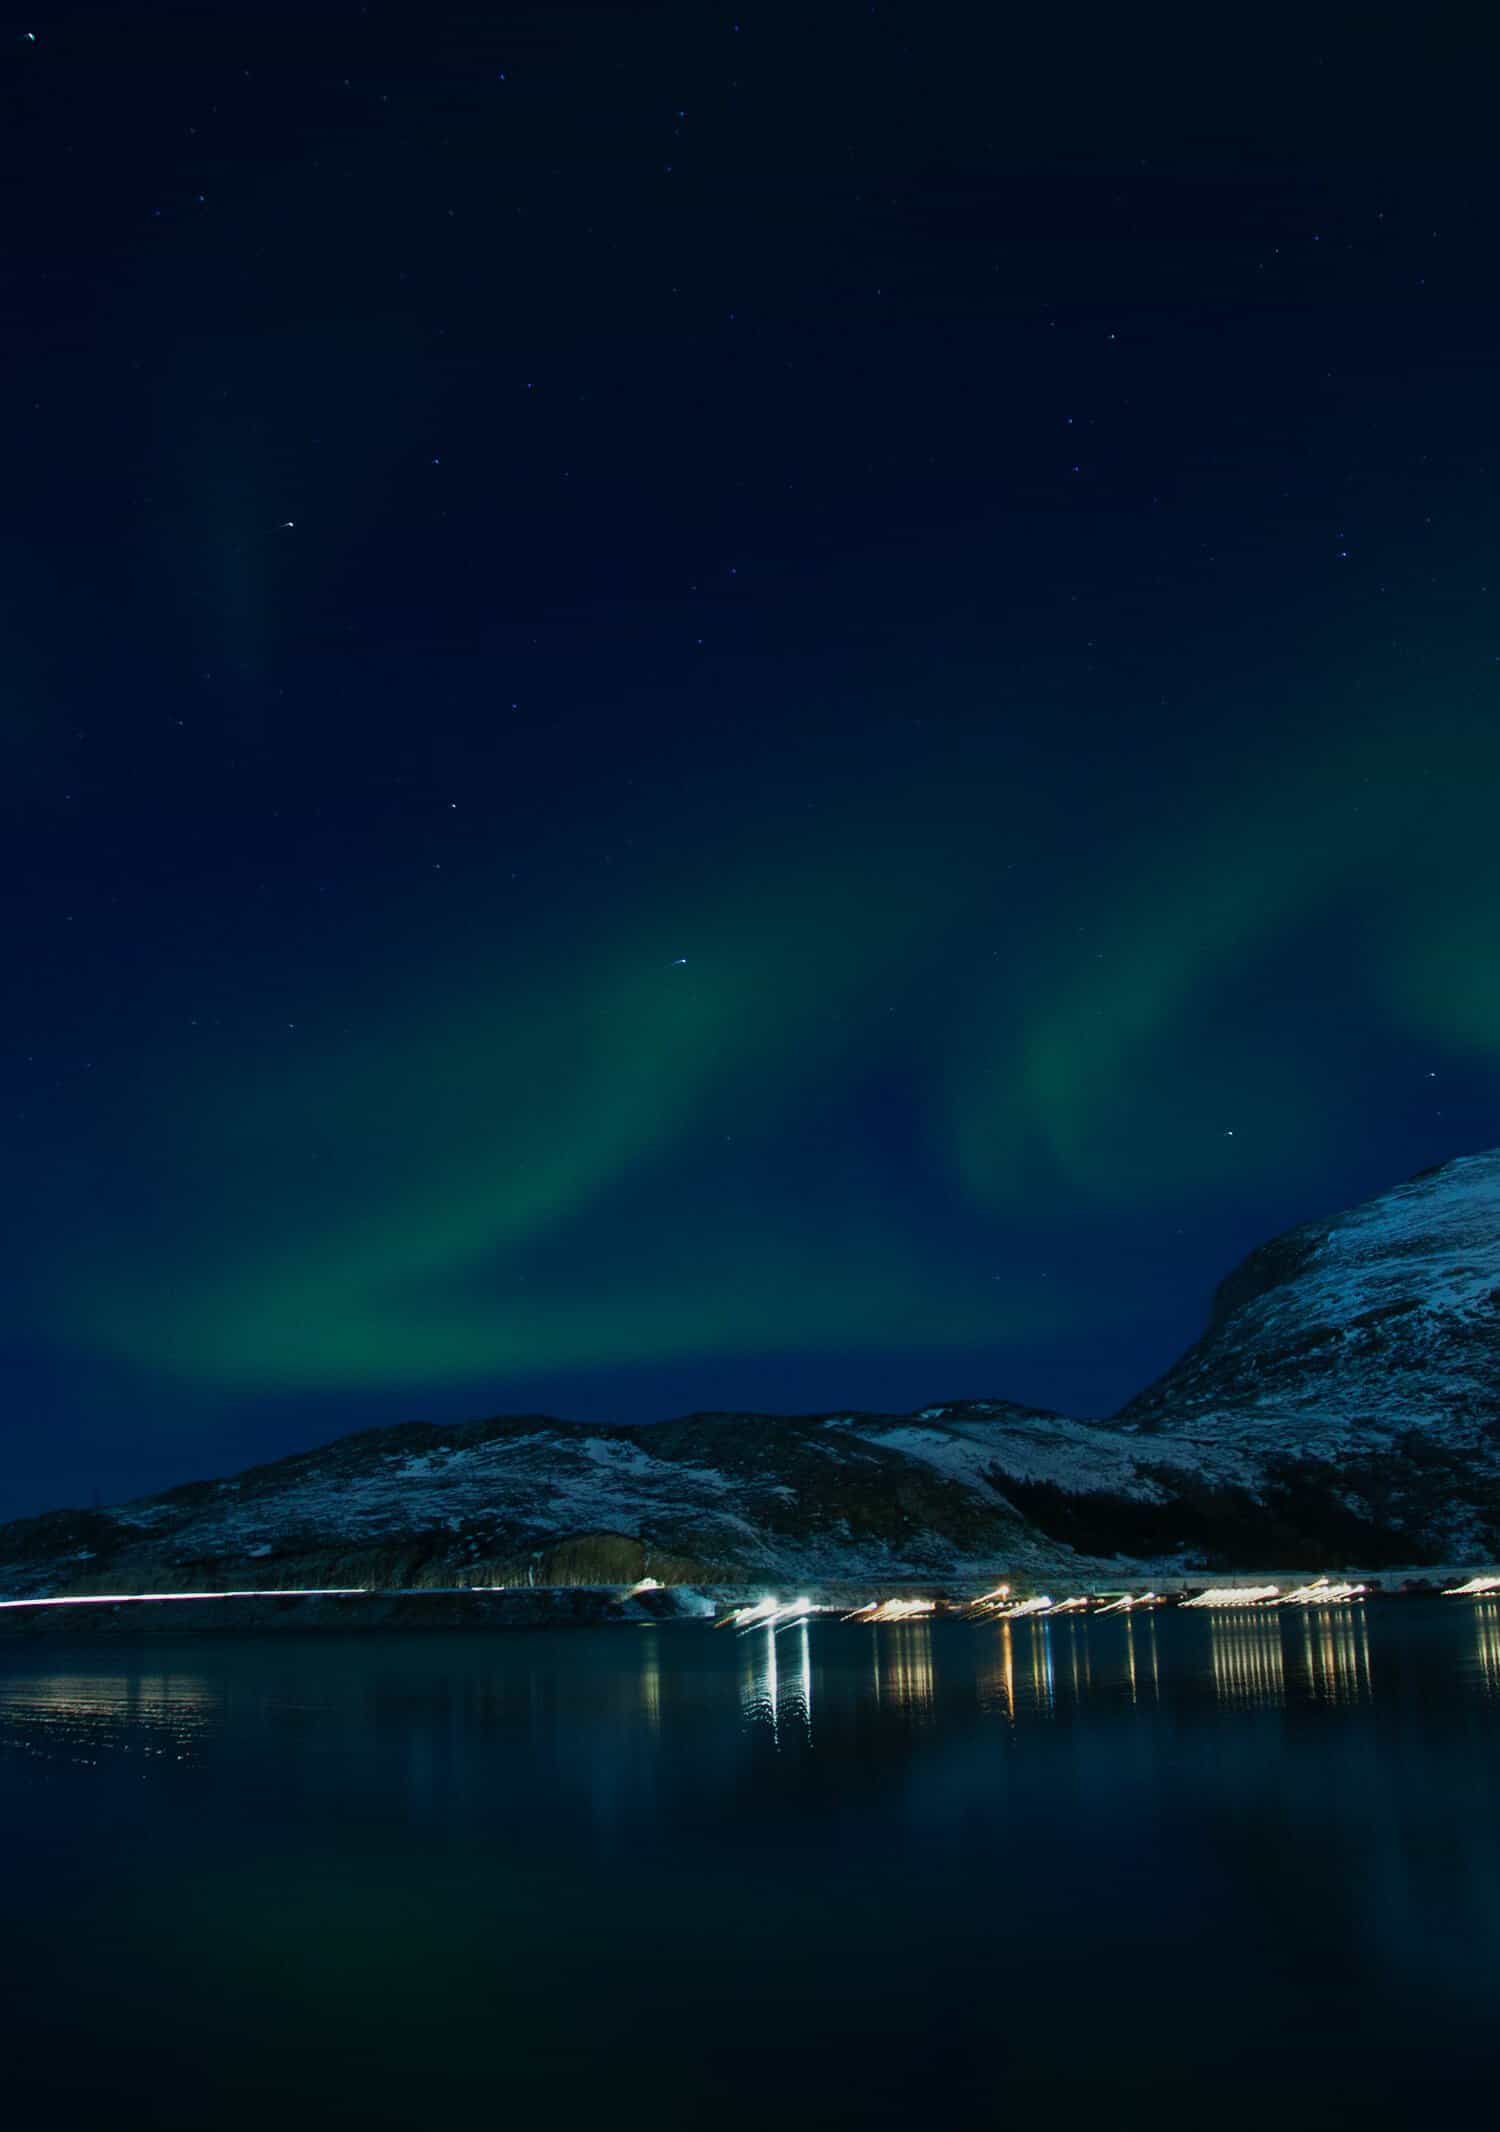
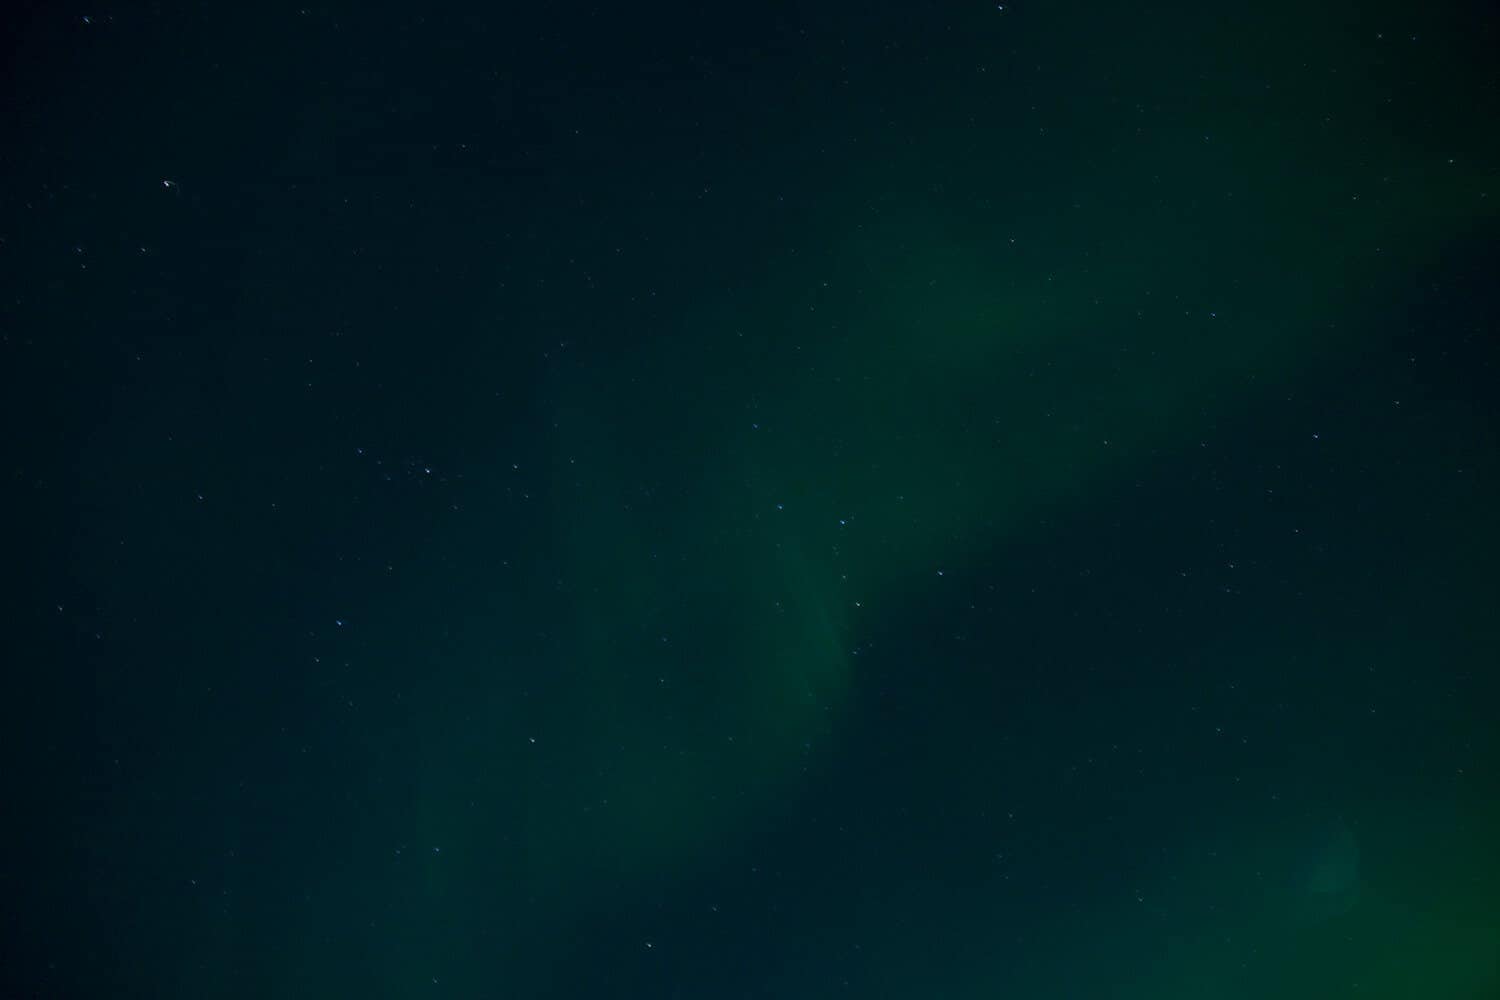
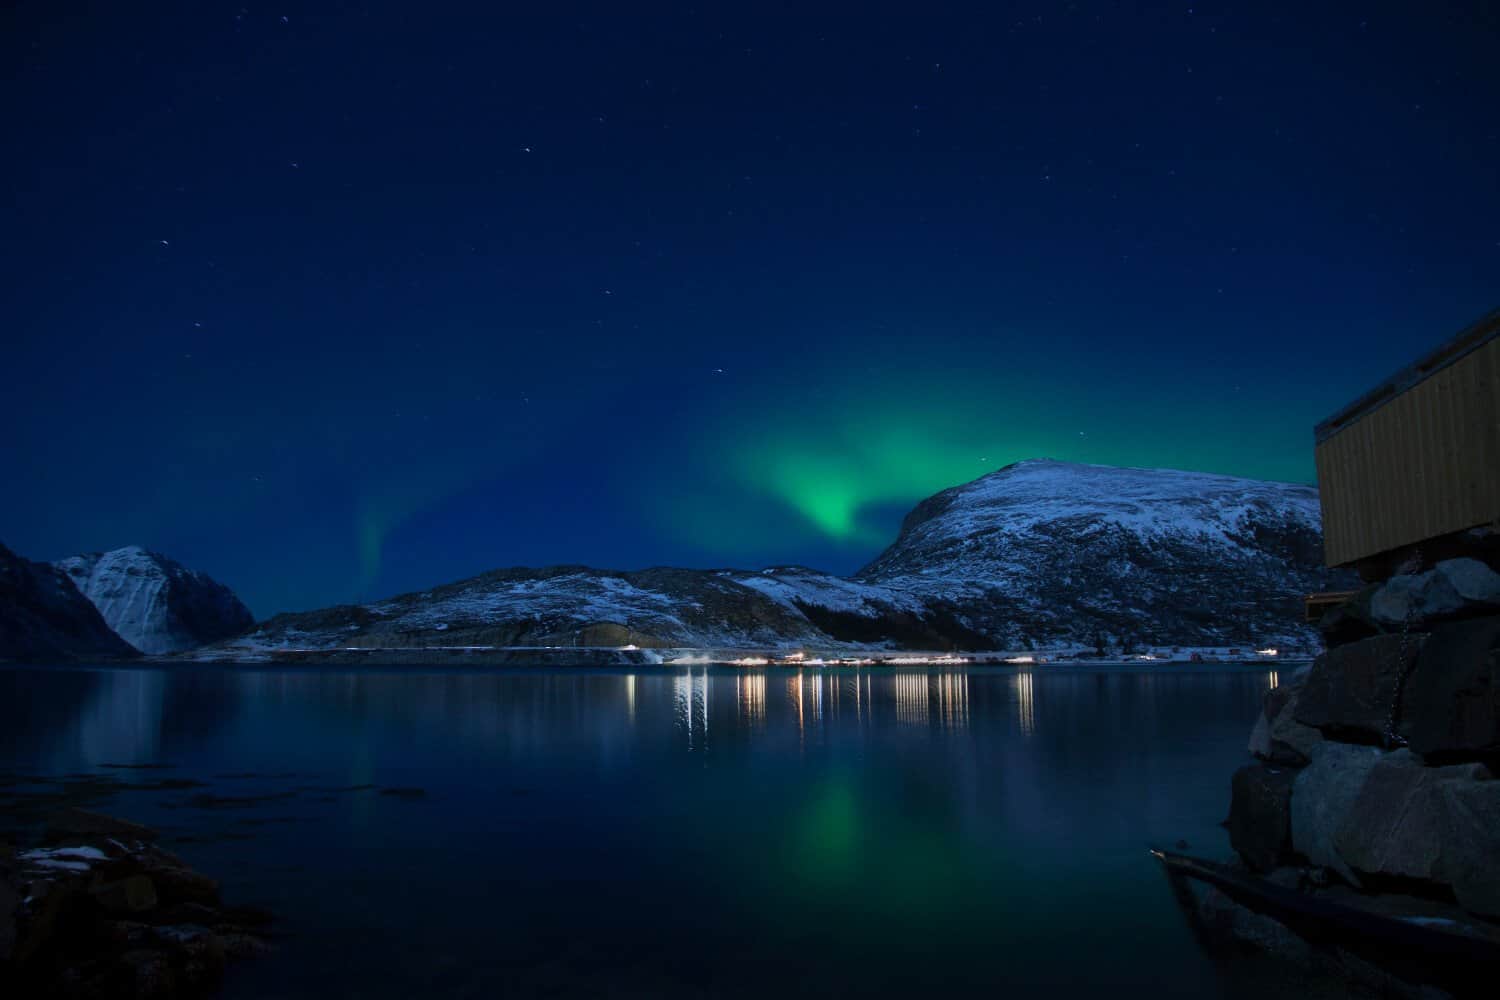
 We were staying at a cabin in Leknes, Norway. This is part of Lofoten, which is a great place to see the northern lights during the winter. You also will need a clear night, where you can see the stars easily. I also recommend downloading the My Aurora Forecast app as that really helped us to know when they were happening in our area. It’s quite cold in the winter so sitting outside all night long could be pretty challenging, but the app was super helpful. Above you can see a photo of when the lights first started to appear, it’s a super faint arc over the mountains. They picked up more as the night went on.
I also recommend warm, fingerless gloves with a mitten flap—that way you don’t have to keep taking your gloves on and off to mess with your camera when the lights are happening. They are not crazy fast; each time we saw them, they would appear for anywhere from 5-20 minutes. But they do move around as light clouds that are being blown by a strong wind, so you want to be ready.
The best photos I got I had the camera set to:
ISO 150-200
F-stop 400+
Shutter 30 seconds (yep, open your shutter for as long as you can to capture the movement)
I also found that the camera had a really hard time focusing in the dark. Of course, you can use manual focus but I found this super challenging because I myself could not see that well in the dark of the night. So it was hard to know if I had the camera focused properly as well. What I did that worked best for me was to focus the camera on the horizon area, just under the northern lights, and hold the shutter button down halfway so the camera focuses but doesn’t fire. Then aim it at the space you want and take a photo. This is similar to when you photograph two people and you want both in focus, this little trick works then, too (along with having a wider aperture so more is in focus anyway).
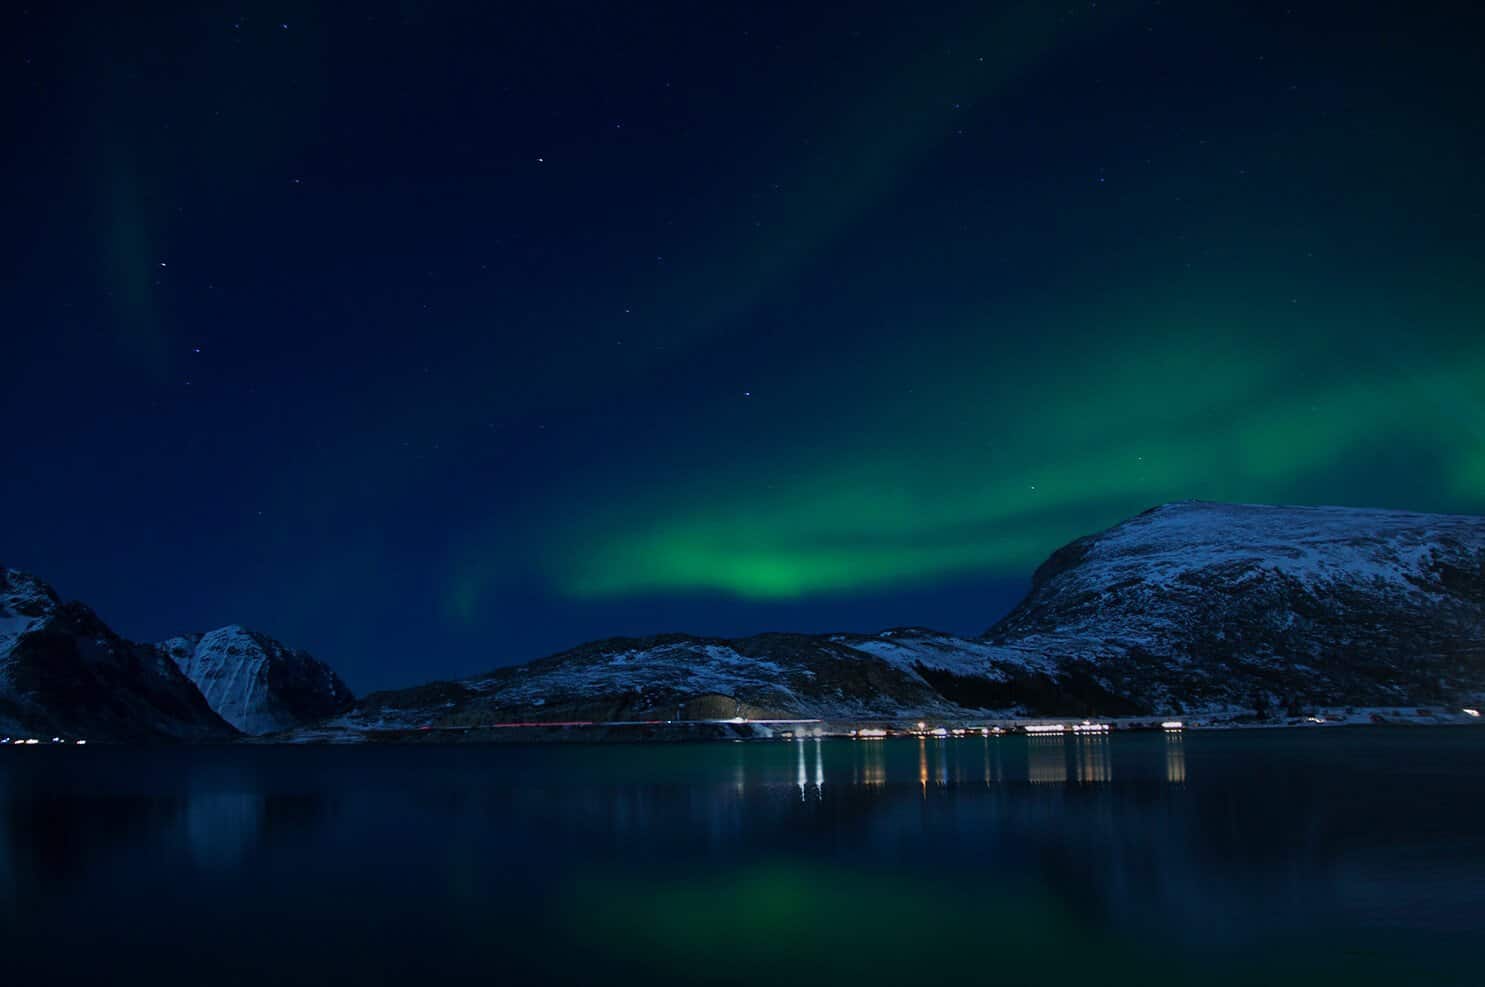
 Here is a photo taken way up above our heads, no horizon in sight. I would not have been able to focus this shot at all without this little trick. But I also found that the particular night that we saw the lights, I liked the shots with some of the horizon and surroundings in the shot more. I think it gives it a little more perspective, so you better see how big the lights were in the sky.
 Of course, even if you’re not a photographer or have no interest in photography, I still think seeing the northern lights should potentially be on your bucket list. They are truly magnificent and just really special. I can honestly say I have never seen anything quite like them and I throughly enjoyed the experience with or without a camera (although I was glad I had one).
For any Aurora buffs out there, feel free to share more information on viewing the lights if you want! Or any photographers who want to share their experience photographing them! Would love to hear from you on the subject because I (clearly) found the whole thing super fascinating. xo. Emma
P.S. Also, if you are on Instagram, check out #lofoten because there are some REALLY amazing photos of the northern lights in there!
28 Comments
I’d never be able to get photos as amazing as yours – I’m a photography noob! But this is nice to note… maybe one day. 😀
Charmaine Ng | Architecture & Lifestyle Blog
http://charmainenyw.com
You’re sweet but I don’t think that’s true. You have really great photos all over your blog. 🙂
These are amazing Emma! Thank you for all the tips! I know these are going to look stunning in your home, and are extra special since you shot them.
Those photos are amazing! A true talent to capture them! Seeing the Northern Lights is high on my Bucket List!
Sarah Lillian | https://livinglifewithsarahlillian.blogspot.ca
My mind is blown that you *never* check a bag. Future post on minimalist packing pretty please!
Great job, Emma! Lovely photos!
Oh man, the aurora is definitely on my bucket list. We went to Alaska last year but didn’t have much luck. Although it was also summertime, so kind of the wrong time of year.
Beautiful photos, looks like an awesome trip!
You did an exceptional job considering you were using someone else’s camera! I’m hoping to snag a Groupon trip there – does anyone have experience with Groupon vacation packages?
Jessica
http://fortheliangrun.com/organic-industrial-home-office-decor-ideas/
Gorgeous shots, Emma! One of these days, I hope to find my way up there to see the Aurora Borealis.
Nice photos. I like night photography. It has a mysterious and eerie mood.
Wow it looks amazing! I have wanted to see the Northern lights for ages, it must have been amazing! Love the photos! xx
https://zoe-ware.blogspot.ca
Wow, your host sounds effing amazing? Wow. (Also, I’m so paranoid I probably would have packed all the tech in the carry-on and the clothes in the suitcase. My tech is just much more expensive!) These are gorgeous shots, and I’m particularly impressed you got them with a 500D and kit lens — I had that for ages before it broke and I upgraded to a 6D (and lost the kit lens) and I don’t remember it being super into night photography, though I got some good firework and skyline shots every now and then. I tend not to bring my tripod when I travel though, but I definitely would for the northern lights. It’s not on my bucket list as such, but, maybe one day. I do live in Europe and mostly travel around here (don’t have a passport, am broke). I was in Norway a couple of years ago, very briefly. I’m just real sensitive to the cold, haha.
(also if I’m fully honest I think I really suck at landscapes. So I’d want to get better at them before I attempt something like this.)
This is so helpful! I like on Lake Superior and I’ve seen the northern lights when I’ve been having a bonfire and lingering outside for an entire evening, but I’ve never been able to photograph them. Frankly I’m usually too nervous to get my camera gear because I worry when I come back they’ll be gone because it usually lasts for only a short time here, in my experience. By now I want to at least try! Thanks for the helpful guide.
Thanks for the photography tips- these photos turned out amazing! Iceland is high on my travel bucket list!
Stunning stunning stunning!
Those photos are just absolutely breathtaking!
I really wish to see something so beautiful at least once in my life.
Have a great week!
-Daria
https://dariaed.com/skincare/
@@@@ i like it @@@@
Beautiful photos, the Northern Lights are on my list to go places!
Amazing! You should check out http://www.tonyloewen.com/ and consider Canada for your next Northern Lights trip! You could see polar bears too 🙂
#notAnAdJustAManitoban
These photos are amazing!! My husband’s family is from Norway and we so badly want to visit and see where they lived. I don’t know if I’d be brave enough to face it in winter, but these photos make it seem almost worth it!
Me and hubby went to Lofoten Island two years ago and we were really lucky to see northern light.
He is a good photographer and he took really amazing pictures of it.
He says your setup isn’t completely right for taking good pictures of northern lights 🙂
The first thing is to use wide angle lents to have a big amount of sky and because the more is wide the angle, the less you are affected by earth rotation.
Then, unlike the usual night photography, time should be shorter because the northern lights moves (5- 8 sec. maximum). Said that, it is important to have a wide aperture, at least F 2.8 and calculate the ISO speed basing on that. A possible ISO speed setting mould be between 1600 and 3200.
These were our pictures:
http://www.thomasfarina.com/projects/aurora-borealis/
Oh, I forgot: focus should be setted at infinity.
I hope these tips could help.
wow! what an experience. gorgeous pictures!
Amazing photograph. I like it thanks a lot for sharing us.
wow-wow. great article. very useful. And amazing photos. What photo editing tool do you use?)
We use A Color Story Desktop actions / Photoshop 🙂
Me and hubby went to Lofoten Island two years back and we were extremely fortunate to see northern light.
He is a decent picture taker and he took extremely astounding pictures of it.
He says your setup isn’t totally ideal for taking great pictures of Aurora Borealis
The principal thing is to utilize wide edge lents to have a major measure of sky and in light of the fact that the more is wide the point, the less you are influenced by earth pivot.
At that point, not at all like the standard night photography,