 It was June of 2017 when we originally ripped apart our first-floor bathroom with big plans to transform it into a stylish place for our guests to … powder their noses. After a year of tirelessly stomping up and down the stairs when nature called or while potty training toddlers, our first-floor bathroom is finally finished! I’m so glad I gave this space time to marinate in my brain, because the end result is much nicer than I had originally planned. And that’s all thanks to the Delta brand and The Home Depot, who sponsored the makeover!
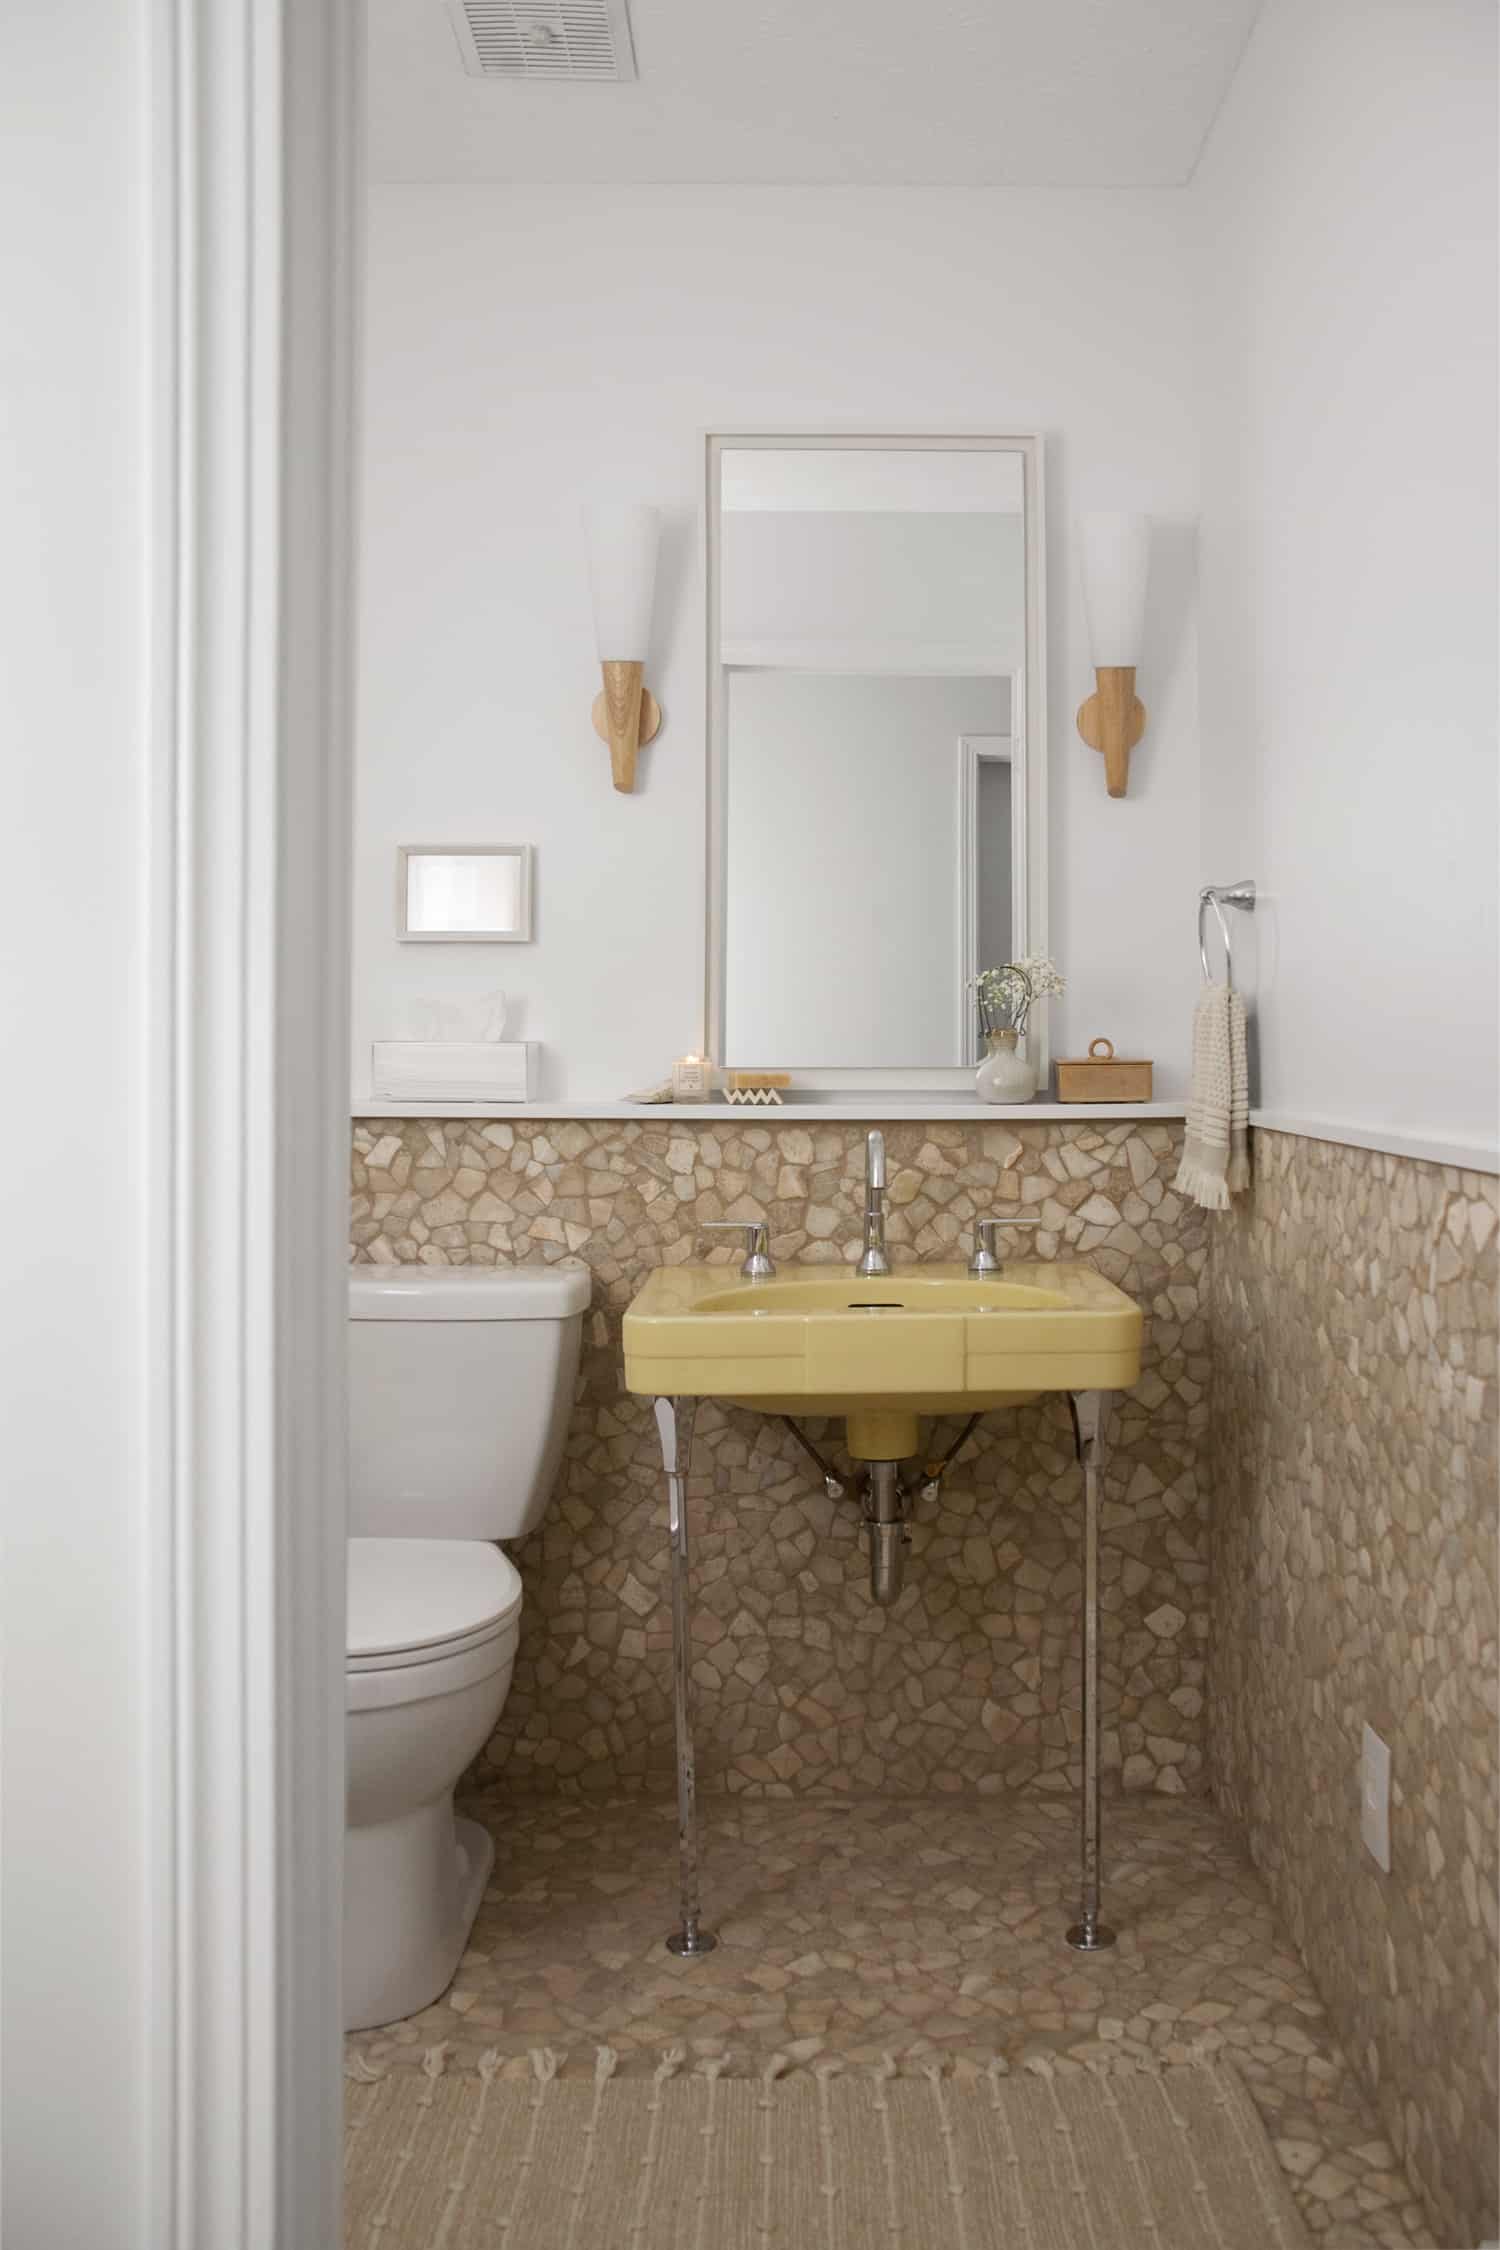
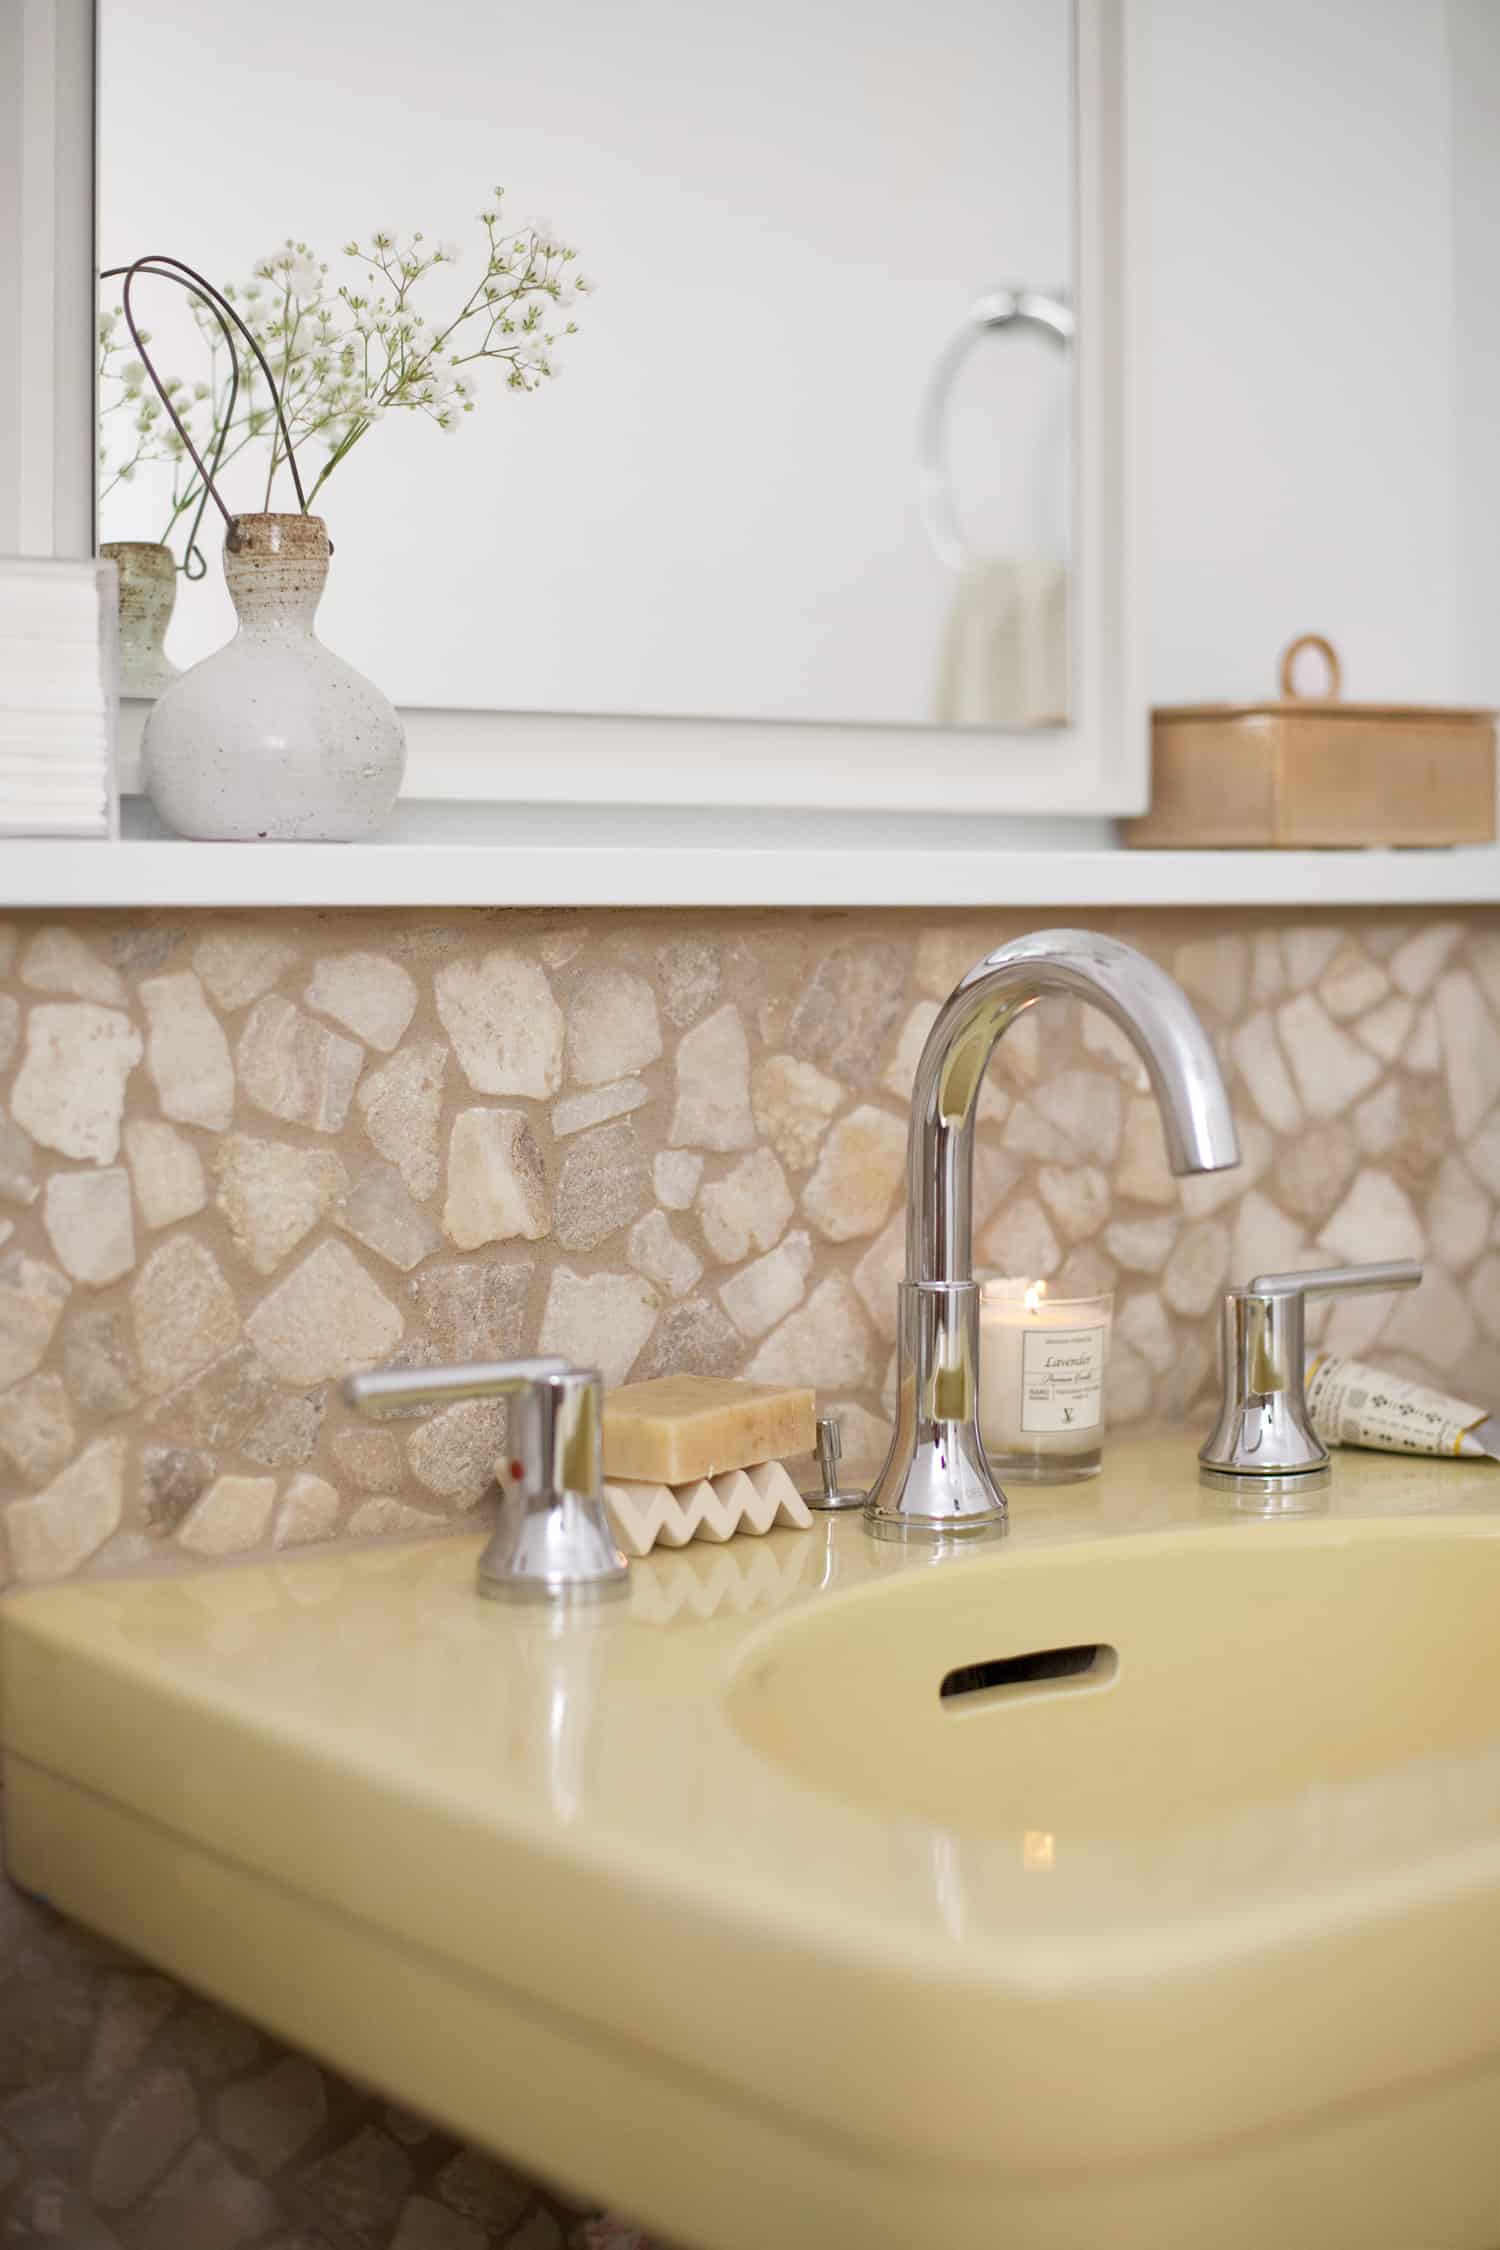
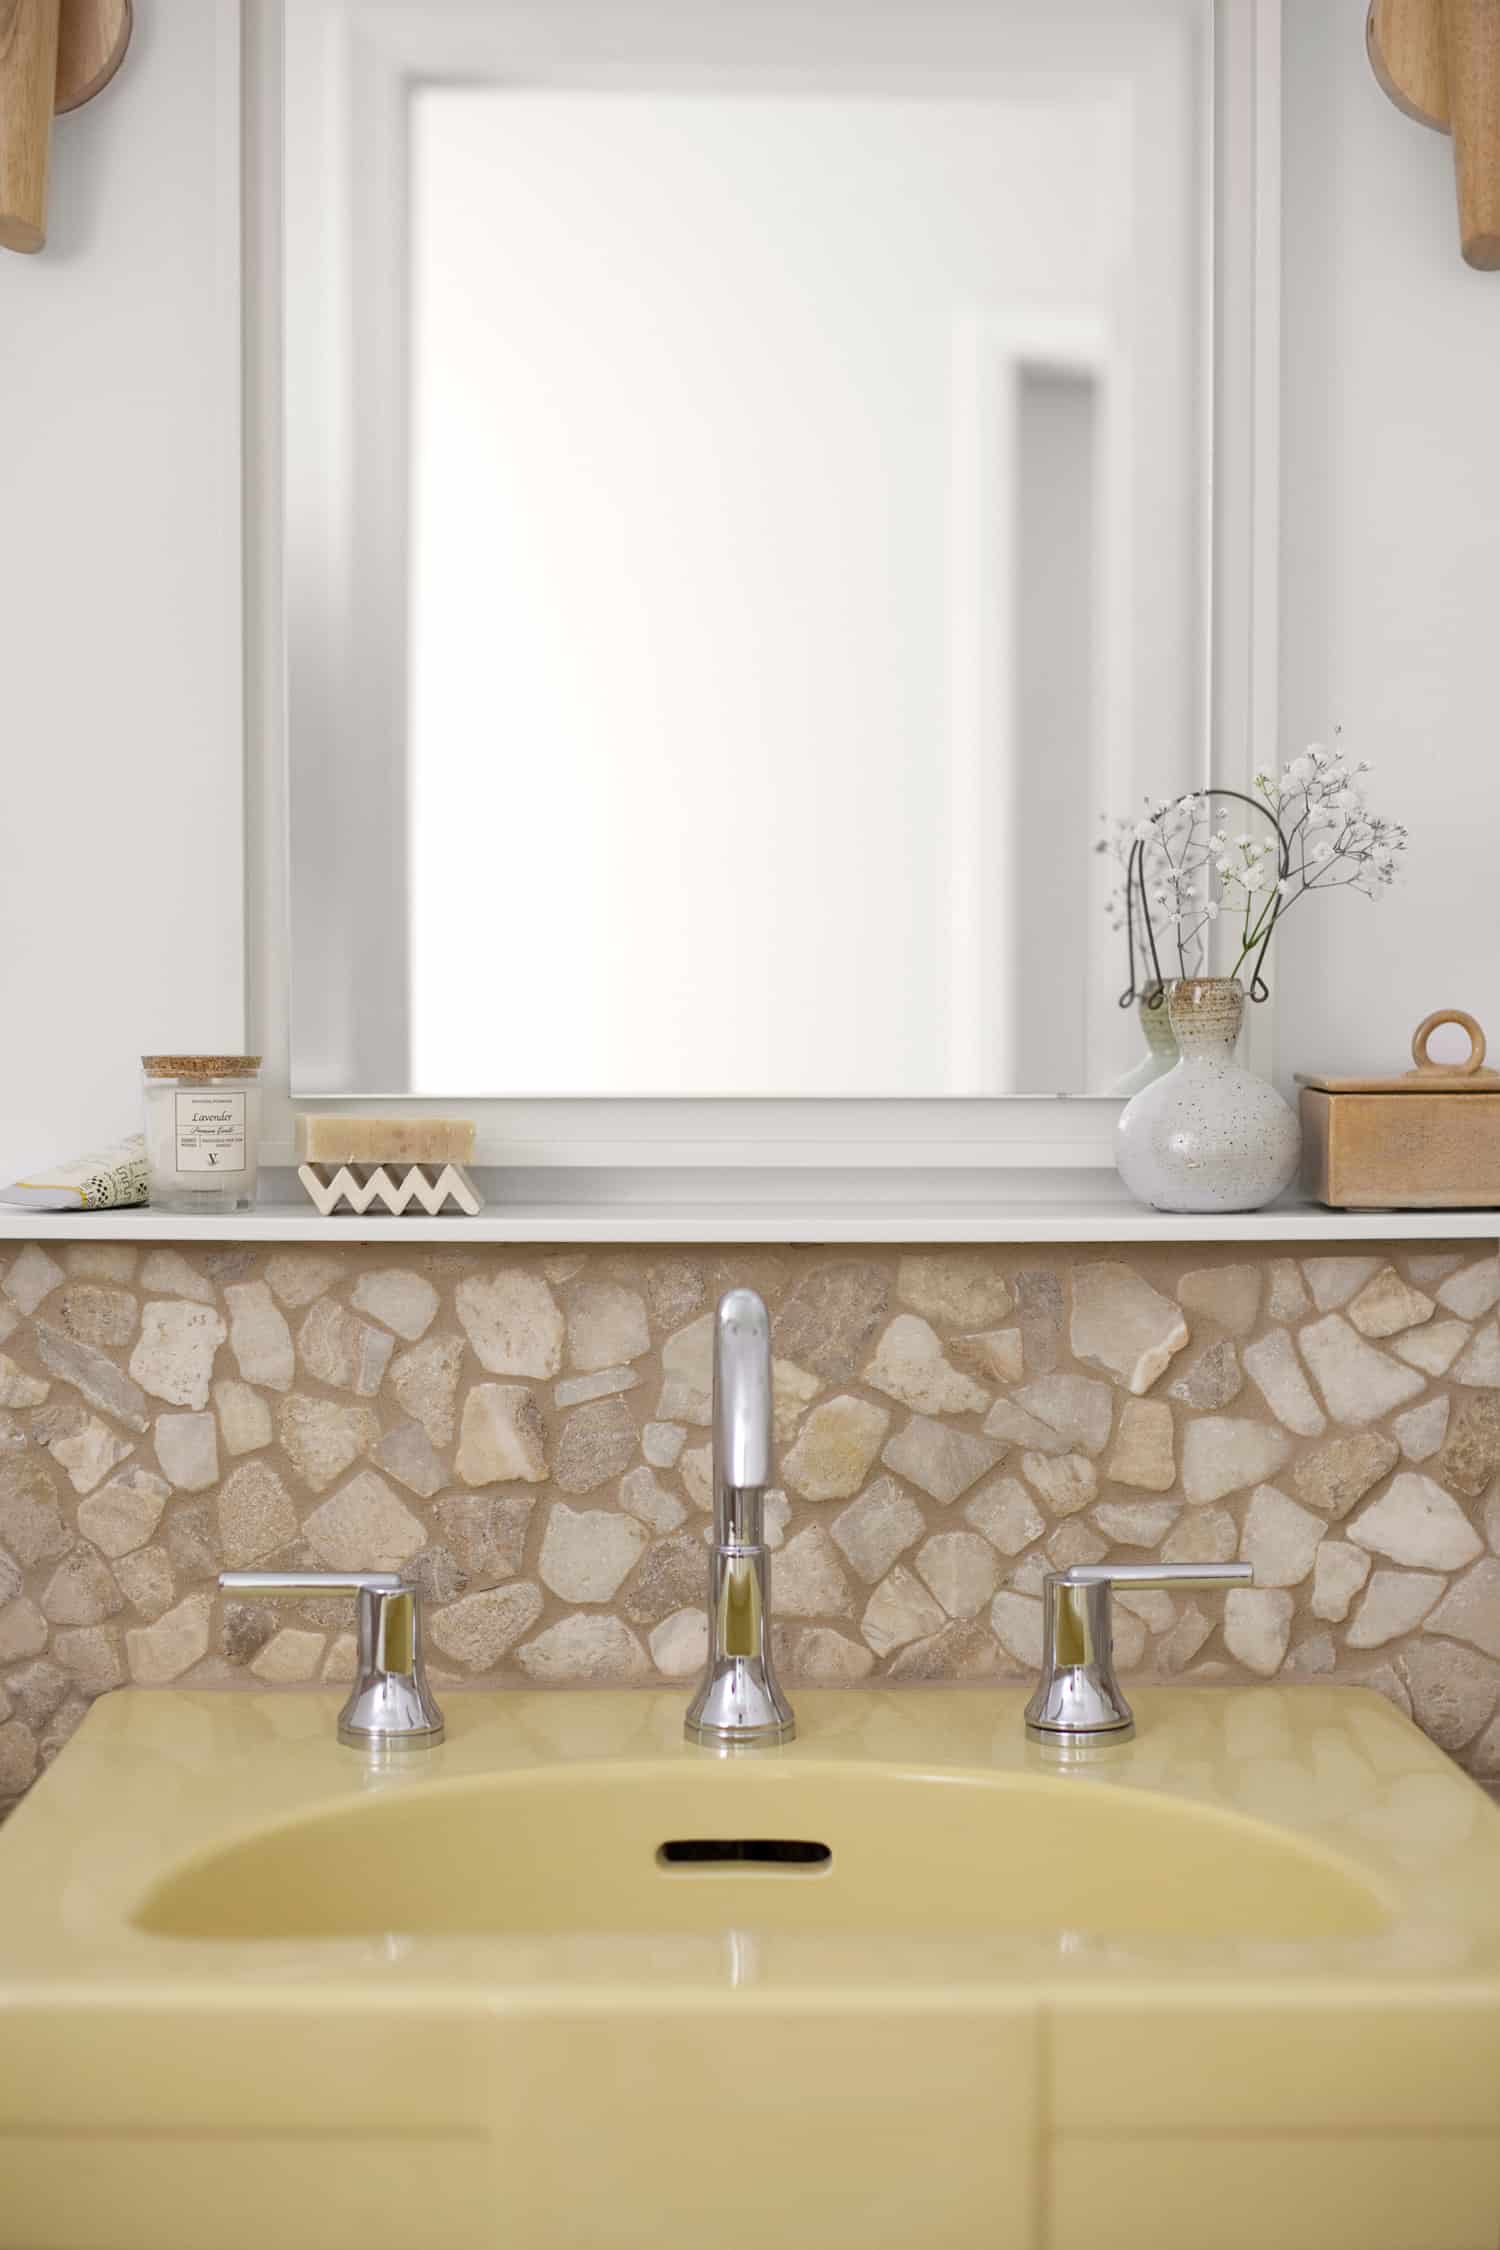
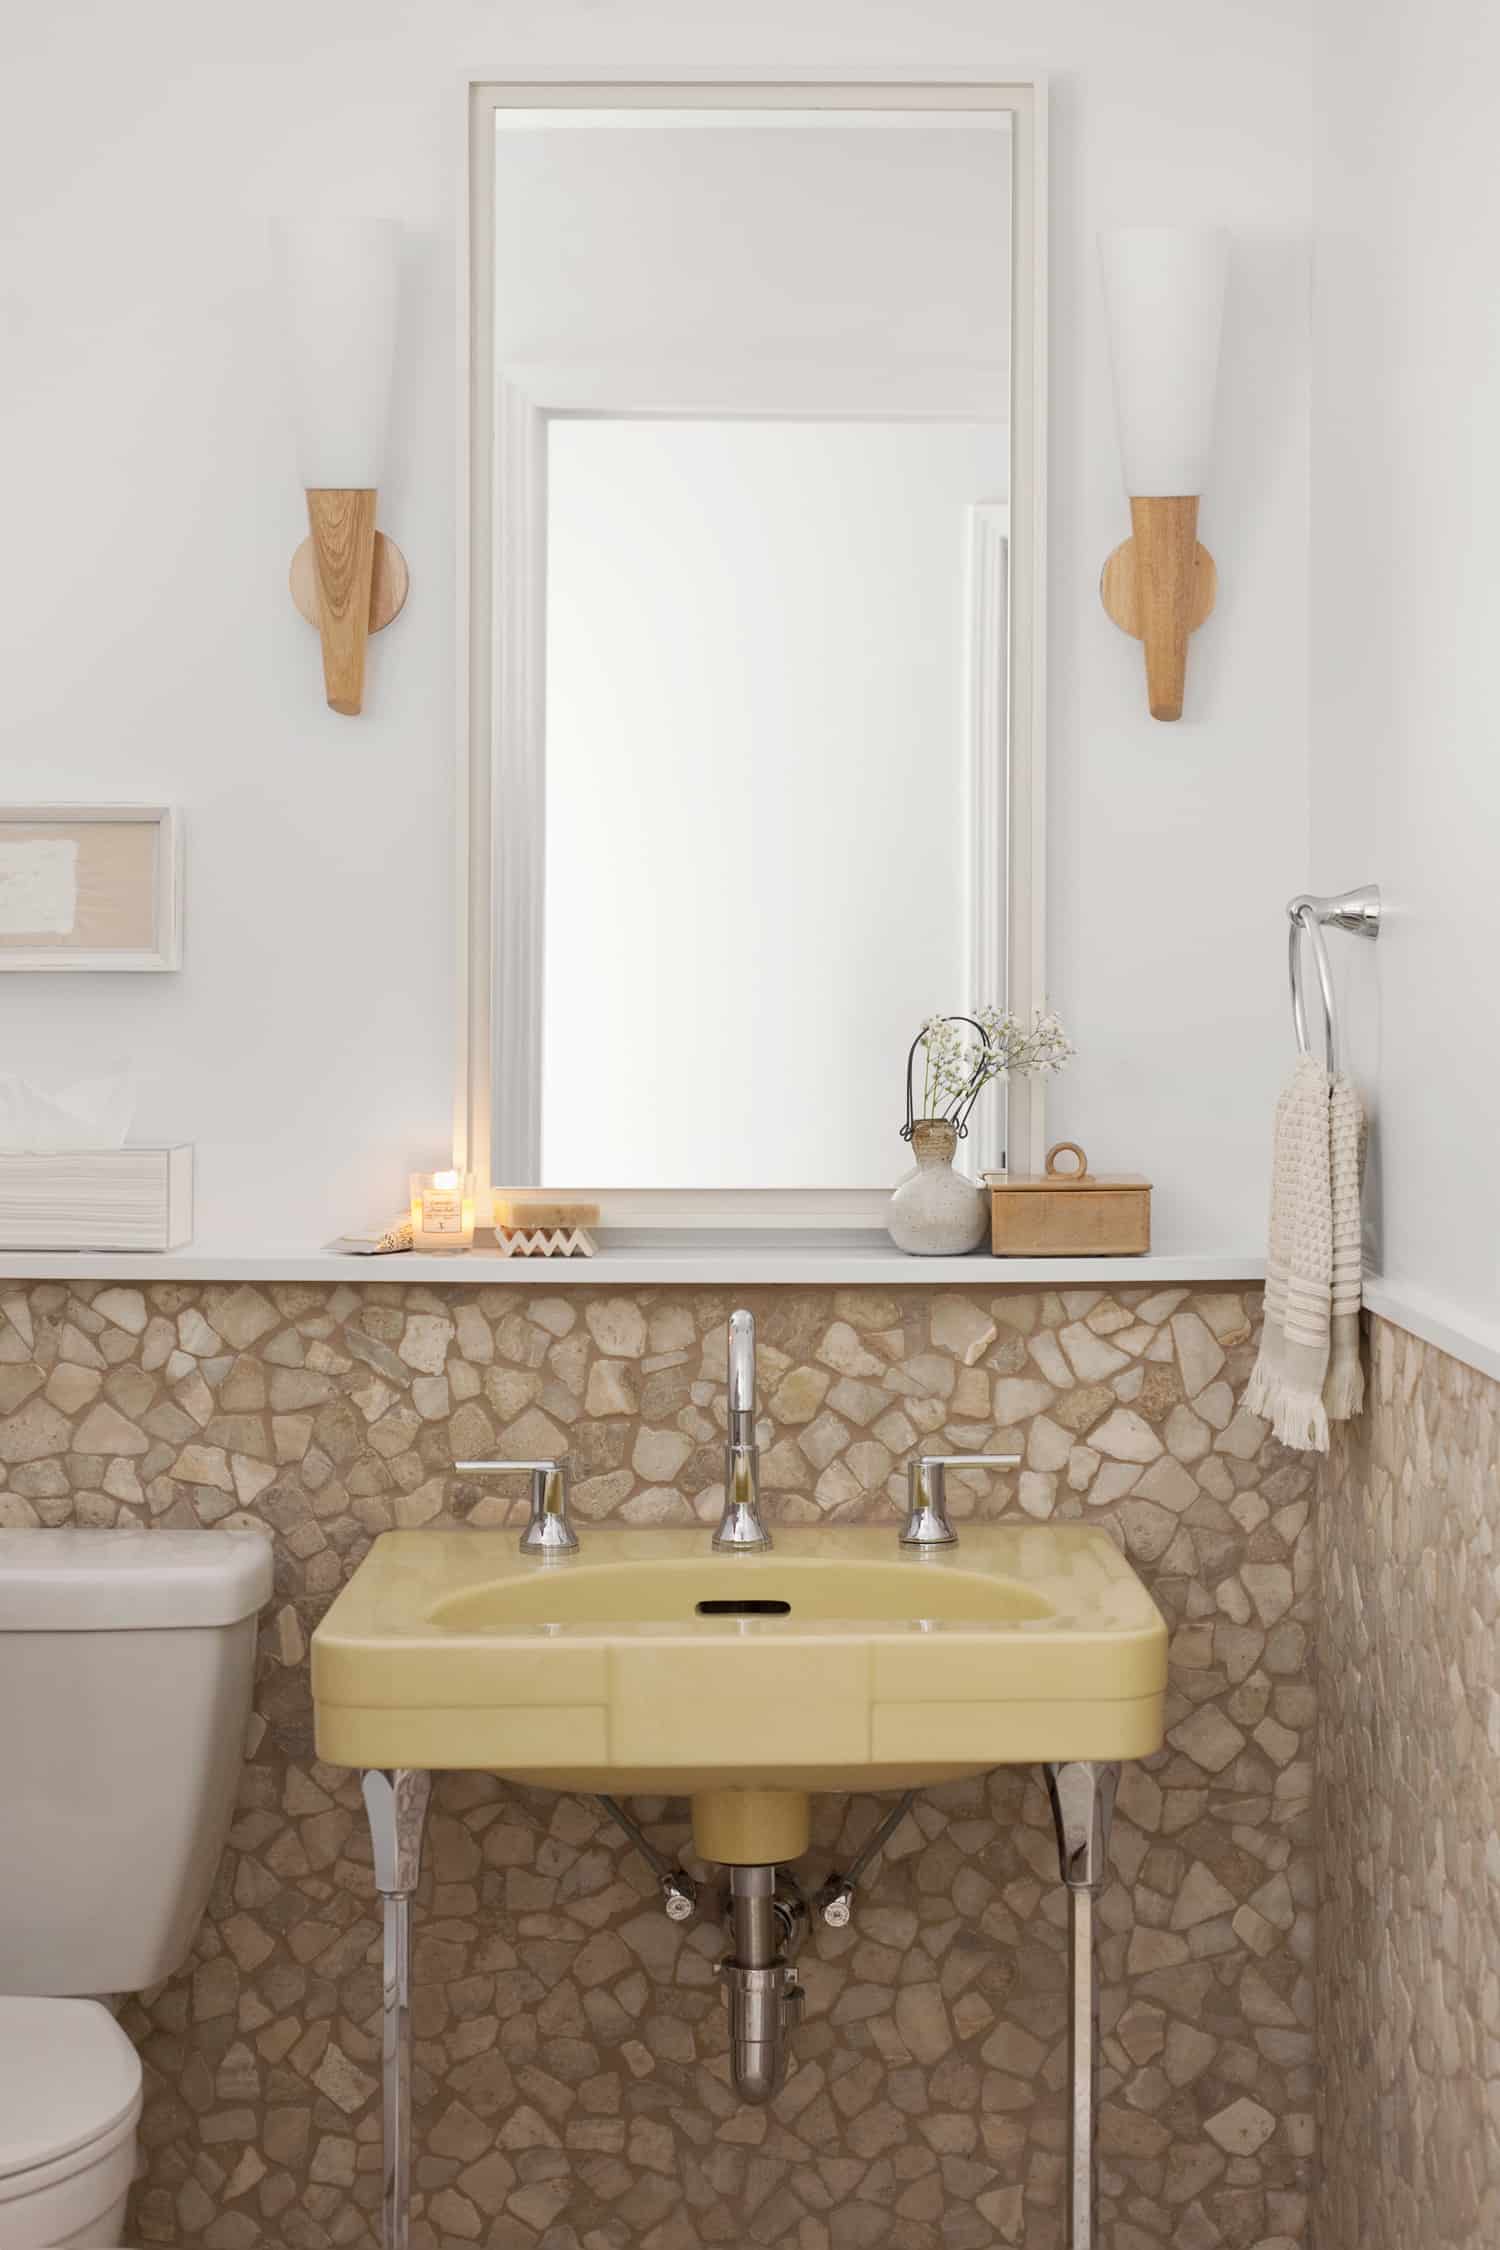
The plan for this space began with a vintage yellow sink I found on Craigslist. I knew I wanted one bold vintage element, though I still wanted the rest of the space to feel fresh and modern. Retrofitting the old porcelain sink with a sleek Delta Trinsic Two Handle Widespread Bathroom Faucet made the whole setup feel very current. The Chrome finish of the faucet I selected ties in with the legs of the vintage sink, but also with other fixtures I’ve used throughout the rest of our home.
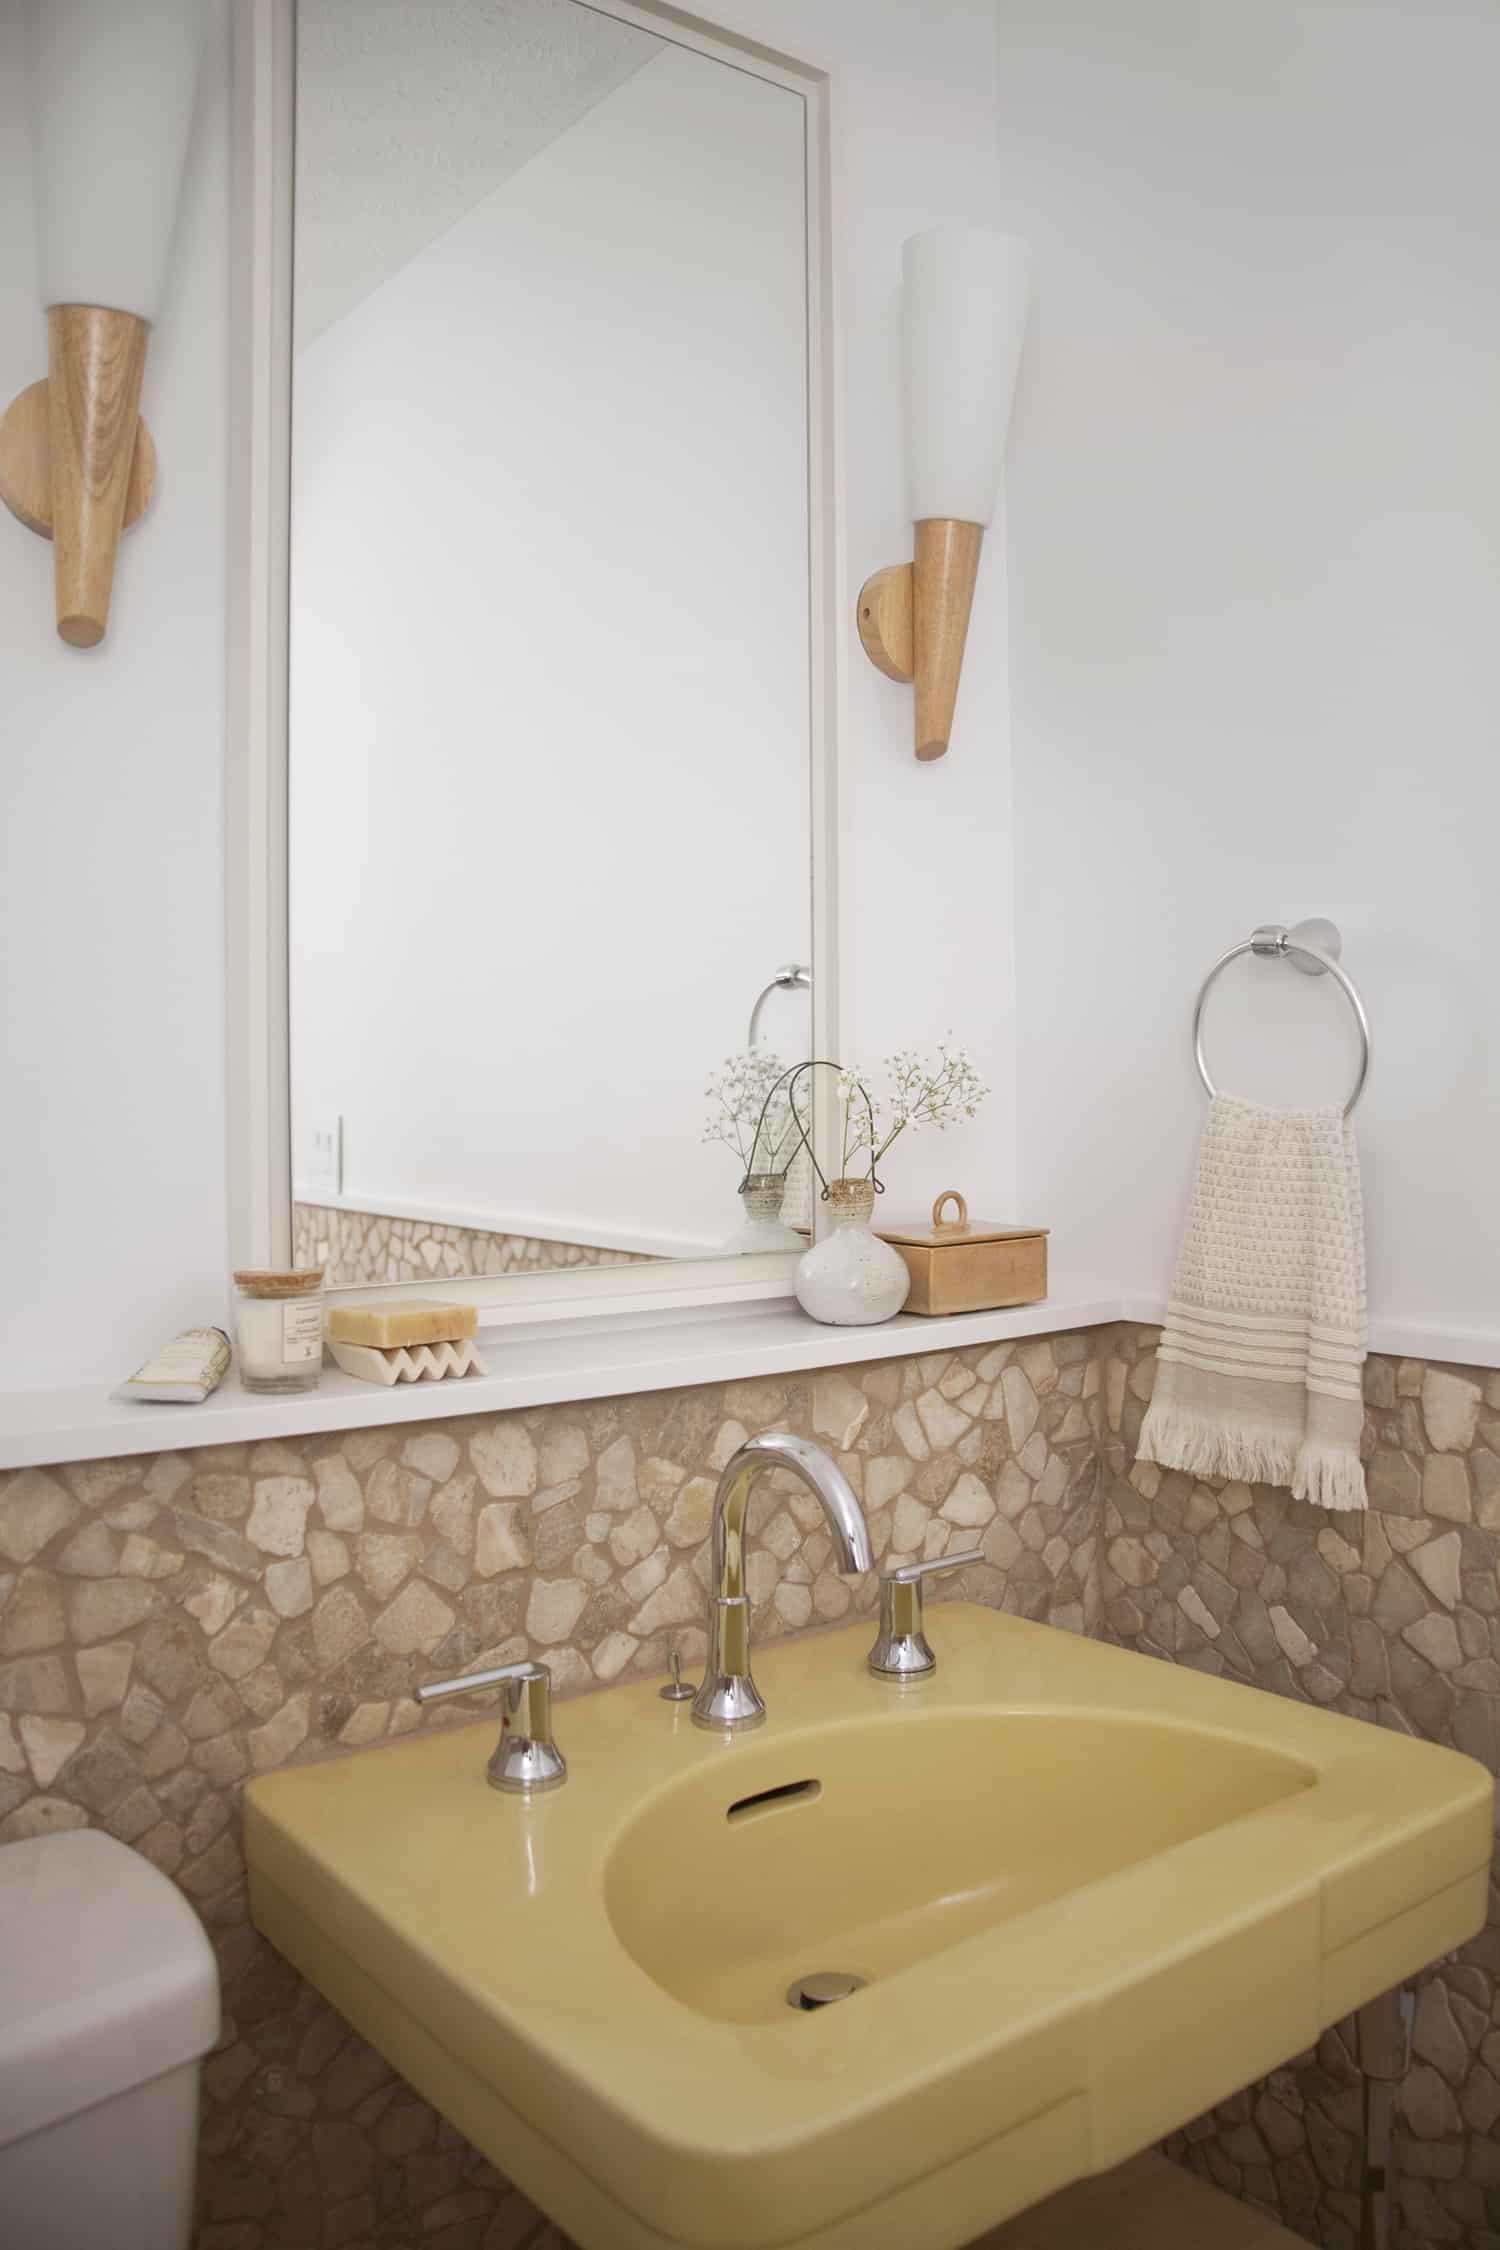 Our home was built in the ’80s, so I’m not trying to fool anyone into thinking I’ve restored our home to a modern version of its former mid-century glory. In fact, I’m not sure our home ever had any kind of glory. But the ’60s influences I had incorporated into our living room renovation have felt like such a good fit. So I thought I’d design our powder room to tie in with that vibe. The extended fireplace hearth and large fieldstone wall in the living room are mimicked here on a much smaller scale with the white ledge and the mosaic rock tile. The torch style sconces are the final nod to my beloved mid-century style, but done up in a contemporary feeling wood, rather than a brass or black finish.
My hope for the space was to create a little space that felt simultaneously modern and vintage, fresh and cozy, and minimal but interesting. I think the modern Chrome faucet and other Chrome accessories from Delta really tied everything together, helping to achieve everything I had wanted for our powder room makeover!
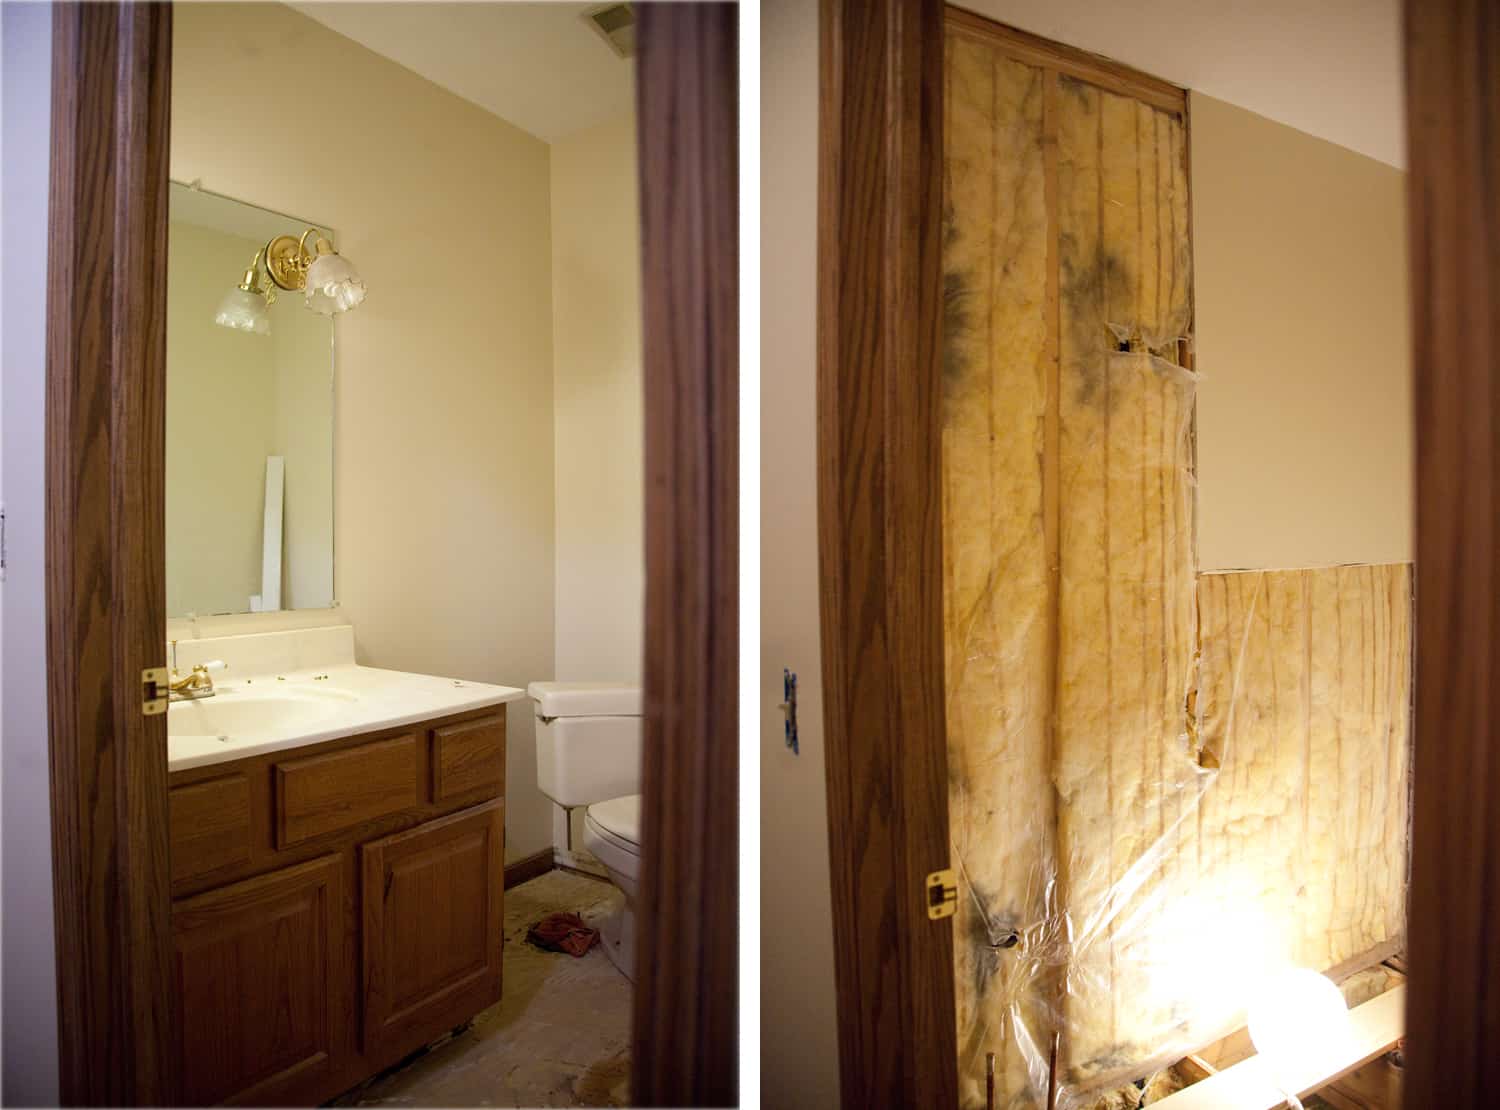
 Powder Room Before
The “before” photo of the powder room was taken after we had ripped out the tile flooring and toilet—a task that happened last summer before it ever occurred to me to take before photos of the powder room! Honestly, it didn’t look better before the floor and switch plate covers had been removed. The before and after images are also not going to look like the same space, because all of the fixtures were moved to a different wall during the renovation process.
Usually I like to repurpose existing fixtures as much as possible, like when I reconfigured all of our kitchen cabinets and painted them for a fresh look. But sometimes you just gotta splurge for new fixtures and professional plumbing help to really make a big impact! I thought a small space like a powder room was the perfect small-scale opportunity for a splurge like this.
 The main reason I wanted to move the sink to the adjacent wall was a total blogger move: I just wanted a better view of the sink! Ha! (Gotta keep it real.) But now that it’s moved, I’m actually loving how nice it is to have a straight shot of the sink and mirror as we walk by the powder room before leaving the house. (Perfect spot for a last look, amiright?!) And honestly, the reflection in the mirror is fine and dandy, I guess, but it’s actually the beautiful yellow sink that I’m really wanting to see before leaving the house. (Can’t stop staring!
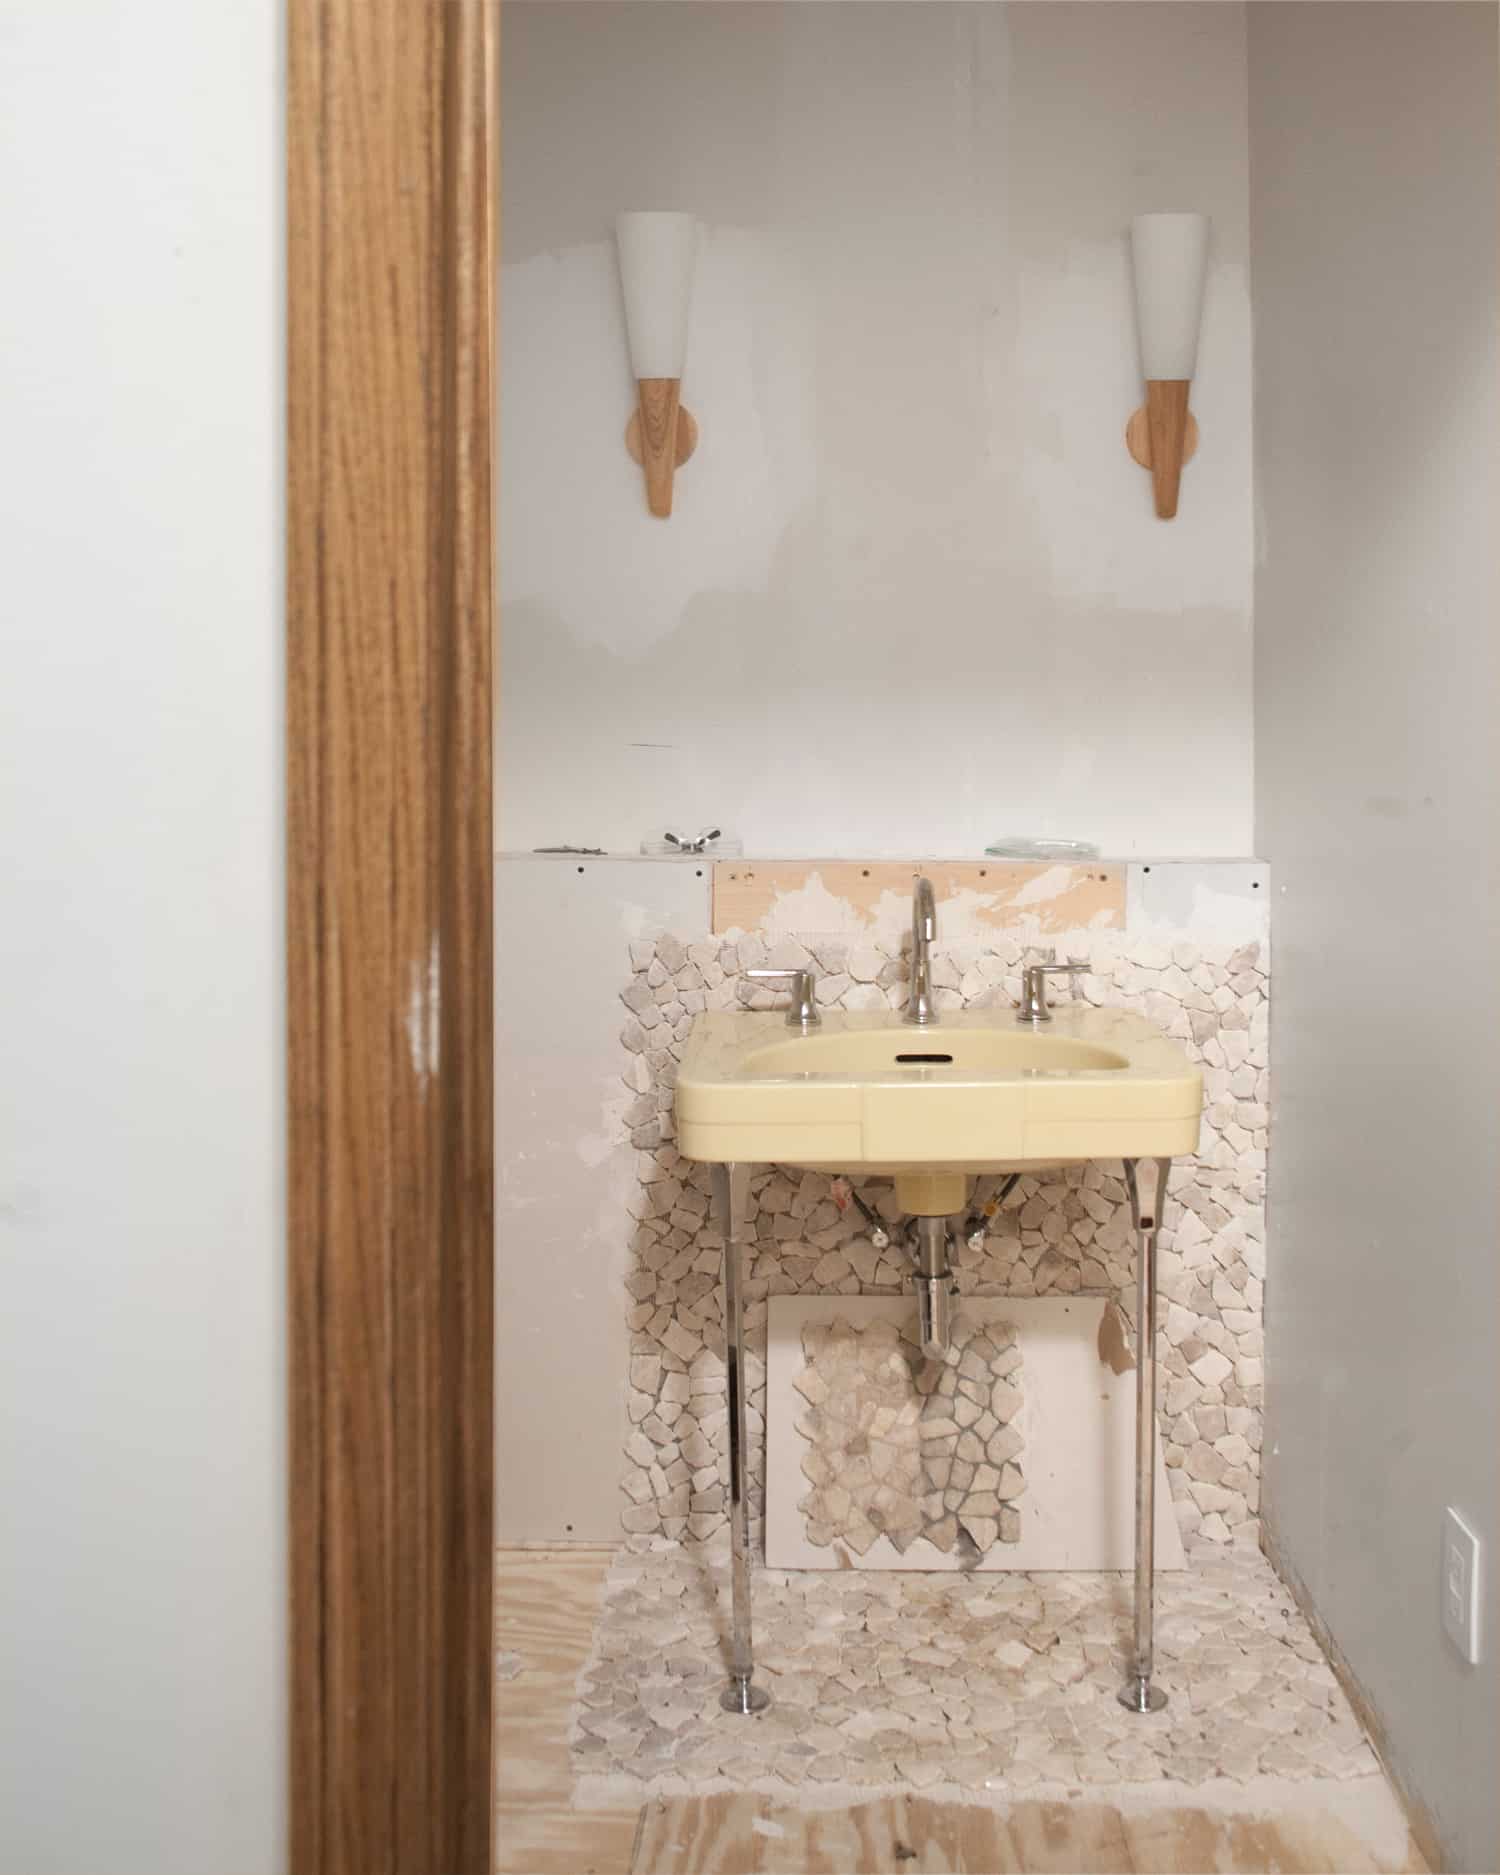
To move the plumbing, we pulled off the drywall to expose the existing plumbing. We also pulled out the subfloor, which wasn’t super easy, but wasn’t too horrible because the existing floor was in bad shape from the thin set from the previous tile floor. Starting over saved us lots of scrapping and grinding. Then the plumbers came over to reroute the plumbing rough-ins.
 I had planned to build a ledge wall for the purpose of creating an extra surface in this small bathroom. But the ledge design ended up being a plumbing necessity. The space behind the existing drywall was just a half inch of breathing room between furring strips and the brick wall of our fireplace. There was definitely no room for plumbing! Fortunately, I had already planned on building the ledge wall, and it was the perfect height for hiding away all of the pipes for the toilet and sink. That’s what you call a win-win situation!
In case you’re curious, the steps for working with a plumber went like this:
Step One: Initial consultation and discussion of work to be done.
Step Two: We prepped the space by removing drywall and subfloor.
Step Three: Plumbers came in and rerouted plumbing with the pipes sticking up for us to work around.
Step Four: We built the ledge wall and put in the subfloor over the rough-ins.
Step Five: Plumbers came back to place the toilet flange and sink plumbing elements.
Step Six: We added drywall to the ledge wall and did all of our tile work.
Step Seven: Plumbers returned to hook up the final fixtures.
Working with plumbers and doing the rest of the labor ourselves ended up being a lot of back and forth. It required more logistics than I’m used to, since I’m usually an island that works by myself or with my dad and my husband. But it was very much worth the back and forth to have professionals do the work correctly and quickly. I’m all for knowing your limits when it comes to DIY. Whenever I feel daring, I buy a new power tool—I don’t mess with the plumbing or electrical. Ha!
 I would like to add a little note here that it is not best practice to lay tile directly onto plywood. I did it. I’m a little embarrassed that I’m admitting that to you all. I wanted an even transition to the adjacent flooring and honestly just felt like it wouldn’t be that big of a deal. Fingers crossed that it isn’t! The previous owners did the same thing and unfortunately their tile held up wonderfully and was a son of a gun to remove.
 After tiling, I put up the wood ledge which is just a poplar 1×6 that I painted with semigloss Behr “White 52,” the same white that’s on the walls. (The skinnier pieces trimming out the adjacent walls are 1x2s that I ripped in half.) Once all of the trim was installed, we added grout. Because of the large gaps between the rocks, we ended up using sooo much grout! It was a great upper body workout as well.
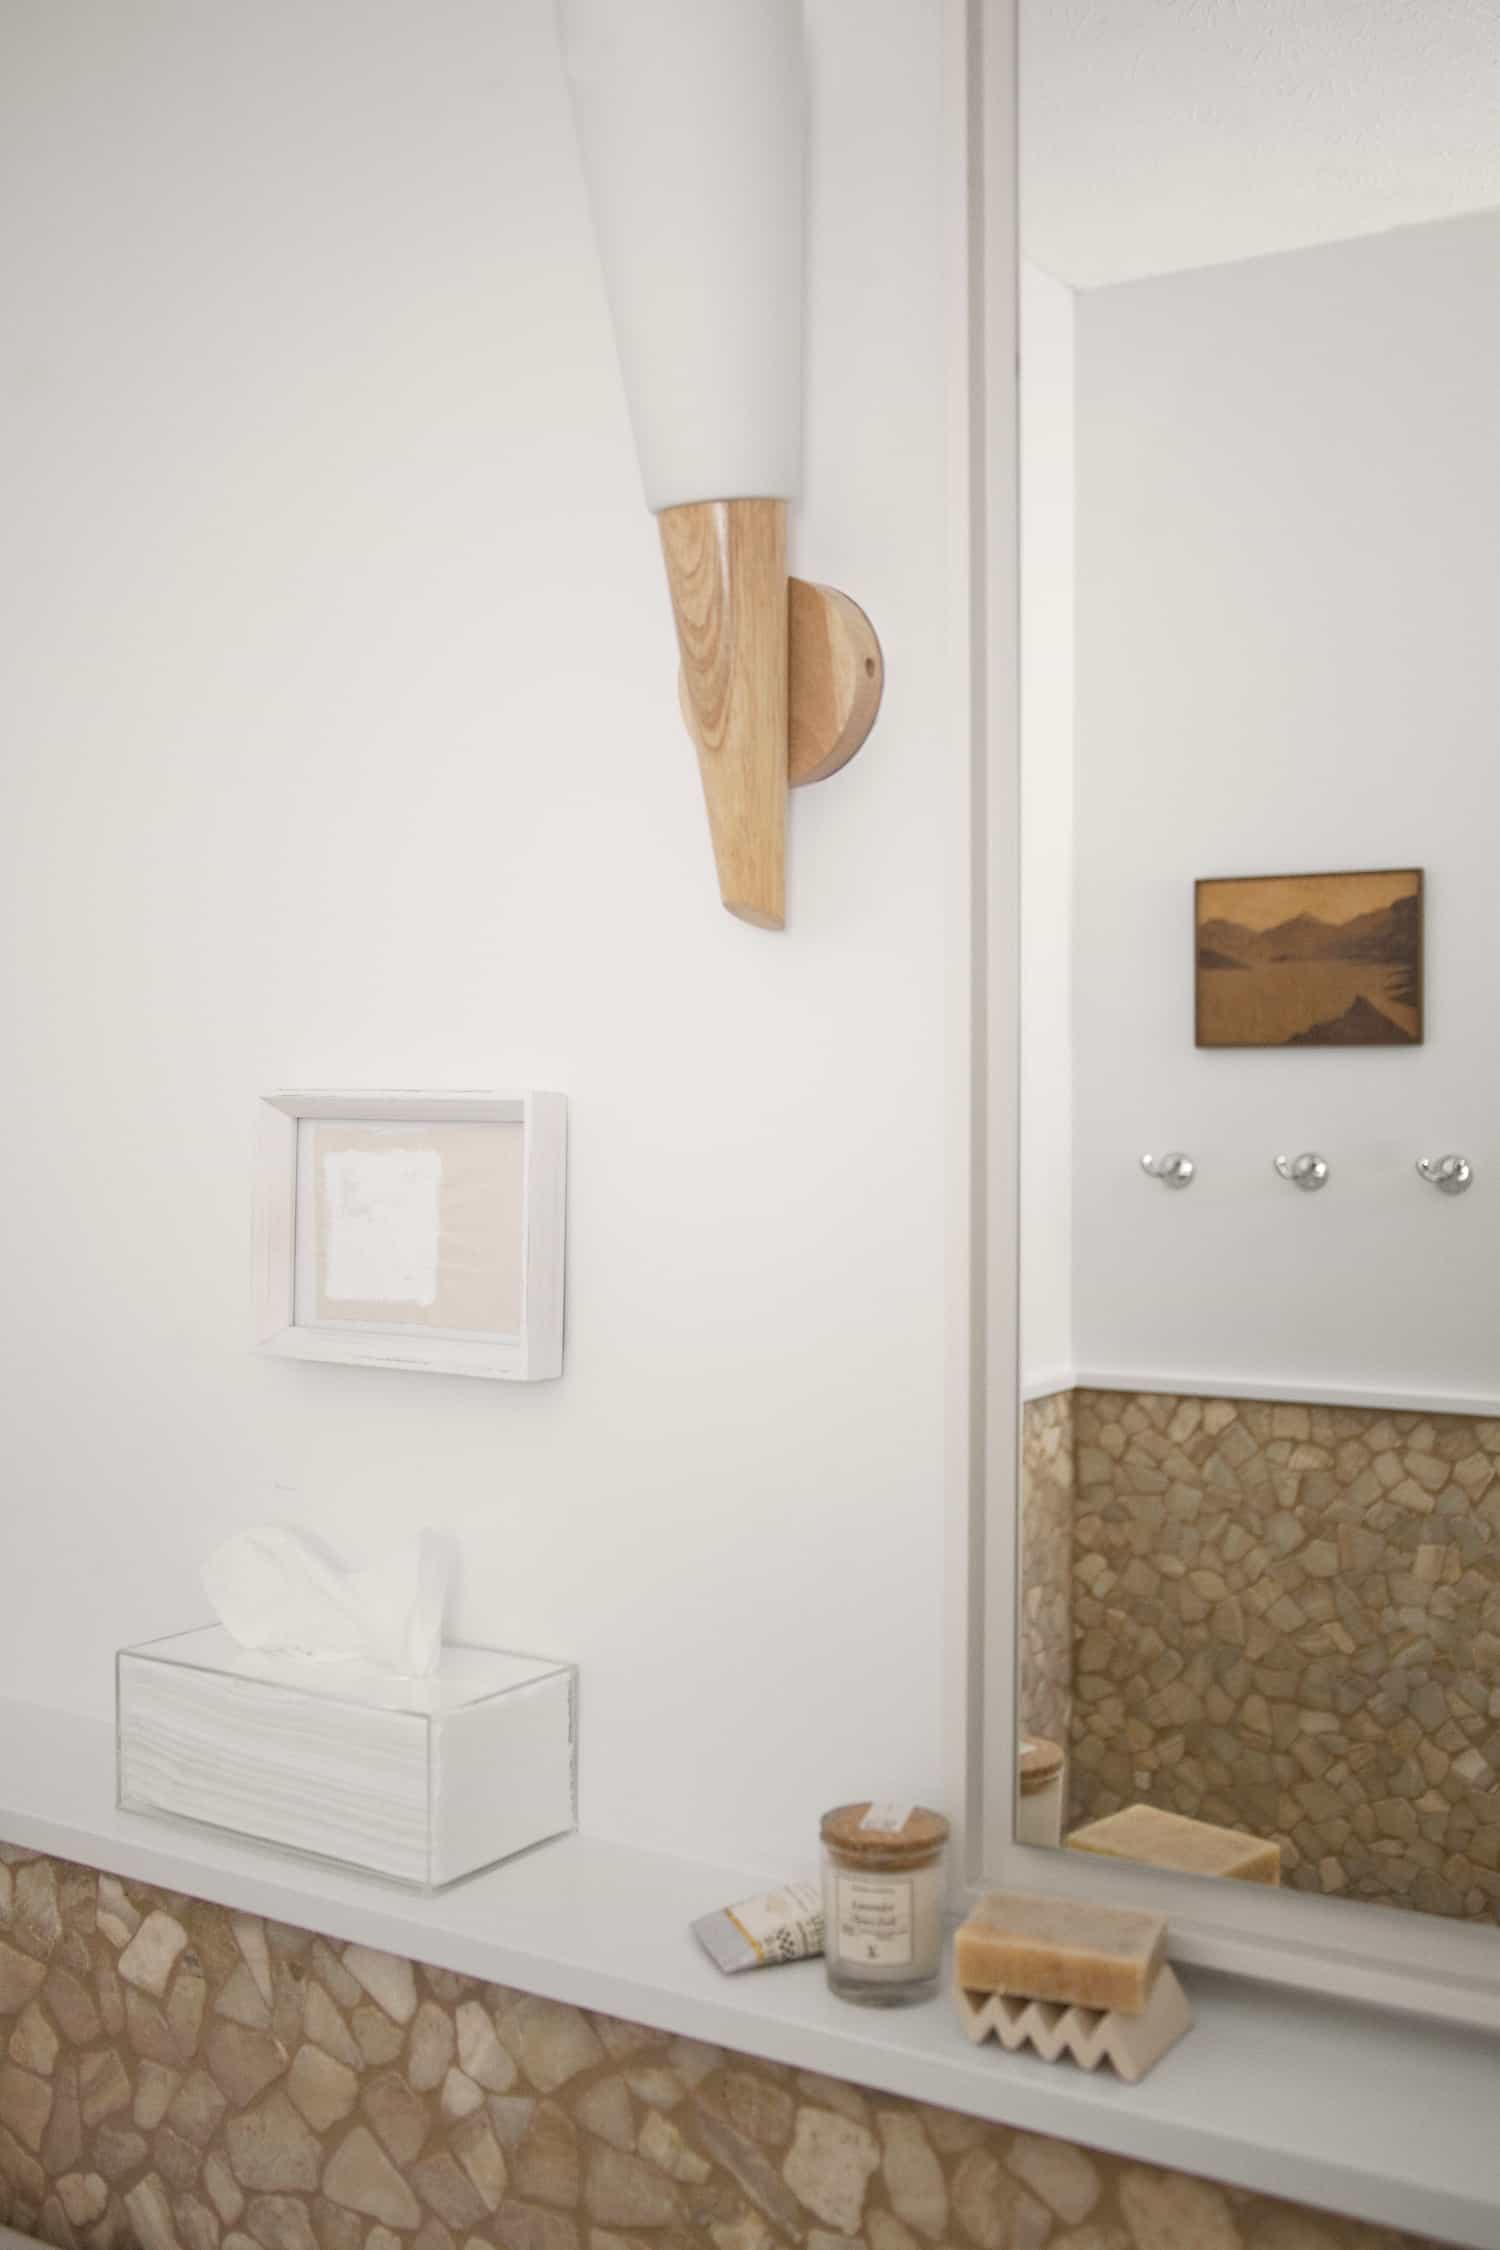 The ledge wall we built has been so handy for displaying bathroom niceties which simply wouldn’t fit on a little vintage sink. I don’t like to use free standing bathroom cabinets unless necessary, and wanted to avoid the clunkiness of a large vanity cabinet since it’s just a little powder room. I just didn’t think all of that storage was necessary. So, ledge to the rescue!
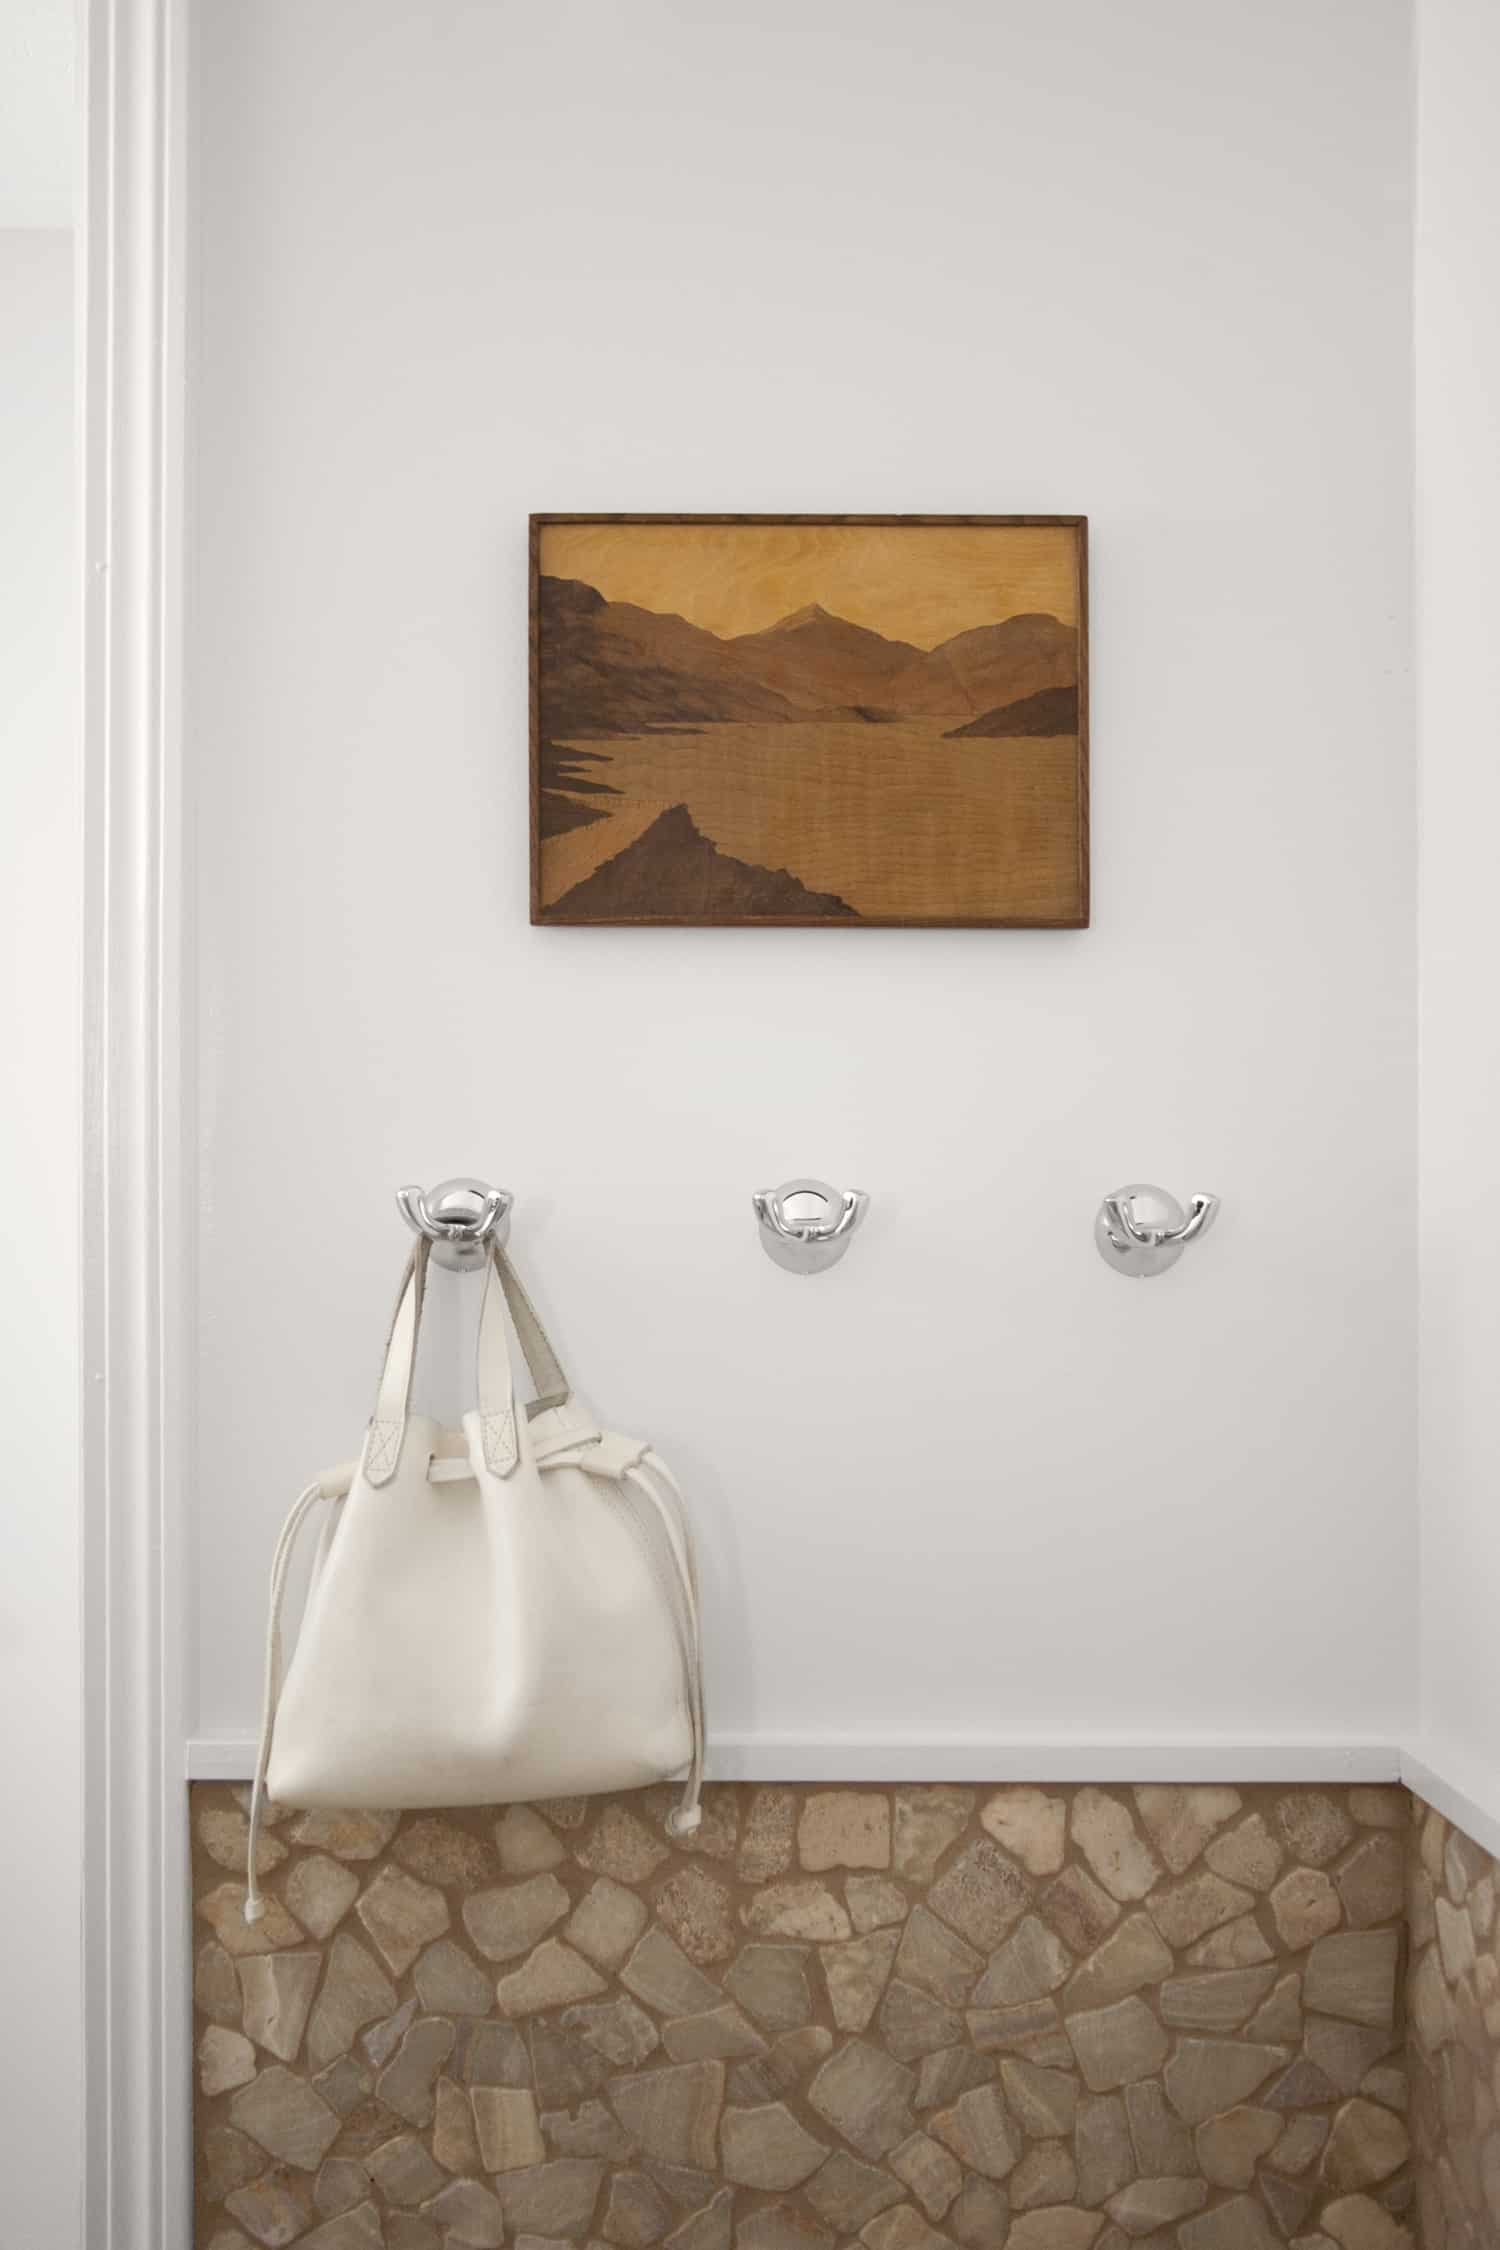 For all of the necessary bathroom accessories, like a towel ring, toilet paper holder, and wall hooks, I used Chrome fixtures from the Delta Lahara Collection. I liked that they were minimal and modern in their styling, but still have curves that make them feel at home with vintage elements. Also, Mama can’t resist Chrome. Chrome is to me as diamonds are to Lorelei Lee. It’s such a perfect pop of bling!
 We also upgraded our toilet with this white Delta Foundations Toilet, available at The Home Depot! It has a small footprint, soft-closing lid, and an efficient but effective flush that meets EPA standards. Our previous toilet was not exactly, shall we say, reliable, and we could never get it to stop running and wasting water. I’m not ashamed to say I’m excited about having a shiny new toilet in this powder room!
 Everyone at our house is so excited to finally have a bathroom on the first floor! I’m pretty sure my little girls keep saying they have to “use the potty” because they actually just want to chill in the newly finished space. And I don’t blame them! BYO Magazine! – Mandi
Material Sources:
faucet: Delta
toilet: Delta
tile: Solistone from The Home Depot
grout: Haystack from The Home Depot
towel ring: Delta
toilet paper holder: Delta
wall hooks: Delta
paint: Behr White 52
16 Comments
Congratulations on the powder room makeover! It’s not usually my type of decor, but I love how unique the outcome is. The tile is beautiful 🙂
Charmaine Ng | Architecture & Lifestyle Blog
http://charmainenyw.com
You say your house was built int he 1980’s- what have you done to the outside? Do you have a picture of it somewhere?
I still love your painted wood floor.
But this yellow sink- I am dying. I hope to find something that remarkable when we finish our basement!
I don’t often leave comments but I had to say that this is one of the best bathrooms I’ve ever seen. It amazes me how you came up with this space from what it was before. Incredible!
That ledge looks great and is a smart hack for getting a little more function out of the space!! I’ve loved following this transformation on IG. What a sweet little bathroom!
The softness of the top half the bathroom really tones down the vintage industrial feel of the bottom half. This style doesn’t really suit my tastes (I hope I can say that politely, as I don’t mean offense!), but what I do love is the ledge you’ve built all the way across. That is brilliant! Thanks for sharing your new place with us, project by project! I look forward to them!
You can still get yellow cammodes…. just sayin ????
Mandi, I follow you on IG so I’ve been following this renovation in your stories. I have to say…I was skeptical when I saw your plans and really did not like them. (I think your vibes skew a bit more 70s than mine.) That being said, I was actually pleasantly surprised by how many elements of this that I ended up liking! The sconces for one. Love the wood elements of those. I really love that ledge and all of the accessories and how you styled them. I like the sink on its own, but something about that combo with the stone is not my fav. But I really appreciate the risks you take. In a blog world where everything kind of looks the same you definitely bring something new to the table! Did you guys ever consider putting the toilet where the old vanity used to be?
The natural stone wall looks fantastic! Although I’m not a big fan of the faucet, it looks so frumpy compared to the rest of the room.
https://www.makeandmess.com/
I wanted to like this so much, but it’s gonna be a no for me. HOWEVER, I still bow at the feet of DIY goddess Mandi for having the gumption to take such a risk and for the back-breaking labor it must have taken to complete.
This turned out amazing! I love how unique your style is and that you go a little over the top to make everything special.
Do you mind sharing where the rug is from?
Love this!
This makeover has gotten into my head! At first, I hate to admit, I really didn’t like it. But then I kept looking. And the more I looked, the more I realized it was a subtle work of genius. It’s retro without being kitschy, so understated and beautiful. Well done Mandi!
I love this bathroom! I think you do an amazing job, your posts inspire me. I need to find that zip zag soap dish! how perfect! (btw I googled “Lorelei Lee” because I don’t know who she is and the result i got was a porn actress so i think I must be missing the diamond connection :P)
I love the vintage sink! We pulled a mint green bath out of our old bathroom and I would have liked to use it when we remodeled but I wanted a free standing bath. I still have it, so it will be used somehow no doubt. It all looks great, thanks for sharing the details.
This is beautiful! I would love to know where your towels are from!
Love that sink and a lot of elements of this powder room. The ledge you added is perfect! I think a different tile choice would have looked so much better, I think it takes away from the awesome sink but makes the white toilet stand out a lot, but I’m glad you love how it turned out. That’s what’s important.