
We partnered with Etsy Studio on this project, a new marketplace launched by Etsy specifically for crafters! They have millions of unique supplies available for all types of crafts and lots of craft inspiration too! Plus you know you’re supporting small businesses from all around the world when you buy from there—it’s a win win!
One of my New Year’s goals was to take the time to make our future daughter some kind of handmade project every month, whether it be a plush doll or a little hat and even a few larger projects like a blanket. This is the second one I’ve completed so far.
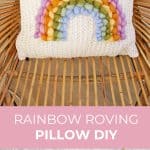
This project is doable on any skill level. You don’t need a sewing machine, and I finished mine in just one afternoon.

–pastel roving
-matching pastel embroidery thread
-scissors
-needle
-pillow (You can use ANY pillow that has a white or light base.)


Step Two: Plan out your roving colors by simply laying them out on the taped shape, adjusting them until you are happy.
I went with all pastels because I’m keeping our nursery very light and soft.

Step Four: Stitch the roving down every half inch or so, working your way all the way around the U shape of each color. Oh—and be sure to start from the inside of the rainbow. It’s easier to control your shape that way.


I actually almost added tassels or pom poms to the corners but ended up loving it better just plain. You can totally add some to yours if you feel it needs more detail.


This was my first project with roving and it won’t be my last. I can see so many possibilities with it! Thanks so much for reading, you guys. I can’t wait to share my completed nursery with you in just a few months. Augh!! xx -Elsie
Credits // Author and Photography: Elsie Larson. Photos edited with the NEW A Beautiful Mess actions.
26 Comments
This is super cute!
https://www.makeandmess.com/
Thank you so much Michelle!
xx!!
I love it! The roving makes it look adorable and cuddly!
Charmaine Ng | Architecture & Lifestyle Blog
http://charmainenyw.com
So cute! I love your trusty helper. Every project turns out better with dogs. I love throw pillows, too. I have so many of them! I like to change out the covers with the seasons, to keep my decor looking fresh, using this easy DIY:
http://www.homedeconomics.com/how-to-make-a-throw-pillow-cover/
Sooooo cute! LOVE that fluffy yarn.
Love this! Easy DIY’s are the best!
I totally agree! 🙂 xx- Elsie
I LOVE the look of chunky yarn. #yarnporn. So cute and magical!
It’s one of my favorite supplies!!!
Hi Elsie,
super sweet.
One warning: our 11 month old boy would rip the rainbow out and apart in no time and try to eat the fluffy stuff…
Nadine
Oh man… I understand. Going to take it one step at a time and adjust as needed one our baby arrives.
xx- Elsie
This is GORGEOUS!! I love how the soft pastel colour complement the soft textures! Such a lovely idea!
Gemma
http://www.fadedwindmills.com
This is my favorite thing ever!!
Thank you Angela!
xx!
So cute! Such a fun DIY <3
https://www.myblackcloset.com/
This is so cute! Can’t wait for your baby to come.
No need for a sewing machine and done in one day? I’m sold! Love how adorable this turned out! Loved, loved, loved Laura’s nursery tour and can’t wait to see yours!
Thank you!!
this is so stinkin cute! New post/ http://www.oliviaschueller.com
I love this! I’ve never heard of roving – what an interesting material. I bet it makes for all kinds of interesting DIY ideas!
http://www.shessobright.com
Super Cute photos.
http://www.couponorcode.com
Love your pillow! I love the softer color choices too!
Awesome idea of crafting your daughter something every month -and how fun will it be when she’s big enough to assist!
OMG this is so cute! And thanks for introducing me to Etsy Studio.
This pillow is ADORABLE (and yes, even for someone without kids – aka me). It even looks like something I might be able to conceivably accomplish, haha.
http://www.wonderlandsam.com
This came out so cute, perfect for a nursery. I love that the rainbow itself is a bit 3D it gives the pillow more interest.
This pillow is amazing! I love it!
Paige
http://thehappyflammily.com