 With a beach vacation on my horizon, I went in search of the perfect beach towel for drying off or sitting pretty at the pool. I wanted a circle towel in soft colors that was also absorbent enough to be practical. Oh, and there’s always that budget that gets in the way. (I mean, helps me spend wisely.) There were some gorgeous options on the market, but they weren’t in my price range or wouldn’t arrive in time for our vacation. As usual, the best way to get everything I wanted was to find a way to make my own.
Thankfully, there were some beautifully simple bath towels at a large home store that made my color and pattern dreams come true! I grabbed some favorites and then headed to my local fabric store with a 40% off coupon in hand in order to get the really good trim made of 100% cotton. They turned out better than I had hoped and have since been thoroughly enjoyed poolside!
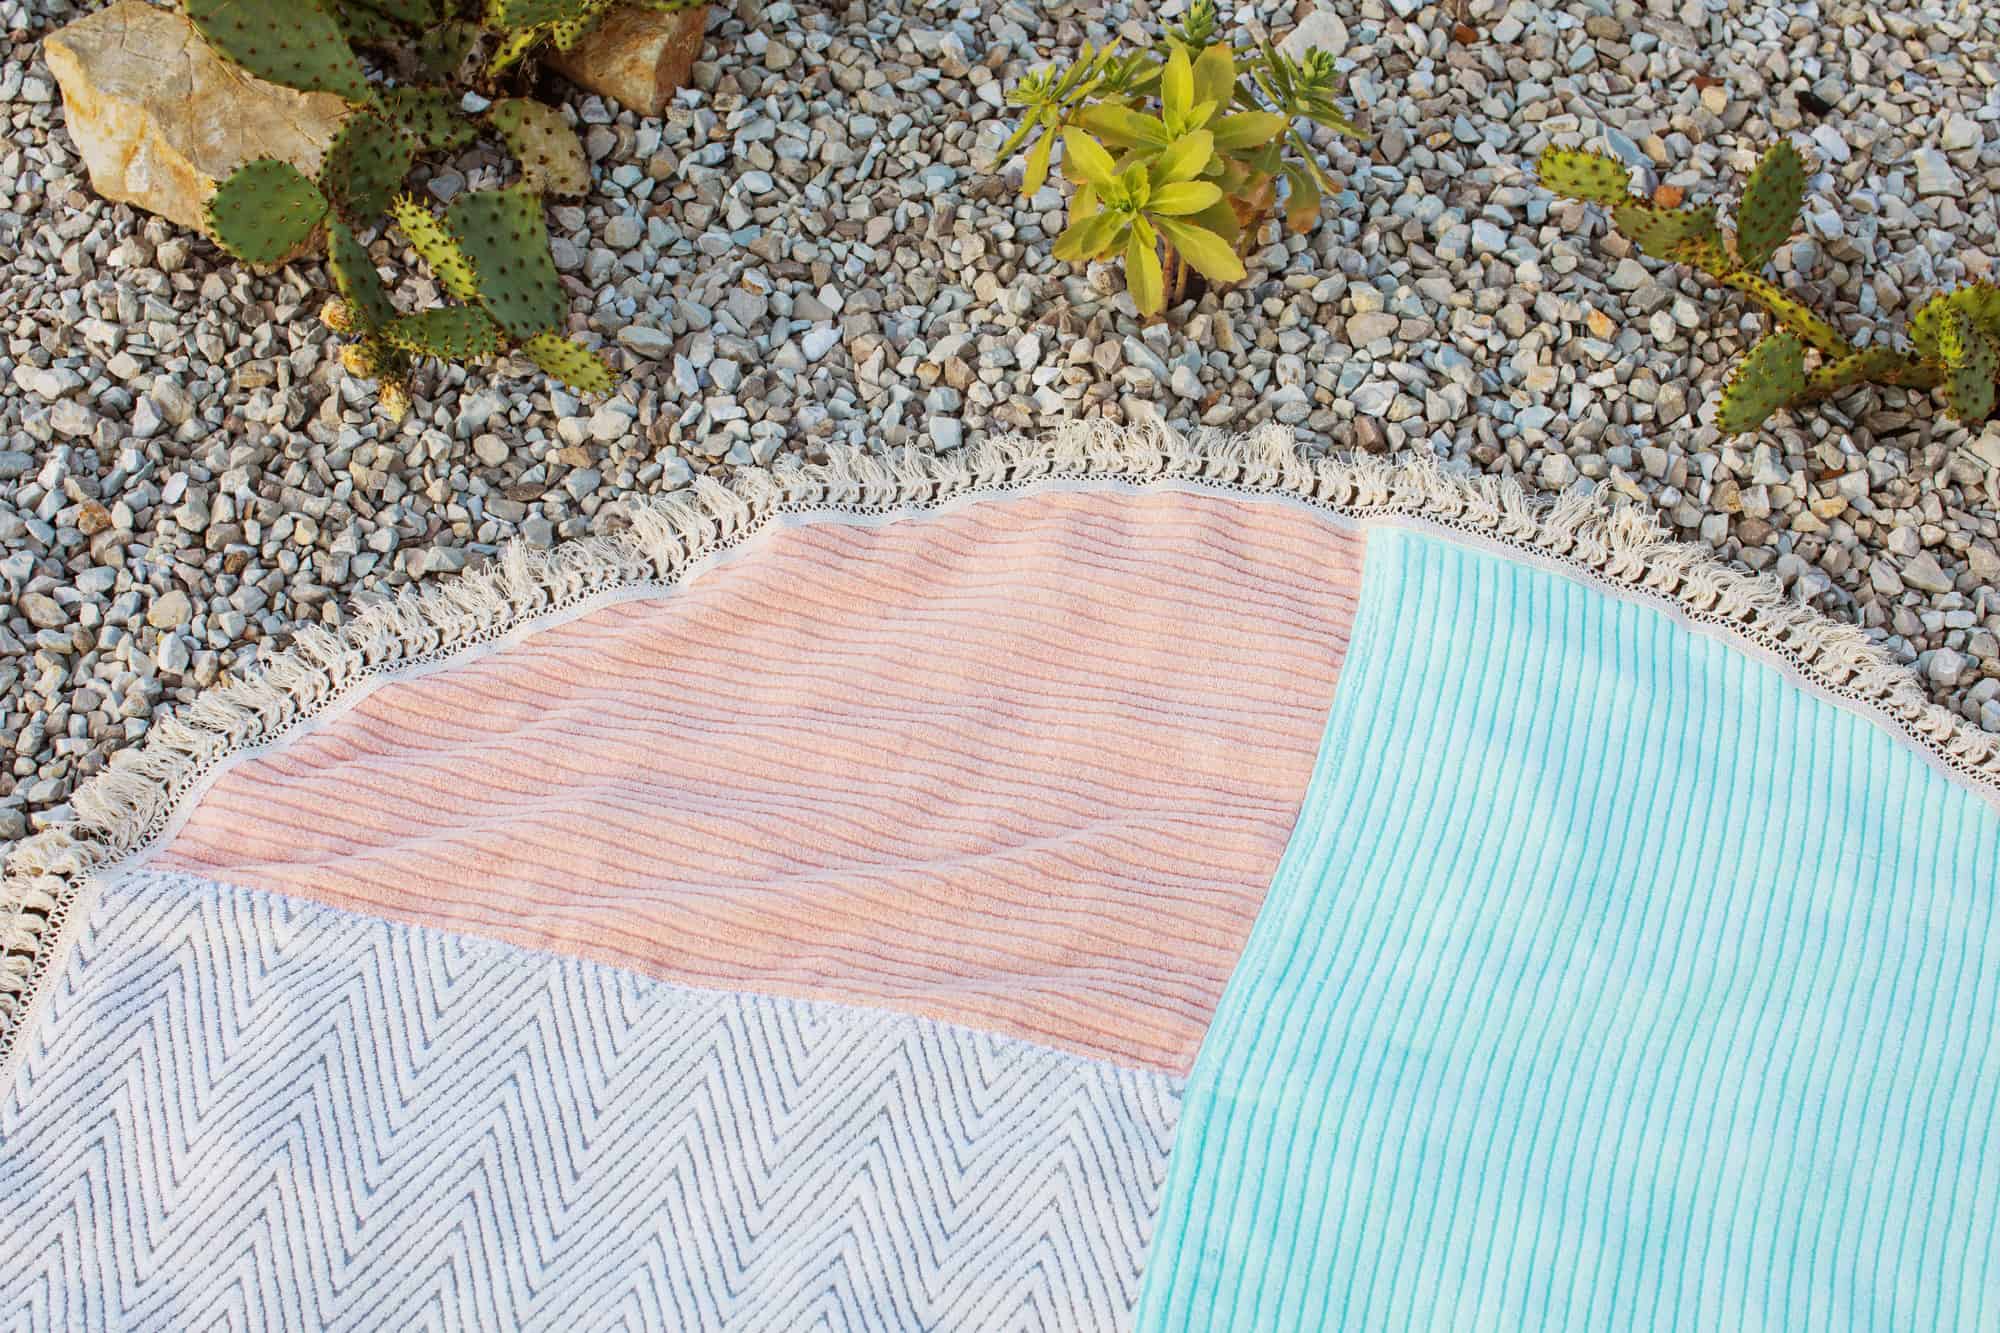 Originally, I wanted to use just one solid cut of terry cloth fabric, but it was so hard to find yardage that was wide enough for a decent circle blanket. After seeing Sandy Nomad’s beautiful beach blankets via Pinterest, I realized I could try for a modern patchwork color block that used towels with just enough texture and pattern to make them really modern and interesting.
I knew if I cut my towels on the diagonal, they’d likely stretch out and I’d end up with truly wonky edges, so I squared things up and offset them just a bit from each other. I ended up with the lushest beach towel that not only made a great blanket for lounging, but did its super-absorbent duty of drying off wet bums once they were done playing in the waves!

 Supplies:
-three bath towels in similar thicknesses
-5.5 yards of fringed trim
-straight pins
-yardstick
-scissors
-sewing machine
When you’re picking out towels to use together, stick within the same general thickness of towel. If two of your colors come in a looser, thin weave and your third is the plushest, thickest towel on the market, it may not allow your towel to lay totally flat. That said, don’t be afraid to experiment with textured towels. I did a color blocked towel, but one of my colors still had a stripe pattern that made it more interesting. I bought four towels for $25 total and was able to make two circle towels with minimal scraps. Then I used a 40% off coupon to purchase my 5.5 yards of trim (per towel), so I was able to spend about $25 per towel on 100% cotton trim. In total, I made two of these for about $38 each and they look like I spent way more on them than that!
 You can play around with the arrangement of your towels, but the best way to ensure things will lay flat and not go all wavy on you as you sew is to use the hemmed edges to your advantage. This means working with right angles. I used my boldest color of towel for half of my circle shape and then placed the two textured towels together—but not with the same long edges together—and then offset them to one side. This added a little more interest than trying to center it on the top towel. To get a good idea of how it’d look, I laid my trim in the shape of a circle and stood back to make sure I liked it. The best part of this design is that I had enough left over from the textured towels to use them to make a second circle towel.
 Place the long hemmed edge of the smallest piece of the circle over the short hemmed edge of the medium piece of the circle. Be sure they overlap by about 1/2″ and that the new long edge that they create is flush at the place where they meet. Add straight pins every 2″ to ensure there is no puckering between these two towels. I usually don’t add mine so close together, but it’s better to overdo it on this kind of project.
 Stitch these two towels together with two lines of stitching. The first should be as close to the hemmed edge as you can. The second line should be about 1/4″ away from the first line of stitching. Be sure to backstitch at the start and finish.
 Here’s an example of your stitching on the back of the two towels. It makes it extra stable, but also ensures there isn’t a loose hem flapping around on the back.
 Place the long edge of the top towel over the long edge of the new combined towels so that they overlap about 1/2″. Be sure you’ve got your colors offset or centered, depending on the look you’re going for. Add those straight pins all along that long edge and stitch things together again. Be sure to do two rows of stitches again, just like in the last step. It may get a little thick at the point where all three towels overlap, so just gently sew over that part or use your hand to crank through so you have more control.
  Now that you’ve sewn your towels together, we need to create that circle shape. Fold your top towel forward so that it’s lying on top of the other two towels with the long seam at the fold. Then grab the two corners of the top towel along that fold and bring them together in another fold. If we were using paper, I’d cut off all of those edges. But we’ll be needing all the excess towel fabric we can save on the second towel, so leave it be.
 Measure the shortest edge of your top towel from the corner fold. My shortest edge was 27″, so I measured 27″ from the corner in about 10 places and marked them with straight pins. You can do this with chalk or a marker, but I didn’t have those on hand. Once I had my shape marked, I cut just above it through all four layers.
Remove the pins and set your excess towel fabric aside.
 Unfold your towel so that the right side of your design is facing you. Then pin your trim around the perimeter of your circle so that it overlaps your towel fabric about 3/8″ or so. Pin every 3″ to make sure things don’t get too wavy.
 Switch your needle setting to a zig-zag stitch (if that’s an option on your machine) and gently guide your trim and fabric through your machine without pulling on it. This will help secure the trim well, but also majorly cuts down on fraying from the towel.
Stitch until you have a 1″ overlap of trim at the end and fold it under for a clean edge before stitching across the top.
 One of the things that keeps this project affordable is using a 40% or 50% off coupon for the trim. Even if you skip the cotton and go with some sort of poly-blend, you’re still going to save SO MUCH if you remember to bring your smartphone and pull up a default coupon of 40% off or wait for a paper coupon of 50%.

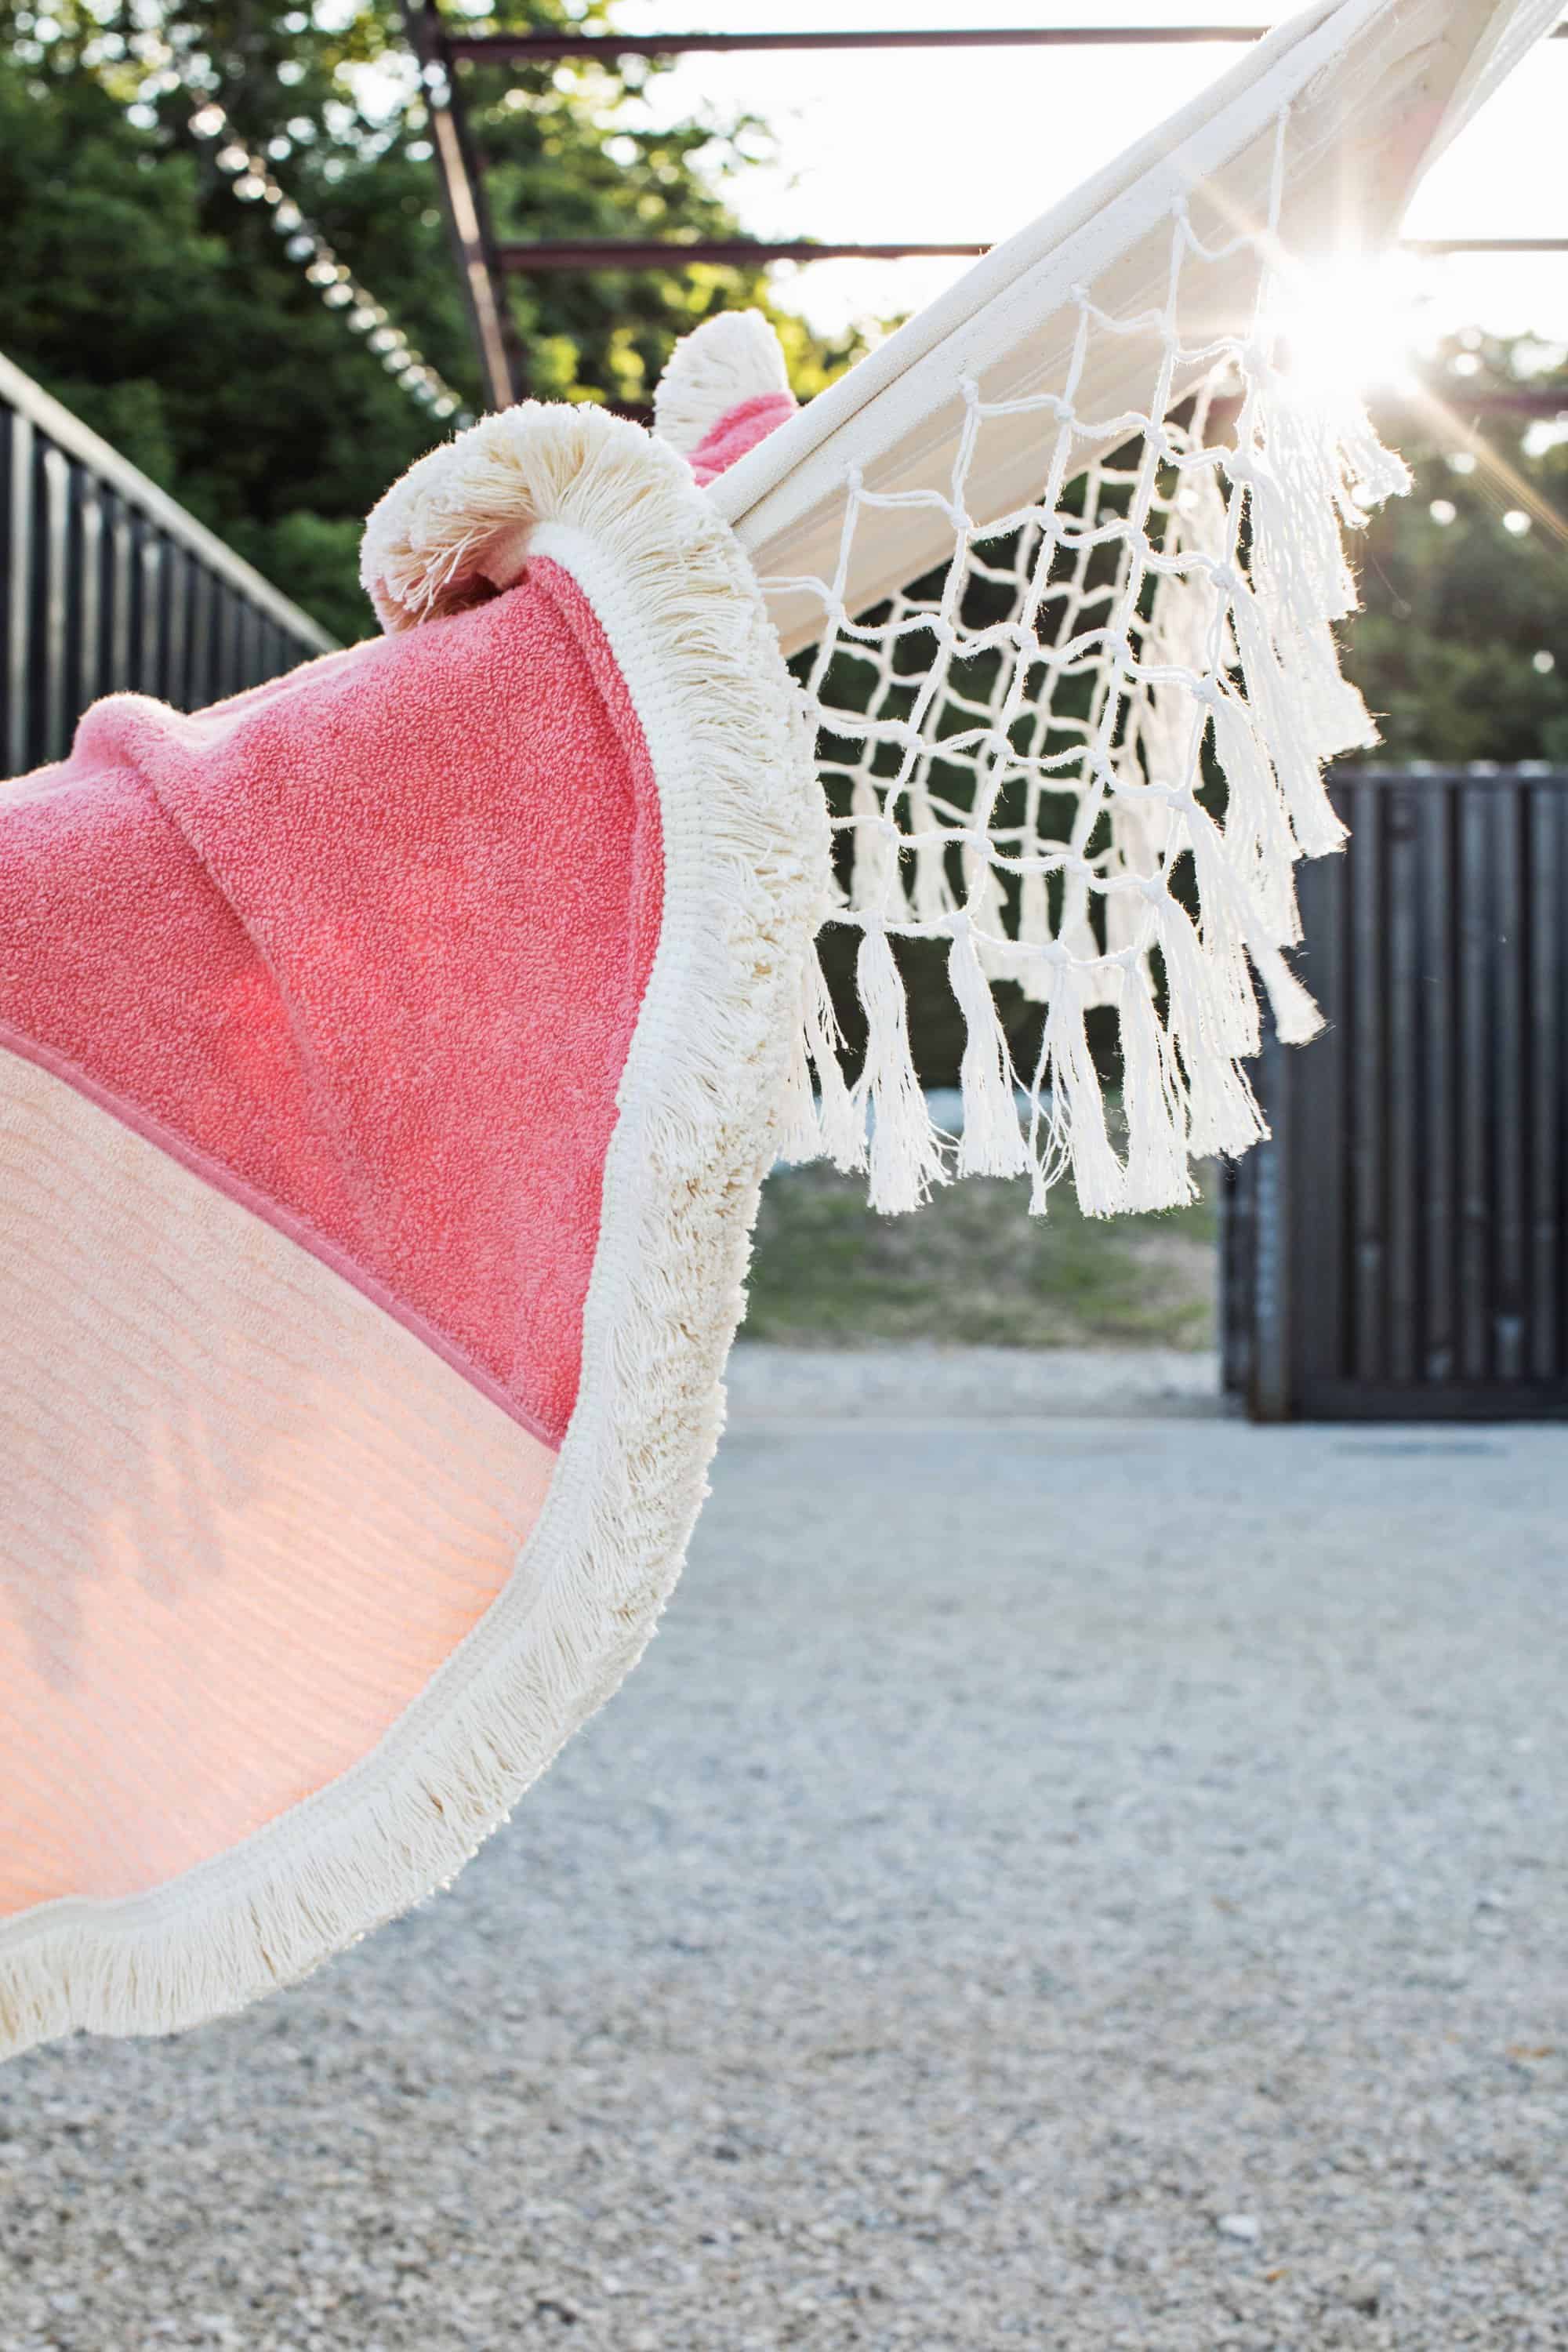
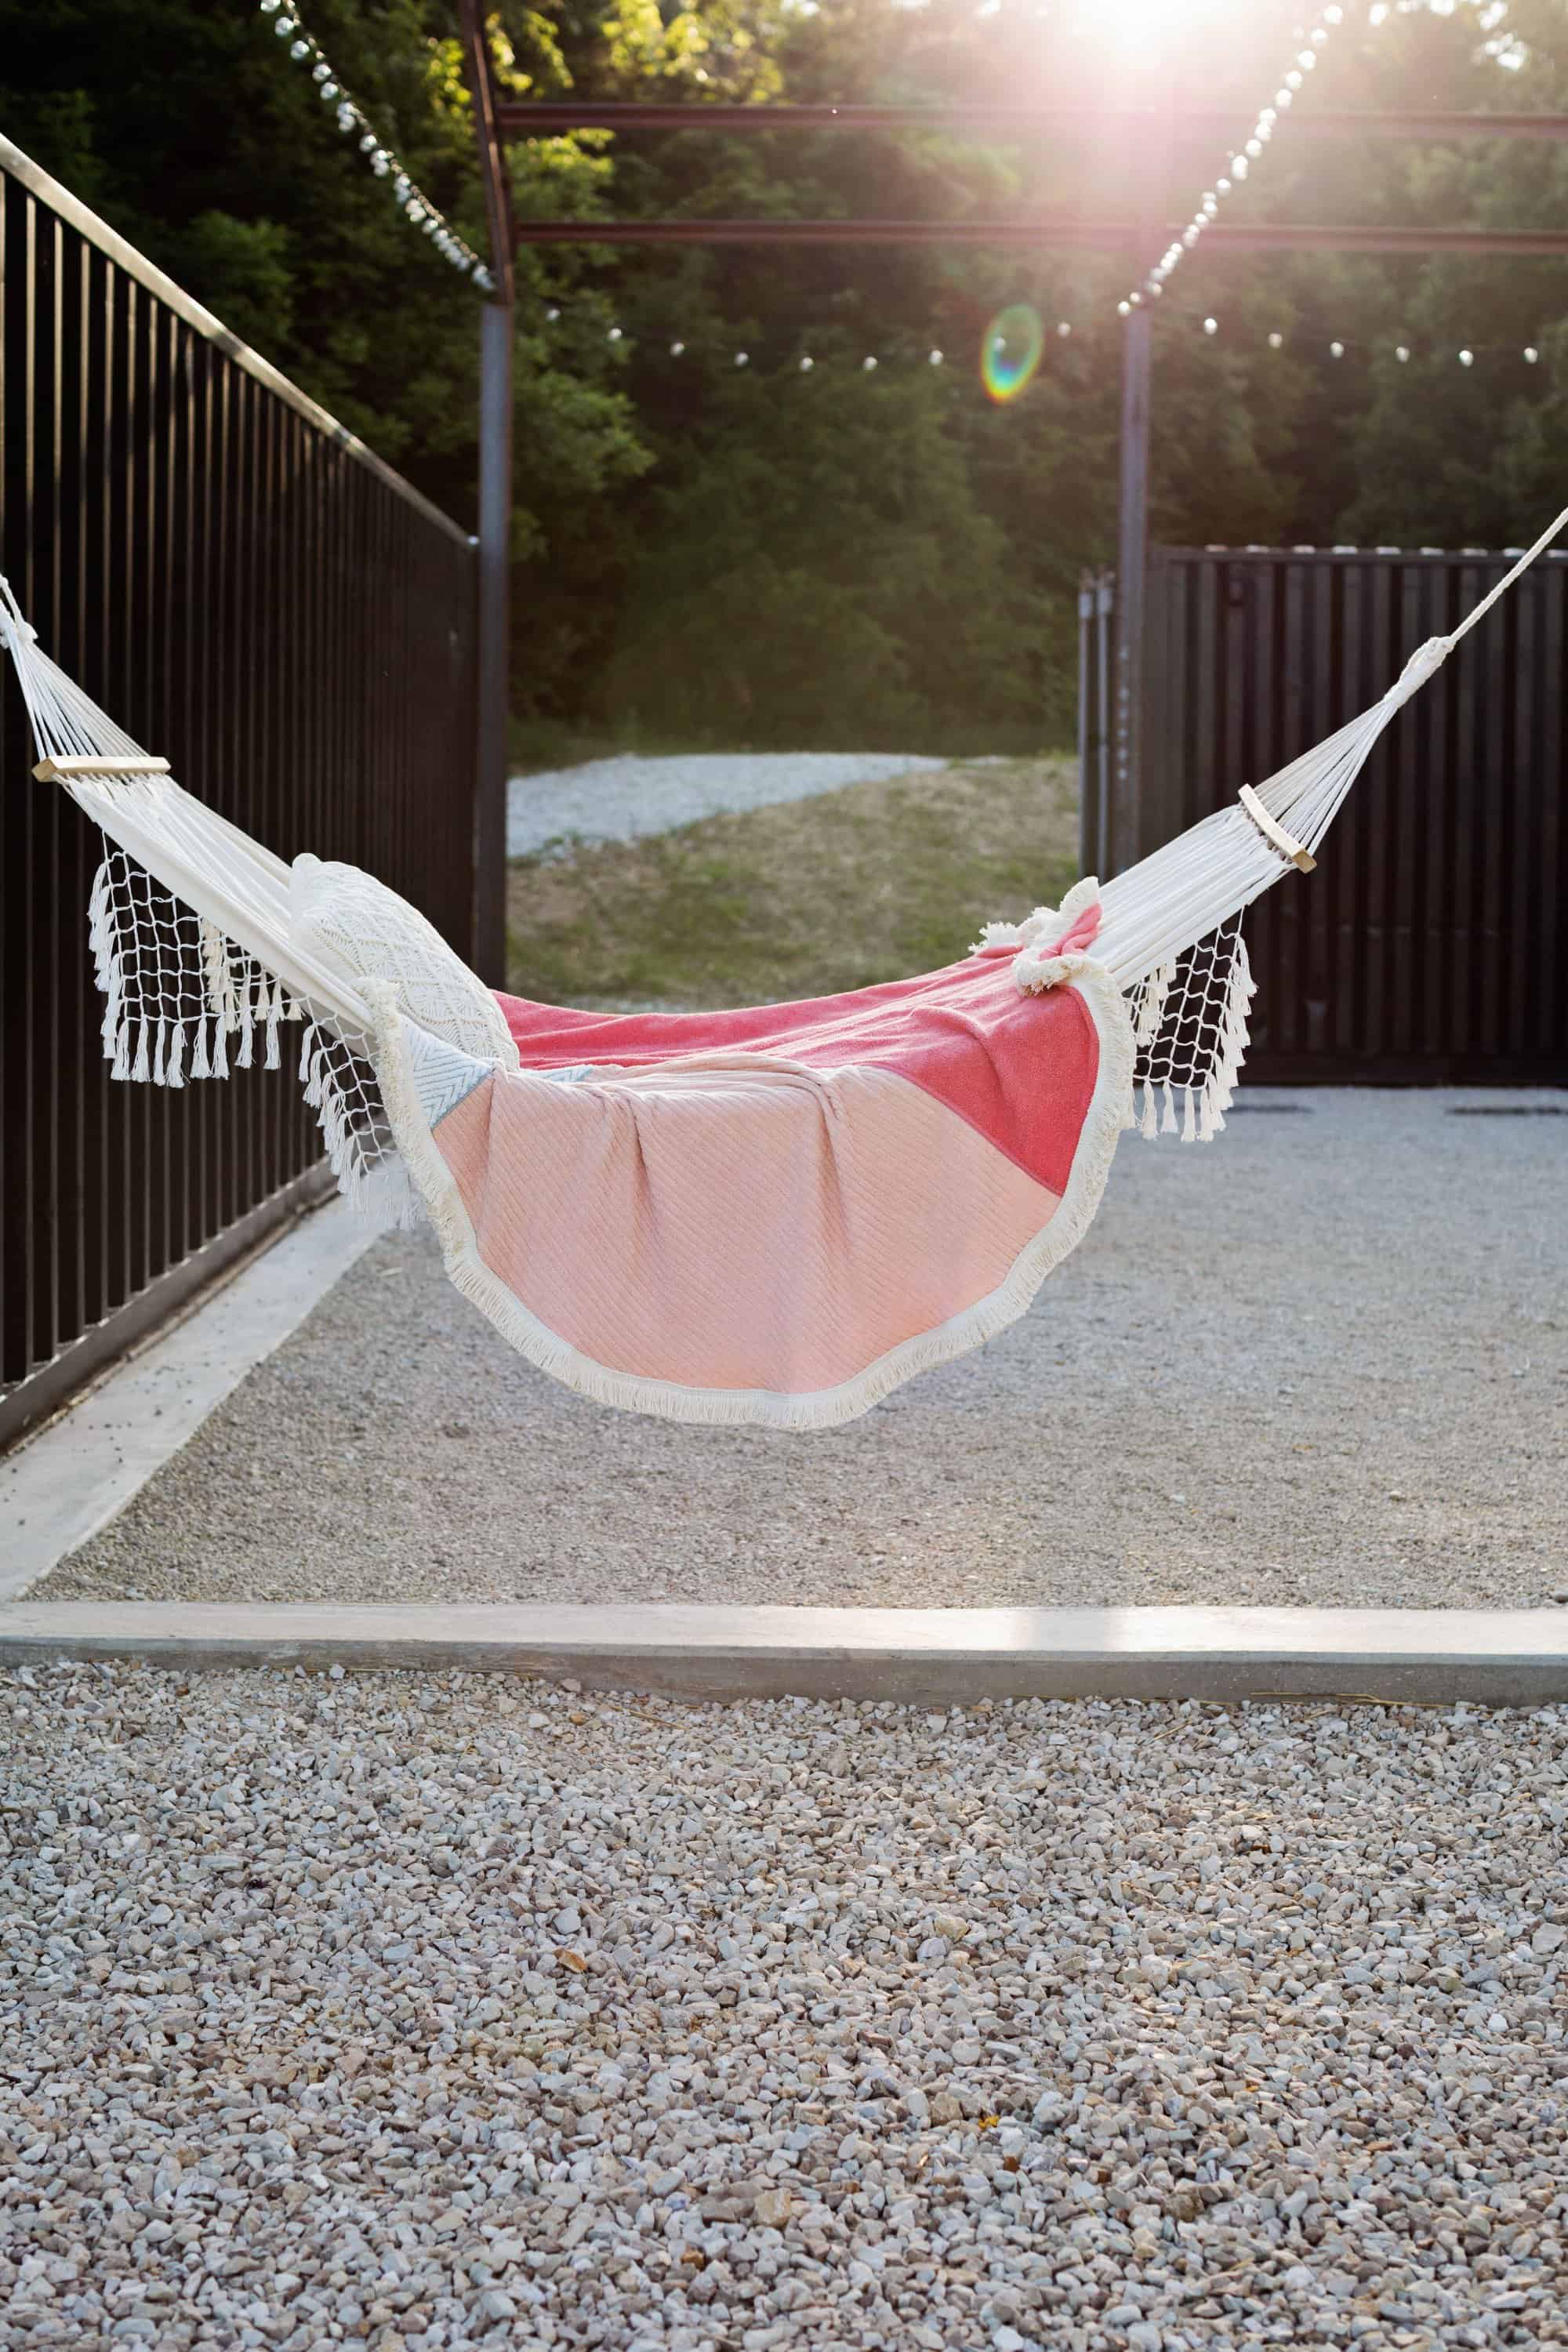 Making your own circle beach towel means you can coordinate colors with your favorite swimsuit. All you need now is your own hammock and someone to bring you something refreshing to drink out of a coconut with a fancy straw!
Speaking of hammocks, we almost took this one home with us after shooting at The Co-Op Venue in nearby Pleasant Hope, MO! They’ve recently opened and are using their beautiful space to celebrate love and community as a wedding venue, workshop venue, and have a beautiful Airbnb. Be sure to check out their site if you’re looking for a special venue here in the Ozarks. – Rachel
27 Comments
What a creative way to use up old towels that are lying around. The round shape is so refreshing!
Charmaine Ng | Architecture & Lifestyle Blog
http://charmainenyw.com
That’s so cute! I shelled out far too much money for my roundie last summer, this seems like a much better way to go. How long did it take you to finish the project? And where are you going on vacation???
Sarina,
It probably would’ve taken about 1.5 hours if I didn’t stop to shoot step outs. Ha! Also, we went to Destin, FL and are already back! It’s already been beach tested and mom approved! -Rachel
This is the perfect idea for all the lone bath towels I have that have no match! I’d like to make a huge one for movie nights in the park. This is one of my favorite crafts so far! Thanks for sharing, so cute!
Oh, I’m so glad you like it! And it would be the PERFECT option for movie-at-the-park night. Love that idea! -Rachel
This turned out so pretty!
Thank you!
LOVE the circle beach towel trend!
It’s such a fun break from the norm, huh!
That is so cool, perfect for the beach!
https://www.makeandmess.com/
Wow, what a brilliant idea this is 🙂 I am so glad I came across this because I know that I’d never have thought about making a circle towel. To make it even cheaper you could get the towels from charity!! I’m definitely going to be making one of these ready for summer, gone are the days of rectangle towels haha!
Have a great day 🙂
Chloe @ https://girllgonerogue.blogspot.co.uk/
That’s genius! And I don’t have a sewing machine 🙁
But I’ll ask my mum if she could help me out.
This is simply BEAUTIFUL!!! I love how well it goes on the hammock and Im thinking of creating a round blanket potentially just because I love the patchwork and the fringe. Amazing colours too (although coming from you it’s not surprising they are gorgeous).
Love this! Might have to get my sewing machine out sometime soon (and maybe move to a country that actually has a summer!)
xx
I can see me and my boyfriend fighting over this one 🙂
i love this diy, is very cute
The Pink Pineapple
New post:http://thepinkpineappleblog.blogspot.com/
You guys get SO CREATIVE it’s blowing my mind! I absolutely adore this piece, I feel like you can place it anywhere, not just for a hammock. Also, just perfect for summer. The three colors you used work very well together, the outcome is gorgeous! I’d never have guessed it was DIY in any way. <3
Have a lovely week!
Joanne | Life in Blue Skies
Ahh! Thank you! That’s the best kind of compliment. 😉 -Rachel
This is AMAZING!!!! Wow, I love how it turned out. Thank you for sharing this tutorial. I’ll definitely have to give this a try.
I am LOVING this! I will definitely have to try it out!
I love this – the round shape really makes it something special. I’ve been looking for a new towel for Wimbledon and going on holiday, and now all I want is a circle beach towel, even if I have to make my own!
– Natalie
http://www.workovereasy.com
You can do it!!! -R
I was thinking of buying one of these round towels, but this DIY looks so fun & easy, I’ll definitely make it myself!! Too cute! xo
Yes! All it takes is about two hours and then you have your own custom towel!
LOVE this so much, but I have no time to make something like this! Haha.
In other news, this is a super specific thing, but on your homepage, when I click More Posts it goes to the old blog format, rather than show more posts. Is it supposed to do that? It bothers me so much! Sorry!
http://www.shessobright.com
It looks really nice!!!!!
I Love the soft feminine look! I have an idea to leave a small opening at the center and use it to slip over your head. Then it could also become a soft changing tent. I’d just have to make it long enough to go to the ankles. What’cha think?