
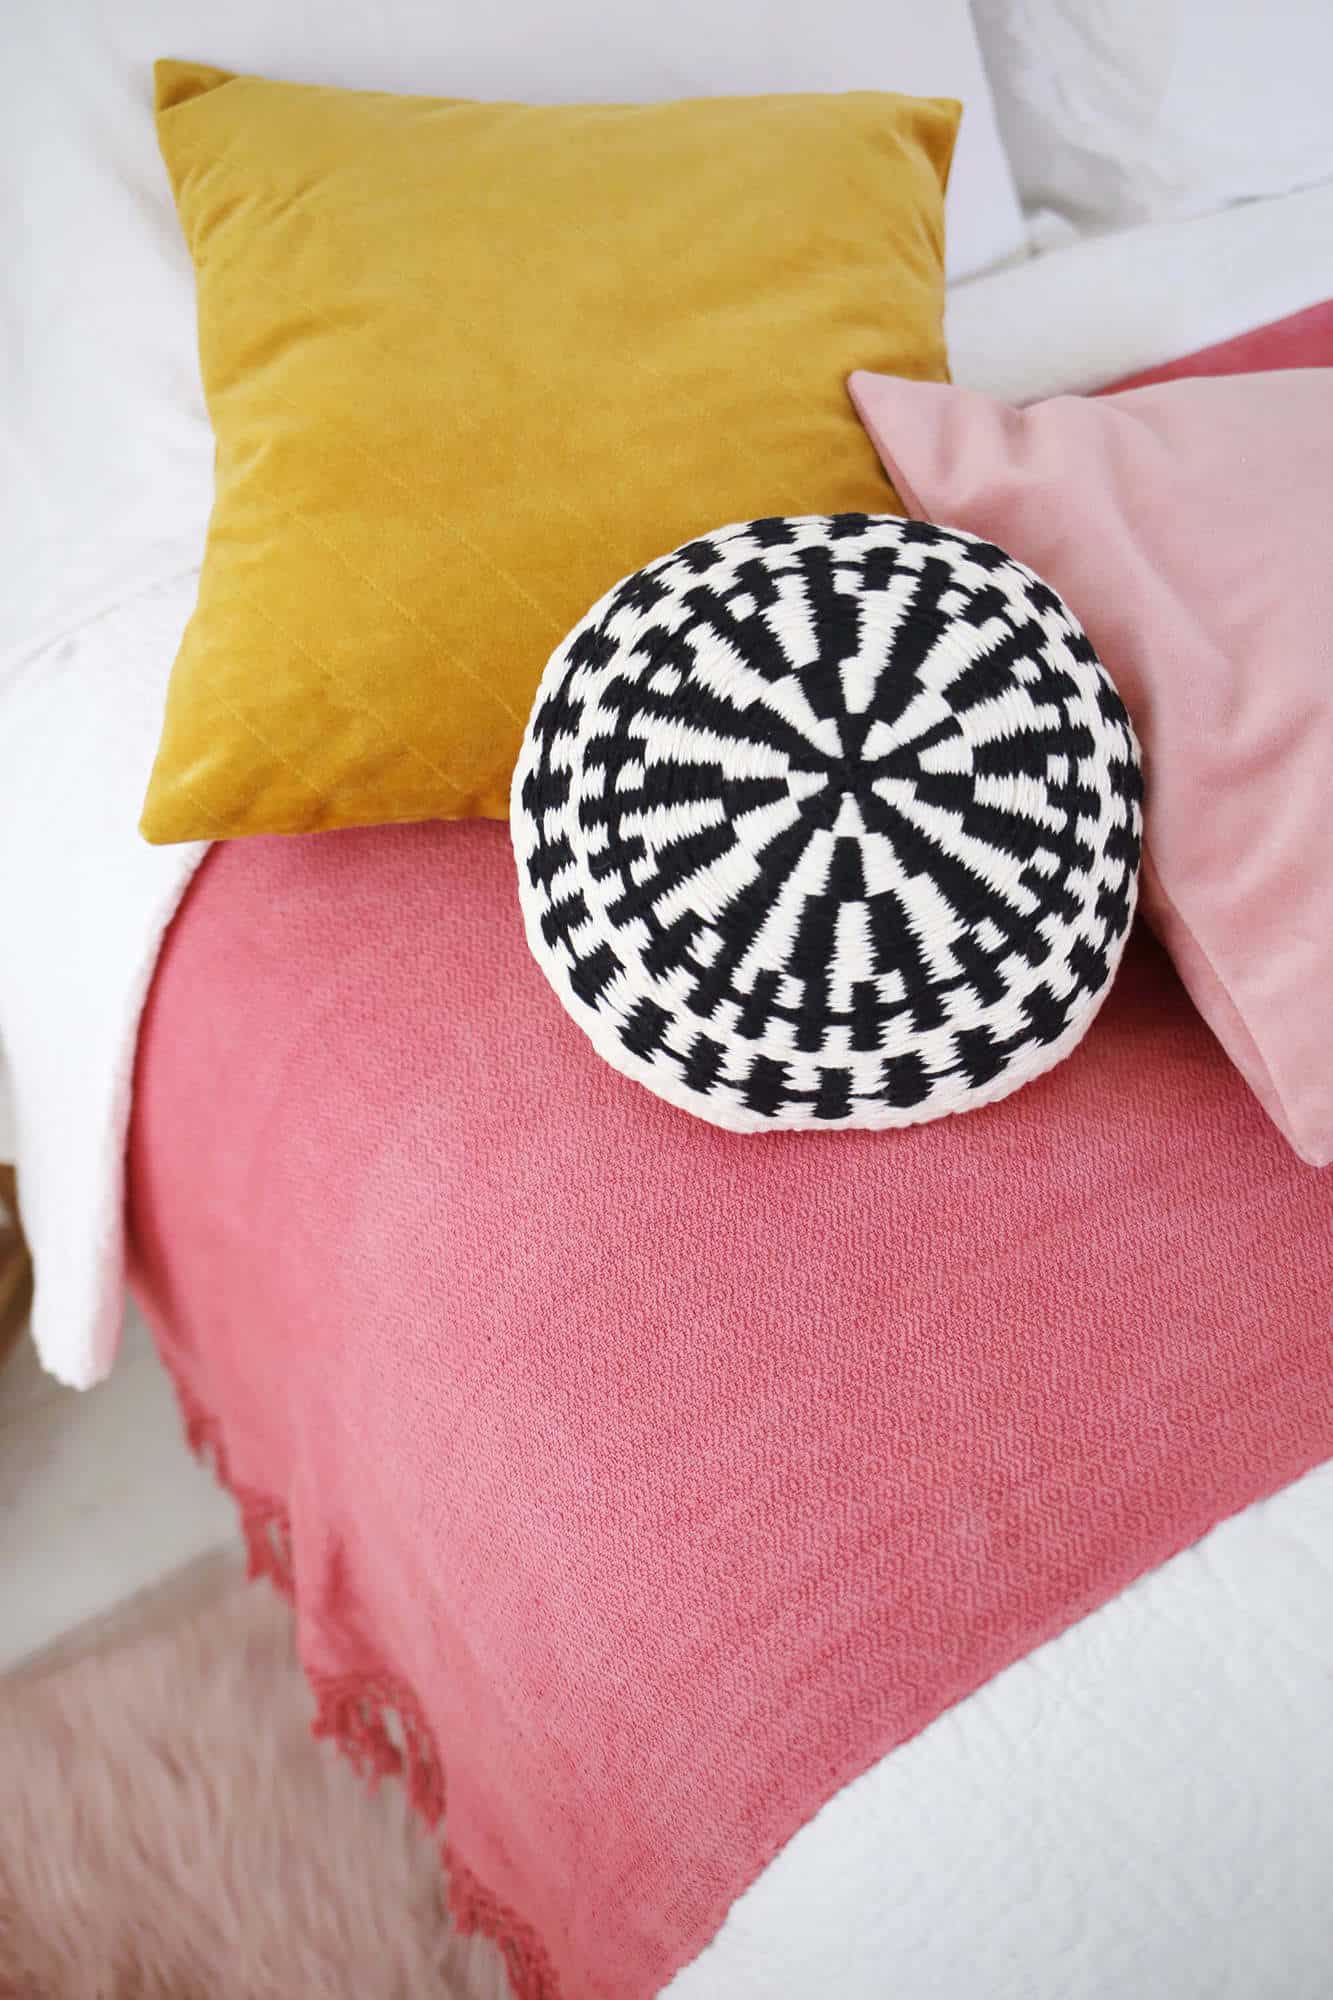
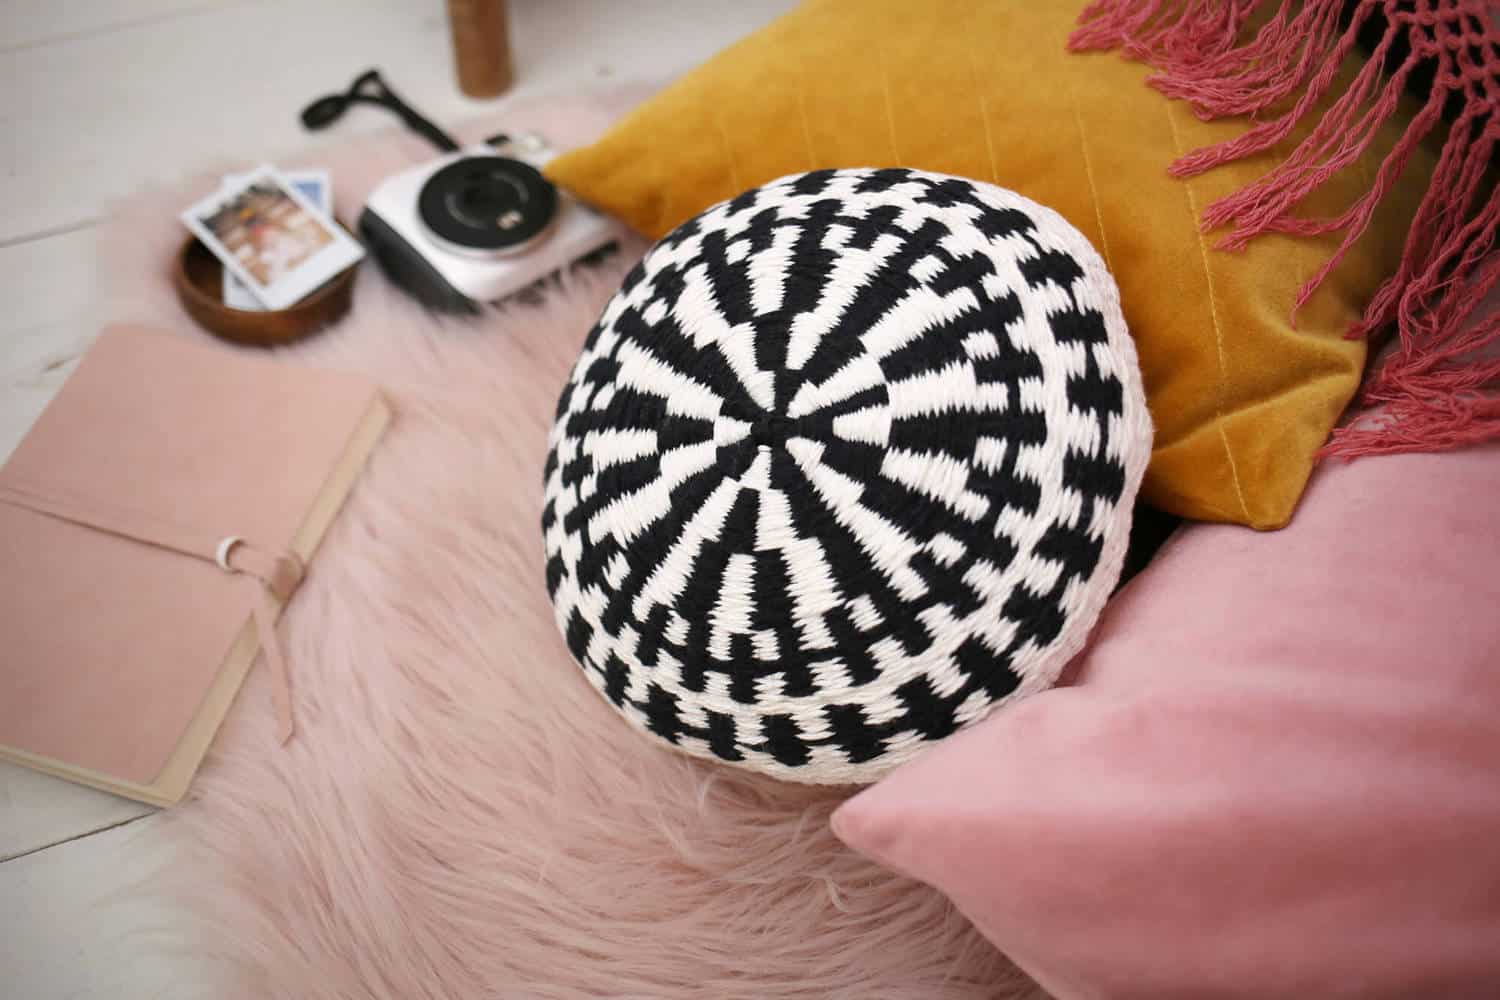
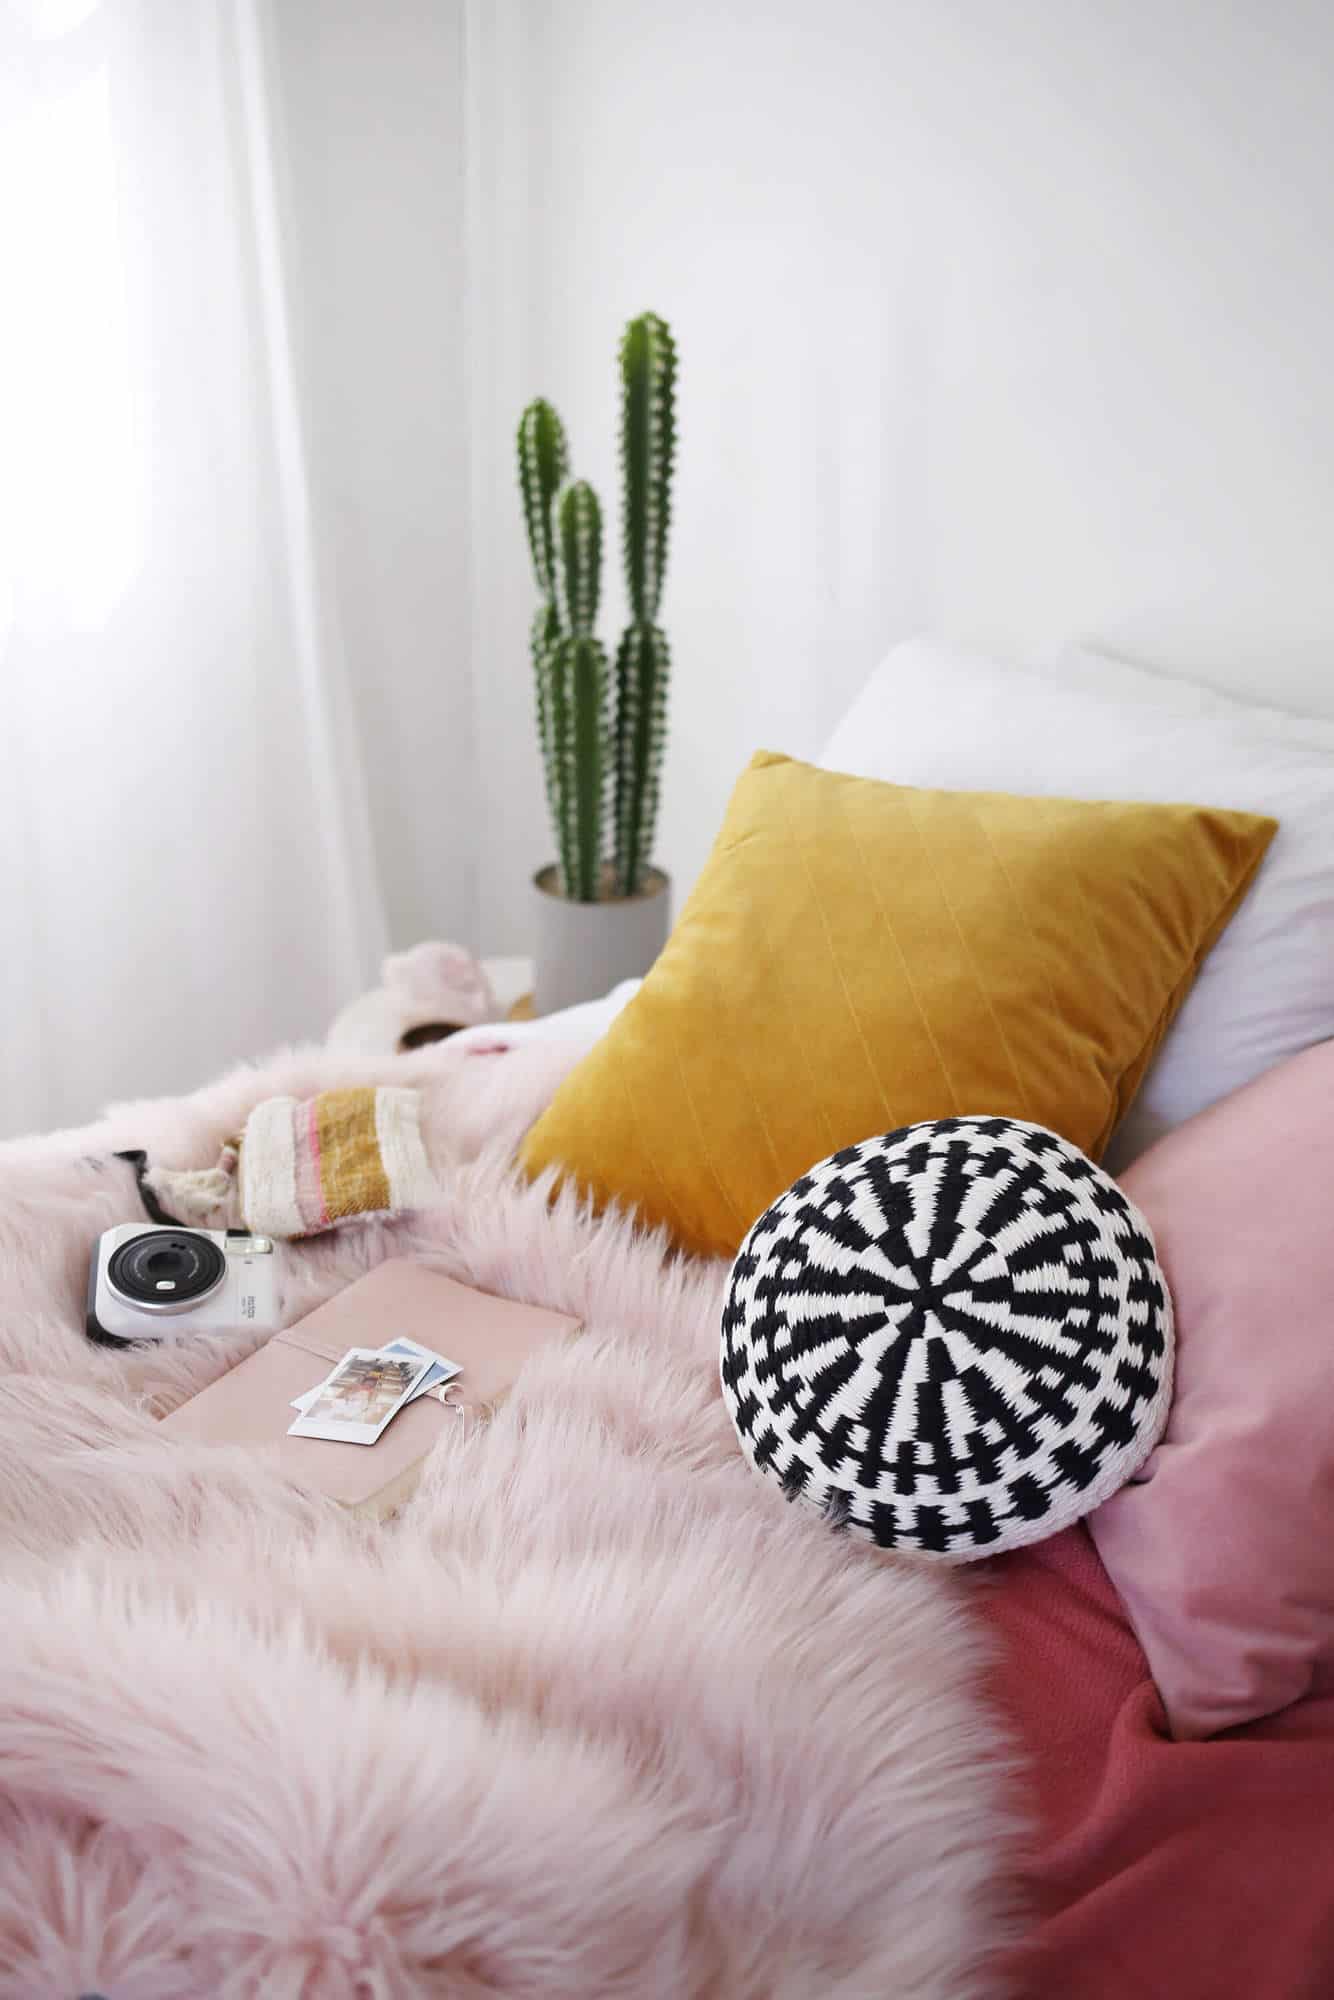
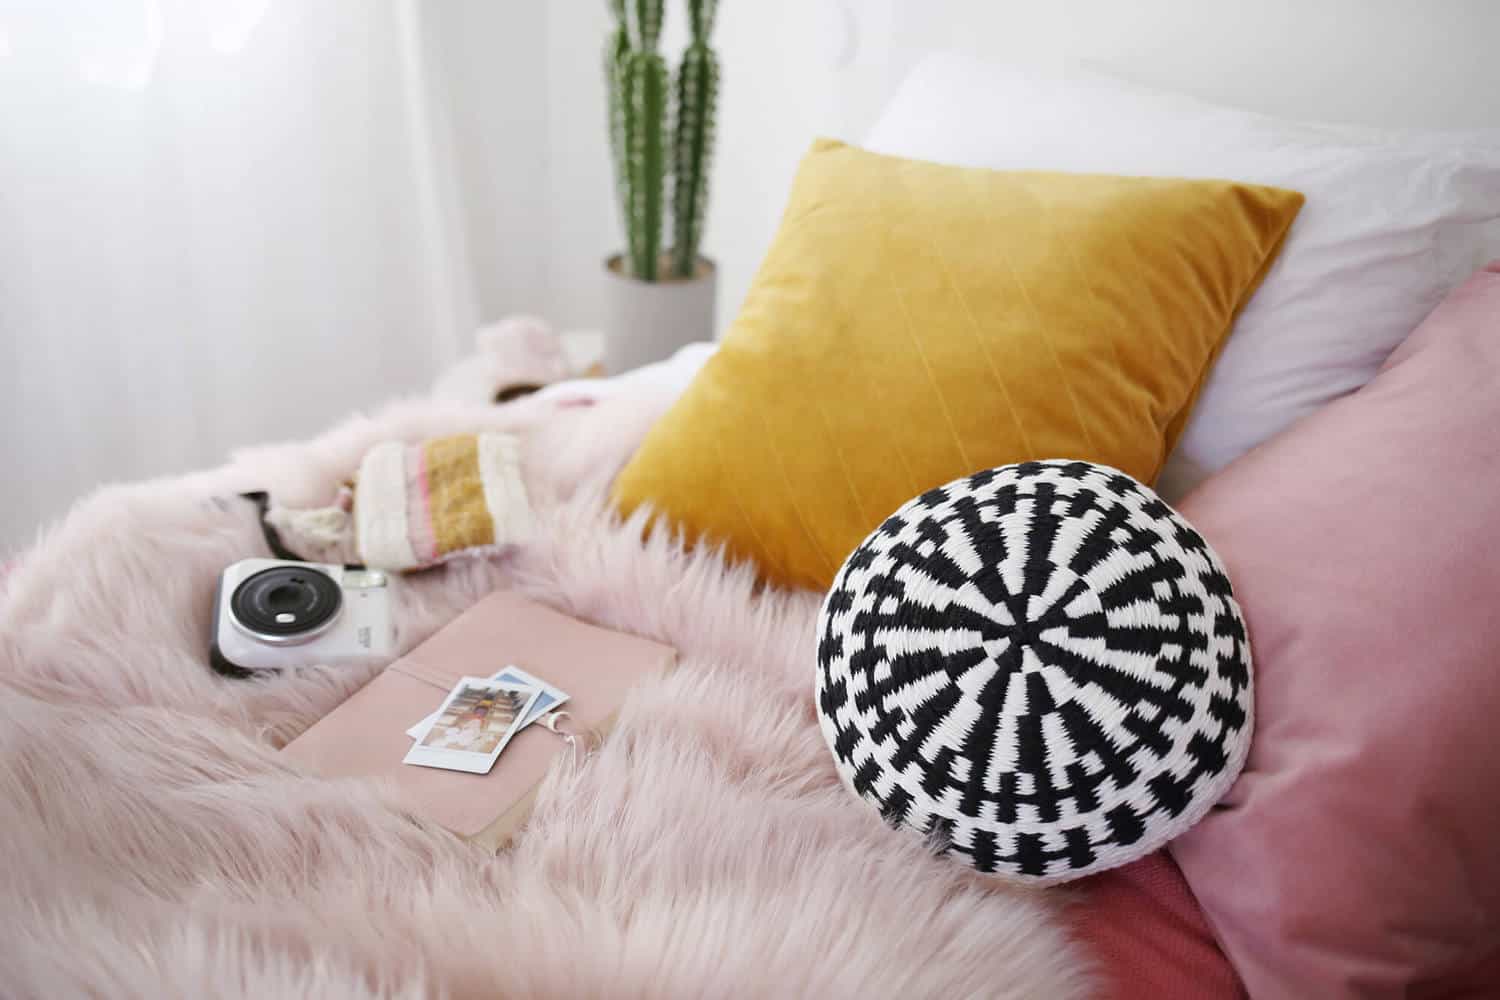
 If you’re as drawn to handwoven textiles as I am, this project is for you! I was inspired to make this after working on some round, woven wall hangings because I wanted to translate the round design into something both decorative and functional. I went with a high contrast color scheme because I always love a bit of black and white in my decor. However, just weaving this using one color would still add plenty of texture, even with a more subtle design.
You can easily make your own loom with a trip to the hardware store and a steady hand. Access to a sewing machine is helpful but hand-stitching your pillow will also leave you with a beautiful finished piece. 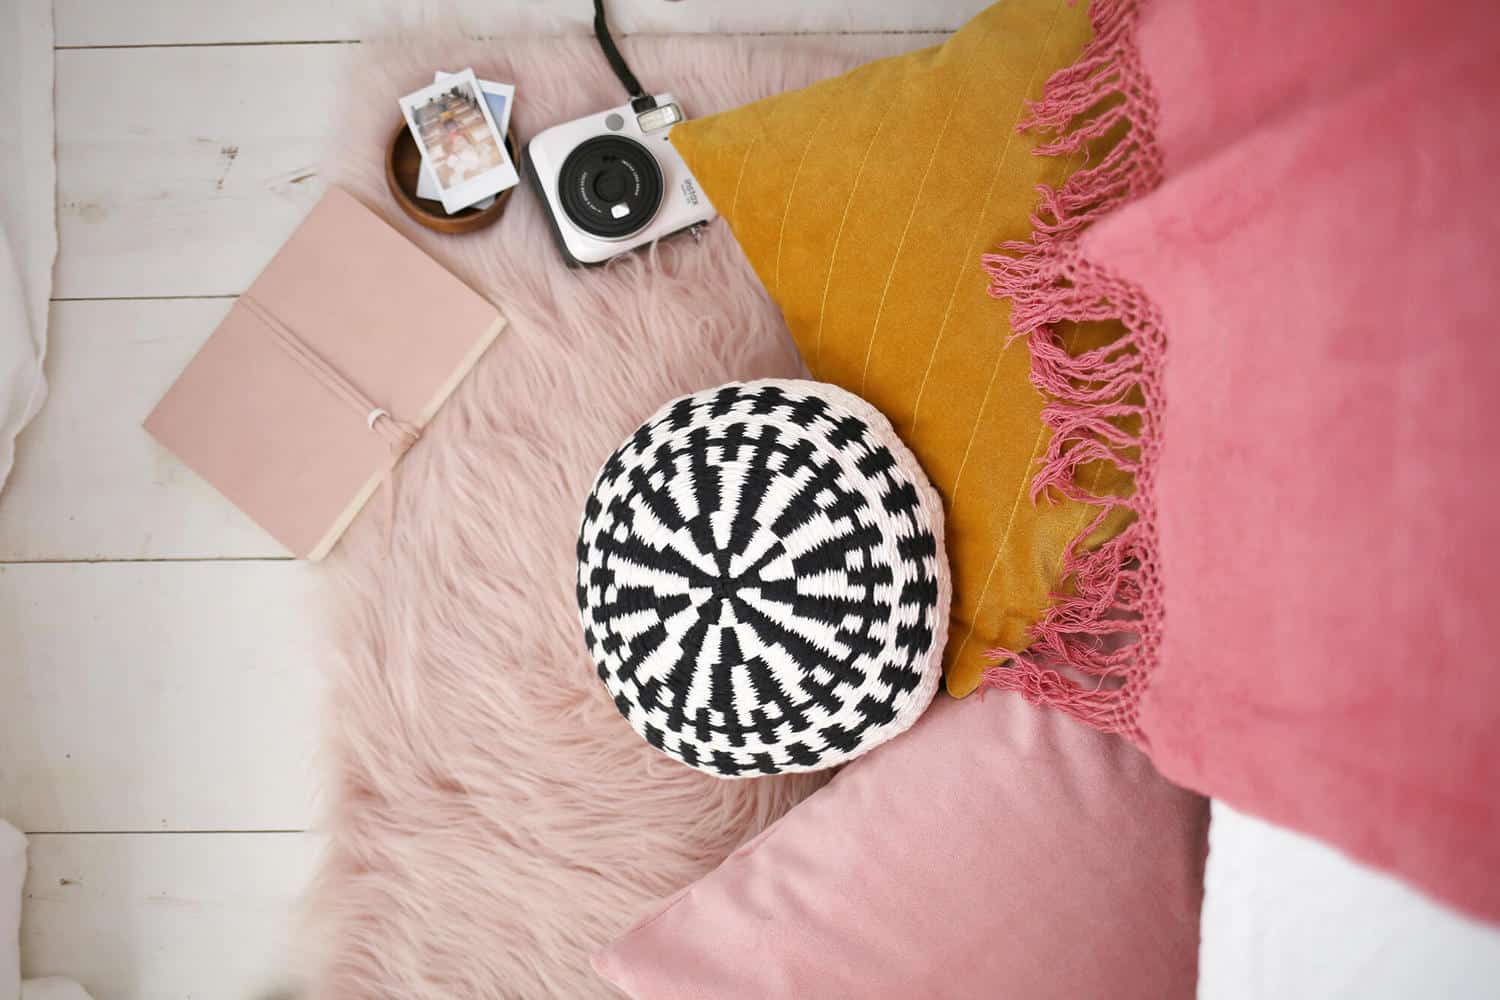
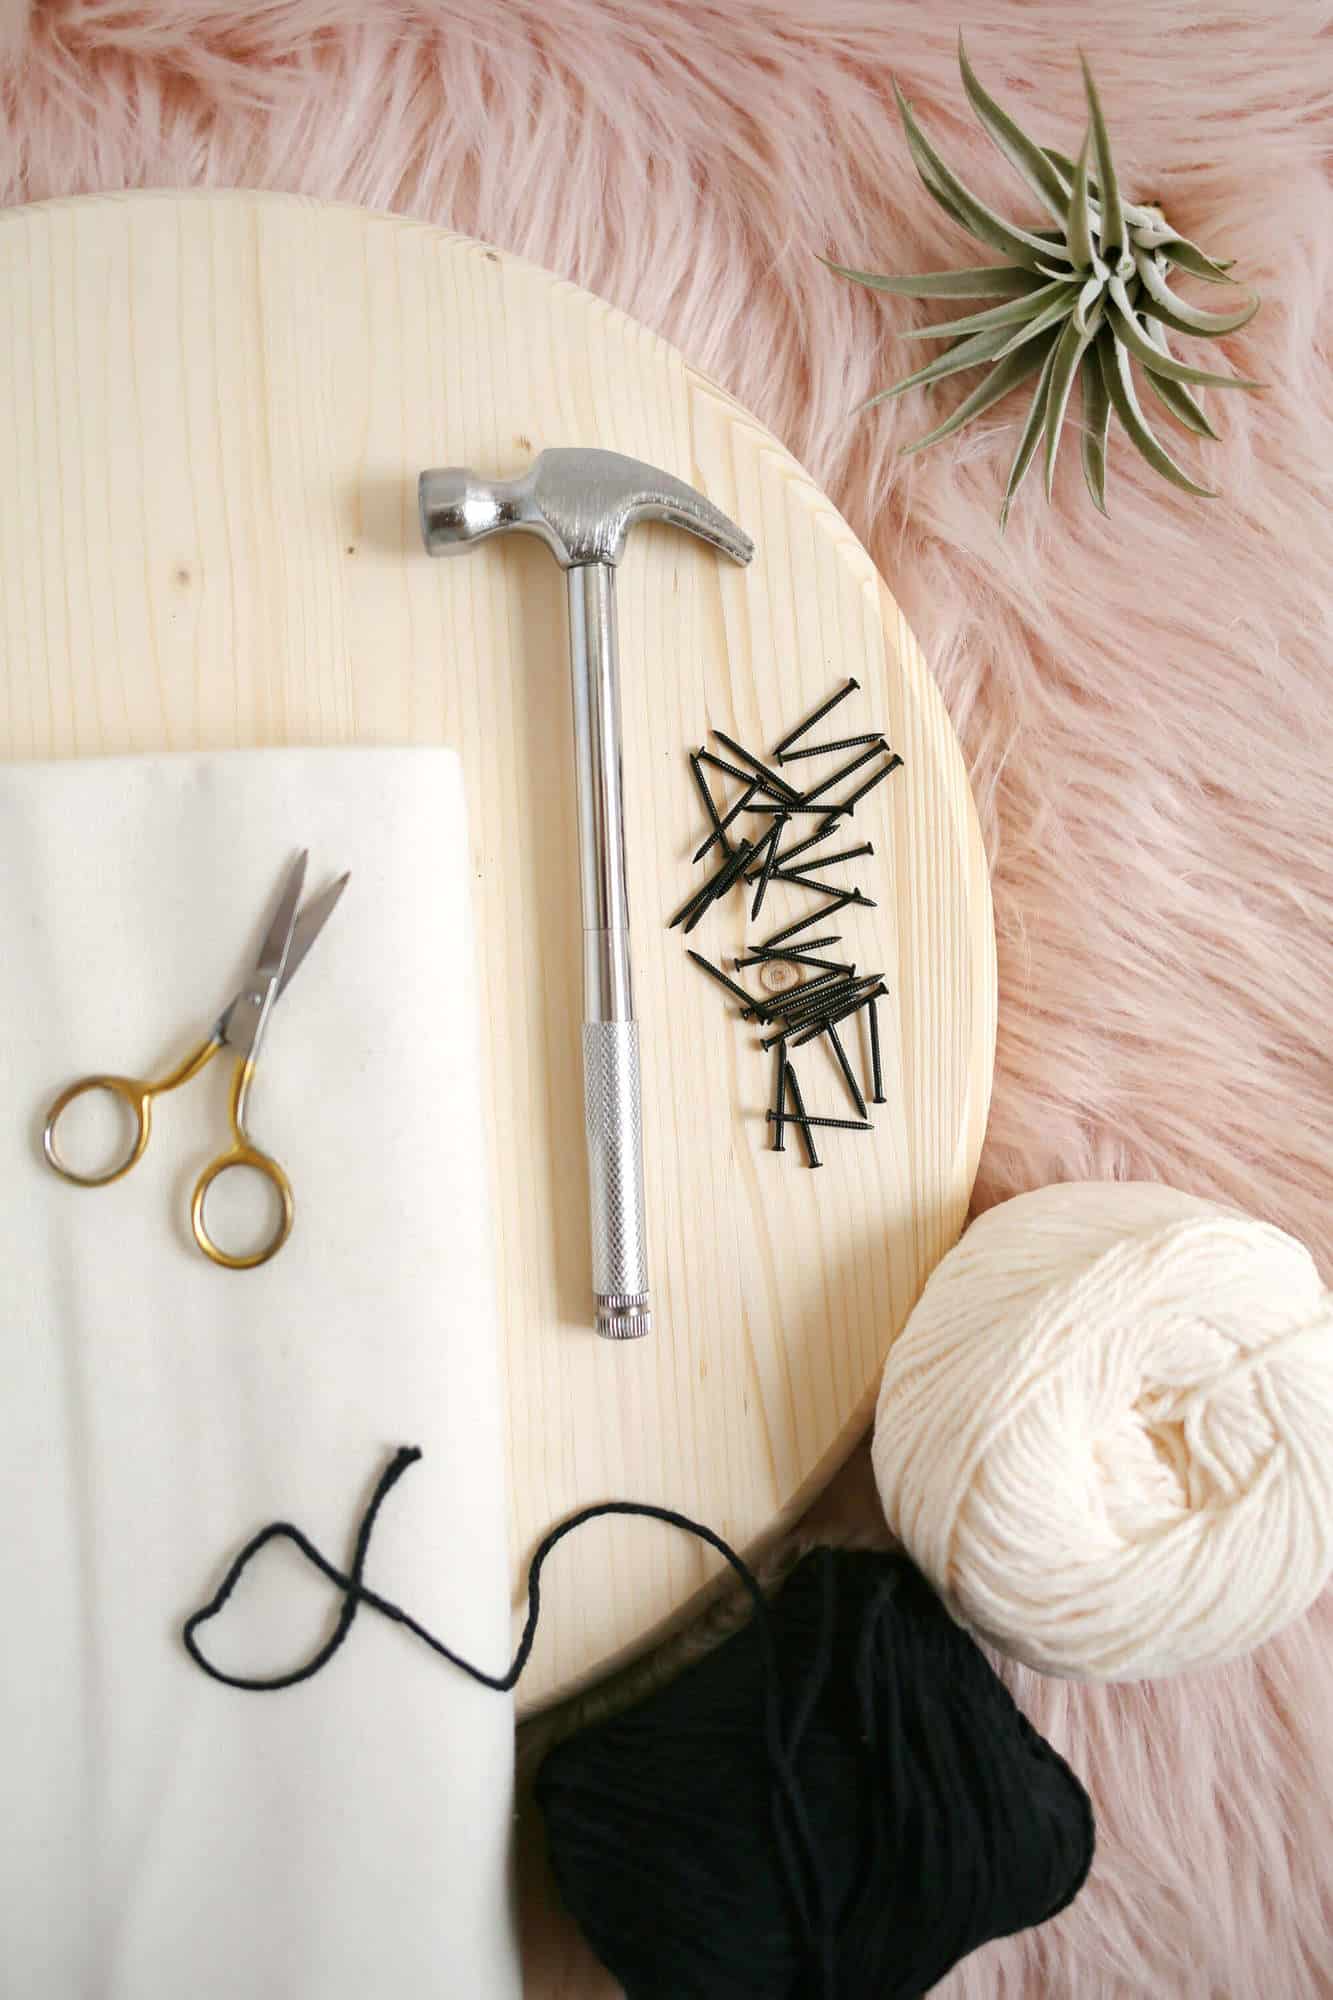 Supplies
-16″ pre-cut piece of round wood (can be found at your local big box hardware store or cut to size)
-14″ round pillow insert
-16″ round cut of canvas in coordinating color
-one skein of ecru cotton yarn (at least 100 yards)
-one skein of black cotton yarn (at least 100 yards)
-sixty 1.5″ black finishing nails (in case you bend some)
-two 3″ tapestry needle
-hand sewing needle
-sewing thread in coordinating color
-sewing machine (optional)
-scissors
-ruler and pencil
Note: If you decide to try a larger- or smaller-sized pillow, just be sure to choose a pillow insert that is roughly 2″ smaller than your round piece of wood. There will be a little bit of shrinkage as you pull your woven piece off of the loom and you’ll also need to account for about 1/3″ seam allowance where you stitch your top and bottom pieces together.
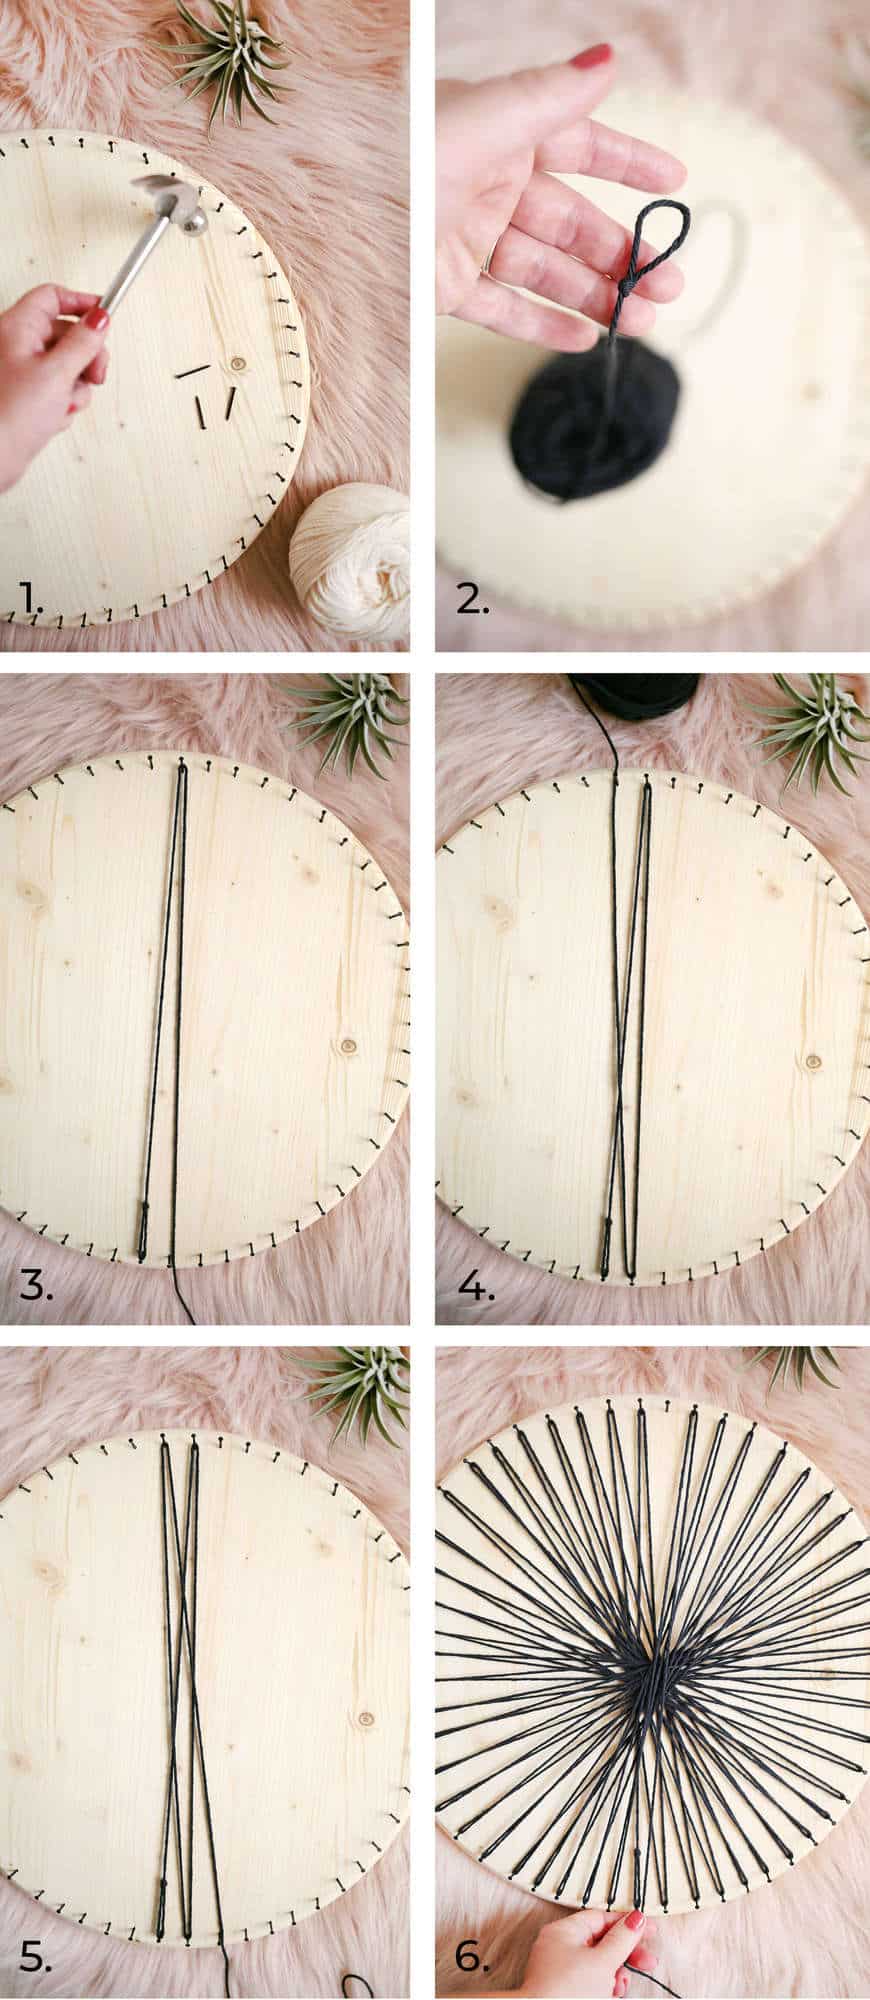
 For this vertical striped design, you’ll want an even amount of warp rows. Otherwise, your default should be an odd amount of warp rows.
Step One: Ideally, you only want to use 50 nails for this design. Nail your first finishing nail about 1/2″ from the edge of your wood. Measure 1/2″ to the right and still about 1/2 from the edge and nail your second nail. Continue measuring and hammering nails 1/2″ apart until you reach the place where you started. Keep your nails as evenly spaced as possible. I used 52 nails in mine, but you should only use 50 for the best pattern.
Step Two: With one end of your cotton yarn, tie a loop knot. Mine is black to make it easier to see. This is what we’ll use to create your warp, the base structure of your woven piece.
Step Three: Place your loop knot over one of the nails nearest you and then wrap it up towards the nail on the opposite side. You can find this nail by counting to the halfway point. Loop it around the top of that nail in a clockwise direction (not all the way around) and back down towards you.
Step Four: Loop your yarn clockwise around the nail to the right of where you started and back up towards the top as shown. Keep your tension taut but not so tight that it pulls your finishing nails in towards you. As you fill up your loom with more yarn, you’re going to want a little bit of breathing room on your warp.
Step Five: Loop it clockwise again around the nail to the left and back towards the bottom as shown.
Step Six: Continue in this pattern until you’ve come back to where you started.
Step Seven: Loop clockwise around the first nail you started with and back up to your last empty nail on the top.
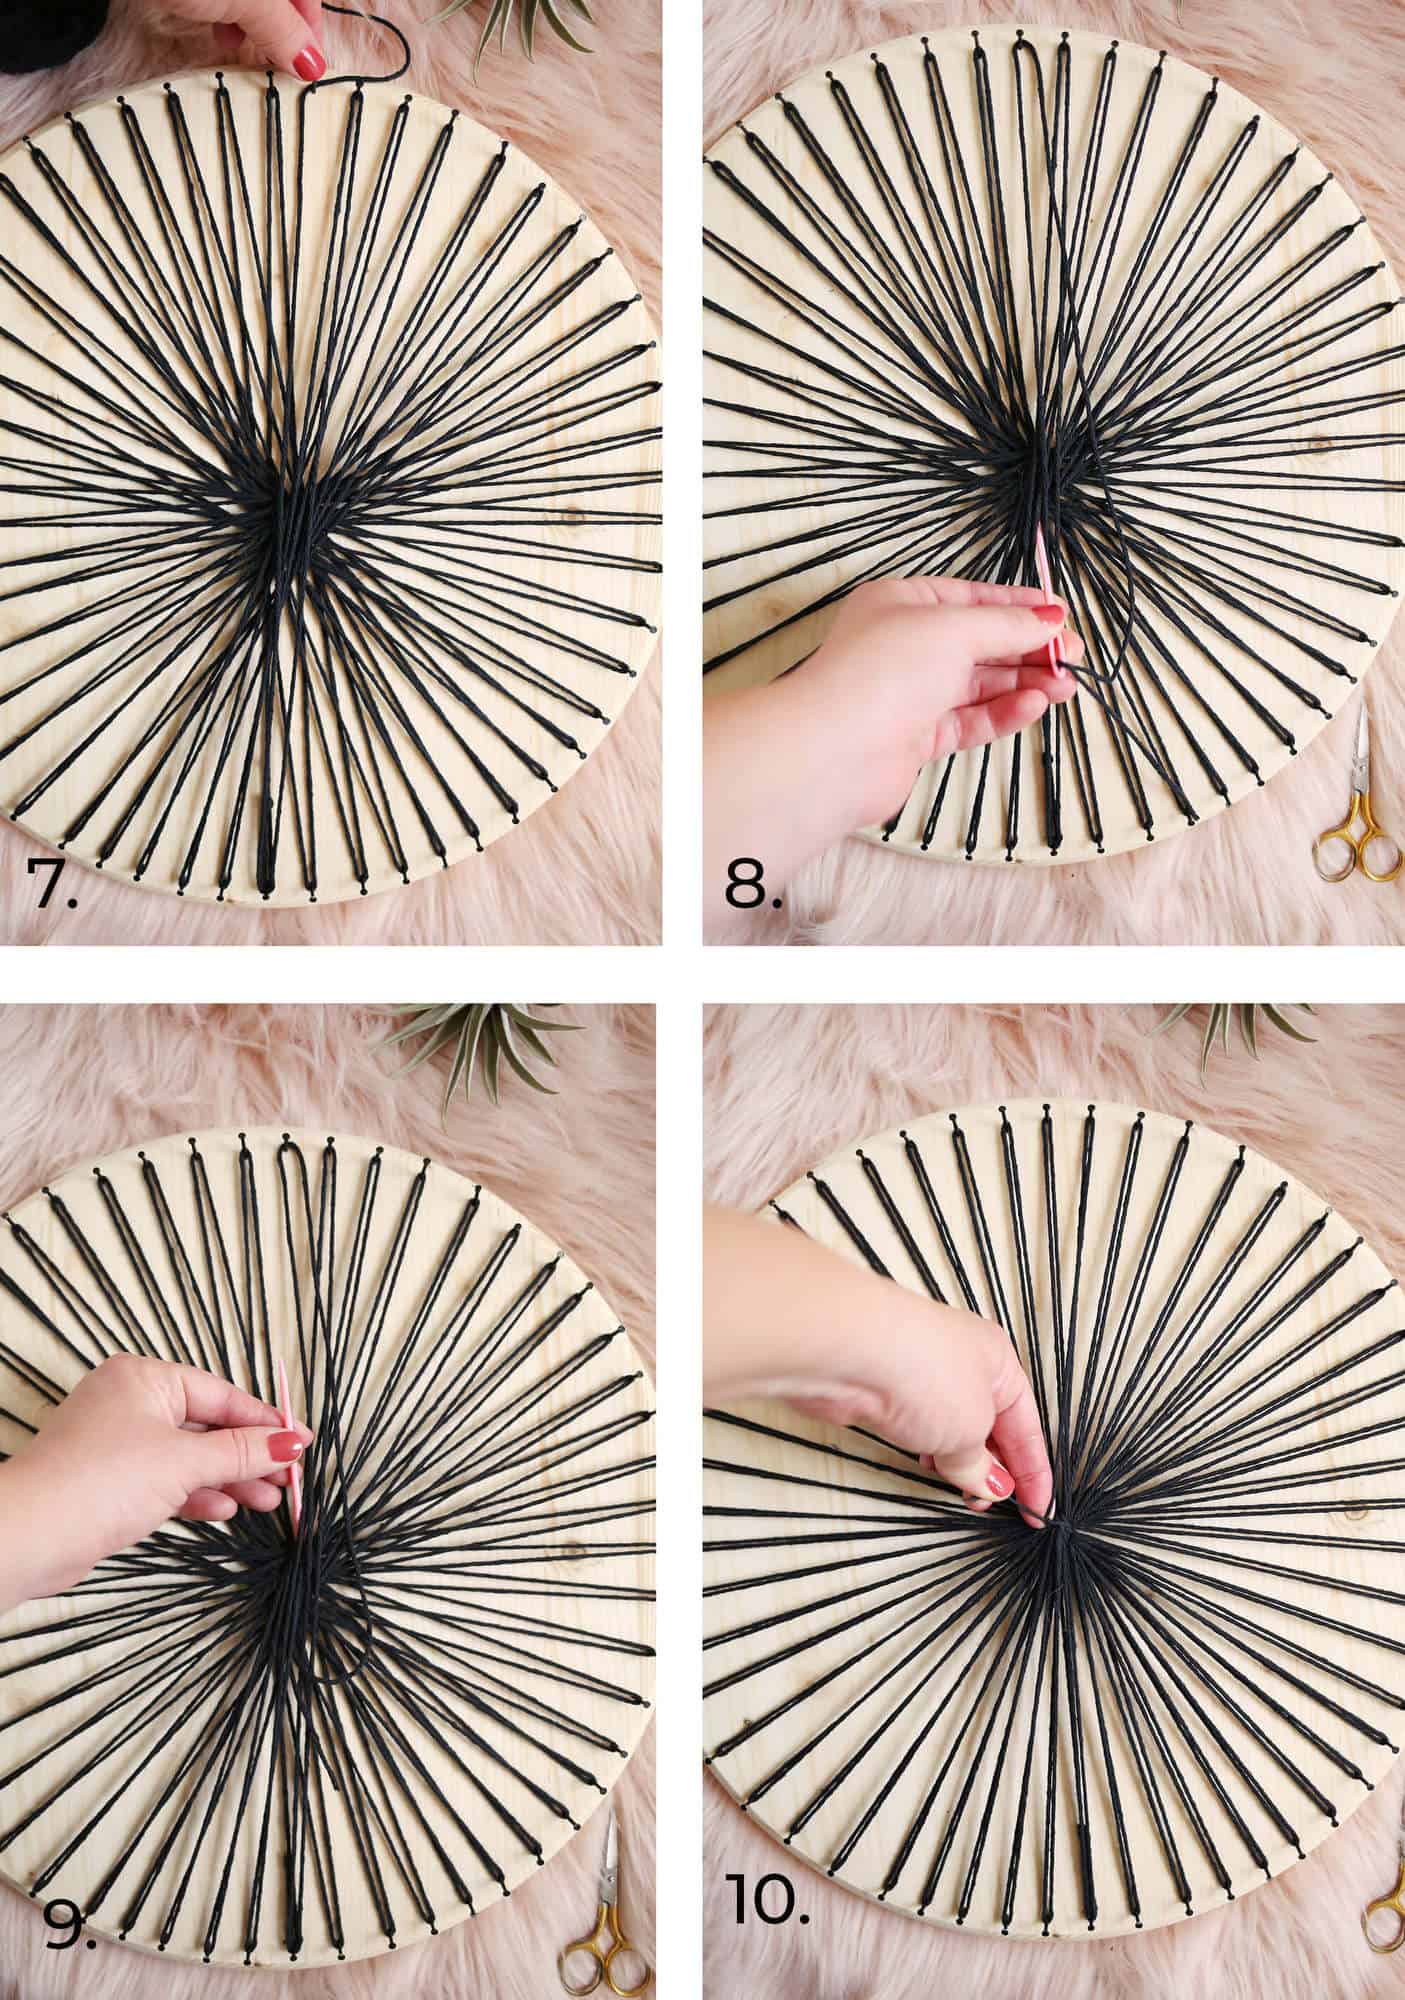
Step Eight: Measure out your yarn to the center of your wood and add about five inches before cutting it off from the yarn ball. Thread your tapestry needle and stitch under the pile where the yarns are all overlapping in the center.
Step Nine: Pull your needle through to the opposite side.
Step Ten: Pull on your warp thread so that it squeezes all of those overlapping threads together a bit and tie a double knot. Trim until you have it 1″ tail. You’ll weave over this with your weft yarn.
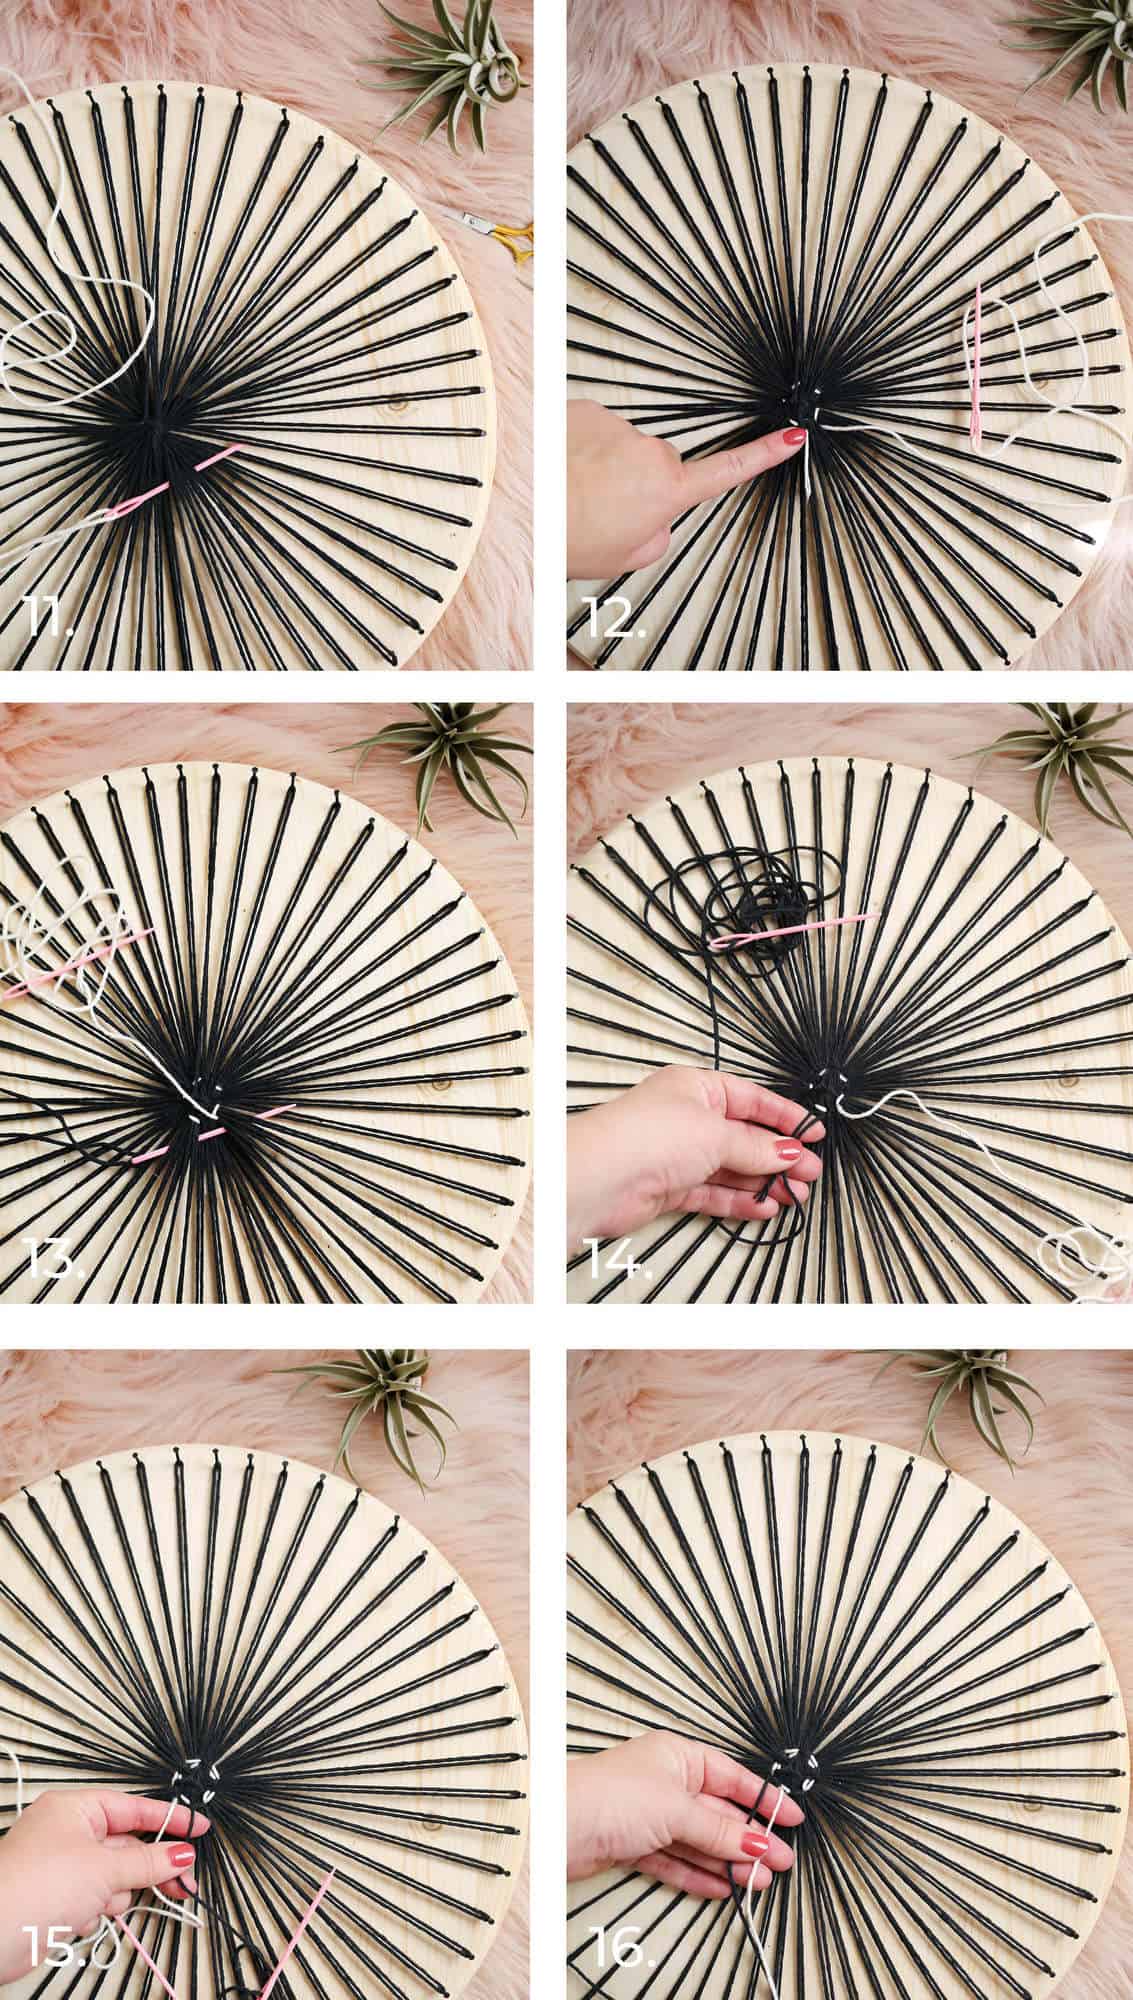
Step Eleven: Cut a wingspan length of your contrasting color yarn (I used ecru). Thread one of your 3″ tapestry needles. Each of your nails holds a set of warp rows. Weaving over and under each of these at the center where there isn’t as much space would get crowded and skew your design a bit. We are going to make some room by weaving over and under five nail heads at a time. This is essentially 10 warp rows, but just think in terms of nail heads to make it easier.
Start by weaving your tapestry needle underneath five sets of warp rows as shown.
Step Twelve: Weave over the next five, under the following five, over the next five, under the following five, until you get back around to the same five sets of warp rows that you wove over. This is one full weft row in the round. Set this needle aside.
Step Thirteen: Cut a wingspan length of your black yarn and thread the other 3″ tapestry needle. Remember where you first wove under five sets of warp rows with the ecru? Well, weave over those same five sets of warp rows with your black. Continue weaving over the next five sets, under the next five, etc.
Step Fourteen: Weave until you come back to where you started. It’s hard to see in this photo because it’s the same color as the warp, but you can see me holding both my tail end and long end because I’ve woven all the way around. Set your black yarn and needle aside.
Step Fifteen: Pick up your needle with ecru yarn and weave over the same set of five warp rows as you did in the first row. Then under the next five and so on until you’ve woven to just behind the other needle with the black yarn. Set your ecru yarn aside.
Step Sixteen: Weave your black yarn over the same warp rows as the first weft you wove in black. You’ll stop just behind the ecru yarn. Continue in this pattern where each color takes its turn going almost all the way around.
 Step Seventeen: If you run out of yarn but wish to continue with the same color, weave until you have about 3″ of a tail left to tuck down where you would naturally be weaving under some warp rows. Then cut a new wingspan of yarn, thread your needle, and follow where you would have woven had you never run out of yarn. Leave yourself another 3″ tail and tuck both tails to the back side. No need to tie them together. They’ll get locked in with the next weft row.
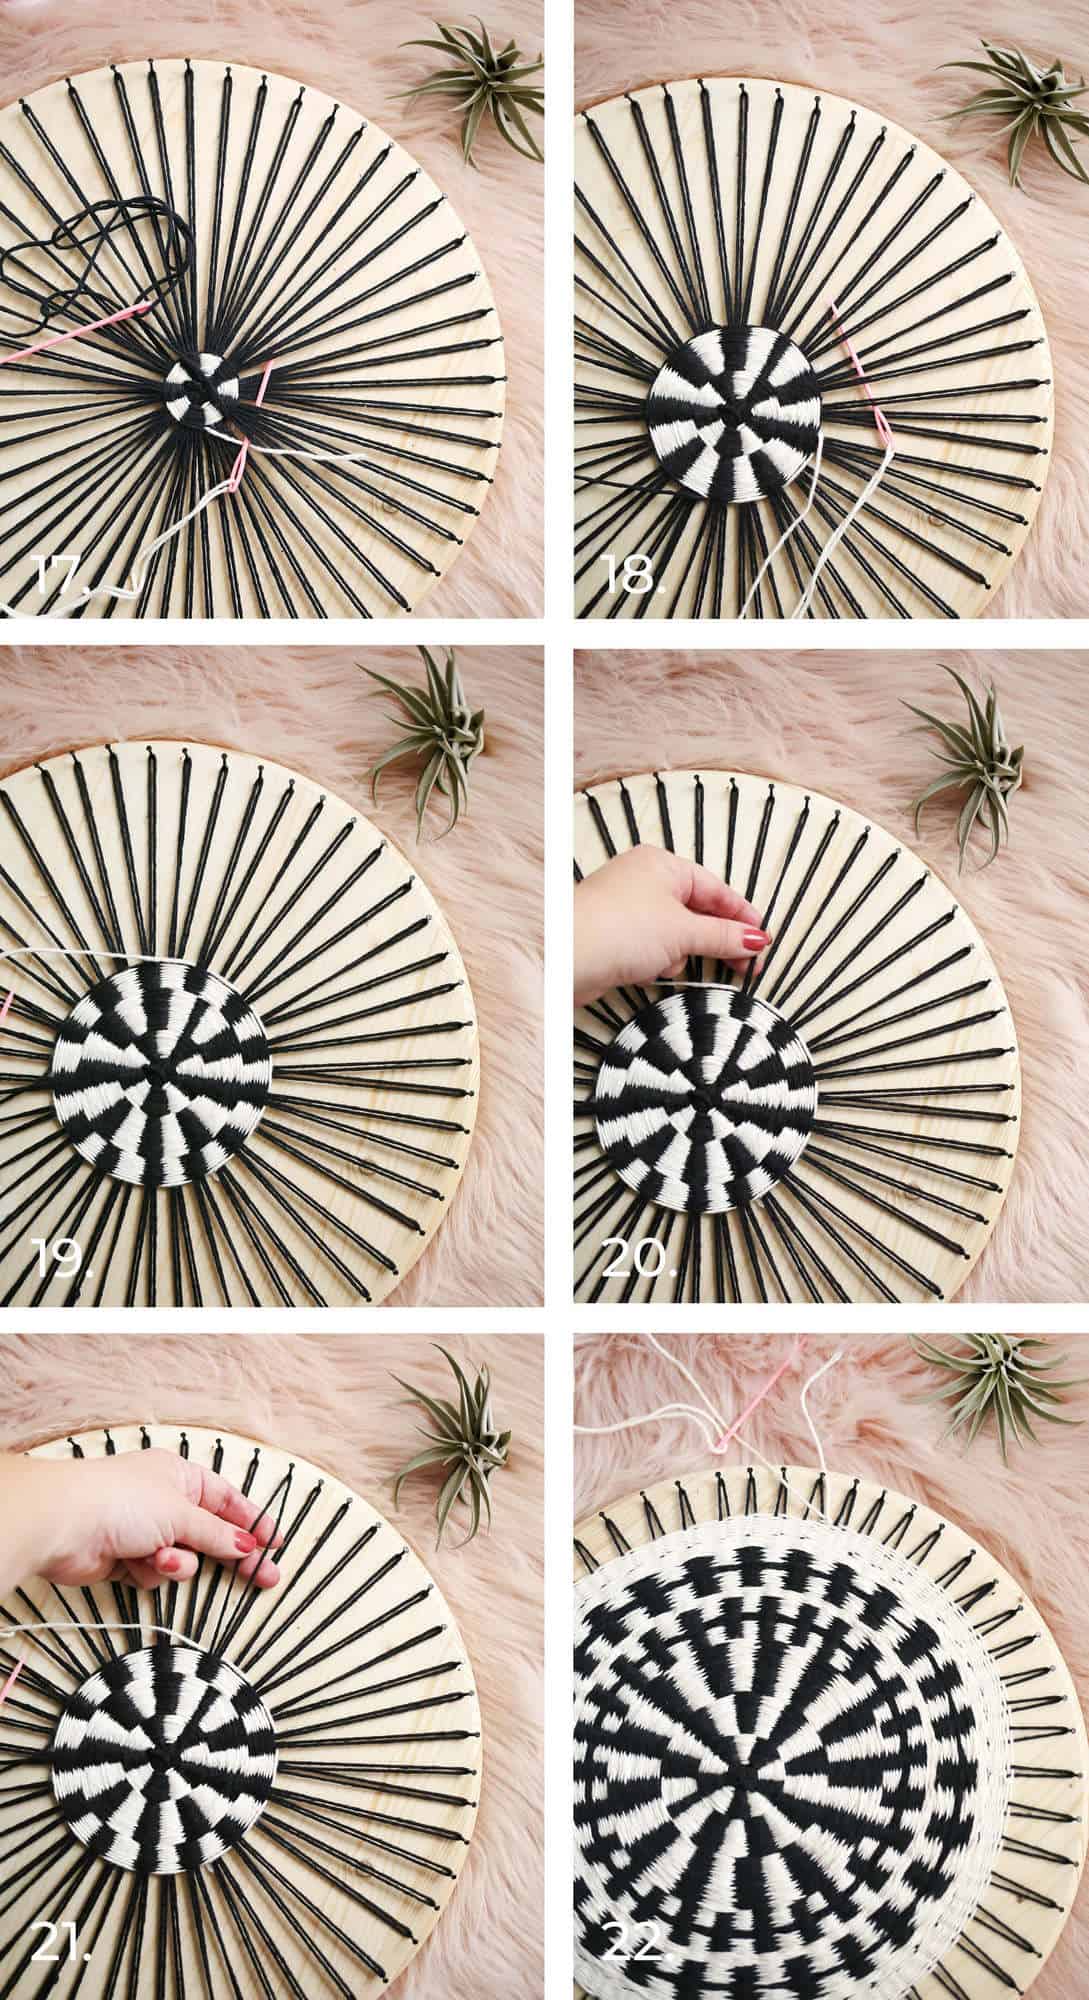
Step Eighteen: You can see there are two sections to my design here. After step seventeen, I wove my next colors over every three sets of warp rows instead of every five. I did this for about 1″. You can see how it shifted my vertical lines a bit. It’s also helping keep the spaces between my warp rows about the same size as they were in the center. For this next section, you can see I’ve started to weave under two sets of warp rows at a time.
Step Nineteen: Here’s an example of my third section and how my vertical lines have shifted again. If you were to use only one color for the whole pillow, you wouldn’t have a design like this. You’d just see consistently spaced weft row stitches from the center all the way to the outer edge.
Step Twenty: The further towards the edge you go, the more you’ll want to reduce the number of warp rows you weave over. For this next section, I’m only weaving over one set of warp rows at a time.
Step Twenty-One: And of course, once you get further out, you can even split each set of warp rows into two rows.
Step Twenty-Two: To get the railroad track pattern, simply weave three weft rows of the same color in a row in a traditional over/under pattern. Then pick back up with the opposite color being woven over the same sets of warp rows as before. You can do this for both colors to create negative space in between the railroad tracks, too.
Once you’ve woven up to about 1/2″ from your nail heads, stop. You’ll need about 2/3″ of room on your warp rows for the next step.
 Twenty-Three: Gently pull your warp rows off of your loom.
Twenty-Four: Fold your first warp row loop over the one to the right of it so that the one to the right goes through the center of the loop. Then fold that second warp row loop over to the right of it so that it goes over the third one. Then fold the third one over the fourth and so on. If you have a crochet hook and are familiar with this concept, it might make faster work. This is one of the cleanest ways to finish your ends off without having to cut and tie knots.
Twenty-Five: Once you get back to the beginning, cut that last warp row loop in half at the top and double knot it through the first one.
Twenty-Six: Make sure your pillow insert fits! You want this to be snug, but if your pillow insert is more than 1″ wider than your pillow case, you’ll need a slightly smaller pillow insert.
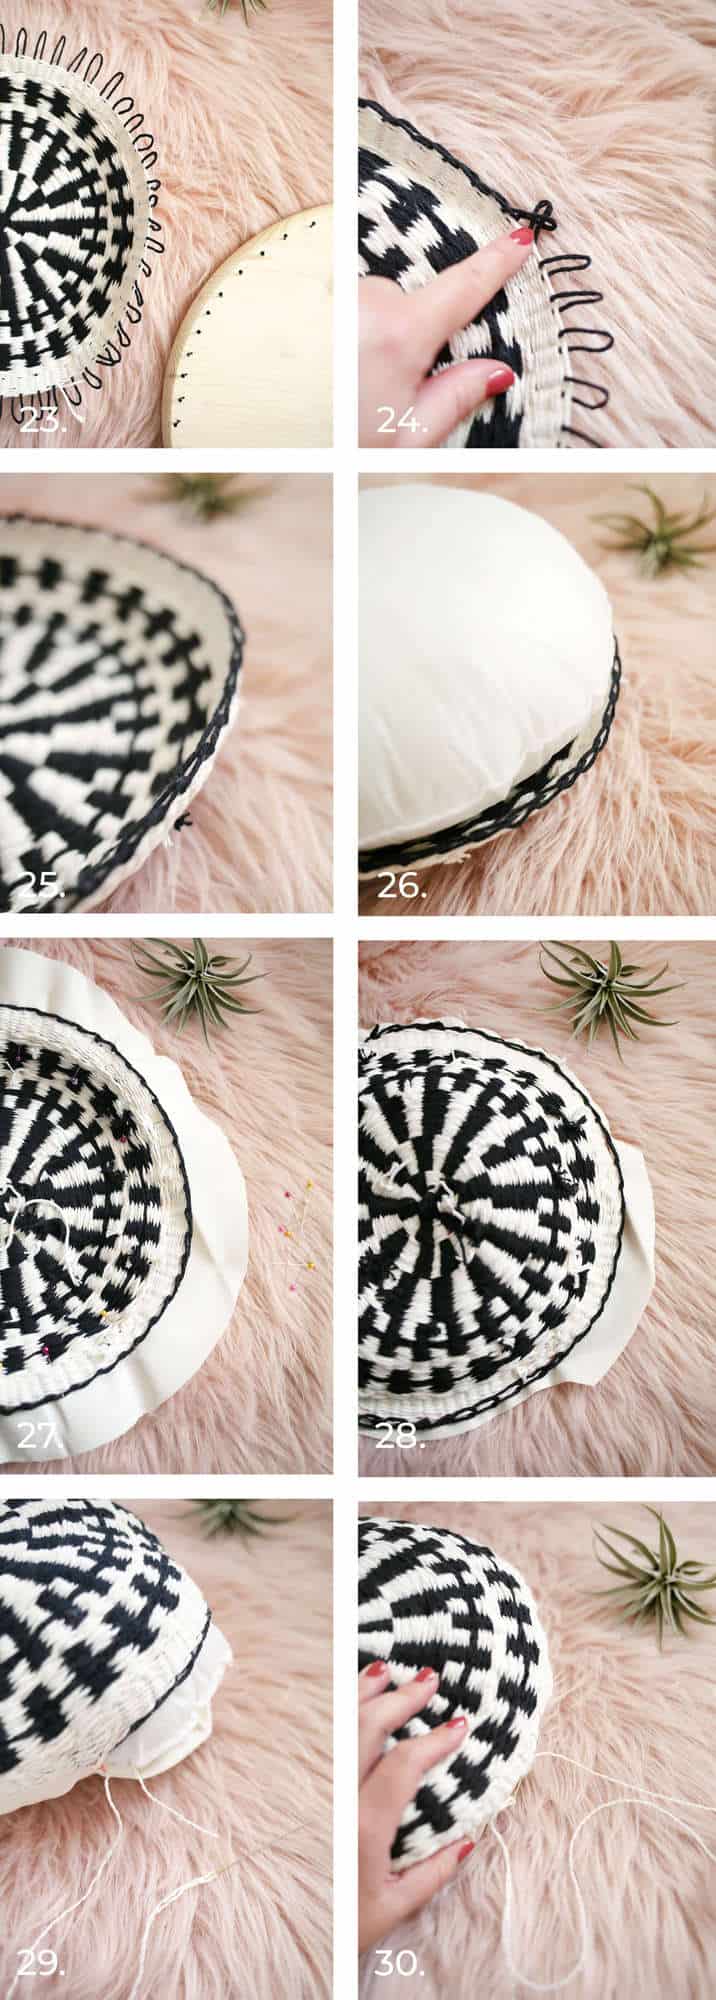
Twenty-Seven: Place your woven piece face down on your cotton fabric. Pin them together every 3″ near the perimeter of your woven piece.
Twenty-Eight: Stitch about 1/4″ in from the edge of the woven piece around the perimeter and stop stitching when you are about 7″ from where you started. This will leave enough room for you to turn your pillow case right side out. Trim your cotton fabric along the perimeter where you stitched them together, but leave it longer on the part that is open as shown. Remove straight pins.
Twenty-Nine: Turn your pillow case right side out. Insert your pillow form. Thread your sewing needle with about 16″ of thick thread and tie a knot in the long end. Start near one end of the opening from the inside of the pillow case to hide your knot.
Thirty: Use a blind-stitch to finish sewing your opening closed. Fluff and enjoy!
Since this pillow case is made from 100% cotton, you can throw it in the wash on a delicate cycle with warm or cold water and let it air dry. However, spot cleaning is recommended.
 Take it a step further and add 10-12 handmade yarn pom poms to the perimeter for something even more fun! What colors would fit your room the best? – Rachel
13 Comments
Love the pattern! Very cute, as with all your DIYs! 🙂
Charmaine Ng | Architecture & Lifestyle Blog
http://charmainenyw.com
Thanks so much!!! I appreciate that.
Just love it!!! ????
Beautiful! How long did it take to weave this?
I would say about 5-6 hours but that includes stopping to take photos, etc. 😉
I am obsessed with this style currently! This looks great!
Isn’t it cute!!! My main goal with all of my DIY’s is to collect cute things for my house by making them. Ha! 😉
Love this may have to try it. But if there is a video showing the steps I’d be forever grateful.
No video for this project but I do have a video-based eCourse called Woven: In the Round that might be helpful! You can find it here: https://smileandwave.bigcartel.com/product/woven-in-the-round
This turned out SO cute!
— Nicole | What Nicole Wore
So glad you like it! I think I might try an all off-white one next!!!
Wow, looks amazing and you make it look so easy! Will definitely be trying this someday.
Thank you so much! I hope you do get to try it!!!