") Oh man, I’m so excited to share this closet door project with you today! I’ve been working hard on gathering up items and implementing all the ideas I’ve had over the last few months for a very special project in our house—the nursery! I’ve done custom closet doors a few other places in our house (like our bedroom and den), and I really love the custom feel that they give to a space. So I thought the nursery would be the perfect spot to add another fun door project too.
Oh man, I’m so excited to share this closet door project with you today! I’ve been working hard on gathering up items and implementing all the ideas I’ve had over the last few months for a very special project in our house—the nursery! I’ve done custom closet doors a few other places in our house (like our bedroom and den), and I really love the custom feel that they give to a space. So I thought the nursery would be the perfect spot to add another fun door project too.
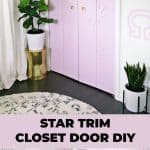
") The doors that were there previously are pretty standard metal accordion doors, and while they are fine, they don’t really add any personality to the room. You can see the wallpaper design I’ve been working on around the door trim (more details on that later!), so I wanted the new doors to compliment the bold walls without competing visually for attention, and I think I found just the right balance with the design I chose.
The doors that were there previously are pretty standard metal accordion doors, and while they are fine, they don’t really add any personality to the room. You can see the wallpaper design I’ve been working on around the door trim (more details on that later!), so I wanted the new doors to compliment the bold walls without competing visually for attention, and I think I found just the right balance with the design I chose.
") I bought two sets of wooden flat-panel accordion doors from Lowe’s (I can’t find a link for them, but they always have them in the store in the door section) and painted them a light lavender color (Valspar’s Lilac Lane to be exact). The doors came in connected sets of two panels, and I think it’s easier to remove the side hinges before painting the doors and replace them later so you don’t have to trim around them.
I bought two sets of wooden flat-panel accordion doors from Lowe’s (I can’t find a link for them, but they always have them in the store in the door section) and painted them a light lavender color (Valspar’s Lilac Lane to be exact). The doors came in connected sets of two panels, and I think it’s easier to remove the side hinges before painting the doors and replace them later so you don’t have to trim around them.
") Once the panels were the right hue, we removed the white doors, reattached the panel hinges, and installed the new ones in the nursery.
Once the panels were the right hue, we removed the white doors, reattached the panel hinges, and installed the new ones in the nursery.
") For the star pattern, I bought 6 of these 14″ wide 10-point wooden stars (they are from this Etsy shop, but it looks like they are on break right now), and I painted them the same color and then cut them in half with my saw (you can use an inexpensive jig saw for that part if you don’t have access to a chop saw).
For the star pattern, I bought 6 of these 14″ wide 10-point wooden stars (they are from this Etsy shop, but it looks like they are on break right now), and I painted them the same color and then cut them in half with my saw (you can use an inexpensive jig saw for that part if you don’t have access to a chop saw).
")
") Once the stars were cut in half, I used painter’s tape to get the placement of each one just right, and then I marked the different heights with tape so I could find those spots easily when attaching them.
Once the stars were cut in half, I used painter’s tape to get the placement of each one just right, and then I marked the different heights with tape so I could find those spots easily when attaching them.
") I put some wood glue on the back of each star half, lined up the edge with the door seam, taped them in place, and then used a nail gun to secure. If you don’t have a nail gun, don’t worry! You can use a regular hammer and small nails and that works just fine too. Nail guns are just faster and handy to have if you do a lot of wood working projects though… totally worth it!
I put some wood glue on the back of each star half, lined up the edge with the door seam, taped them in place, and then used a nail gun to secure. If you don’t have a nail gun, don’t worry! You can use a regular hammer and small nails and that works just fine too. Nail guns are just faster and handy to have if you do a lot of wood working projects though… totally worth it!
") Once the stars were attached, I filled in and smoothed any nailhead indents with wood filler, and then touched up the paint where needed. After adding the brass handles, my doors were ready to be admired!
Once the stars were attached, I filled in and smoothed any nailhead indents with wood filler, and then touched up the paint where needed. After adding the brass handles, my doors were ready to be admired!
")
") Aren’t they sweet?? I just love them. Since the stars are a more interesting 10 point variety rather than the usual 5 point, I think they look less childish. So you could really do this pattern in any room of a house. It also reminds me a bit of the vintage sunburst mirrors and hardware plates, so I think that’s a great addition to our midcentury house as well. Still gathering up the rest of the nursery items, but it’s a big relief to have another of the larger scale projects off my list—onto the next!! xo. Laura
Aren’t they sweet?? I just love them. Since the stars are a more interesting 10 point variety rather than the usual 5 point, I think they look less childish. So you could really do this pattern in any room of a house. It also reminds me a bit of the vintage sunburst mirrors and hardware plates, so I think that’s a great addition to our midcentury house as well. Still gathering up the rest of the nursery items, but it’s a big relief to have another of the larger scale projects off my list—onto the next!! xo. Laura
Credits // Author and Photography: Laura Gummerman. Photos edited with the NEW A Beautiful Mess actions.
29 Comments
Slightly off topic, but what a beautiful cat you have 🙂
Thank you! I think so too!!
Laura 🙂
Adorable, could really work for a young girl’s room. I love the pink colour too.
Charmaine Ng | Architecture & Lifestyle Blog
http://charmainenyw.com
This looks incredible! I love how you give a step by step instruction on how to do it, and I agree that these stars look less childish than the regular 5 point stars. The pictures look great and I love your cat in it too! 😉
http://thedianaedition.com
This looks so cool, and I love the colour!
https://www.makeandmess.com/
These turned out so cute. They add an unique flair without being too in your face. Perfect home decor touch
That looks amazing! I like the new doors much better than the old ones even though they were pretty too.
That’s so cute!!
-Kirsten // http://www.porkandcookies.com
These are too cute! Great idea!!
Everything about this looks absolutely cute! The massive icons (lips, heart, etc) on the wall are excellent details too. Are those sticker decals or paint stenciled in?
PS: Loving the new look of ABM! Well done guys.
-Anne | http://annescribblesanddoodles.blogspot.com
They are painted and I’ll show you the whole thing later!
Laura 🙂
These doors are beautiful, and I am obsessed with your wallpaper. I can’t wait to see more of your nursery!! This is my favorite DIY post this year! Well done, Laura! 🙂
I love this (heart eye emoji). Plus, this is a wood working project I feel like I could actually do on my own. Your little one is going to have such a beautiful space to grow up in!
This is amazing! Your creativity never ceases to amaze me!
With Love, From Me to You
Mallory
http://www.withlove-frommetoyou.com
That’s awesome, Laura! I did something similar, but with gold paper, but into stars. Love it!
That’s really really cool, love how it looks even better with this beautiful pink shade, very nice!
xo
Melodie
http://www.happymelodie.com
So cute!!! Definitely pinning this for closet ideas for my house. We purchased a fixer upper in 2015 and still don’t have any closet doors up gahhh! One thing I might do is get gold hinges, or spray painted the hinges gold to match the handle but reallly such a minute detail that will be hardly seen hah. Love your creativity!! <3
Can you put the author at the top, so we can see who is writing the post without having to scroll down?
I agree with rebecka- it’s nice to see the author of the post at the top.
Love Love Love this DIY! Your nursery is going to be so perfect for little Gummerbaby! The rug looks gorgeous too! One suggestion though, from one momma to another – those plants look amazing in there right now but once your baby is mobile (crawling) you are definitely not going to want to have a fiddle leaf fig (or any other plant or decor object) balanced on a side table that the baby can grasp or pull down and the floor plant is a tad spiky for little eyes and will also become a favorite snack for bebe (or at least the dirt in the planter will). Maybe more of your awesome hanging planters for this room?
This is such a fun idea! Very Palm Springs vibes. 😉 Your and Elsie’s kids are going to have the COOLEST bedrooms – I’m jealous, haha!
http://www.wonderlandsam.com
That pink is so pretty! and what a fabby idea x
This is such a fun project! I love it!
Paige
http://thehappyflammily.com
Awesome idea, I had old style sliding doors and just got rid of them and went with a curtain. I like my curtain, but this is very stylish. Also your cat looks like one of my cats.
So pretty!! Great job!!!
Hi Laura, On my own, I think the metal accordion doors actually add some personality to the room, especially for the fact that they are easy on the eyes. The color palette match and the wall paper makes the room more attractive. I really like the result of this DIY project, it is sweet and inspirational.
Wow, this is so cute. I love this closet door project, your hard work has really paid off in the final result. If I’d do this, I’ll probably do a neutral color to make it useful for both girls and boys just in case.
This is such a fun project! I love it!
🙂
Love Love Love this DIY! Your nursery is going to be so perfect for little Gummerbaby! The rug looks gorgeous too! One suggestion though, from one momma to another – those plants look amazing in there right now
http://sprayerguide.com/best-paint-sprayer