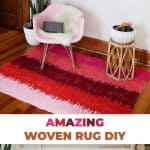
If you’re itching for a repetitive project to fill your longer fall evenings or just really want an excuse to rewatch all four seasons of Hart of Dixie on Netflix, you’re in luck! Will this handwoven rug take you hours upon hours to make? Yes. Will your enthusiasm fade after the first two episodes? Yes. Will you grow weary of it 1/3 of the way through and be tempted to throw up your hands in surrender only to realize if you don’t power through the tedium, you’ll have an awkwardly large loom forever leaning against your wall mocking you? Yes.
But then…then you’ll realize you’re about halfway up your loom, and suddenly it’s starting to feel like you might finish this thing! Once you graduate from weaving while sitting to weaving while standing, you’ll find yourself resisting the urge to take hourly selfies in front of it. You’ll finish that final episode of Hart of Dixie, Season Four and not even notice because you’re laser focused on your last section, and suddenly you’re finished! Woohoo! You’re also the very proud owner of a one-of-a-kind, 4.5″ x 6″ handmade rug that will surely impress anyone that darkens your door.
Be warned that should you complete your own handwoven rug, your friends will threaten to steal it from your home or request you make them one for Christmas. It’s just par for the course. Tell them you’re happy to point them in the direction of a good tutorial.
My design inspiration came from this image that was highlighting a specific technique. I was so charmed with the static lines that I decided to mimic them in my own pattern and settled on five colors that I knew would create a bold statement. It’s not so technical that it requires a lot of counting and not so simplistic that it’s underwhelming. I’m so happy with how it turned out!
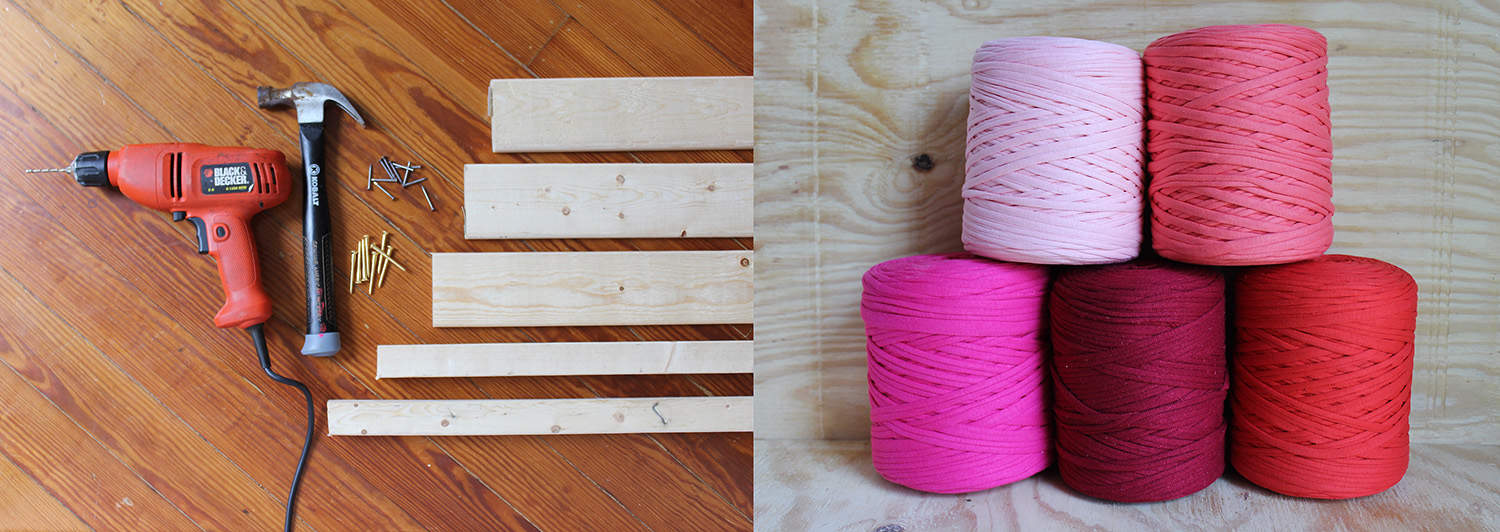
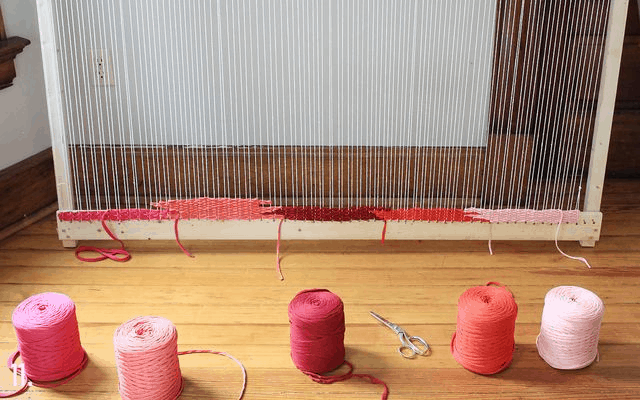
Supplies:
– two 2″ x 2″ x 8′ pine boards
– two 1/2″ x 4″ x 8′ pine boards
– twelve 1.5″ wood screws
– box of 2″ nails with small heads
– power drill and bit to match screw size
– hammer
– 100 yards of cotton twine
– five spools of jersey yarn in 150 yards each
– tapestry needle for finishing work
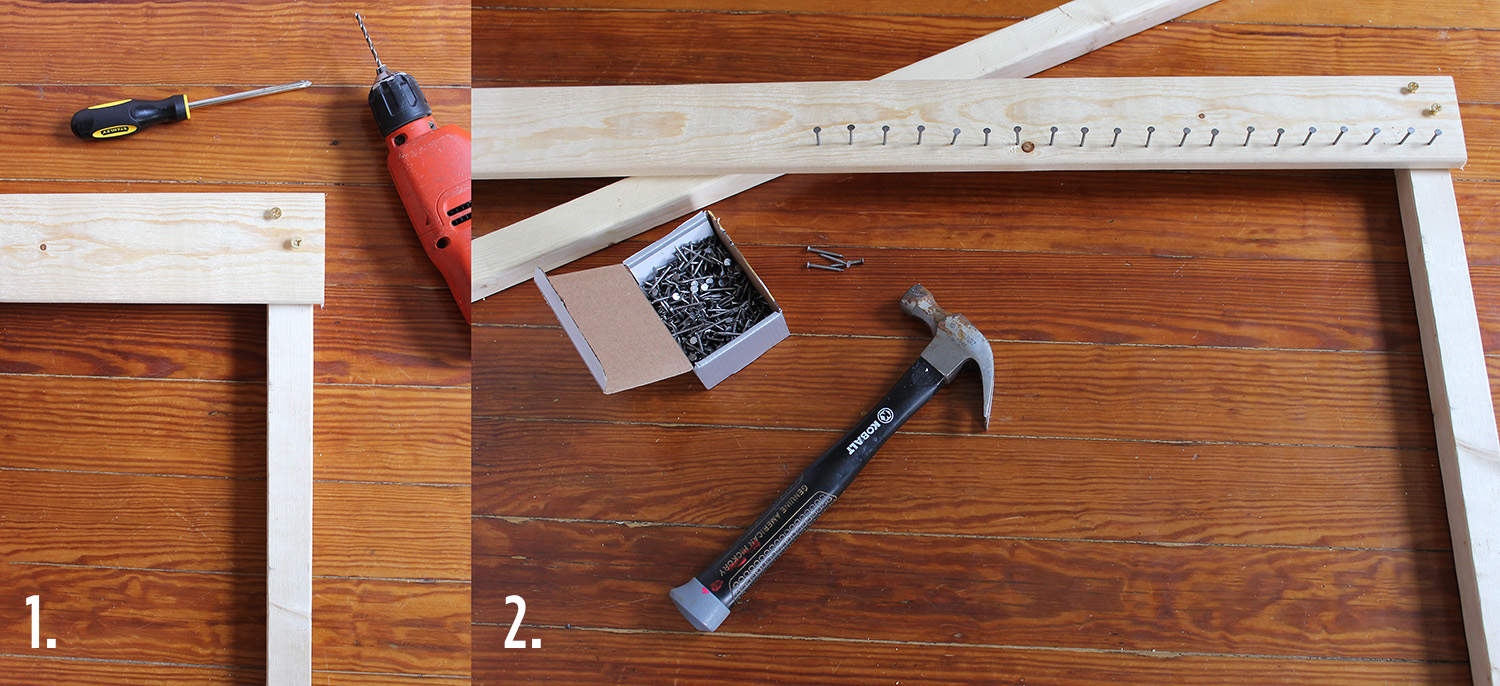
Step One: Cut down your 2″ x 2″ x 8′ boards to 6′ long with a handsaw or have it cut at your local lumber store. Cut both of your 1/2″ x 4″ x 8′ boards in half (or have it cut at your local lumber store), and then set one of your halves aside.
Create a rectangular shape with a third 4′ board resting in the center. The 4″ wide boards should rest on top of the 2″ x 2″ x 6′ boards. Pre-drill two holes in each corner where your boards overlap and two holes on each end of the center board. Add your screws.
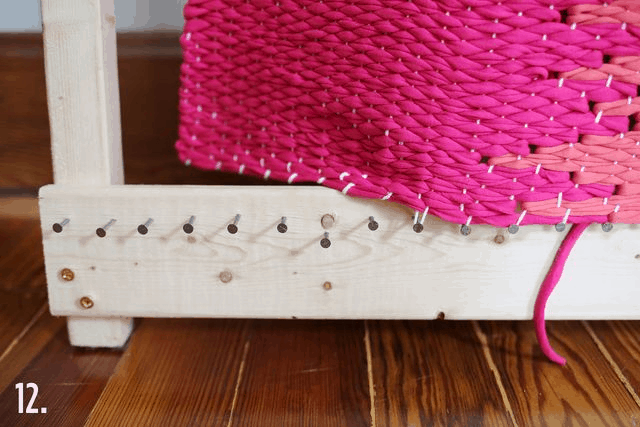
Step Two: Place one of the cuts from the 2″ x 2″ x 8″ boards under one of the 4″ wide boards for support. Hammer nails across the top board so that they are evenly spaced. I suggest about 3/4″ apart and at least 3/4″ from the edge of your board.
Step Three: Repeat on the bottom board. Be sure you have as many nails on the top as on the bottom.
Step Four: Starting in one corner, tie a loop-knot and wind your cotton warp up and down and up and down across the entire frame. Tie a loop-knot and hook over the last nail.
Step Five: Divide your warp up evenly into five sections by marking the center of each section with a strip of the jersey yarn for that section. This will serve as a guide so you don’t end up with crooked columns.
Step Six: Start weaving your center section with a 5′ strip of jersey yarn with your fingers. Leave a 4″ tail on the back and weave through about 20 warp rows (10 nails). If you’re looking for more thorough steps on weaving, check out this tutorial.
Step Seven: Weave back the way you came but weave past the row you started by another row or two. Create little rainbows as you push your yarn down so you’re not pulling too tightly on the warp rows.
Step Eight: Continue weaving back and forth so that no two weft rows are stacked evenly. You want to create a zigzag effect.
Step Nine: Weave your next section in and make sure you fill in the gaps by weaving all the way in. It’s like dancing the cha-cha. If one of your jersey yarns is thicker than the other, you may want to weave two rows of the thinner yarn for every single row of the thick yarn to help them stay even all the way up your rug.
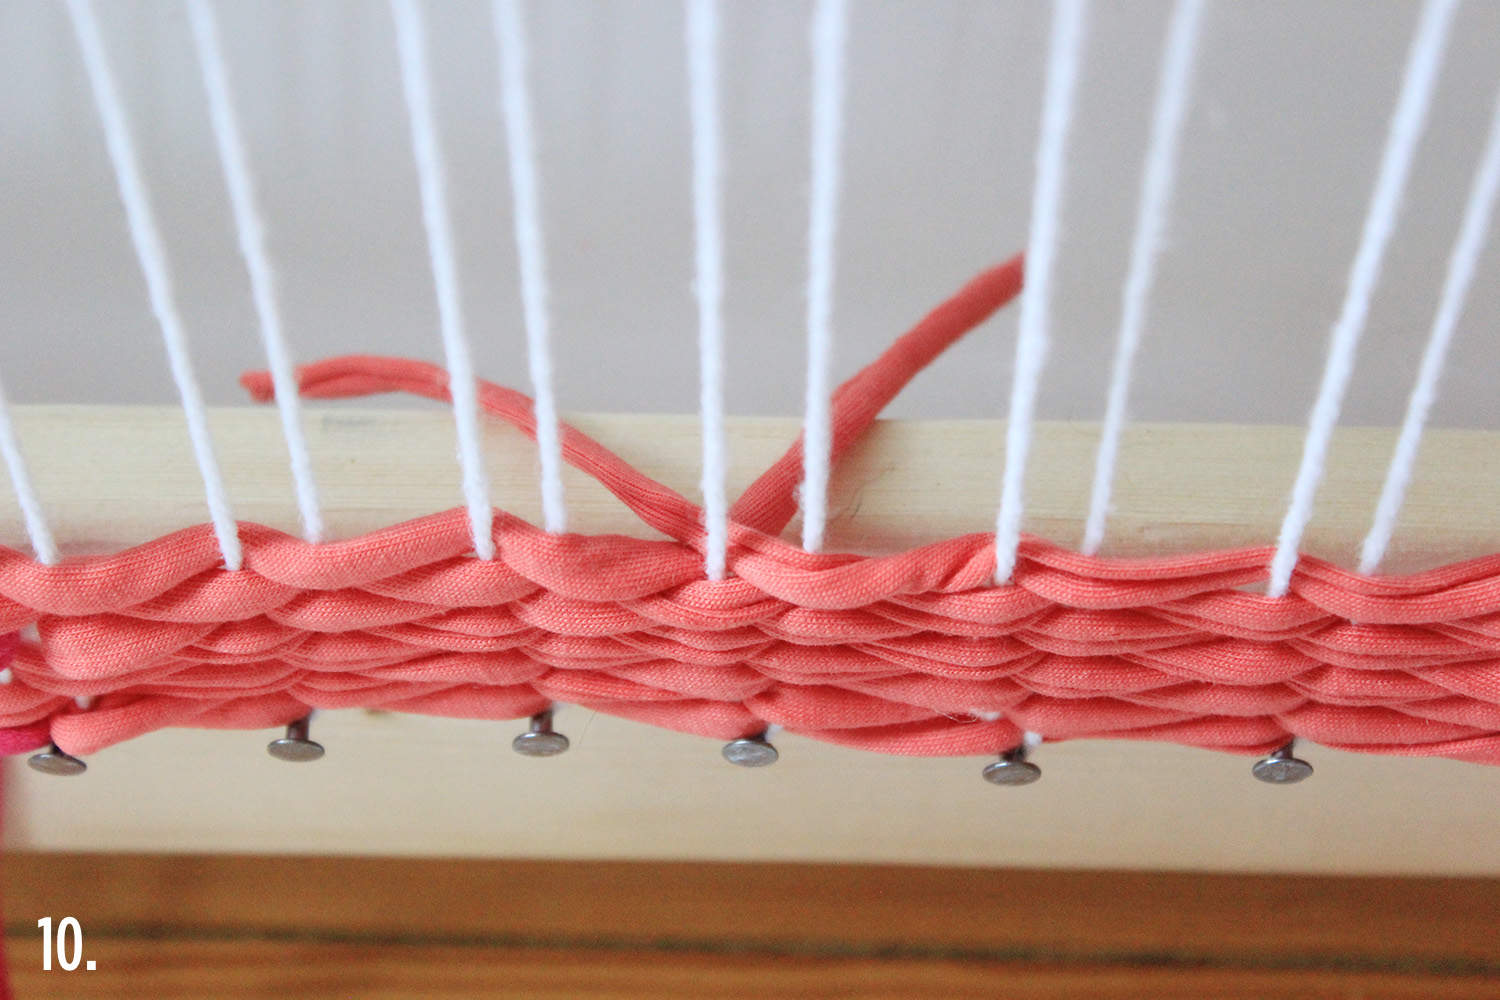 Step Ten: When adding in a new color or just another length of yarn in the same color, be sure your two tails overlap behind the same warp row as shown. This will create a seamless look on the front.
 Step Eleven: I suggest working on one strand of color until you run out and then moving to the color next to it so that you’re still working from left to right while you are working up your loom. If you just do peach all the way up and then burgundy all the way up, your warp strands might start to pull in and you’ll get a less even rug. Be sure not to pull tightly as you weave to avoid the hourglass shape!
Here’s evidence of my halfway point. I was so worried I would run out of the center color before getting close to my desired height, but I ended up having just enough. Phew!
 Step Twelve: Once you’ve woven as high as you’d like, carefully remove your warp from the bottom row of nails. Gently pull them up and over the nail heads, and then adjust your jersey yarn as needed.
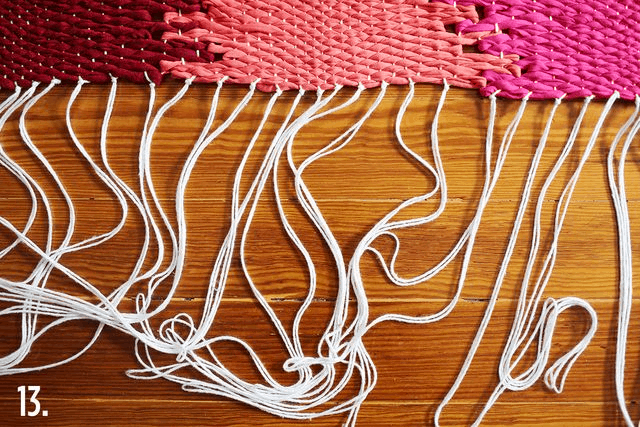 Step Thirteen: If you haven’t already, lay your loom flat on the floor. This will keep your rug from stretching out unevenly as you unhook the top warp rows from the nails. I had about 2′ of space between the top of my rug and the top of the loom. Tie each pair of warp rows in a knot closely to the top rows of jersey yarn.
Step Fourteen: Use your needle to stitch each knotted pair of warp down the back side about 4″. Continue all the way across the top. Trim excess. This will hide your ends. You can also tie knots in your yarn tails on the back side. If they are too thick, you can leave them alone and it’s unlikely they’ll unravel, but be careful when you wash it. I suggest spot treating your rug or hand washing it and letting it dry flat or over an even surface.
The total cost of this project was about $85 worth of supplies (minus my drill that I already had) and about 15 hours of my time. It’s incredibly satisfying to finish any kind of creative project, but this is one you’ll want to keep forever. I love knowing I have the skills to create beautiful pieces for my own space that help reflect my personal style and that I (mostly) enjoyed the time it took to bring it to fruition. You will, too! –Rachel
If you need another fun challenge, you can also try this woven rug I made from cotton sheets. It’s still working hard in my studio and has survived the washing machine more than once!
Credits// Author and Photography:Rachel Denbow. Photos edited with A Beautiful Mess actions.
59 Comments
Amazing, Rachel!
xx- Elsie
Beautiful …. Kudos, great job. #loveofrugs
This is so gorgeous, will pass the info on to my sister who will make it for me (fingers crossed!)
http://vodkaandarose.blogspot.co.uk
ooop, I love this!
Wow, so much talent!
xoxoBella | http://xoxobella.com
Beautiful! And so practical at the same time. Best kind of project!
This project and the outcome are so impressive. AMAZING work!
This is so pretty, I love the design and colors!:)
Very cool. I definitely will be filing this away under “things to do when I’m starting to hate winter!” : )
This looks great! Who knew weaving a rug could be a DIY. Thanks for sharing. I have one question: where did you buy all that jersey yarn?
Beautiful!!!
I’m tired just reading the first step. Looks so cool though.
I like these kinds of DIY’s ! Thanks for sharing this amazing one.
Xx, Clem ♥ thepopblog
Very pretty love it! http://www.hannamarielei.com
Wow this is so inspiring! First I thought “ok you`ll never do something like this” but after reading the tutorial I`m totally into it! Project for the next summer holidays? I think that sounds perfect! 🙂
http://www.carolinespassion.wordpress.com
This is so beautiful! I’m not sure if I have the patience to make anything sizable, but I could totally make a doormat or something 🙂 Thanks for the idea!
love the jagged lines in that rug! it creates an interesting ‘live edge’ quality to the striping. nicely done 🙂
So much dedication to make this. I’ve been needing a new rug for my dorm and a new project to take up some time….. eeeepp.
x Theresa
Wow! This is so impressive! I need a rug for my office. I may try this.
Could you share where the jersey yarn came from? The cost of this seems super low based on the price of jersey yarn I’ve seen.
Thanks!
I love this rug! I definitely want to give this a try when we move into our new house next year!
Paige
http://thehappyflammily.com
You ladies continue to make my DIY list grow and grow. This looks likes so much fun and a great weekend project. I LOVE LOVE LOVE it!
http://www.throughmyowneyes.com
Do you think I could easily alter the size of this, to make more of a runner for a hallway?
That first paragraph describes SO MANY of my projects. Well done for completing, the results look amazing!
Awesome!! I’m already imagining what I can do with this…
As a side note, it looks like Rachel has a similar home to mine… stained wood floors, doors, and trim. I would love to see some ideas as to how to decorate with so much “built in” wood! I love the warm look, but when furniture shopping, it can go into too-much-wood or mismatchy territory quickly! Apologies if you’ve covered that before and I missed it!
I was wondering the same and was looking around and saw this: http://www.woolandthegang.com/product/jersey-be-good/yarn-and-wool/V455250246
its 11 for 105 yards so for 750 yards (5 spools of 150 yards- as needed here) it’d be right around 80
I love this rug! Where did you get the chair from, though?
What an amazing project! And really impressive how you kept working on this, I would have thought this over halfway through. And those colours are absolutely beautiful!
https://www.makeandmess.com/
My question also!!! Haven’t found anything quite like around the interwebs yet.
This is awesome! Where do you get your t-shirt yarn from? I can’t seem to find it anywhere!
The color palette is amazing, I am loving it! Great rug. Never done this king of project before but this post is inspiring me to give it a try!
Success!
First I thought it was a store bought rug, now I know that you made it yourself, then it is even more stunning.
The colours are gorgeous.
I going to have to share this around!!
Well Done.
I have been searching and searching for rug options. I was basically set and now I want to make this! I want to real bad! Oh so pretty! xo
Wow, Rachel!! So beautiful and congrats on finishing such a project! I want to go through the agony of doing this now, but I think I will have to rewatch all the reruns of White Collar!
What a labor of love! It turned out great. I’ll keep this in mind next time I’m searching for a tedious but impressive project to do in front of the tv.
I love this rug.
It is soooo wonderful!
Greetings & Love
Ines
such a great idea! not sure if i’ll have the patience but i’d love to give it a try for my little man’s nursery 🙂
Wonderful ! So beautiful idea !
This is so awesome! Someday I’ll have to attempt this.
If I do…I’ll let you know at http://www.lumberandlaundry.com
Help!
Did I miss your source for 150 yard spools of “jersey yarn”? And is there a size or ply you suggest for cotton warp? Can’t wait to get started!
Himanshi,
I’ve just added the source for the yarn in the supplies but here it is, too. https://www.etsy.com/shop/GANXXET
Thanks!
Tina,
I’ve just added the source for the yarn in the supplies but here it is, too. https://www.etsy.com/shop/GANXXET
Thanks!
Melanie,
I purchased mine from Ganxxet Fabric Yarn on Etsy. Here’s the link:
I’ve just added the source for the yarn in the supplies but here it is, too. https://www.etsy.com/shop/GANXXET
Thanks!
Madeleine,
Absolutely! Just build a frame that is about 6″ wider and taller than your specifications or make two narrow rugs on the same wide frame and stitch them together at the short ends to make one long runner.
Katy,
It’s from Modernica. 😉
Justine,
I’ve just added the source for the yarn in the supplies but here it is, too. https://www.etsy.com/shop/GANXXET
Thanks!
Mary,
I’ve just added the source for the yarn in the supplies but here it is, too. https://www.etsy.com/shop/GANXXET
For the cotton warp, I just bought a cone of cotton yarn from Michael’s hobby store and they are around $13, I think.
Thanks!
Her sektörün ihtiyacını analiz ederek geliştirilen, satıştan satın almaya, muhasebeden finansa, e-ticaretten personel yönetimine kadar tüm çözümler için DİA yazılım kalitesinden yararlanın.http://www.dia.com.tr/ #Dia #yazilim #DİAYazilim
I love this! Quite Boho
You are so creative! I think your projects are one of the most unique ones out there:) I will hopefully recreate on for myself. Have a nice day, Sophia
http://www.littlesewingmachine.blogspot.de
Such high praise! Thank you for your sweet compliment. 😉
Wow! This DIY is so inspiring!!
Girls!
This is absa-frickin-lutely gorgeous !!!
I have to try this , , , , , one day 😉
<3
Pia
This is so beautiful! I’ve been on the lookout for new rugs and I’m obsessing over this DIY one! I want to try to make more of my own decor – this might be the place to start!
g.
Hello!
You can buy jersey yarn at ganxxet.com or at Etsy store of Ganxxet!
Nuria
Thanks Rachel 🙂
I’ll check it out. Thanks Nuria 🙂
Hi Rachel! I fell in love with this tutorial and just started my rug! and I already have a question… should the back side of the rug be towards you as you weave or the backside of the loom? Or does it matter? Thanks!!