") It’s probably no secret that we love washi tape here at ABM. We use it in projects all the time (like here and here), and we even have our own line of it now too! We’re working with our longtime supporters Chronicle Books on this post, who sent us a copy of Fun with Washi! The book is filled with washi ideas we hadn’t thought of, and it inspired us to make our own version of their pixelated washi heart, but we decided to do the heart as a wall decal on a much larger scale. Since the washi can be removed whenever you like, this is also a great decor idea for renters and dorm rooms.
It’s probably no secret that we love washi tape here at ABM. We use it in projects all the time (like here and here), and we even have our own line of it now too! We’re working with our longtime supporters Chronicle Books on this post, who sent us a copy of Fun with Washi! The book is filled with washi ideas we hadn’t thought of, and it inspired us to make our own version of their pixelated washi heart, but we decided to do the heart as a wall decal on a much larger scale. Since the washi can be removed whenever you like, this is also a great decor idea for renters and dorm rooms.
") Supplies:
Supplies:
-2″ wide washi tape (this brand is the best washi for walls)
-1/4″ washi tape
-X-Acto knife
-metal ruler
-cutting mat
") First you’ll want to use the 1/4″ tape to make a horizontal grid of lines that are far enough apart to fit your wide washi tape between them.
First you’ll want to use the 1/4″ tape to make a horizontal grid of lines that are far enough apart to fit your wide washi tape between them.
") Make as many lines as you need to achieve the height that you want (mine is about 40″ tall). You’ll notice that I made the lines shorter towards the bottom and top so I wouldn’t waste any thin tape in places where I wouldn’t be putting any squares.
Make as many lines as you need to achieve the height that you want (mine is about 40″ tall). You’ll notice that I made the lines shorter towards the bottom and top so I wouldn’t waste any thin tape in places where I wouldn’t be putting any squares.
") Next I added some vertical lines to the grid to keep all the hearts in line vertically as well. I marked every other square so I only had to use half the tape, and each space fits two squares with a 1/4″ space between them.
Next I added some vertical lines to the grid to keep all the hearts in line vertically as well. I marked every other square so I only had to use half the tape, and each space fits two squares with a 1/4″ space between them.
") To cut a lot of squares at once, use a large cutting mat and lay several strips of tape back to back horizontally on the mat. Make sure you can see the measurement lines on the top and bottom edge of the mat. Use your X-Acto knife and ruler to cut vertical lines every 2″. (I cut down every 2″ because that’s how wide my tape was, but if your tape is different, then cut your lines using whatever measurement that tape is). You should be able to peel off each square if you just lift a corner with the X-Acto knife.
To cut a lot of squares at once, use a large cutting mat and lay several strips of tape back to back horizontally on the mat. Make sure you can see the measurement lines on the top and bottom edge of the mat. Use your X-Acto knife and ruler to cut vertical lines every 2″. (I cut down every 2″ because that’s how wide my tape was, but if your tape is different, then cut your lines using whatever measurement that tape is). You should be able to peel off each square if you just lift a corner with the X-Acto knife.
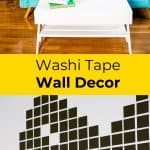
") All I had to do from that point on was fill in the heart starting with one square at the bottom middle position. Once the shape was as wide as I wanted it, I went straight up, made the little “humps”, and back down in at the center. If you want to make this exact shape, you can always just count how many are in each row and go from there. Once your squares are attached to the wall, just pull off the thin tape and stand back to admire your results.
All I had to do from that point on was fill in the heart starting with one square at the bottom middle position. Once the shape was as wide as I wanted it, I went straight up, made the little “humps”, and back down in at the center. If you want to make this exact shape, you can always just count how many are in each row and go from there. Once your squares are attached to the wall, just pull off the thin tape and stand back to admire your results.
")
")
") It’s just too cute if you ask me! Make sure to choose a good brand of washi (like the one I linked in the supplies) so you don’t have to worry about doing all that work just to have it fall right off the wall. Of course, if you ever move, get sick of it, or have a change of “heart”, just peel it off, and you should be good to move on to your next idea! xo. Laura
It’s just too cute if you ask me! Make sure to choose a good brand of washi (like the one I linked in the supplies) so you don’t have to worry about doing all that work just to have it fall right off the wall. Of course, if you ever move, get sick of it, or have a change of “heart”, just peel it off, and you should be good to move on to your next idea! xo. Laura
Credits // Author: Laura Gummerman, Photography: Laura Gummerman and Sarah Rhodes. Photos edited with A Beautiful Mess Actions.

47 Comments
Washi tape is such a gift to home decor addicts and artists everywhere. It’s simple, but it packs such a punch in projects like these! Really great idea and well executed, Laura 🙂
Cat
http://oddlylovely.com
This is such a cool (and doable!) project. That couch though is giving me life. Any info on type/store/etc?
This is awesome…hope i have the patience to align everything correctly… love this DIY…
xo
Hems
agoldentulip.blogspot.com
Haha I like the funny pun at the end!
super cool!
Yes — can we talk about where the couch is from? it is incredible!
I’d totally do this! But I think I’d keep the strips altogether (instead of cutting tons of little squares) though. It would make it easier to remove, maybe. I love the idea though 🙂
Omg, what a creative way to use the washi tape ! Great stuff.
http://www.kinikunormal.blogspot.con/
Wow, you must be incredibly meticulous to pull this one off! It looks great though, and it’s a plus that so little is required to make it 🙂 -Audrey | Brunch at Audrey’s
what a cool idea! 🙂
I love this idea! I have been all about washi tape the last couple of months, but have definitely suffered from some of the inferior brands falling off the wall. I can’t WAIT to get some from the ABM shop!
Johanna
http://www.ourjoyfulhome.com
my goodness you guys just keep getting more creative by the minute. This is so adorable!! I need this in my life!
This is awesome!!
I love you guys.
I’m wondering if you do gift certificates for the store? I know lots of people who would love free range in your shop as a Christmas present!
(Sorry if this is a double post – first time commenter, long time fan)
very cool! I wish you guys could come to my house and give me a few tips.
http://www.modeography.com
Very cute! I love the wash tape door way you did in the past that was in stripes!
http://www.tuskstails.blogspot.com
That is so cute! I love the idea
Xo
Diary Of A Mua
It’s from Joybird and I love it!! http://joybird.com Will share more details in my office tour soon.
xx- Elsie
Sadly, we do not have a gift certificate function to our shop this year. Maybe next year!
You can, however, gift a Happy Mail subscription.
xx- Elsie
This is a very-very nice idea! I will totally do this after I got my own room~ XD
gabbythegabby.blogspot.kr
I love washi tape DIYs! So affordable and easy! I did a post on how to make thrifted items your own, and washi tape is definitely one of my favorite ways!
Theresa
http://www.underhonesttrees.com
this is sooo cute!! my little sister would love this!! I’m gonna share it with her!! <3
http://itshalo.blogspot.com/
I love it 🙂 So cool!
This is so cute and fun to do! It may take time and patience but the result is amazing!
https://annescribblesanddoodles.blogspot.com/
Love this! Such an easy way to decorate a wall! Would be so cute for a kids room too!
http://sometimesgracefully.com
I borrowed this book from my library and had this exact same design half done on my kitchen cabinet when I saw this post! Clearly I like it. 😉
looka amazing
i LOVE the washi tape and the thousands of variations of using
great idea =)
this is so cute!
xx nikki
http://www.dream-in-neon.com
Hi! My name is Amelia Grace! I am 12 years old and I have been blogging for a few years. My blog is Amelia Grace (ameliagrace11.blogspot.com). I love A Beautiful Mess so much! I have been looking at your blog since my last birthday, when my friend gave me your photo idea book as a gift. I am a photographer, and I love all of your photography! I love your photo book! I am also really into fashion and art and I love all of your projects! 🙂 Your blog is so inspiring!
Amelia 🙂
Simple and beautiful. I’m super excited about finding out about this stuff just in time for planning my dorm room. Thanks!
Love this! Can’t wait to try!
http://life-love-craft.blogspot.ca/
Such a cool product!
xoxo Kennedy
Northern Indigo
This is too cute. I might do some variations of this in my kid’s rooms… BTW, love the color of that couch!
such a gorgeous project 🙂
Love this!!
AH! I adore this in so many ways. (Also, for a second I was like “How did the ABM bathroom floor end up on the wall?!” haha)
Adorable. It makes the room! I love the pillows and white fuzzy throw… will you share where those are from? Thanks!
Reggie
Adorable! It makes the room! I love the pillows and the white fuzzy throw… will you share where you got them? Thanks!!
Reggie
I love this! It’s so simple, yet such a big impact! And cheap! That’s my very favourite part!
Very pretty
Washi tapes have very adorable designs. I love how you used everyday washi tape to make a beautiful heart that lights up the living room.
I love how you decorated the room! It is gorgeous
I need more details about the couch! Can’t stop thinking about it and waiting for office post! Hurry hurry 🙂
Hi Reggie! The pillows are DIY: http://abeautifulmess.com/2014/05/geometric-wool-felt-pillows.html 🙂 -Jacki
Hi Elizabeth! It’s from Joybird 🙂 -Jacki
Hi Megan! It’s from Joybird 🙂 -Jacki
Amazing!!!
I looooooooooove this heart so much and think it would look super cute in a child’s room.