 Technically, we’ve only lived in two houses that we’ve owned, but I feel like I’ve already had a lot of experience with this area of changing lighting in a home. For someone that’s newer to the renovation game, you may have walked into a house and not been super happy with the lighting setup but not really realized that it’s something you can totally change (and it shouldn’t be a whole giant ordeal like some renovation ideas can be). Our current house had quite a few lighting areas that we redid, so I’ll show you some of the main changes and why we made them and then I’ll show you our newest fixture location in our front room being planned and carried out as well …
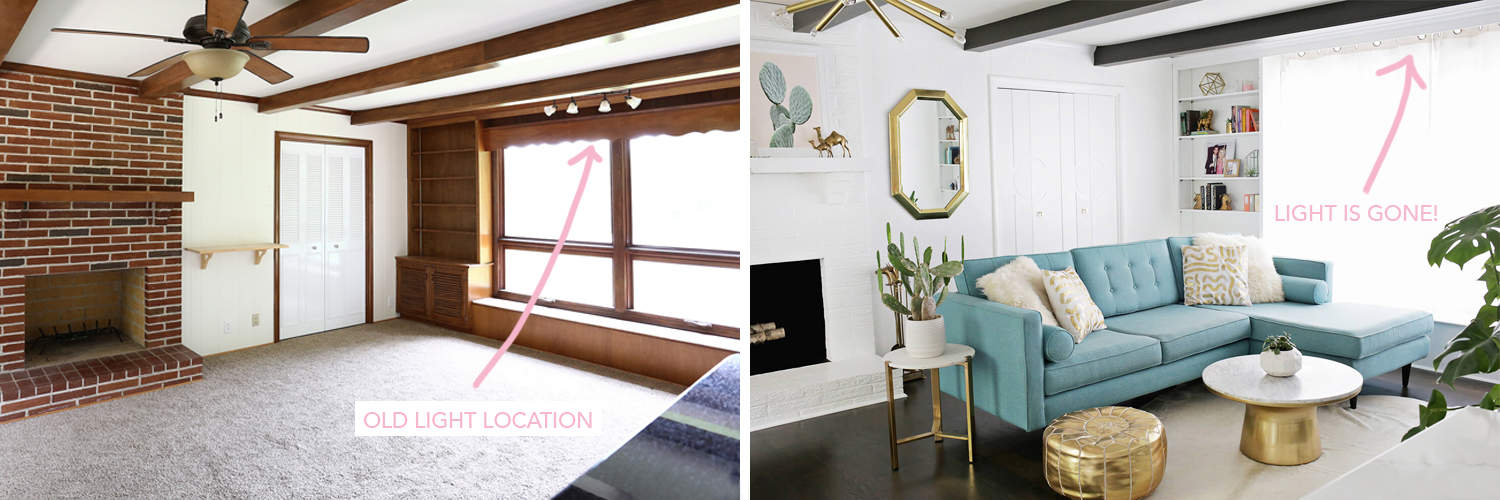 Remove lights that are unnecessary or an odd location: This light location seemed odd to me from the time we first entered the house. There was a long branch-like fixture with little spot lights on it, but there was nothing below it to light up other than a window ledge, so it just felt kind of useless. I could have tried to salvage the odd location with a new fixture in a style I liked better, but since I was pretty sure I never wanted to turn the light on at all, I just decided to have an electrician remove the light and smooth the ceiling like it was never there. Pretty inexpensive and quick to have done. Lights to remove in this category are ones that you look at and say, “Why is that there??”
 Add lights that help define a space as separate: The opposite side of that long den room is a spot where we added a light! Over by the window I decided I wanted a little breakfast nook table and to make it feel like a separate “official” space I added this pendant globe light above it. It helps give light to the table since it’s a little far from the main light for the room (I have all overhead lights in the house on a dimmer so they are more of a soft glow as needed) and a light above the table signals that this is a separate area from the couch, and makes it feel more official than just a random table by a wall. I needed the help of an electrician on this one too as they had to add a connection for a light in that spot and tie it to a switch to make it functional (I used the old switch for that odd branch light by the window in the example above so that saved some money there!).
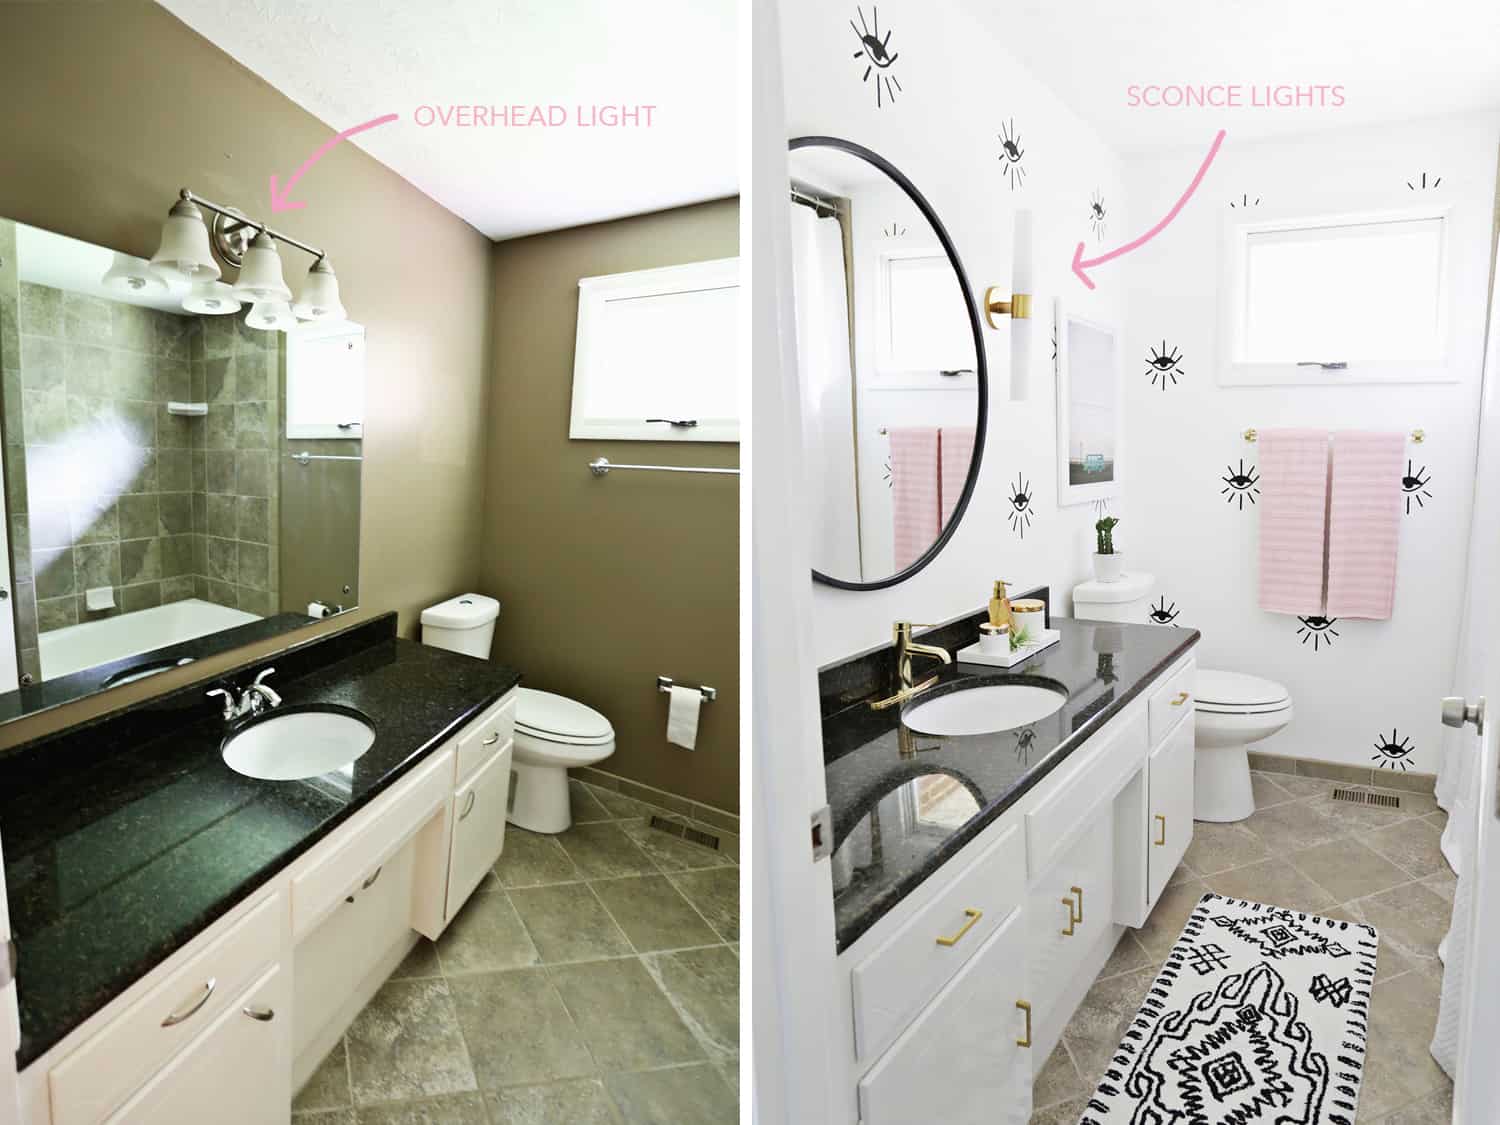 Change lights that aren’t flattering: If you feel like there are lights that aren’t flattering, you can switch the location! I know there are a million bathroom lights that are meant to go over the mirror (and cool looking ones at that), but it’s juuuuuuust not my favorite in a bathroom or anywhere there’s a mirror you’re looking in for a decent amount of time. No matter how pretty the fixture, I have never used a bathroom mirror with an overhead light and thought, “Wow, this lighting is really flattering!” Never. Anytime I’ve had that thought it’s always been with sconce lights where there are at least two lights on either side of the mirror near face height (or in some bathrooms that have more of the “ring light” type mirrors but that may be a little extreme for some tastes).
You can see we moved that location of lights with our electrician in our guest bath and it made a huge difference in there. That may be just a personal preference on the overhead vs. sconce debate, but that’s how I feel on that issue. Regardless of how you feel on that if there is a space where you feel like people look kind of ill when you look at them, think about where the lighting is and if it’s too harsh/bright or in a bad location. If it’s the location you can move the box to a different area to not be the only direct light source in the room. Or you can add a dimmer to not make the light so bright, change the warmth of your lightbulb color, or you can add some floor lamps or wall lights to help fill in the light and have it coming from other directions as well (or all of the above!).
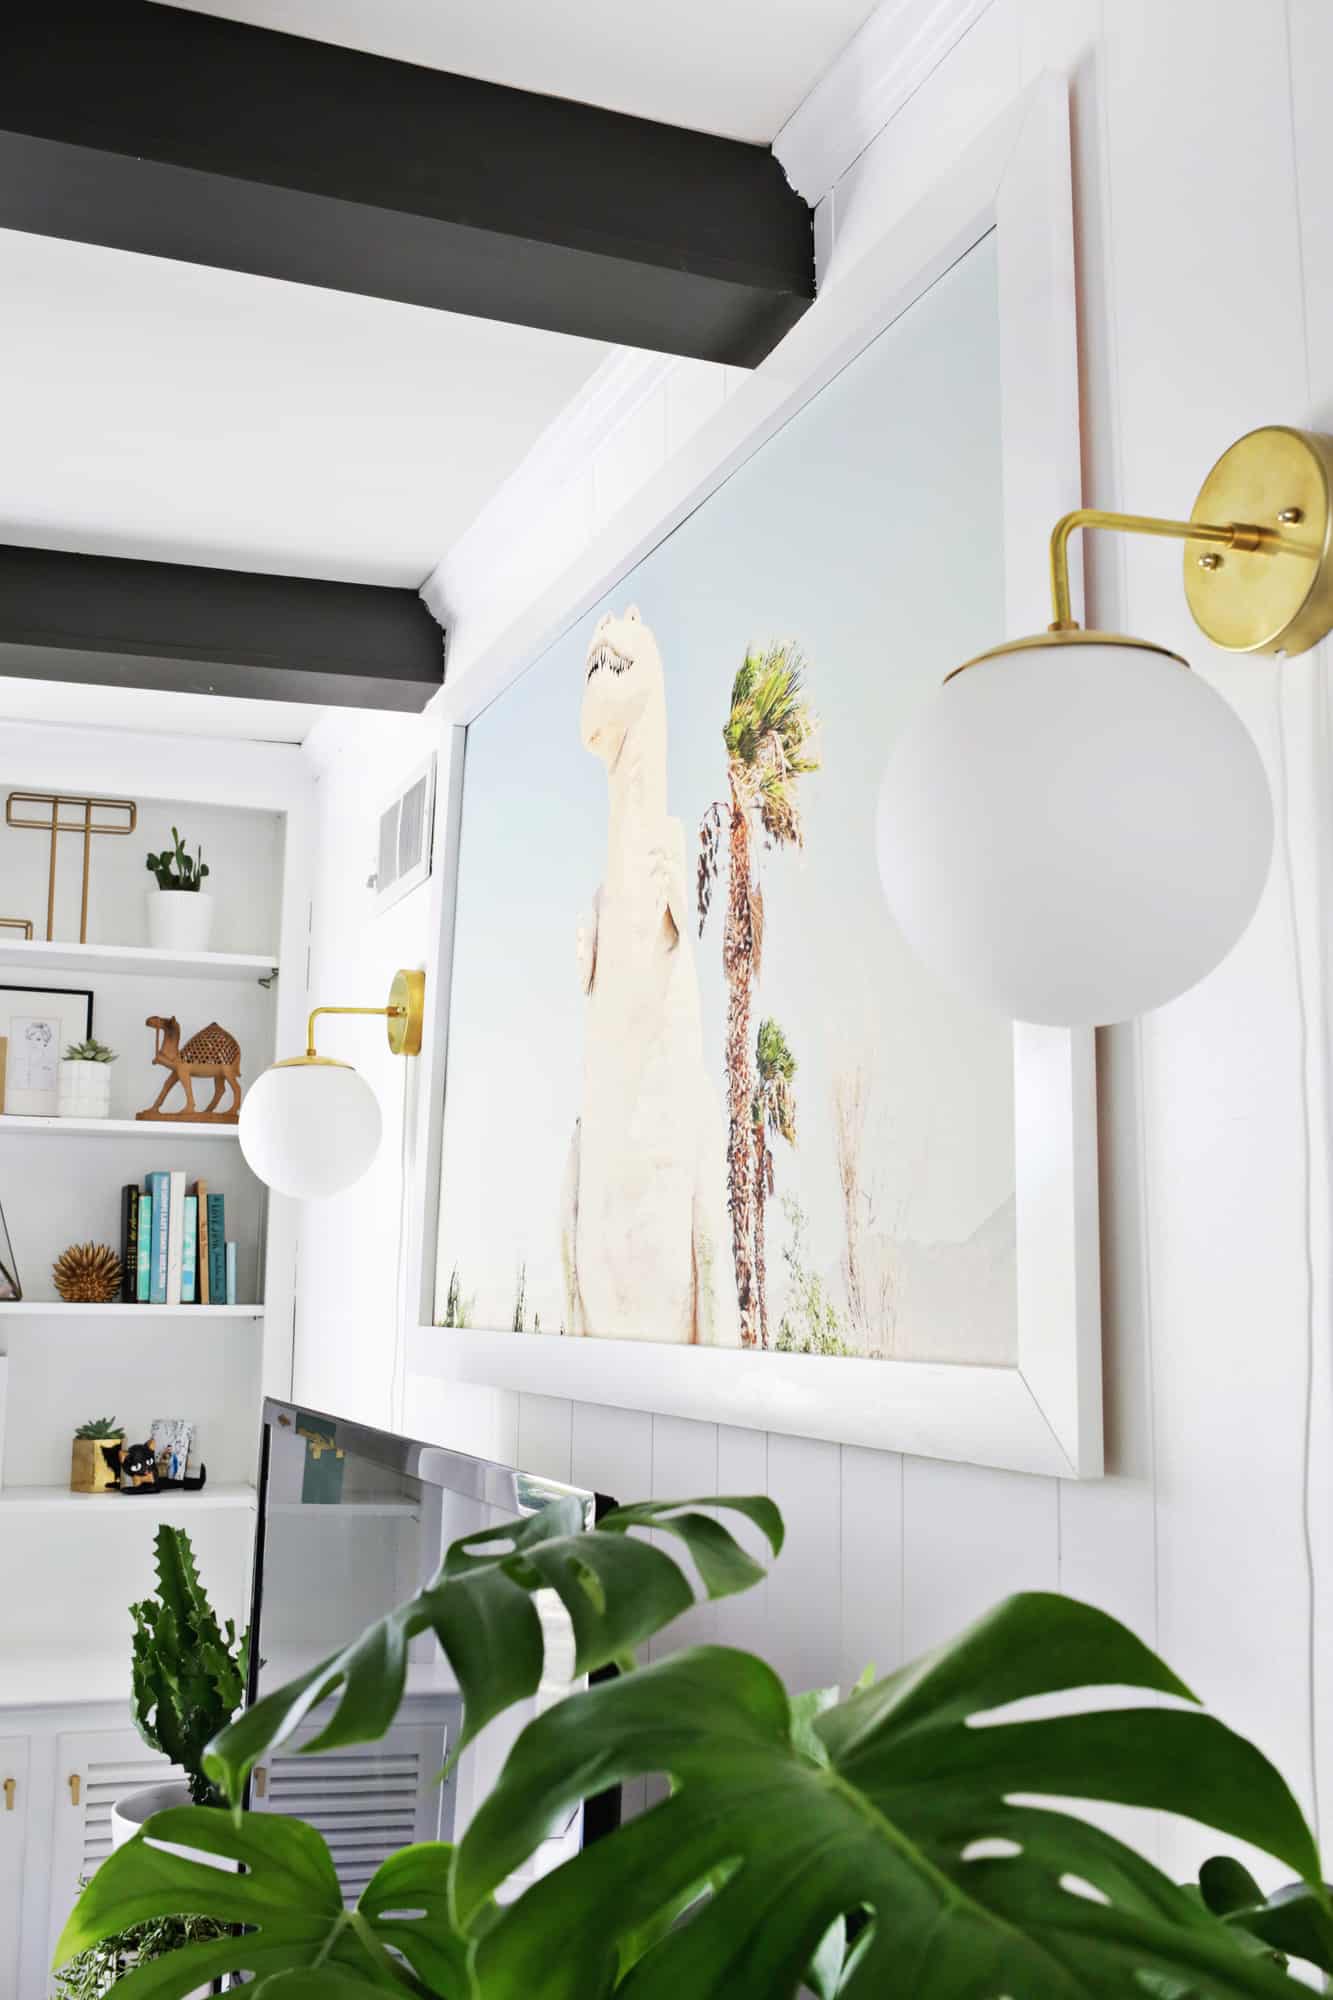 Add lights when other lighting isn’t adequate and lamps are awkward: Speaking of adding more lights, the last tip is to add more lights when what you have isn’t quite cutting it and it still feels dim. I think most of us have been in houses or rooms where there’s one overhead light for the room, but it’s just not bright enough to where it feels a little dim and sad rather than dim and cozy. You can definitely fill in the lighting gap with some floor or table lamps (you can buy dimmer switch cords for lamps which I highly recommend) but also think about some wall mounted options. I added two of these DIY mid-century sconce lights on either side of our TV and they were perfect for filling in a light gap on that side of the room. There wasn’t really a space I could put a lamp that didn’t feel awkward or wouldn’t have a cord running across the floor. So the wall mounted lights were just what we needed and since they are plug-in lights I didn’t have to have an electrician install anything, so that made it a little more affordable too.
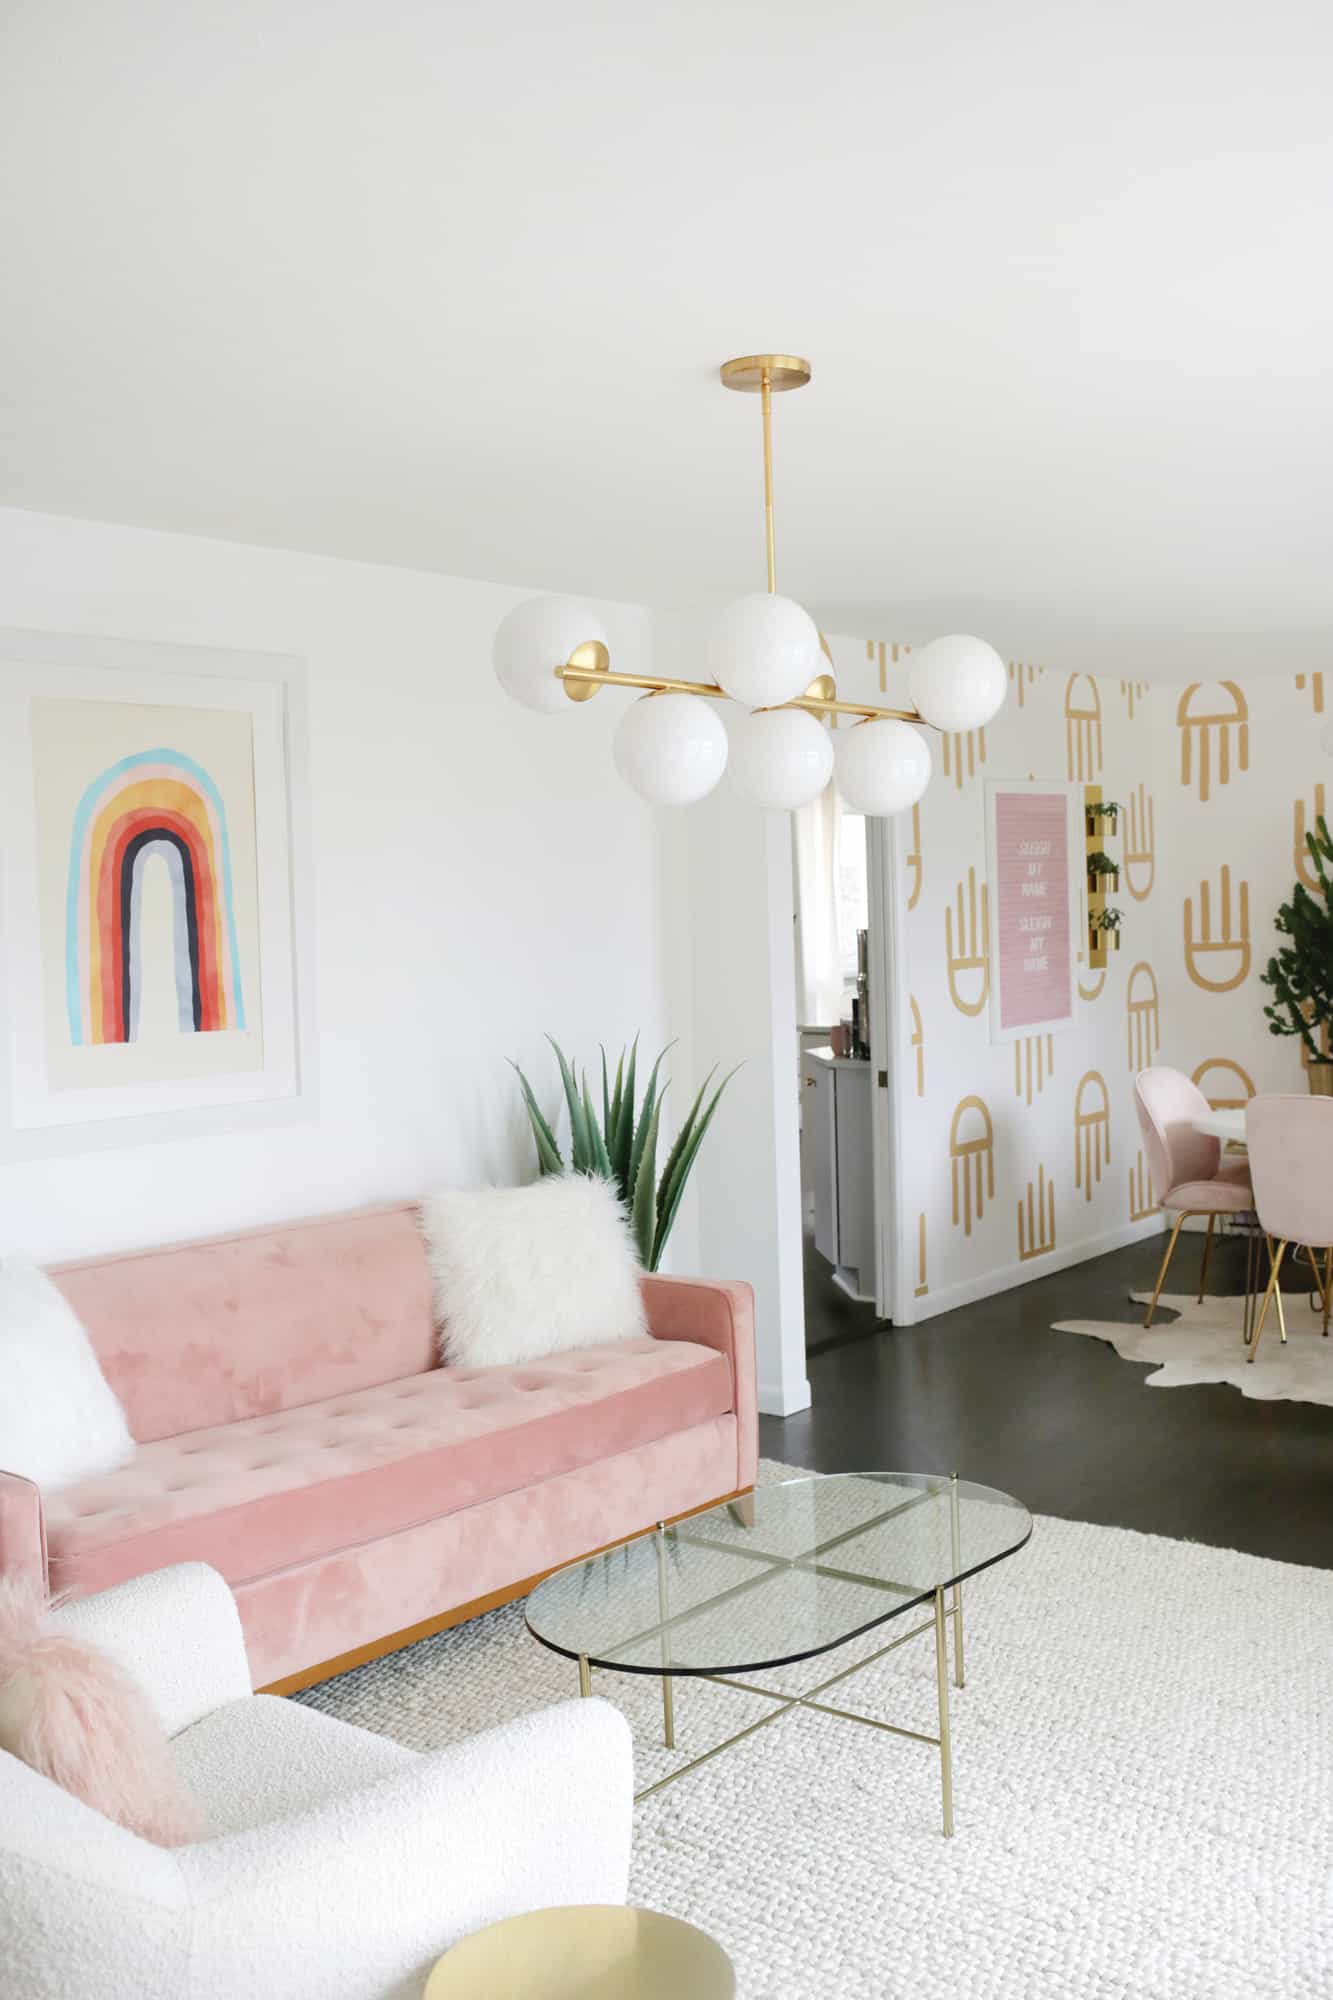
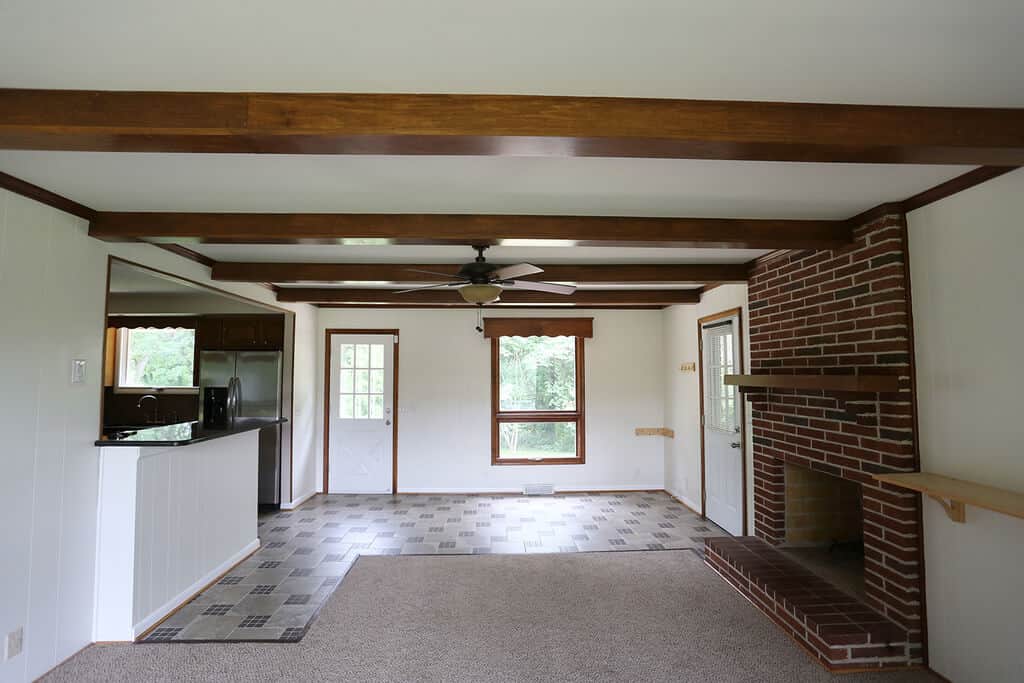
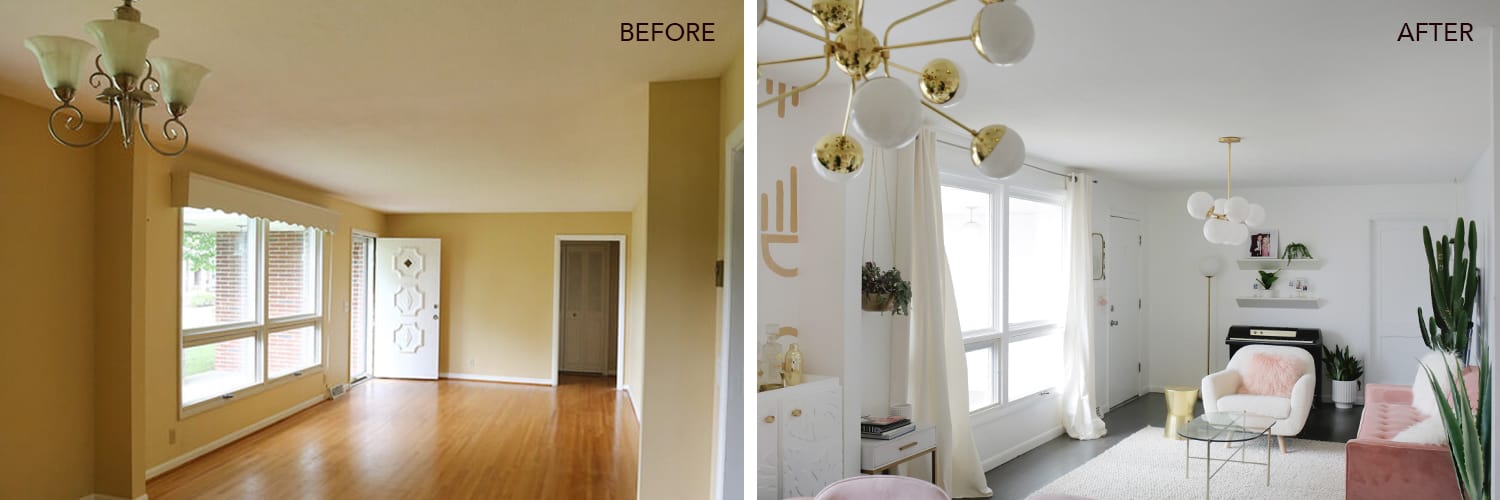
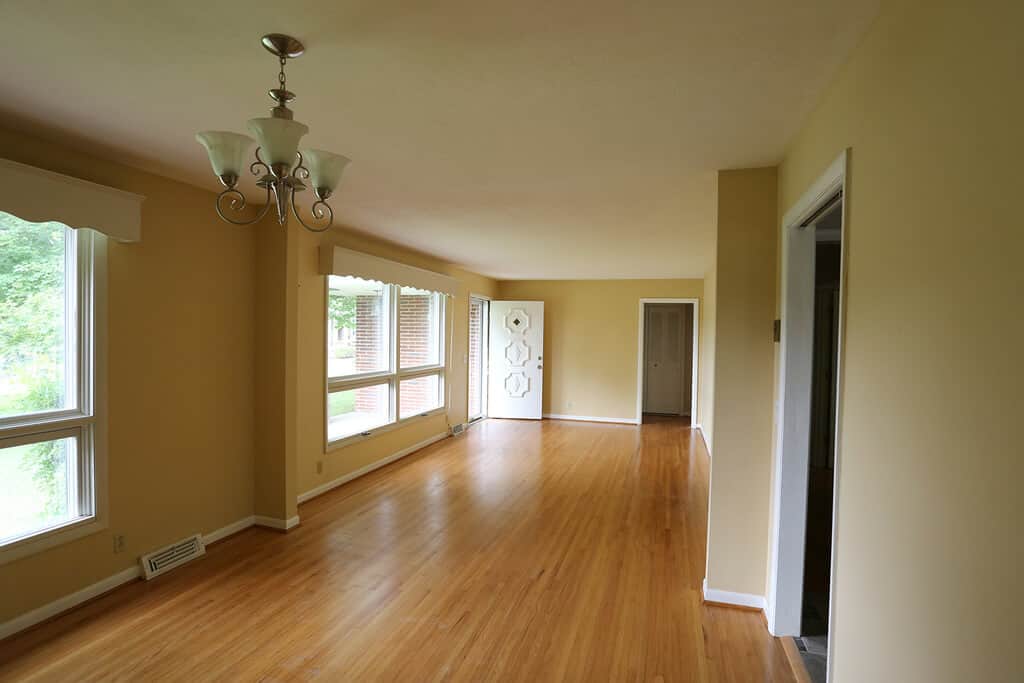 OK, so for the present day example, you can see in this “before” photo of our front room that the dining table light is all the way on one side of the room and then there is just a long area with no light fixture at all. We have a couch, chair, and coffee table on the other side and it’s the main area where we sit and hang out for parties, but it’s just always felt too dark over there. Even with a lamp, I just don’t get the light coverage that I want in that 2/3 of the room and a light there will help designate that as a separate space as well. If this room was used for one purpose with one central action area (like a den that’s just for sitting or a dining room with only a table) and it needed two fixtures, I would probably center the fixtures evenly and use the same light for both spots like Elsie has in her den. But since the areas serve two different purposes and are decorated to be separate (our dining area has a painted wallpaper on that section), I chose this mid-century light as a complimentary cousin light of the chandelier in our dining room and I think they work really well together.

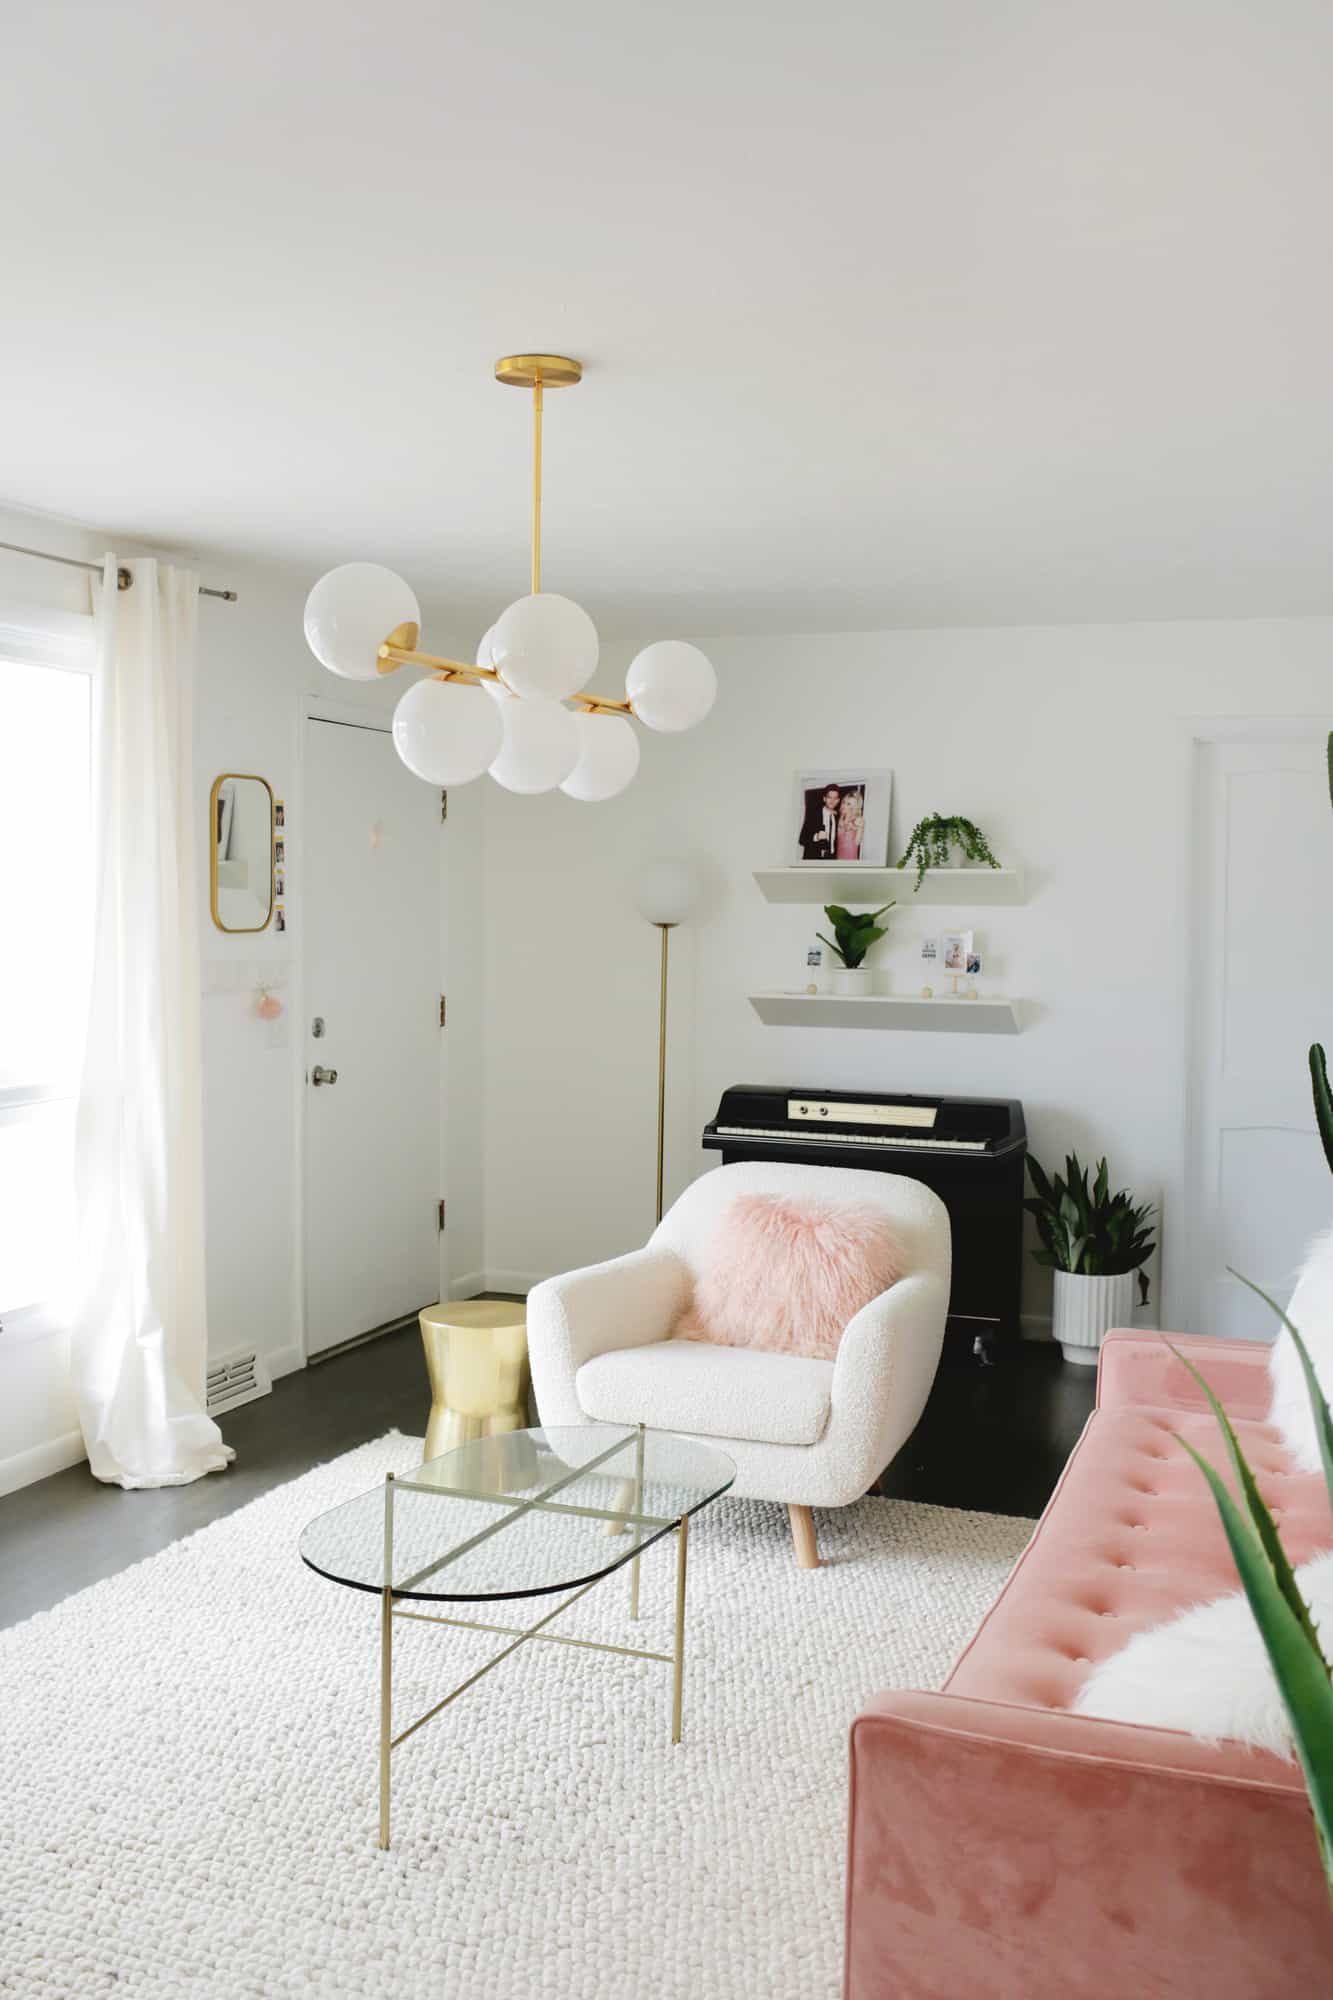 I had an electrician come out and add a light box for that area so we could install the fixture there and they put that light and the dining light in the same switch location so we could turn on and off the lights for the whole room in the same place. I also had them add separate dimmers for both lights so they can be controlled separately as well. I was laughing because when the workers were done, they said it looked so much better and it really balanced out the room to have the second light and I was like, “I know! I agree!”
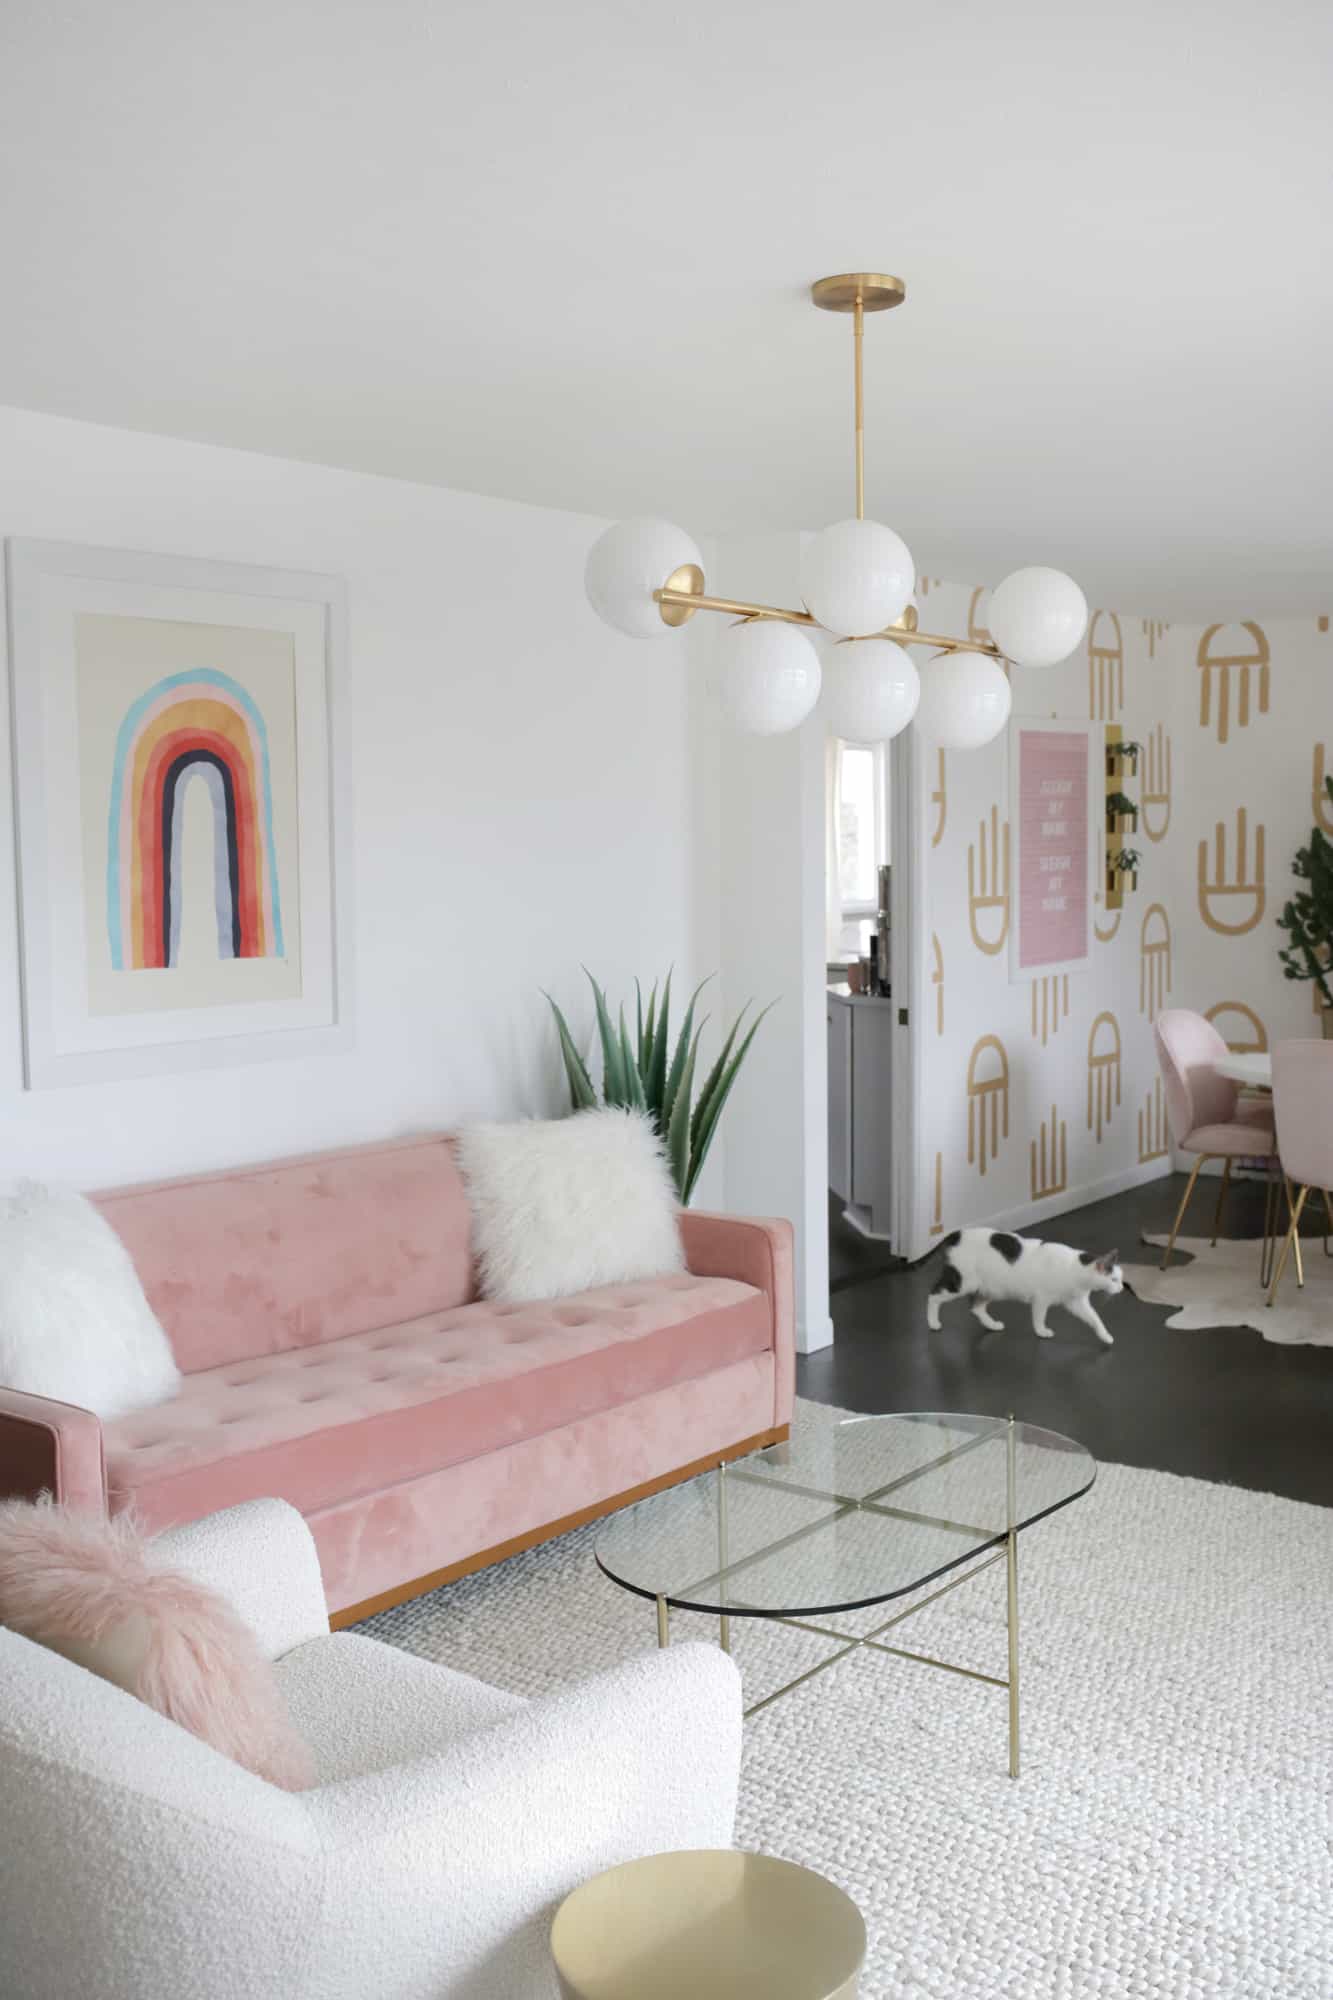 See how pretty that looks? It absolutely does the duel purpose of adding light to that area of the room and defining the space as it’s own area—love it! I would definitely suggest having the same type and warmth of bulbs for fixtures in the same room. Otherwise, one can really stand out in a bad way if you have cool-toned LEDs in the one and warm incandescent bulbs in the other and they are on at the same time at night.
So now you know your lighting options when thinking about changing up the lighting in a home! It’s definitely a good thing to keep in mind when changing a space (or changing the functionality of a space you currently use) to know what’s possible and that it’s not a huge renovation project like some other home things can be. Hope these tips are helpful the next time you’re thinking about a lighting change! xo. Laura
3 Comments
Love looking at the before and afters, even though I don’t have a house of my own to play with (yet). Thanks for sharing! 🙂
Charmaine Ng | Architecture & Lifestyle Blog
http://charmainenyw.com
Beautiful job girls! I love your work and use of color!
Hi Laura! Looks great! Just wondering what you paid to have a light box installed.