") I’ve been trying to think of more ways to add greenery to our new house, and while I love how my hanging gold bowl planters turned out, I needed something that could work on a smaller scale in our dining room area. I was playing around with making holders out of clay, but then I saw these little round wooden jewelry boxes and thought they would be just the right look once they were cut in half. Projects like these are the reason I love having a jig saw—they are super inexpensive and easy to use, but a whole new world of possibilities is opened to you when you have one. Don’t be intimidated by the word “saw” because you can totally use this one!
I’ve been trying to think of more ways to add greenery to our new house, and while I love how my hanging gold bowl planters turned out, I needed something that could work on a smaller scale in our dining room area. I was playing around with making holders out of clay, but then I saw these little round wooden jewelry boxes and thought they would be just the right look once they were cut in half. Projects like these are the reason I love having a jig saw—they are super inexpensive and easy to use, but a whole new world of possibilities is opened to you when you have one. Don’t be intimidated by the word “saw” because you can totally use this one!
") Supplies:
Supplies:
-small wooden jewelry boxes with removable lids
-jig saw
-glue
-balsa wood
–1/2″ cup hooks
-small gold chain (check chain section of hardware store)
-waterproof caulk and sealer (optional)
") Use a small screwdriver to remove the lid from the box. Mark down the center of the bottom and sides of the box to divide the box in half. Use your jig saw to cut the box down the line into two equal halves (go down one side, across the bottom and up the other side).
Use a small screwdriver to remove the lid from the box. Mark down the center of the bottom and sides of the box to divide the box in half. Use your jig saw to cut the box down the line into two equal halves (go down one side, across the bottom and up the other side).
") Trace the open side of the box onto your balsa wood and cut out a back panel to close in your half box. Use glue to secure the balsa wood to the box and allow the glue to fully dry.
Trace the open side of the box onto your balsa wood and cut out a back panel to close in your half box. Use glue to secure the balsa wood to the box and allow the glue to fully dry.
") Paint the outside and top lip of the planter with paint. When the paint is dry, you can waterproof the inside of your planter if you plan on using live plants on your wall. I would seal the inside seams with a waterproof caulk and then spray the inside wood with a waterproof sealer. These are small plants in small containers, so they shouldn’t need that much water at one time, but it’s good to waterproof them to protect your wall and floor. I have been finding some really good faux succulents at craft stores lately, so I decided to put in real dirt but fake plants. The dirt totally helps trick you into thinking they are real, but you never have to remember to water them—WIN!
Paint the outside and top lip of the planter with paint. When the paint is dry, you can waterproof the inside of your planter if you plan on using live plants on your wall. I would seal the inside seams with a waterproof caulk and then spray the inside wood with a waterproof sealer. These are small plants in small containers, so they shouldn’t need that much water at one time, but it’s good to waterproof them to protect your wall and floor. I have been finding some really good faux succulents at craft stores lately, so I decided to put in real dirt but fake plants. The dirt totally helps trick you into thinking they are real, but you never have to remember to water them—WIN!
Once your planters are painted and sealed, screw in two cup hooks into the top back corners of the planter, and cut your chain to size with chain cutters.
") I made a mockup with tape so I could see where I wanted the planters hung and how far down they should go. I would recommend doing something like this if you are hanging multiples in a group.
I made a mockup with tape so I could see where I wanted the planters hung and how far down they should go. I would recommend doing something like this if you are hanging multiples in a group.
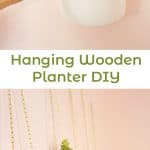
") Add your plants into your mini wall planters, and you’re ready to hang those babies!
Add your plants into your mini wall planters, and you’re ready to hang those babies!
")
")
") I mean, would you have ever guessed that those planters used to be wooden jewelry boxes?? I love how they look grouped together in staggered lengths, but this would also be a great idea as singles to flank both sides of an entryway mirror or in a grouping with some colorful prints as well. You can also apply the same idea to larger boxes if you want a bigger wall planter. So don’t be afraid to play with different shaped boxes if you find some you like. Just another DIY reminder to always “think outside the box”!! 😉 xo. Laura
I mean, would you have ever guessed that those planters used to be wooden jewelry boxes?? I love how they look grouped together in staggered lengths, but this would also be a great idea as singles to flank both sides of an entryway mirror or in a grouping with some colorful prints as well. You can also apply the same idea to larger boxes if you want a bigger wall planter. So don’t be afraid to play with different shaped boxes if you find some you like. Just another DIY reminder to always “think outside the box”!! 😉 xo. Laura
Credits // Author and Photography: Laura Gummerman. Photos edited with A Beautiful Mess actions.
34 Comments
Love this idea. Do the succulents not get root rot because you are misting them?
Where did you get the wooden jewelry boxes from? I checked hobby lobby but can’t seem to find them…
This is a great idea. Some of my succulents died recently, so I bought a bundle of fake succulents to replace them. This would be a great way to use the leftover ones.
A DIY Blog
They are so cool, I totally love them! Now I just have to find a spare wall!
https://www.makeandmess.com/
What a nice idea!
This looks amazing, what a great way to decorate an empty wall. Great post, will definitely try this <3
Valentina from http://fashionwithvalentina.blogspot.com
It’s a cool idea, but I feel like we’ve seen this before? Maybe it’s just the “take container, put plant in, attach to wall” concept – I know there have been similar ideas on here before.
This is such a cute project 🙂
http://misadventuro.us
Laura! This is so good. I think I like these even more because they’re on that pink wall. Any chance you can tell me what colour and brand it is? I can’t wait to get some fake succulents – darker rooms can actually have greenery now!
http://ohlovelybows.com/
These are so cute! Great little DIY project
Dresses & Denim
Aww, this is so cute!:)
http://printedforest.blogspot.co.uk/
I love these! I made some hanging planters for my family last year for Christmas, but I love the look of the hanging chain. So simple and lovely 🙂
Laura
http://thefoxtrails.blogspot.com
I love these hanging plants! They totally add so much to the room!
Paige
http://thehappyflammily.com
Sure, lots of people attach plants in some form or fashion to walls but I hadn’t seen a jewelry box redeux before! My takeaway from this post was to widen my perspective and find creative ways to personalize basic craft supplies. And that I should probably get a jig saw to expand my crafting capabilities 🙂
Oh my word these are sooo cute!!! Gotta make these asap!
♥Heather and Melissa
http://golddippedchaos.com
this is a great idea, but I think I may fill the pots with something else… nothing I plant ever lives lol.
So cute and looks so simply for just us girls to get a little crafty and not need the boys! 🙂
http://www.throughmyowneyes.com
such a fun & cute idea for someone with not a lot of counter space!!!
Is it noted anywhere which paint color this is? I tried looking on Instagram and this post and haven’t been able to find it. I seriously have to know! It’s perfect for the project I’m doing right now!
You girls always come up with the simplest DIY and it actually looks really awesome! I will give a try to this one for sure!
X
How cute!
I love it!
OMG, this is brilliant! I’ve been looking for a way to add some plants to my home without having pots on the floor or shelves. This is perfect! And thanks so much for the awesome and very clear tutorial. As a DIY blogger myself, I really appreciate all the detail! LOVE YOUR WORK!
omg i love this!
XO Ellen from Ask Away
http://www.askawayblog.com
It’s so cute!! I love it so much:))
http://www.yumiandyuji.blogspot.kr/
I don’t usually mist real succulents, just water with small bits of water ever week or so 🙂
Laura
I got them at Michaels, but I have seen them in other craft stores too! Keep an eye out!
Laura 🙂
I think it’s called Valspar Baby Blush 🙂
Laura 🙂
It’s Valspar Baby Blush 🙂
Laura
These would work beautifully in my current space. I need to make some!
This is adorable!! I’m always looking for new ways to display my plant babies!
http://www.themoptop.com
These are so cute and exactly what I need in my apartment! Too bad I don’t own a jig saw 🙁
This is a unique and easy way to decorate an empty portion of a wall at home. Adorable one, I would surely like to go with it. Many thanks for revealing it through your post.
OMG! A woman used a jigsaw . In India we don’t have such muscular ladies except my mother.?