 I’ve always loved “family photos” even when we were just a family of two, but now that we have (IMHO) the cutest toddler in the world, family photos are even closer to my heart now! We did a family photo swap with Elsie recently, where we met at the same location and I took pictures for them and she took pictures for me, and while it’s never easy taking photos when toddlers are involved, we got some really sweet photos out of it. I wanted to frame my favorite one from the shoot, and I thought it would be a great project to partner with our friends at Canon USA for a DIY frame! I’ve used little wooden discs for lots of projects over the years and I thought they would also make a great border for around the edge of the frame for a subtle textural look. Here’s how I did it!
 Supplies:
-photo paper
–Canon PIXMA TS9521C printer
–12 x 12″ frame
–2″ wooden discs (I used 32 for the frame)
-white paint or spray paint
-hot glue gun
 Print your 12×12″ photo. I used my new PIXMA TS9521C and am loving this new printer! The quality of prints is the same as what you would expect from all Canon printers, and this one was specifically designed with crafting in mind. It’s multi-functional too so it can handle all kinds of projects.
 Take your wooden discs, lay them on a sheet of cardboard and spray paint them white. Allow the discs to fully dry.
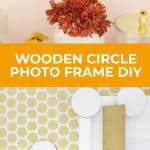
 Heat up your glue gun and glue one circle in the middle of each corner of your frame. Glue another circle centered in the middle between each corner circle and then glue two more circles spaced out evenly on either side of the middle circles so you end up with 5 circles from end to end (you can lay a ruler next to the frame to see where the middle should be, etc.). Repeat so this pattern is repeated all around the frame.
 Take your remaining circles and glue them so they are centered over each gap, creating a kind of scalloped pattern. Repeat until your entire frame is covered by the circles.
 Since the sides of most laser-cut wood shapes are usually darker (the heat from the laser burns them darker, I’m assuming), I did a few extra coats of white paint with a small brush around the edges of the circles so they were fully coated. Once it was dry, my frame was ready to hang!


 Isn’t that sweet? I like the textural look that the circles bring to the frame to make it a bit more interesting, but it’s not so overpowering that you are distracted from the cute photo that you are trying to display. This is something that you can do on a larger or smaller scale and with a variety of different sized circles as well. You can also paint your circles a custom color as well, but I would recommend painting your frame that color too so it all looks like one piece from the side view. Glad we got a cute photo from our little family shoot—I’m sure we’ll be doing a lot more of those as Lola grows, so I’ll have to think of some more frame ideas soon! xo. Laura
5 Comments
Family photos are my favourite to put up on walls, insteadthan paintings or artworks. I just find that photos give a more personal touch to a room! 🙂 🙂
Charmaine Ng | Architecture & Lifestyle Blog
http://charmainenyw.com
This printer looks amazing! It’s going on my Christmas list!
Photo frame looks so amazing. I liked your tutorial. Thank you so much for posting this tutorial!
So cute! Frame catches your interest but let’s you then focus on the photo. We are failing so hard at hanging family photos ????
I absolutely adore how simple and cute that frame is! What a wonderful and easy tutorial. This definitely makes me want to run out and get some little wood rounds ♥
McKenzie Allyshia | http://www.mckenzieallyshia.com