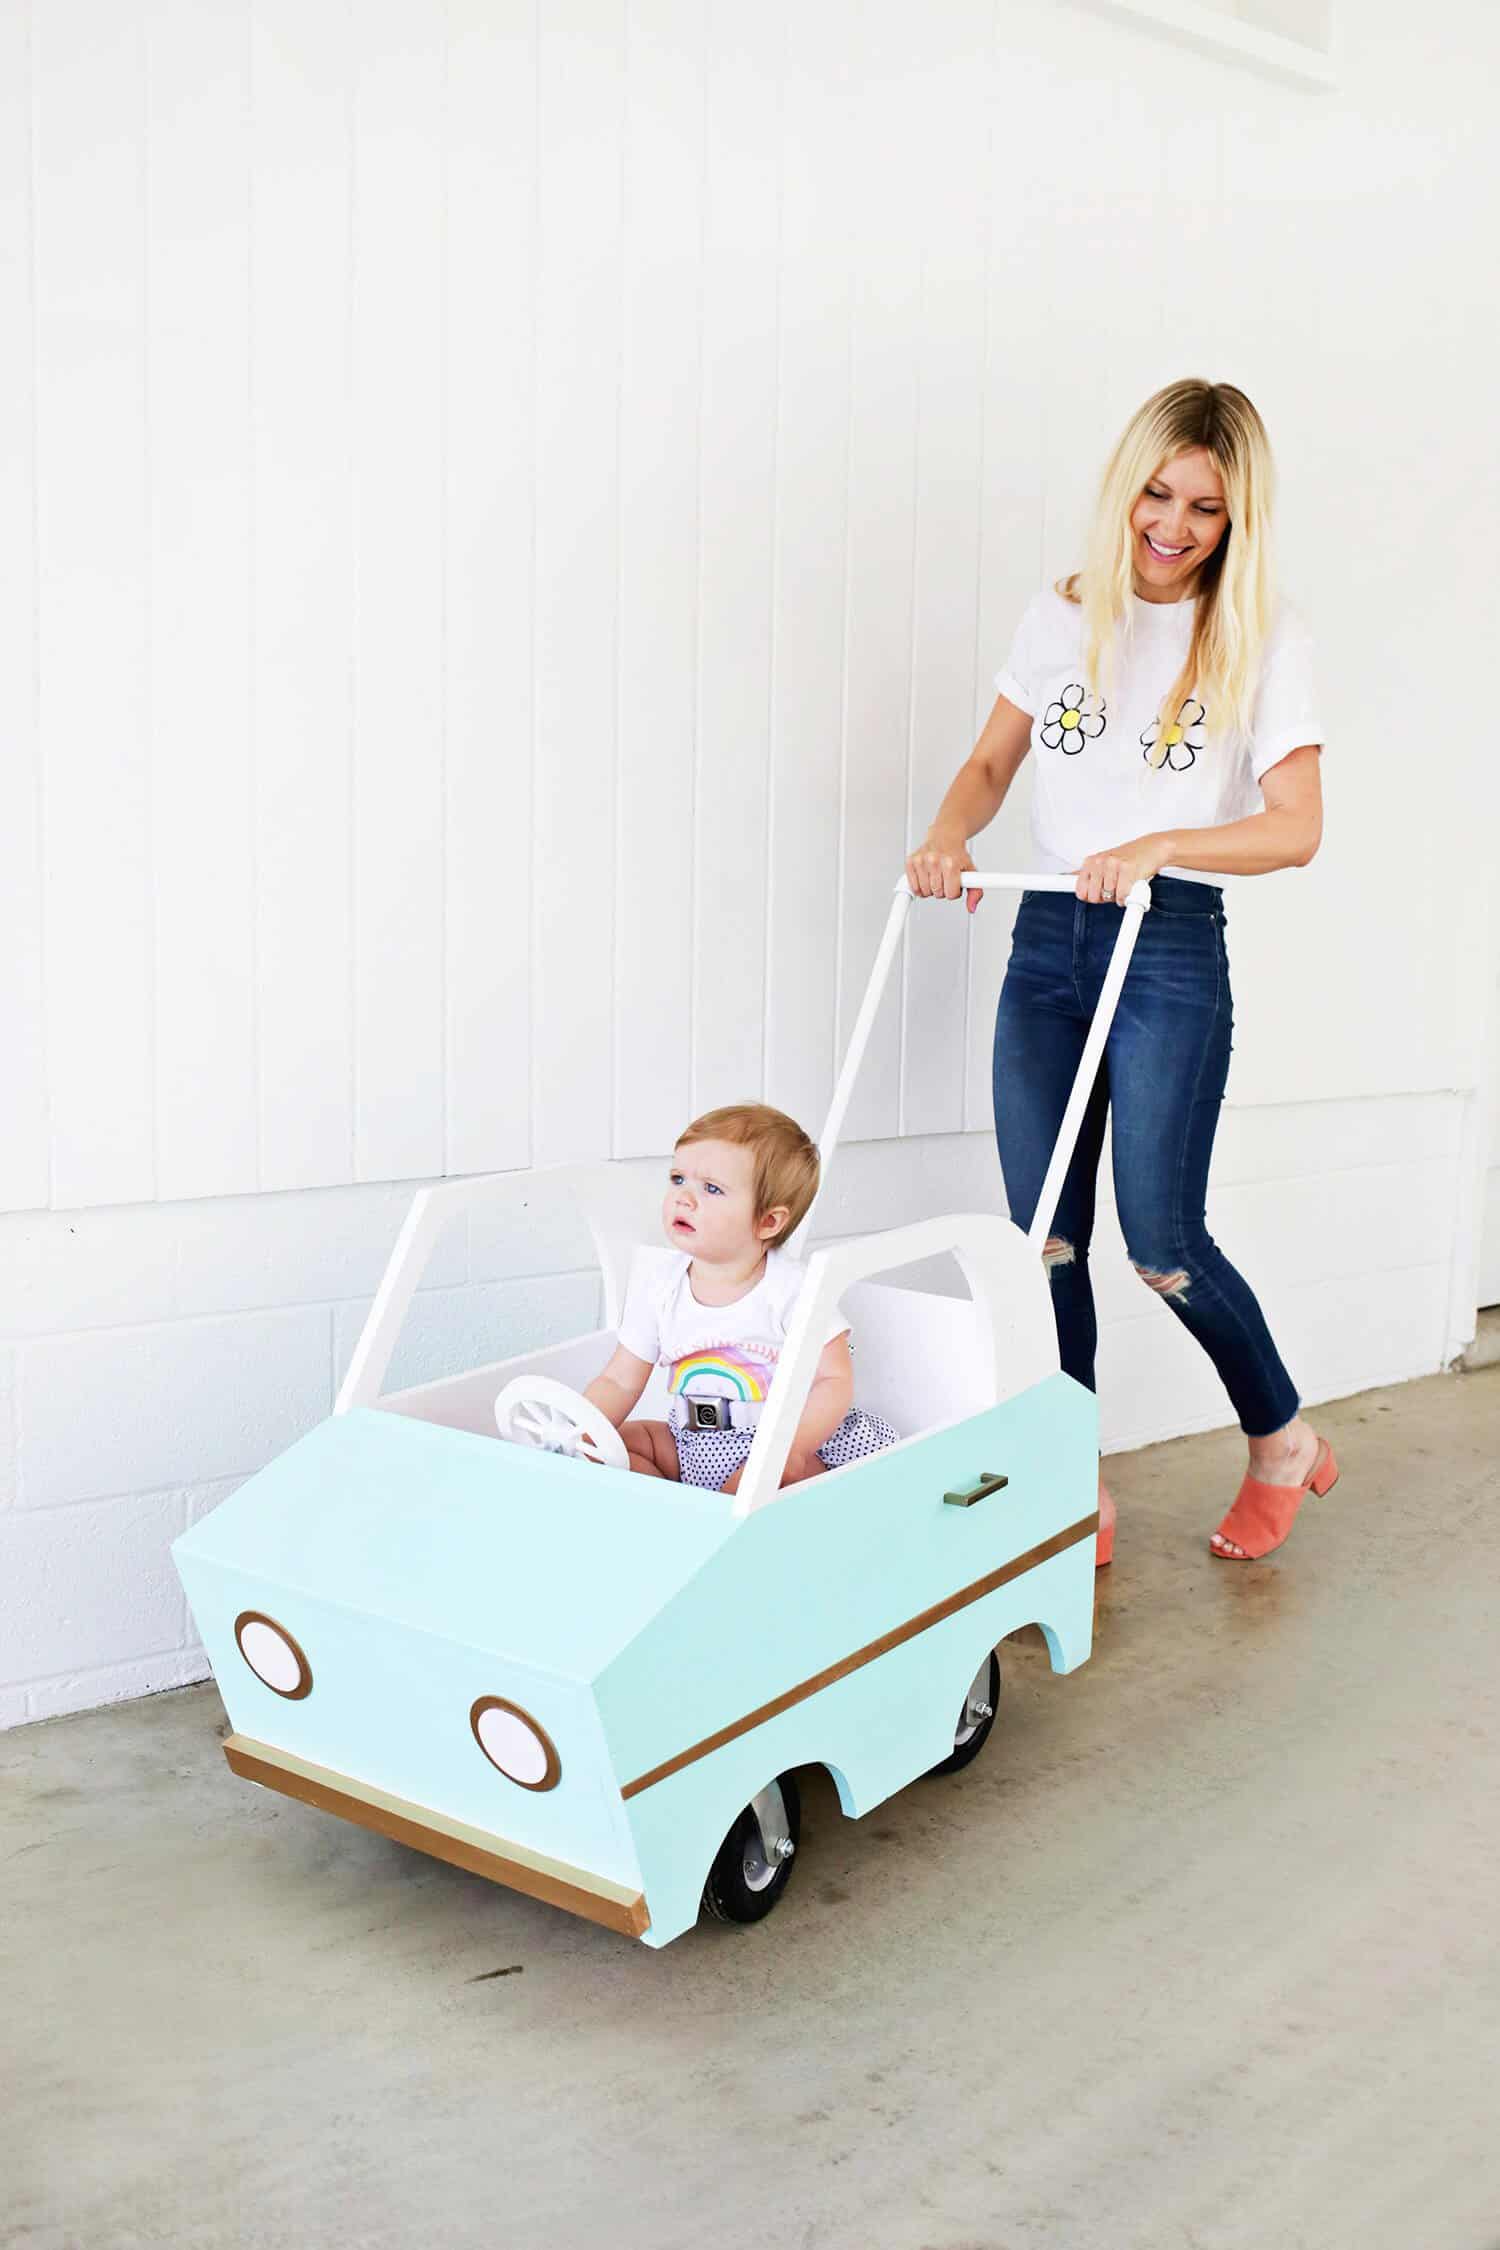
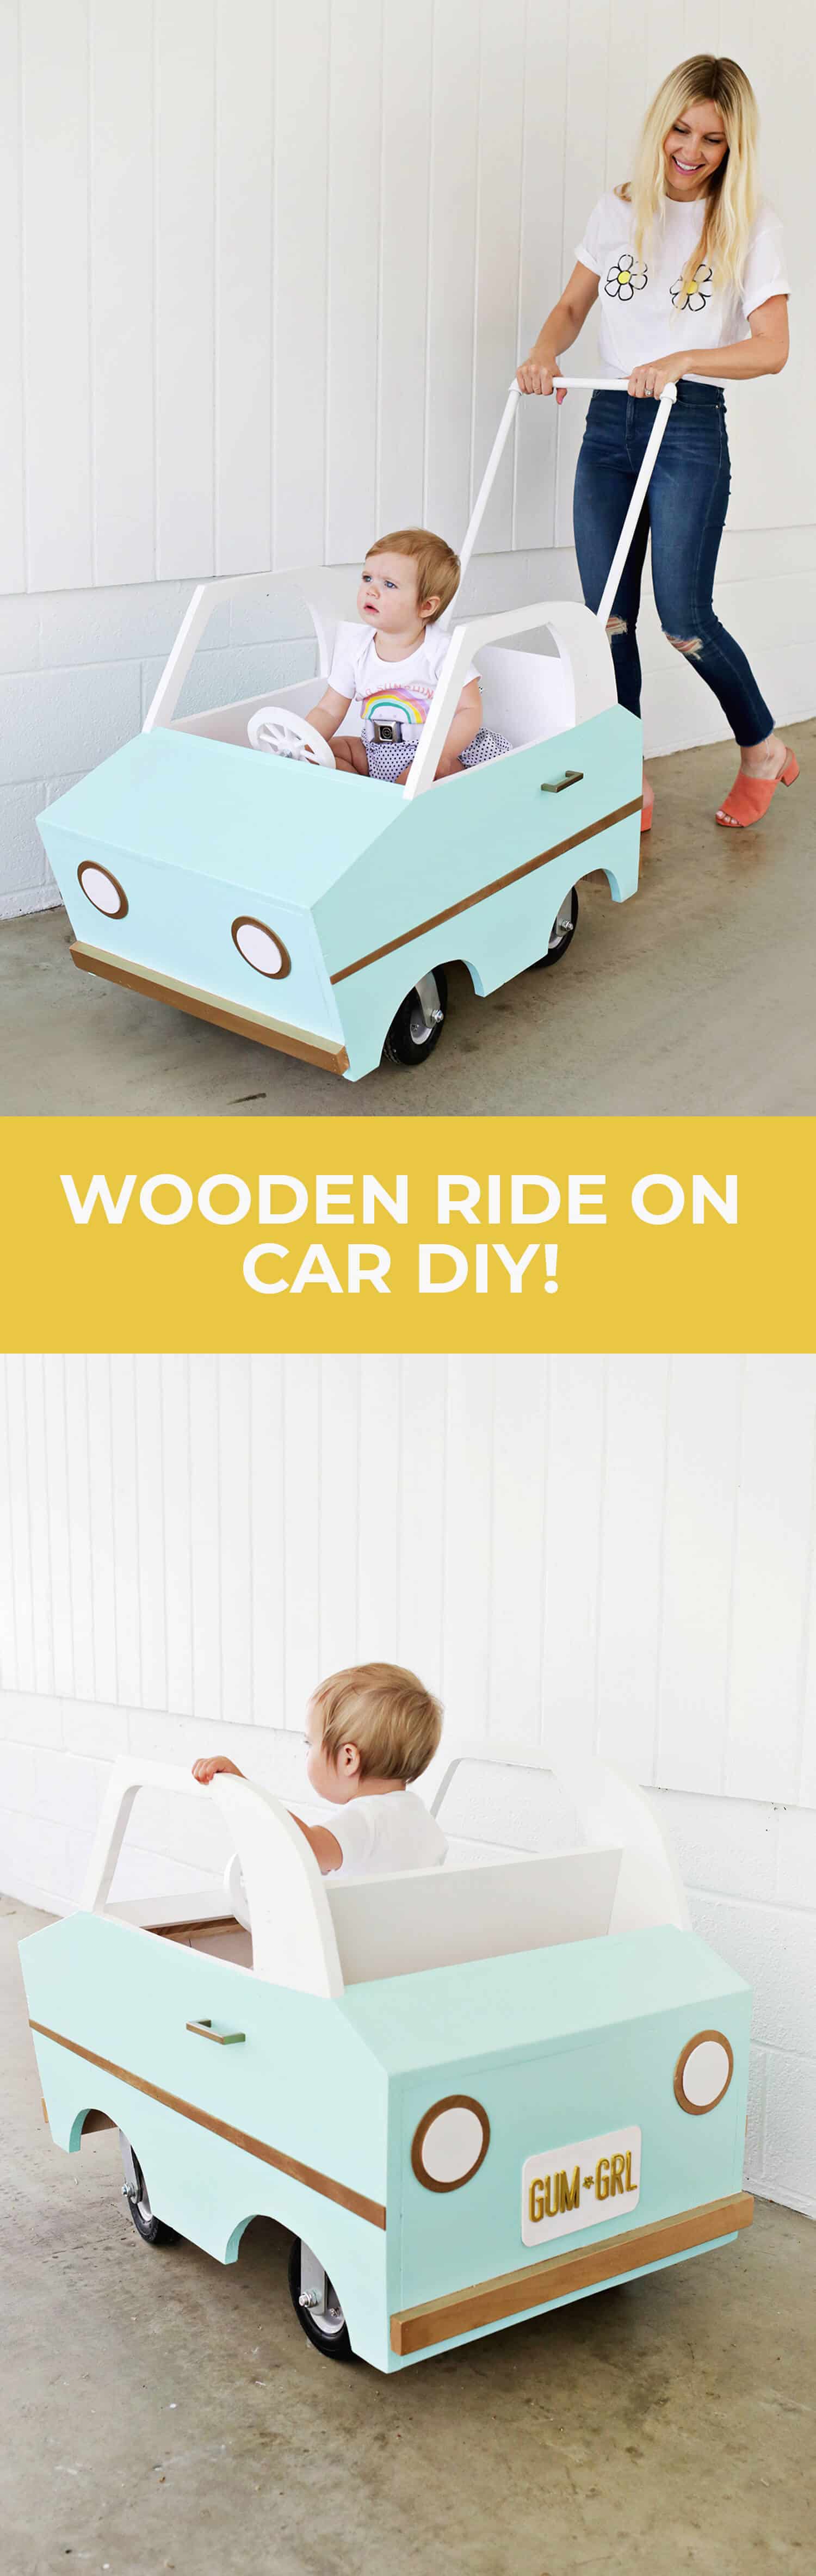
 This post is basically a good reminder that sometimes in life the most ridiculous ideas are actually the best ideas! I was thinking about making something cat-related that would be kind of a car shape, but then I thought, “Well, maybe I should make a real car, and not for cats, but for Lola!” I spent a while sketching out how that would work in 3D and even though I wasn’t totally positive how I was going to build it, I knew I just had to figure it out. I modeled the car partially after this cute car we used for a holiday napkin DIY and a 1961 Autobianchi Bianchina that’s similar to the car Audrey Hepburn drove around Paris in How to Steal A Million (the best movie by the way). It was quite a challenge to figure it all out, but it came together so well and we love it!! Here’s what we did:
Supplies:
–3′ x 2′ board (3/4″ thick) You’ll need 2 of these boards for the sides of the car
–20″ x 6′ board (3/4″ thick) This will be the bottom and front and back panels of your car
-1 1/2″ wide boards (3/4″ thick) You’ll need about 103″ of board length to cut all your different parts
-10″ wide board (3/4″ thick) This will be for the seat and seat back and you’ll need 2 boards cut to 20″ long
–corner brace (4 of these to support the seat)
-2 fixed 6″ wheels and 2 swivel 6″ wheels
-2 door handles
-wooden circles for headlights (I used a 3″ circle and 4″ circle for each)
–seat belt
–wooden steering wheel and a long bolt and 2 nuts to attach
-nails and hammer or nail gun
-wood screws and drill
–jig saw and miter saw
-wood glue
-wood filler and sandpaper
-paint color of choice
–1″ upholstery foam and vinyl for seat (optional)
-bass wood (check craft store for that) for finishing details
–wooden car template (right click to download)
Supplies for handle:
-1/2″ threaded pipe (two 24″ sections for the sides and one 12″ section for the middle of the handle)
–1/2″ elbow pieces (you need 2)
–1/2″ floor flange (you need 2)
-8 nuts and bolts to attach handle to the car
–metal paint
First, you’ll need to print your template at FedEx Office or Staples on their larger blueprint printer so that the image is 3′ wide x 2′ tall. You can also create your own car design if you wish and just use this process as a general template for how to put it all together—get creative! Once you have your template cut out, trace it onto your 3′ x 2′ boards.
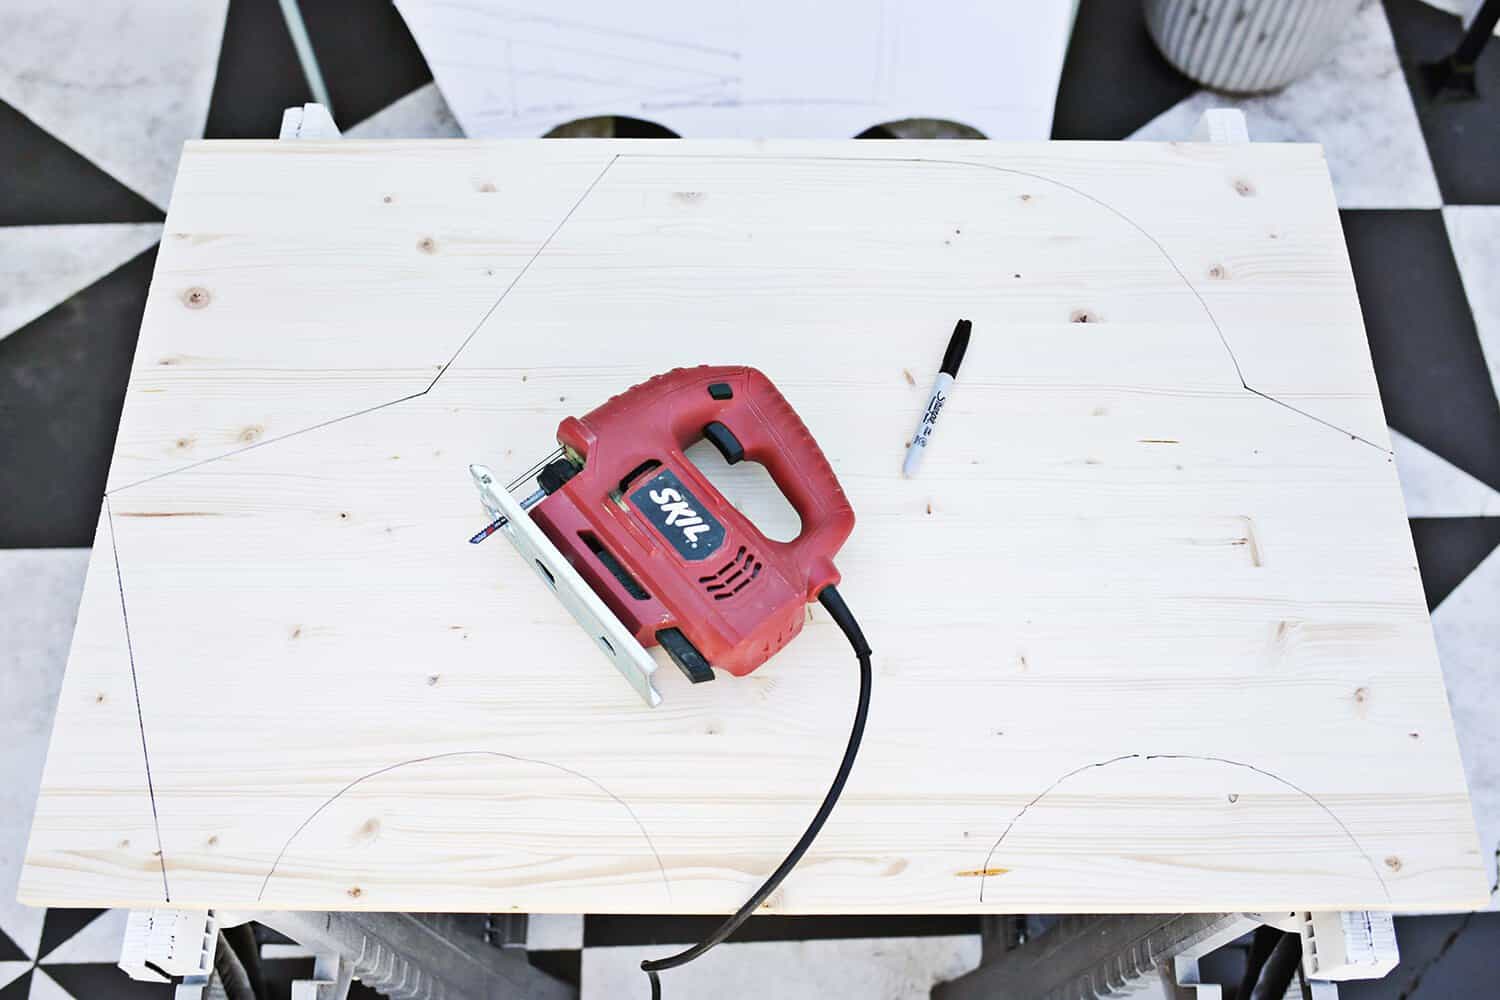
 Once your car shape is traced on both wooden boards (you need 2 sides for your car), use your jig saw to cut out your shape. You’ll see that I didn’t cut out the window at this time in my photos, but that’s because I thought I was just going to paint the window shape on and then realized halfway through the process that it would be much cuter to cut the window out instead. YOU, however, should cut the window out on this step. As a side note, when cutting with jig saws in the middle of a shape, it helps to drill holes big enough for your saw blade in the piece you are going to cut out so that gives you a hole to start the jig saw through (like I showed you for the middle of the “O”s on this sign).
  Attach 2 corner braces on the inside of each of your car side pieces 5″ up from the bottom edge of the car.
  Cut your 20″ wide board to be just long enough to fit 1-2″ away from the back and front edge of your car (that way your front and back panels will still have room to fit in between the side boards of the car later). This will be the bottom panel of your car. Use wood screws to screw the corner braces in place.
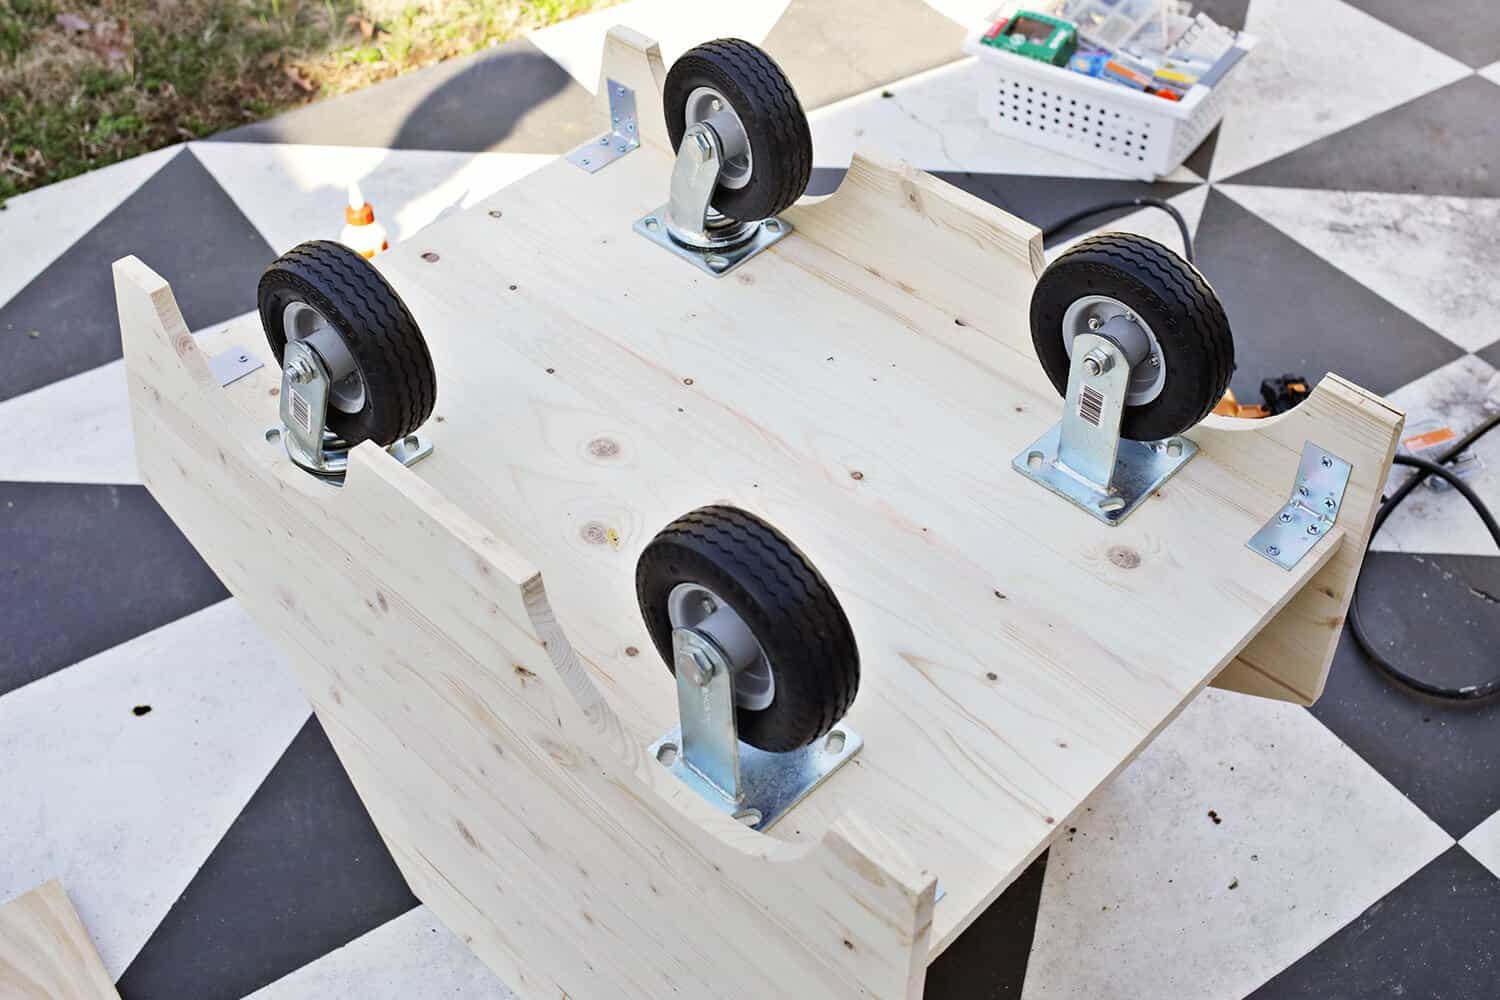 Position the wheels next to the wheel cutouts with the swivel ones in front and the stationary ones in back. Drill the appropriate holes to attach the wheels through the floor panel and use bolts and nuts to attach the wheels in place. The wheel cutouts need to be that elongated half circle instead of a smaller cutout so that the swivel wheel in the front can move freely. Also, once you get the wheels placed and attached, you can either leave them on or take them off while you work on the car (the car will be more stationary if you take them off) and put them on again at the very end.
 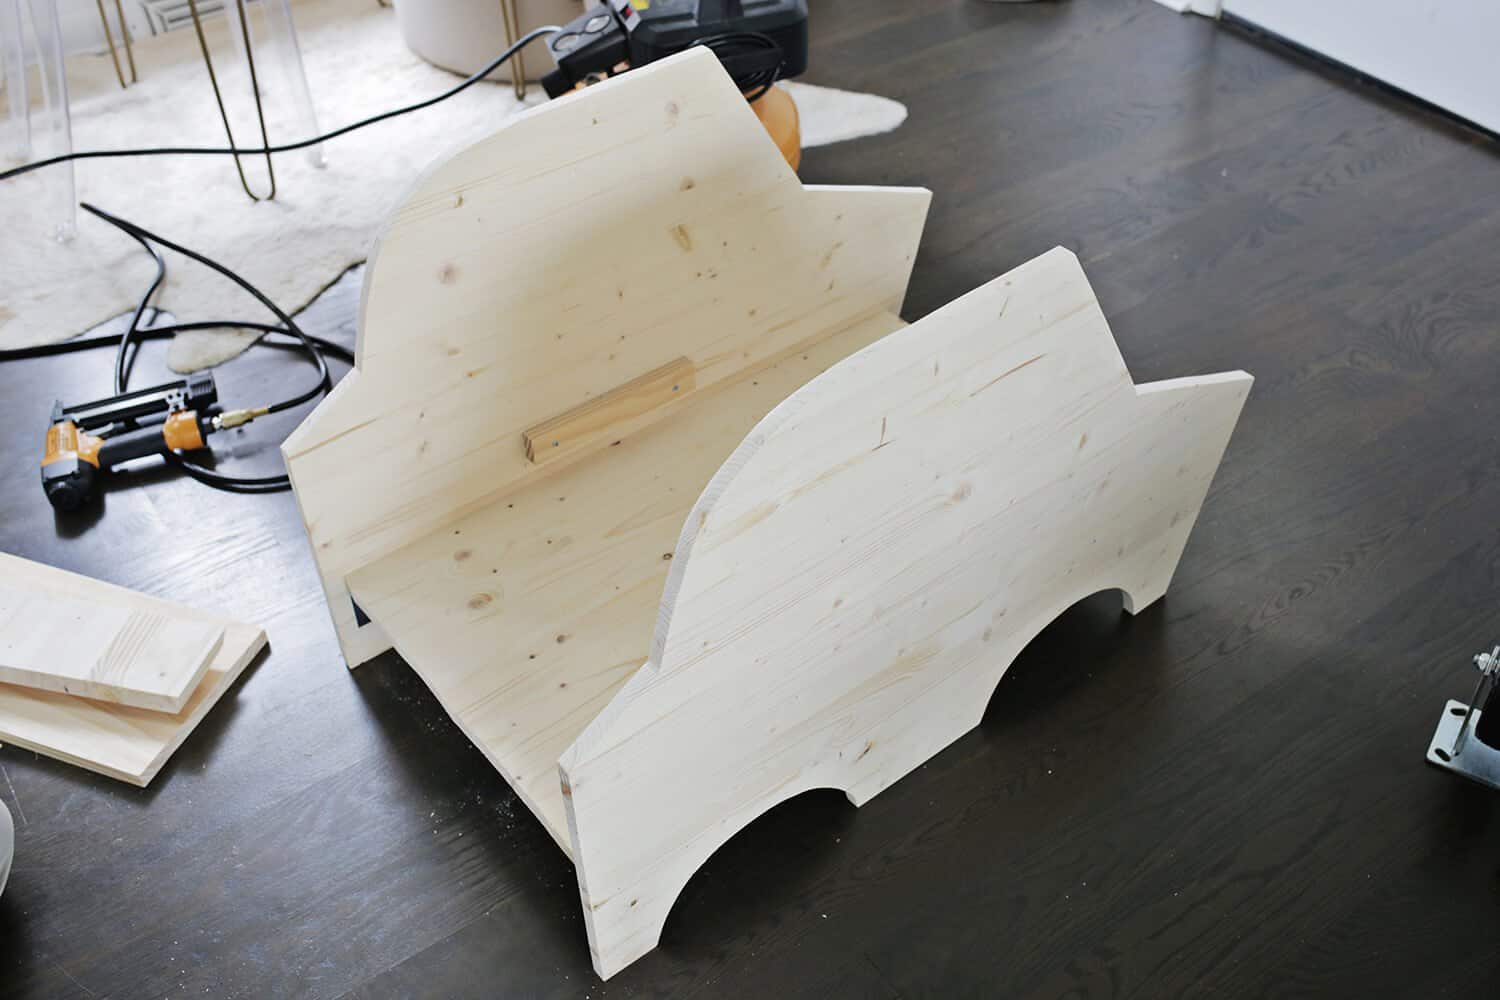 To prepare for the seat, cut and screw in two 10″ long strips of wood about 2″ off the floor (one on each side) so that you can set the seat on those edges and have the seat up off the floor a bit.
 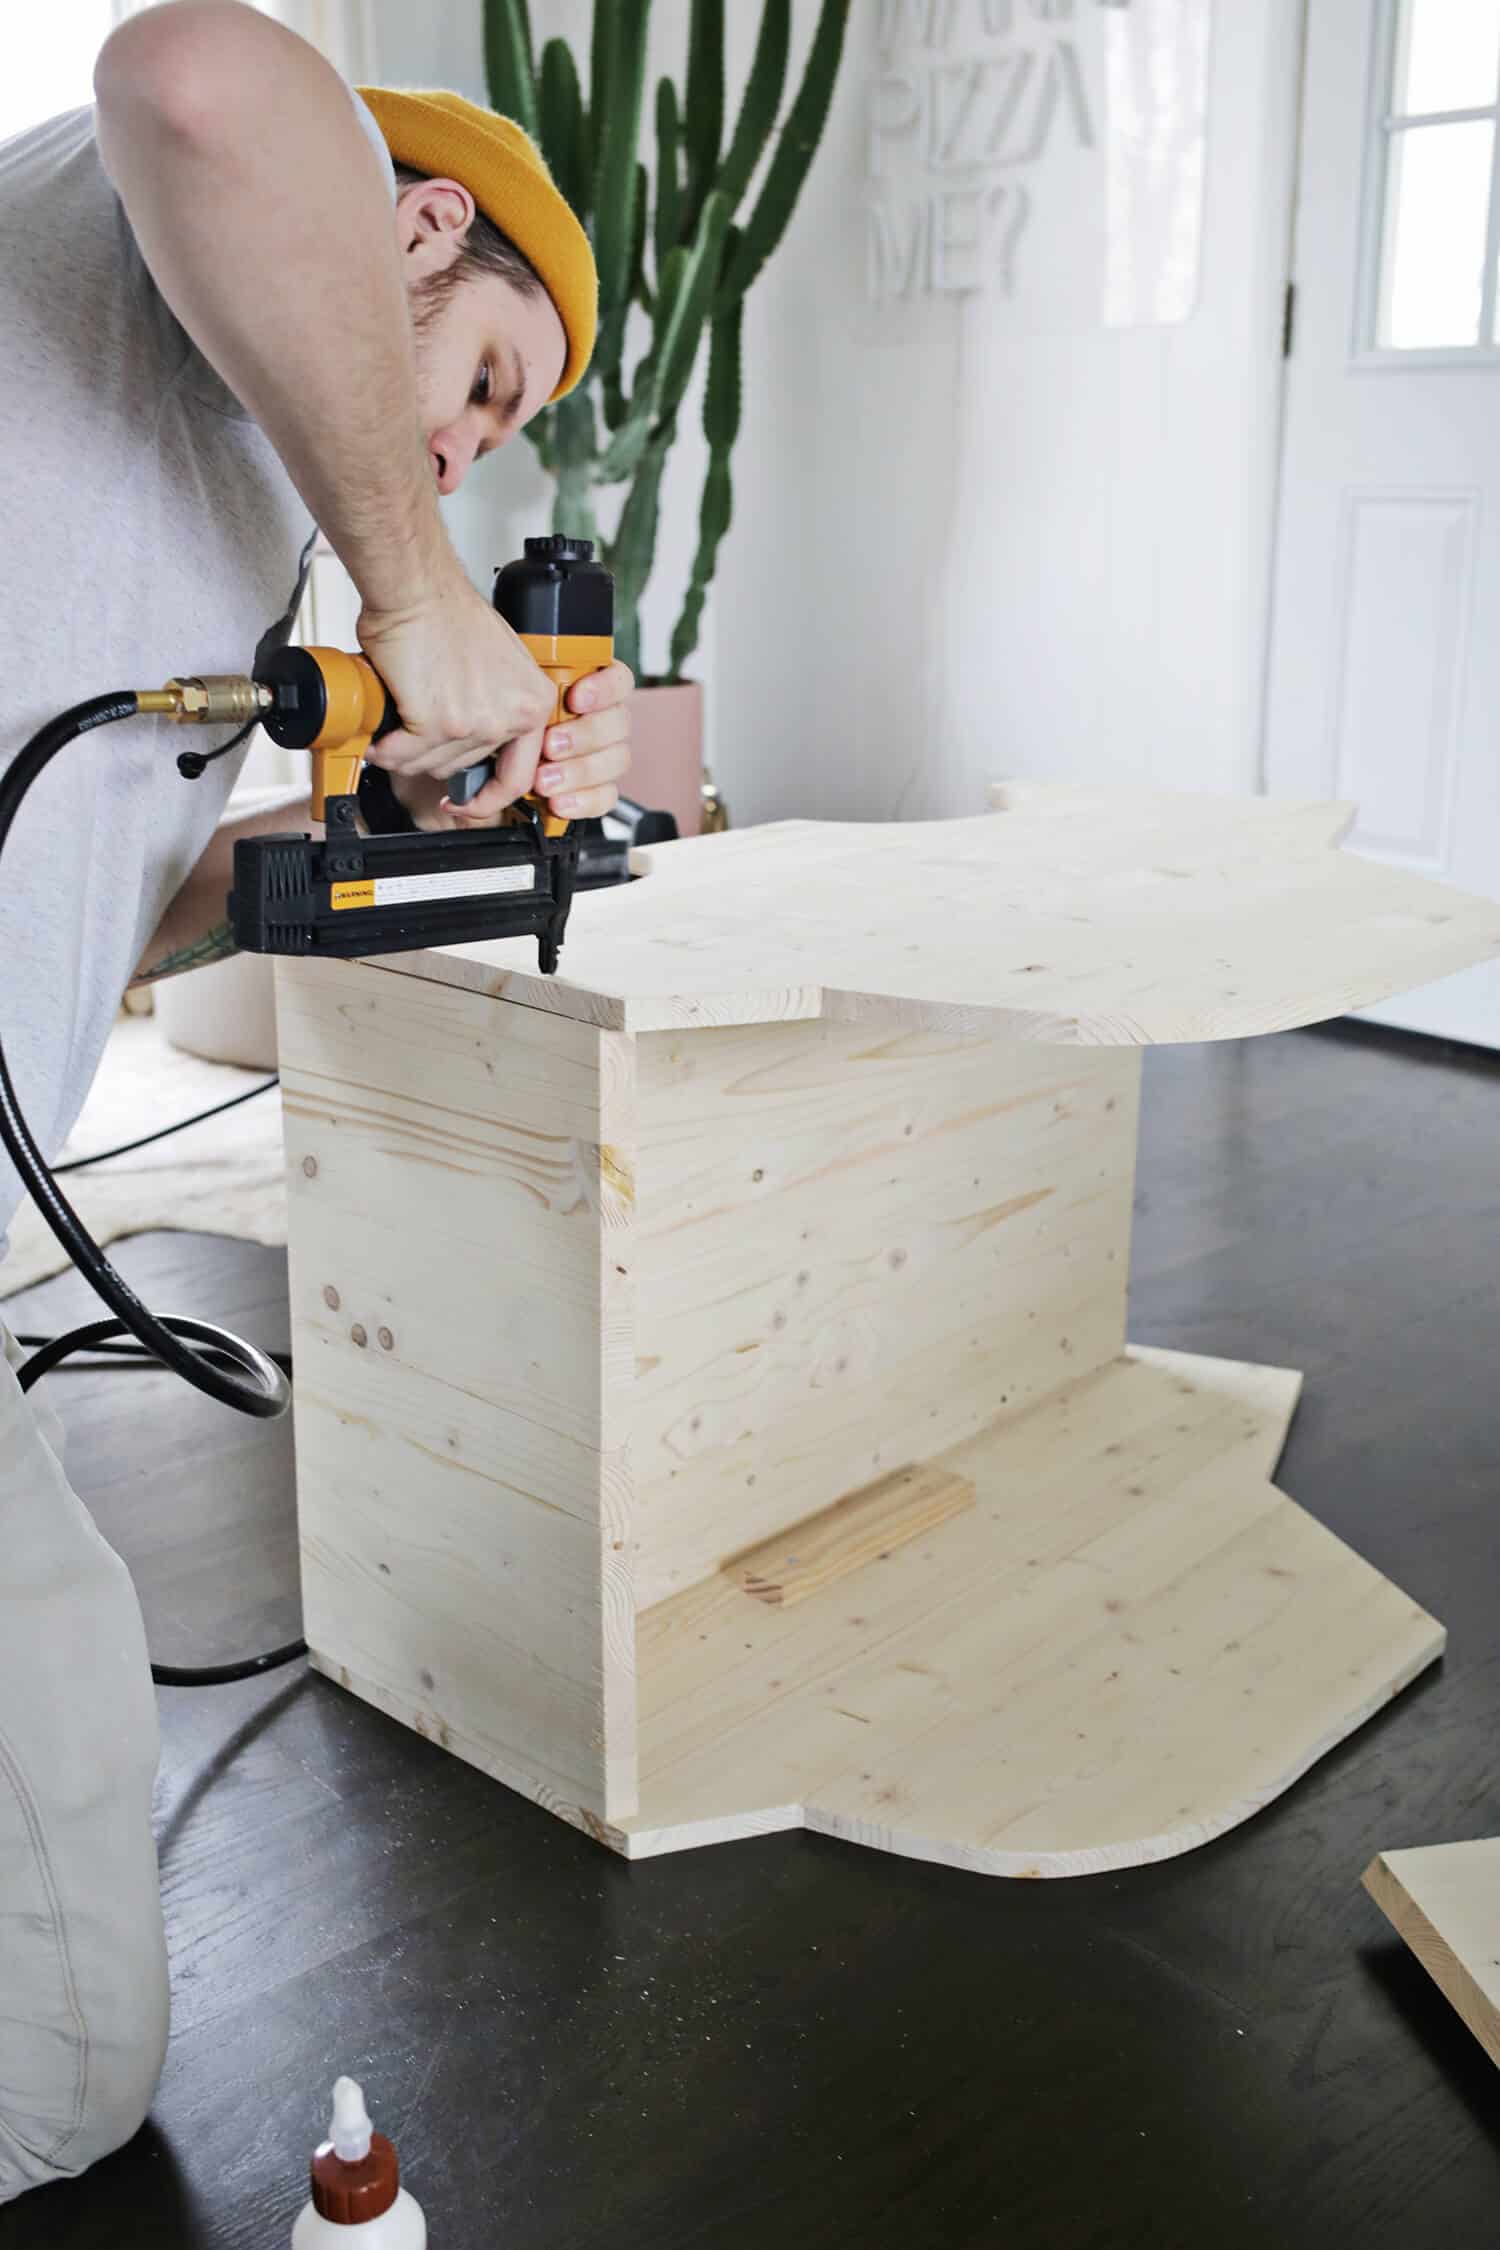 To close in the back of the car, you need to cut a back panel from your 20″ wide board that stops 3/4″ from the top of the back. Since most miter saws only cut 10-12″ of board width at a time, we couldn’t cut the whole 20″ board width in one swoop, so we had to cut that section of board in half, up the middle, with a jig saw (cutting it a little longer than needed) and then cut each 10″ half on the miter saw.
Once we cut each bottom end at a straight angle and the tops at a 30° angle, we could wood glue them back together to make a 20″ wide board that had a straight cut bottom and a 30° angle top cut. We also used a horizontal scrap piece of wood and some wood glue and screws on the side that faces inward as a brace over the vertical seam to give the two pieces a bit more strength as well. You can see the middle seam a little in the picture above, but when it’s all put together, you wouldn’t know it was made in two pieces. Use wood glue and a nail gun or hammer and nails to nail that section between your two car sides. 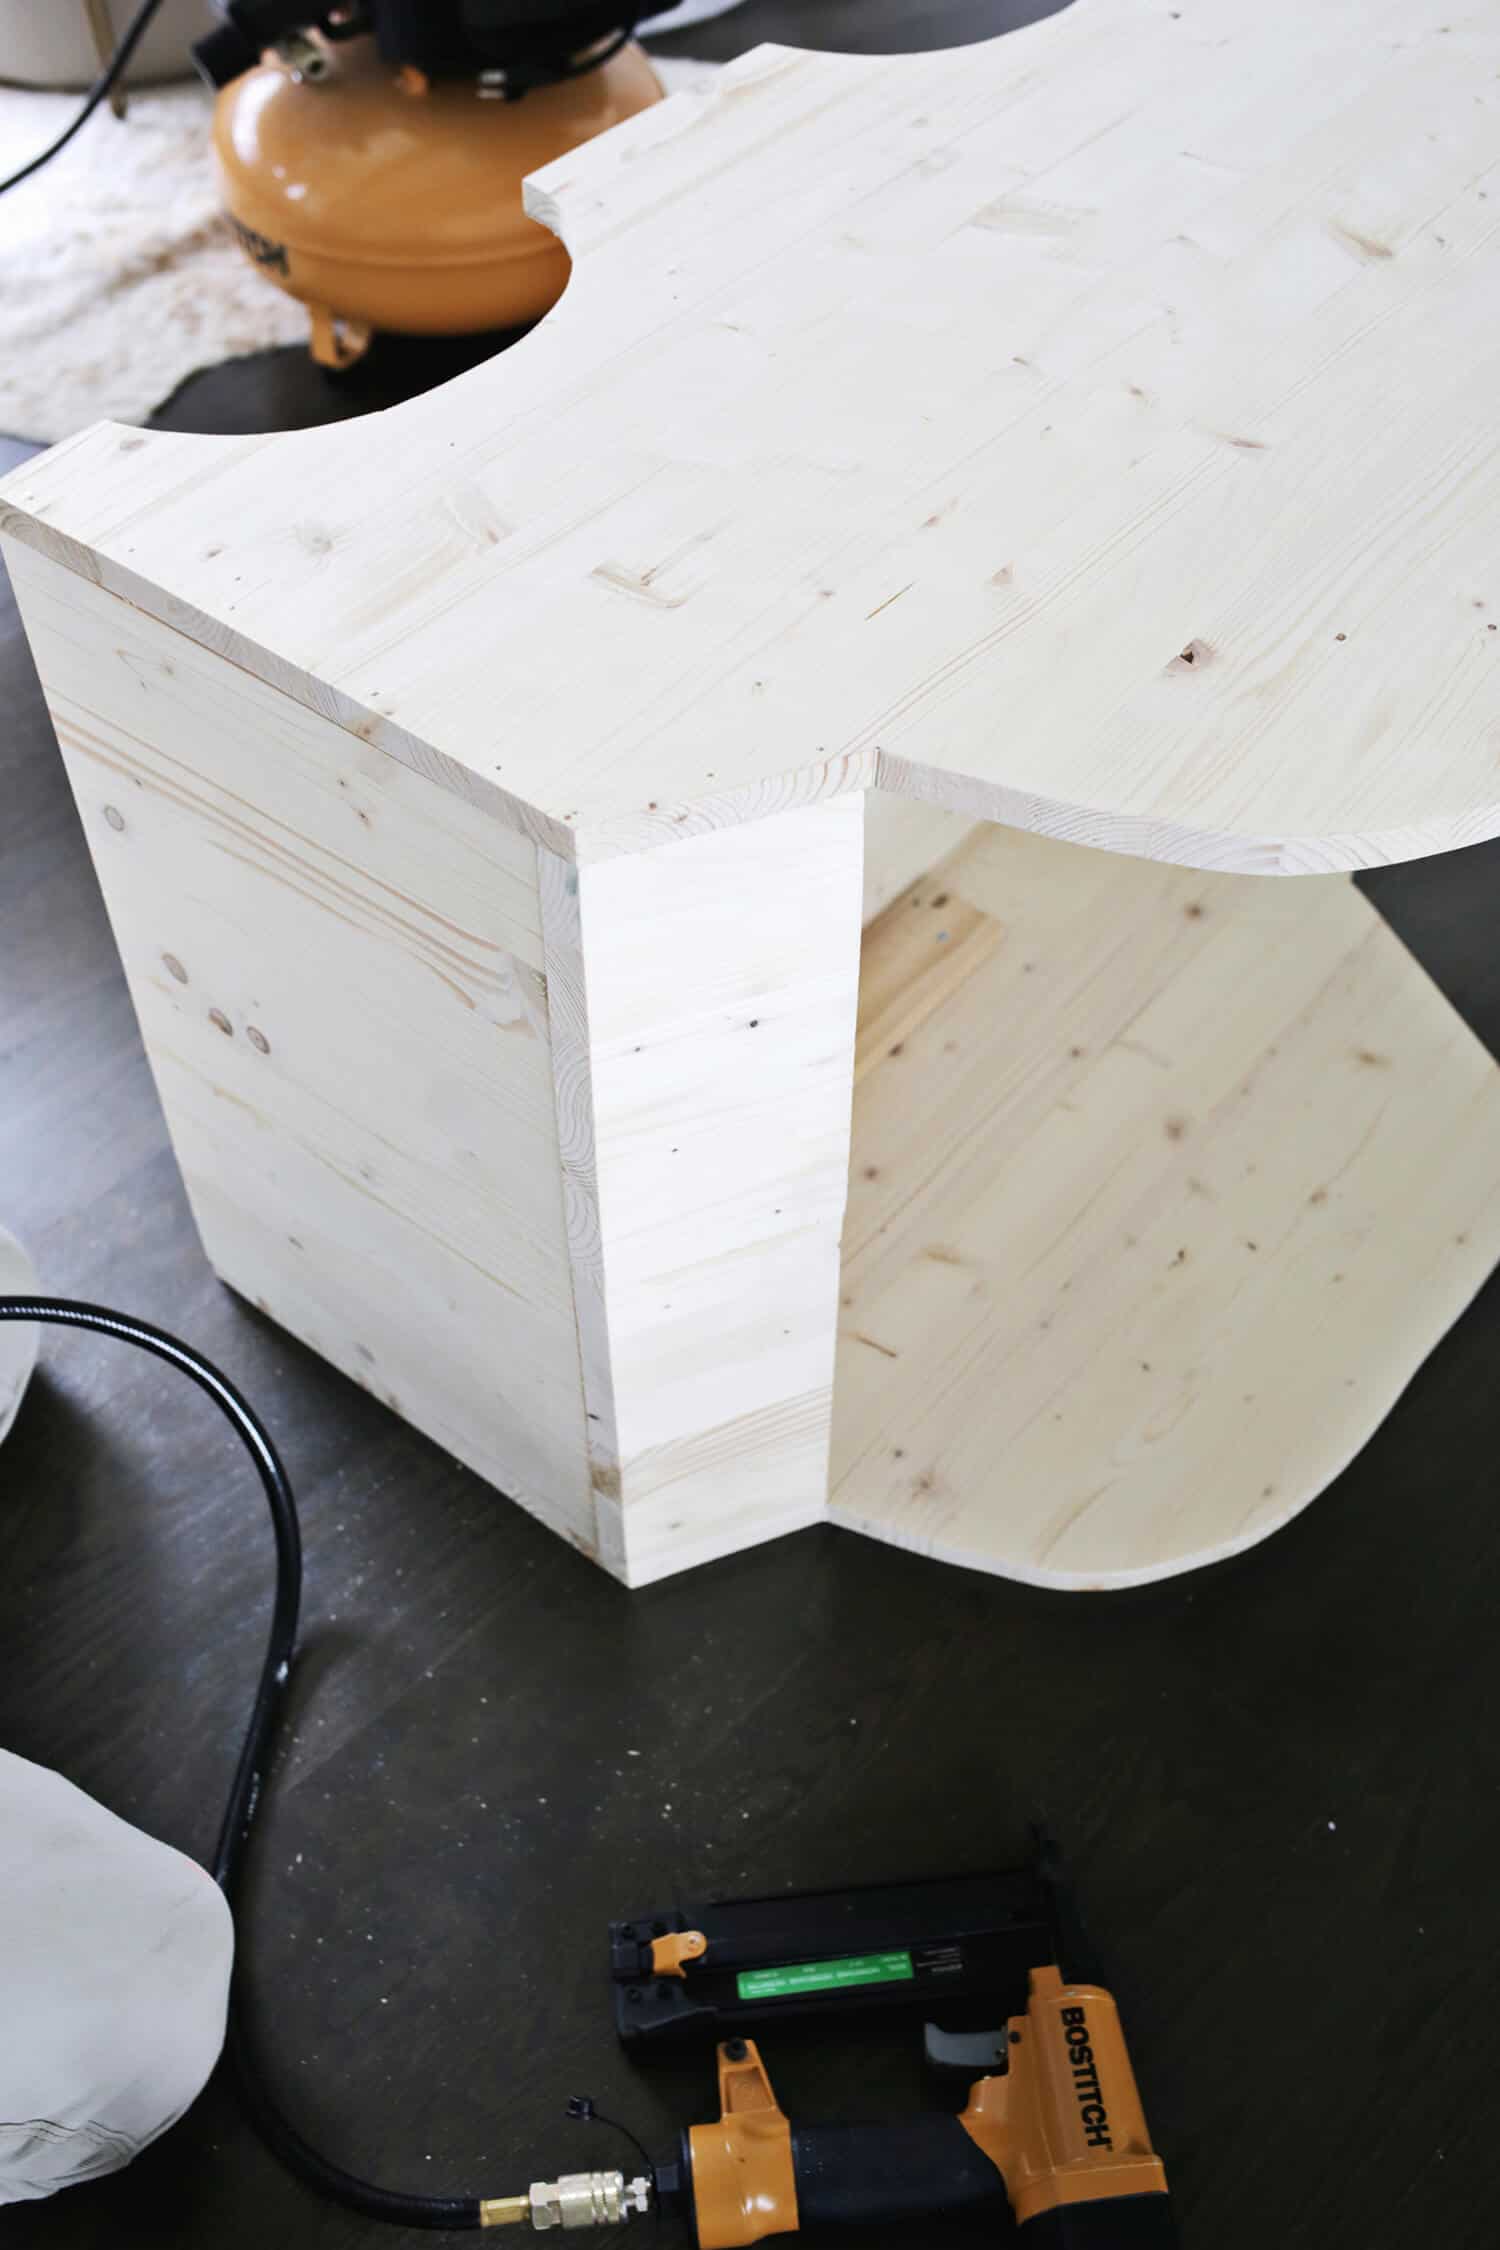 Repeat the process of cutting the 20″ wide board in half to make a shorter panel for the top section of the back panel, but cut the bottom edge with the 30° angle and leave the top as a straight cut right where it hits the back of the window shape.
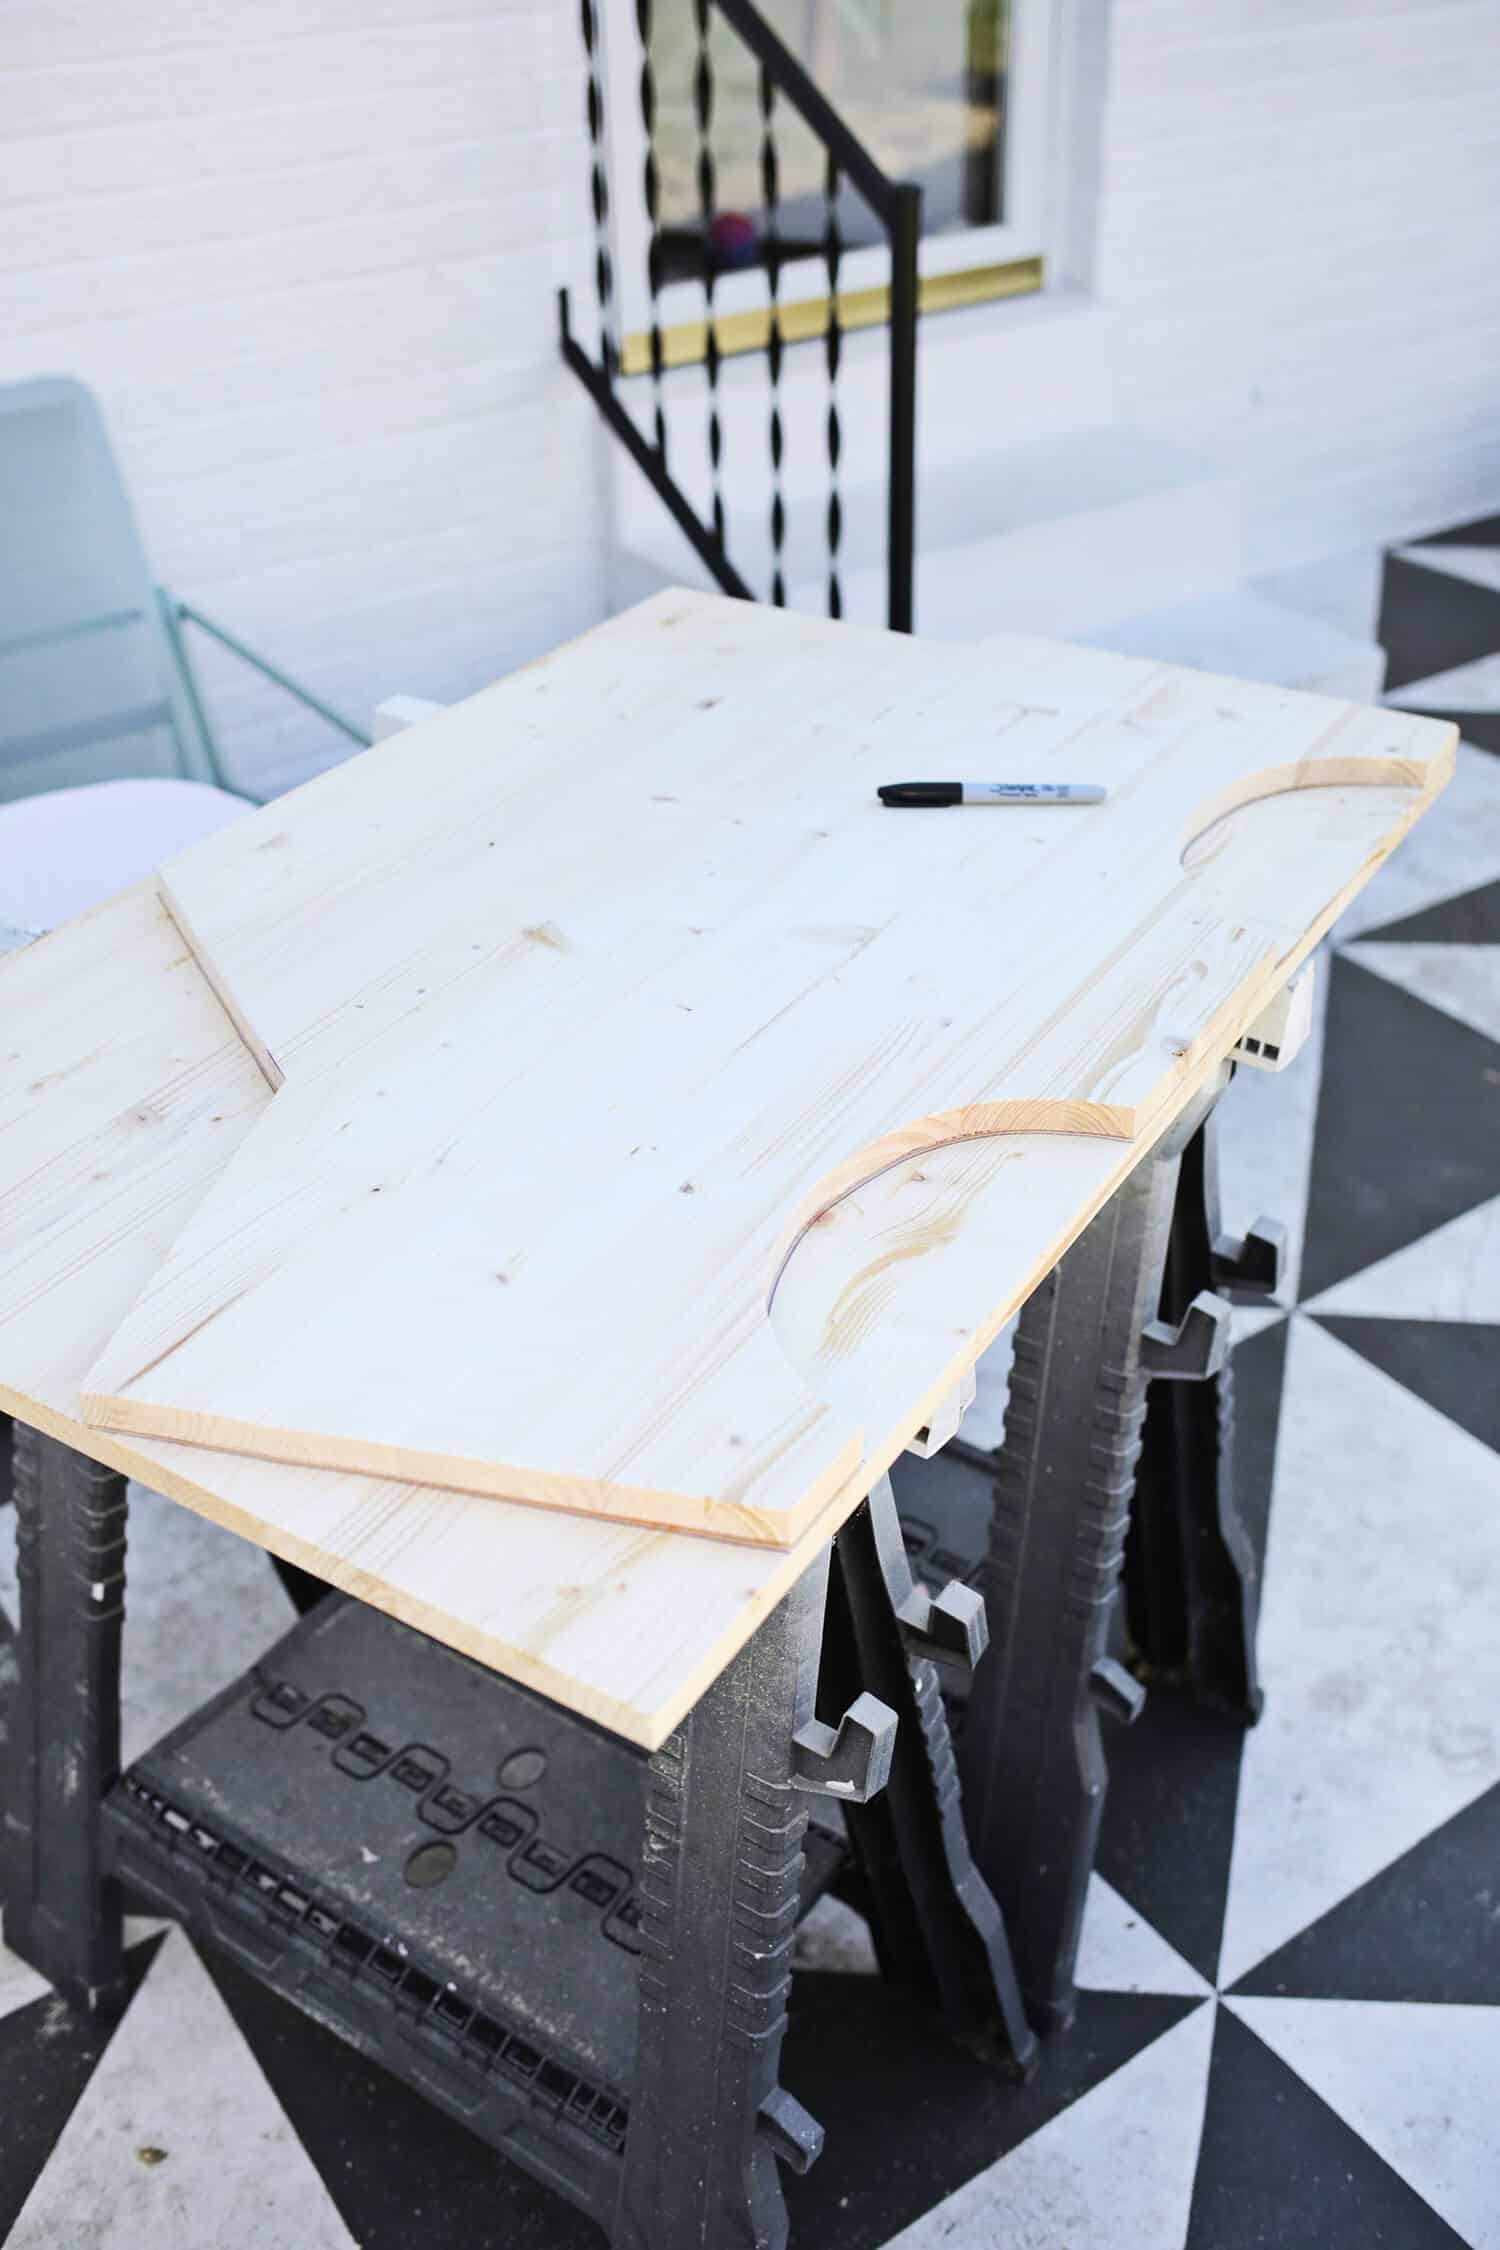
Repeat the process for the front of the car, except that the front has a 45° angle at the tip of the nose instead of a 30° angle. I would definitely suggest cutting some test pieces on scrap wood before cutting the real pieces so you can hold them up to the car and make sure your angles are right, and then you can adjust your angle smaller or larger as needed.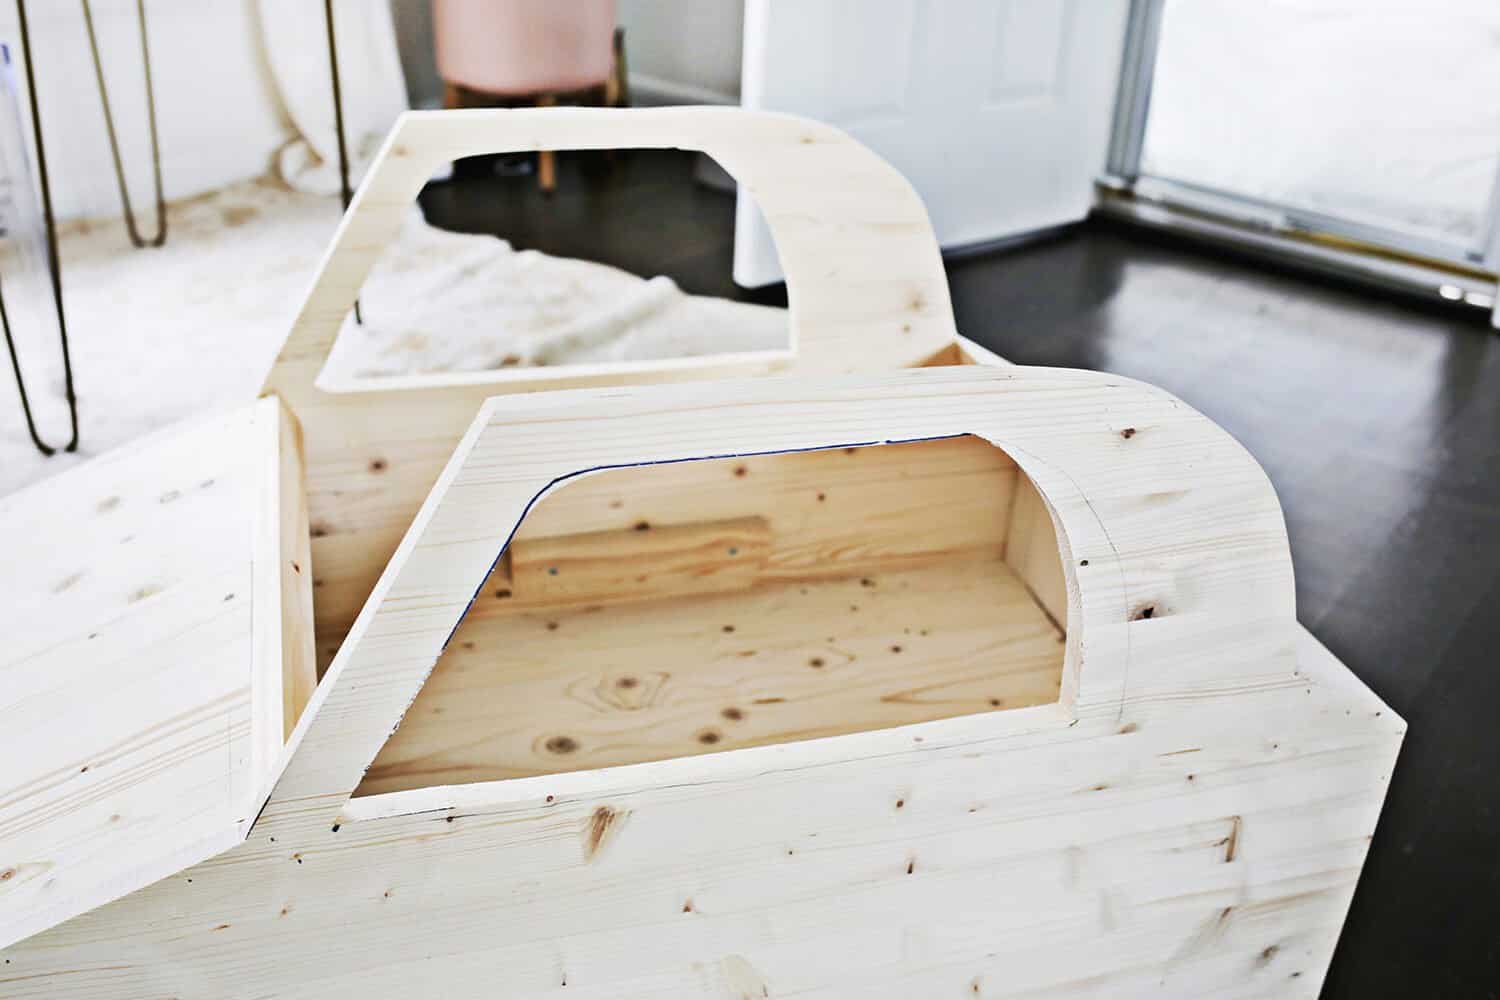 This was when I realized I should cut out the windows—ha!
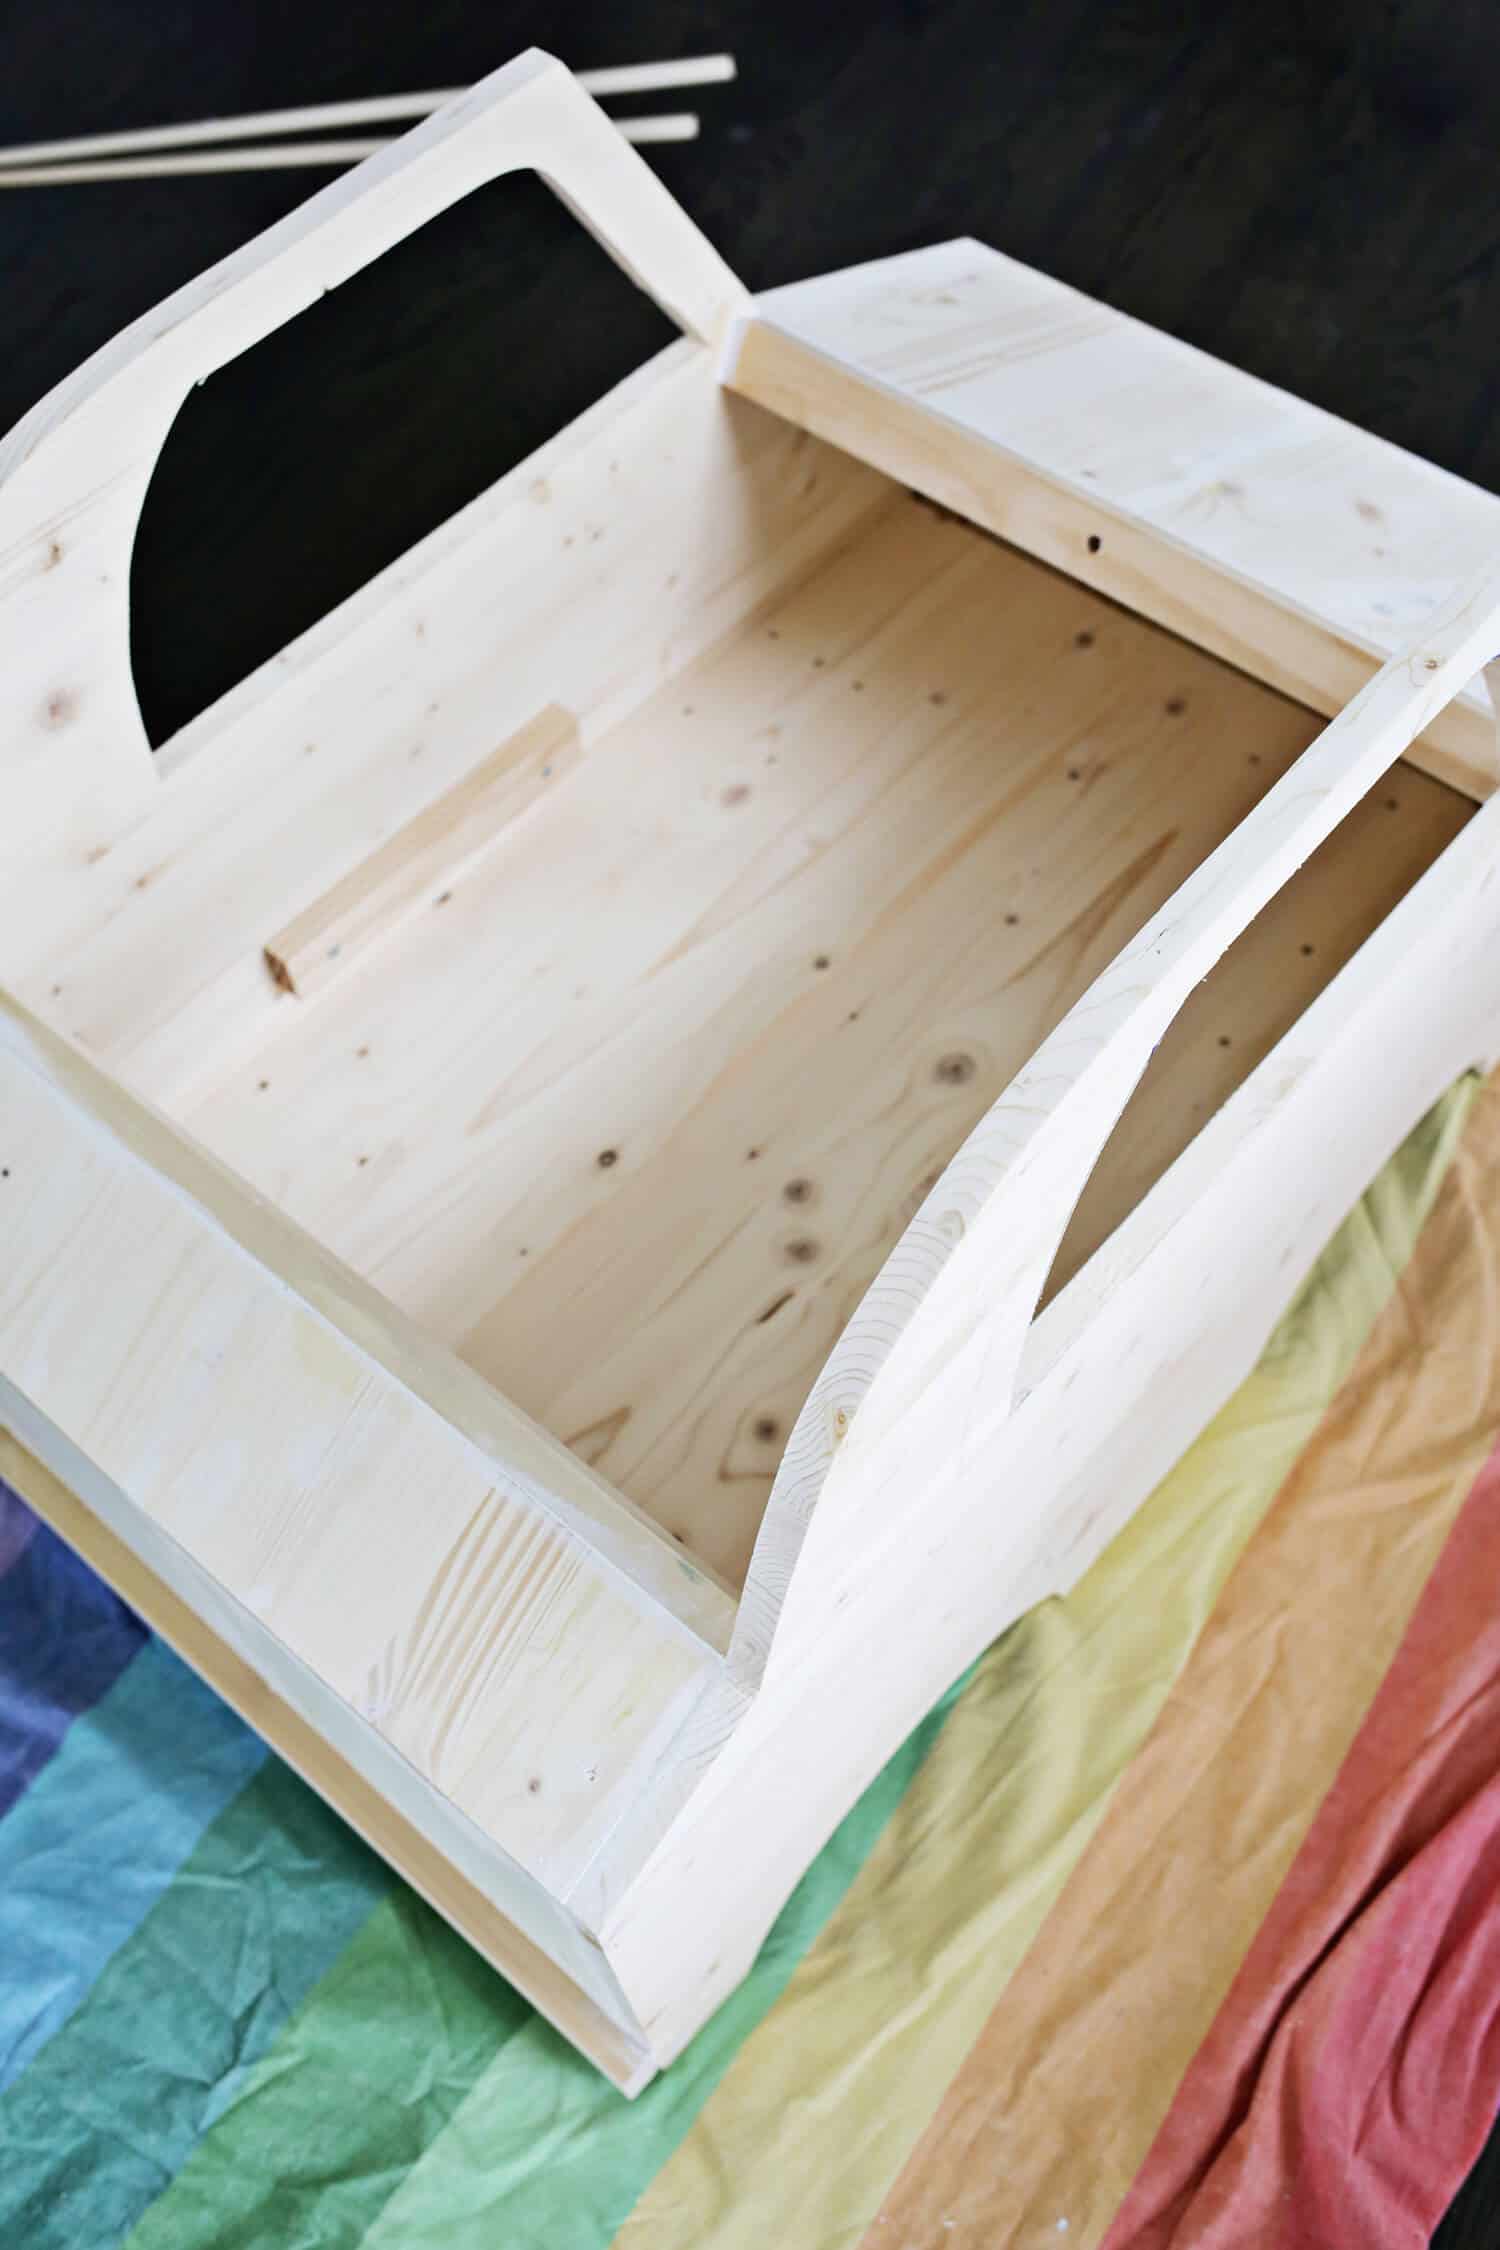 Cut 2 pieces from your 1 1/2″ wide boards that are 20″ long and place them at the tops of your front and back panels to finish your edges and also give you a place to mount your steering wheel from on the front (drill a 3/8″ hole for your wheel in the front piece). Use wood glue and nails to attach.
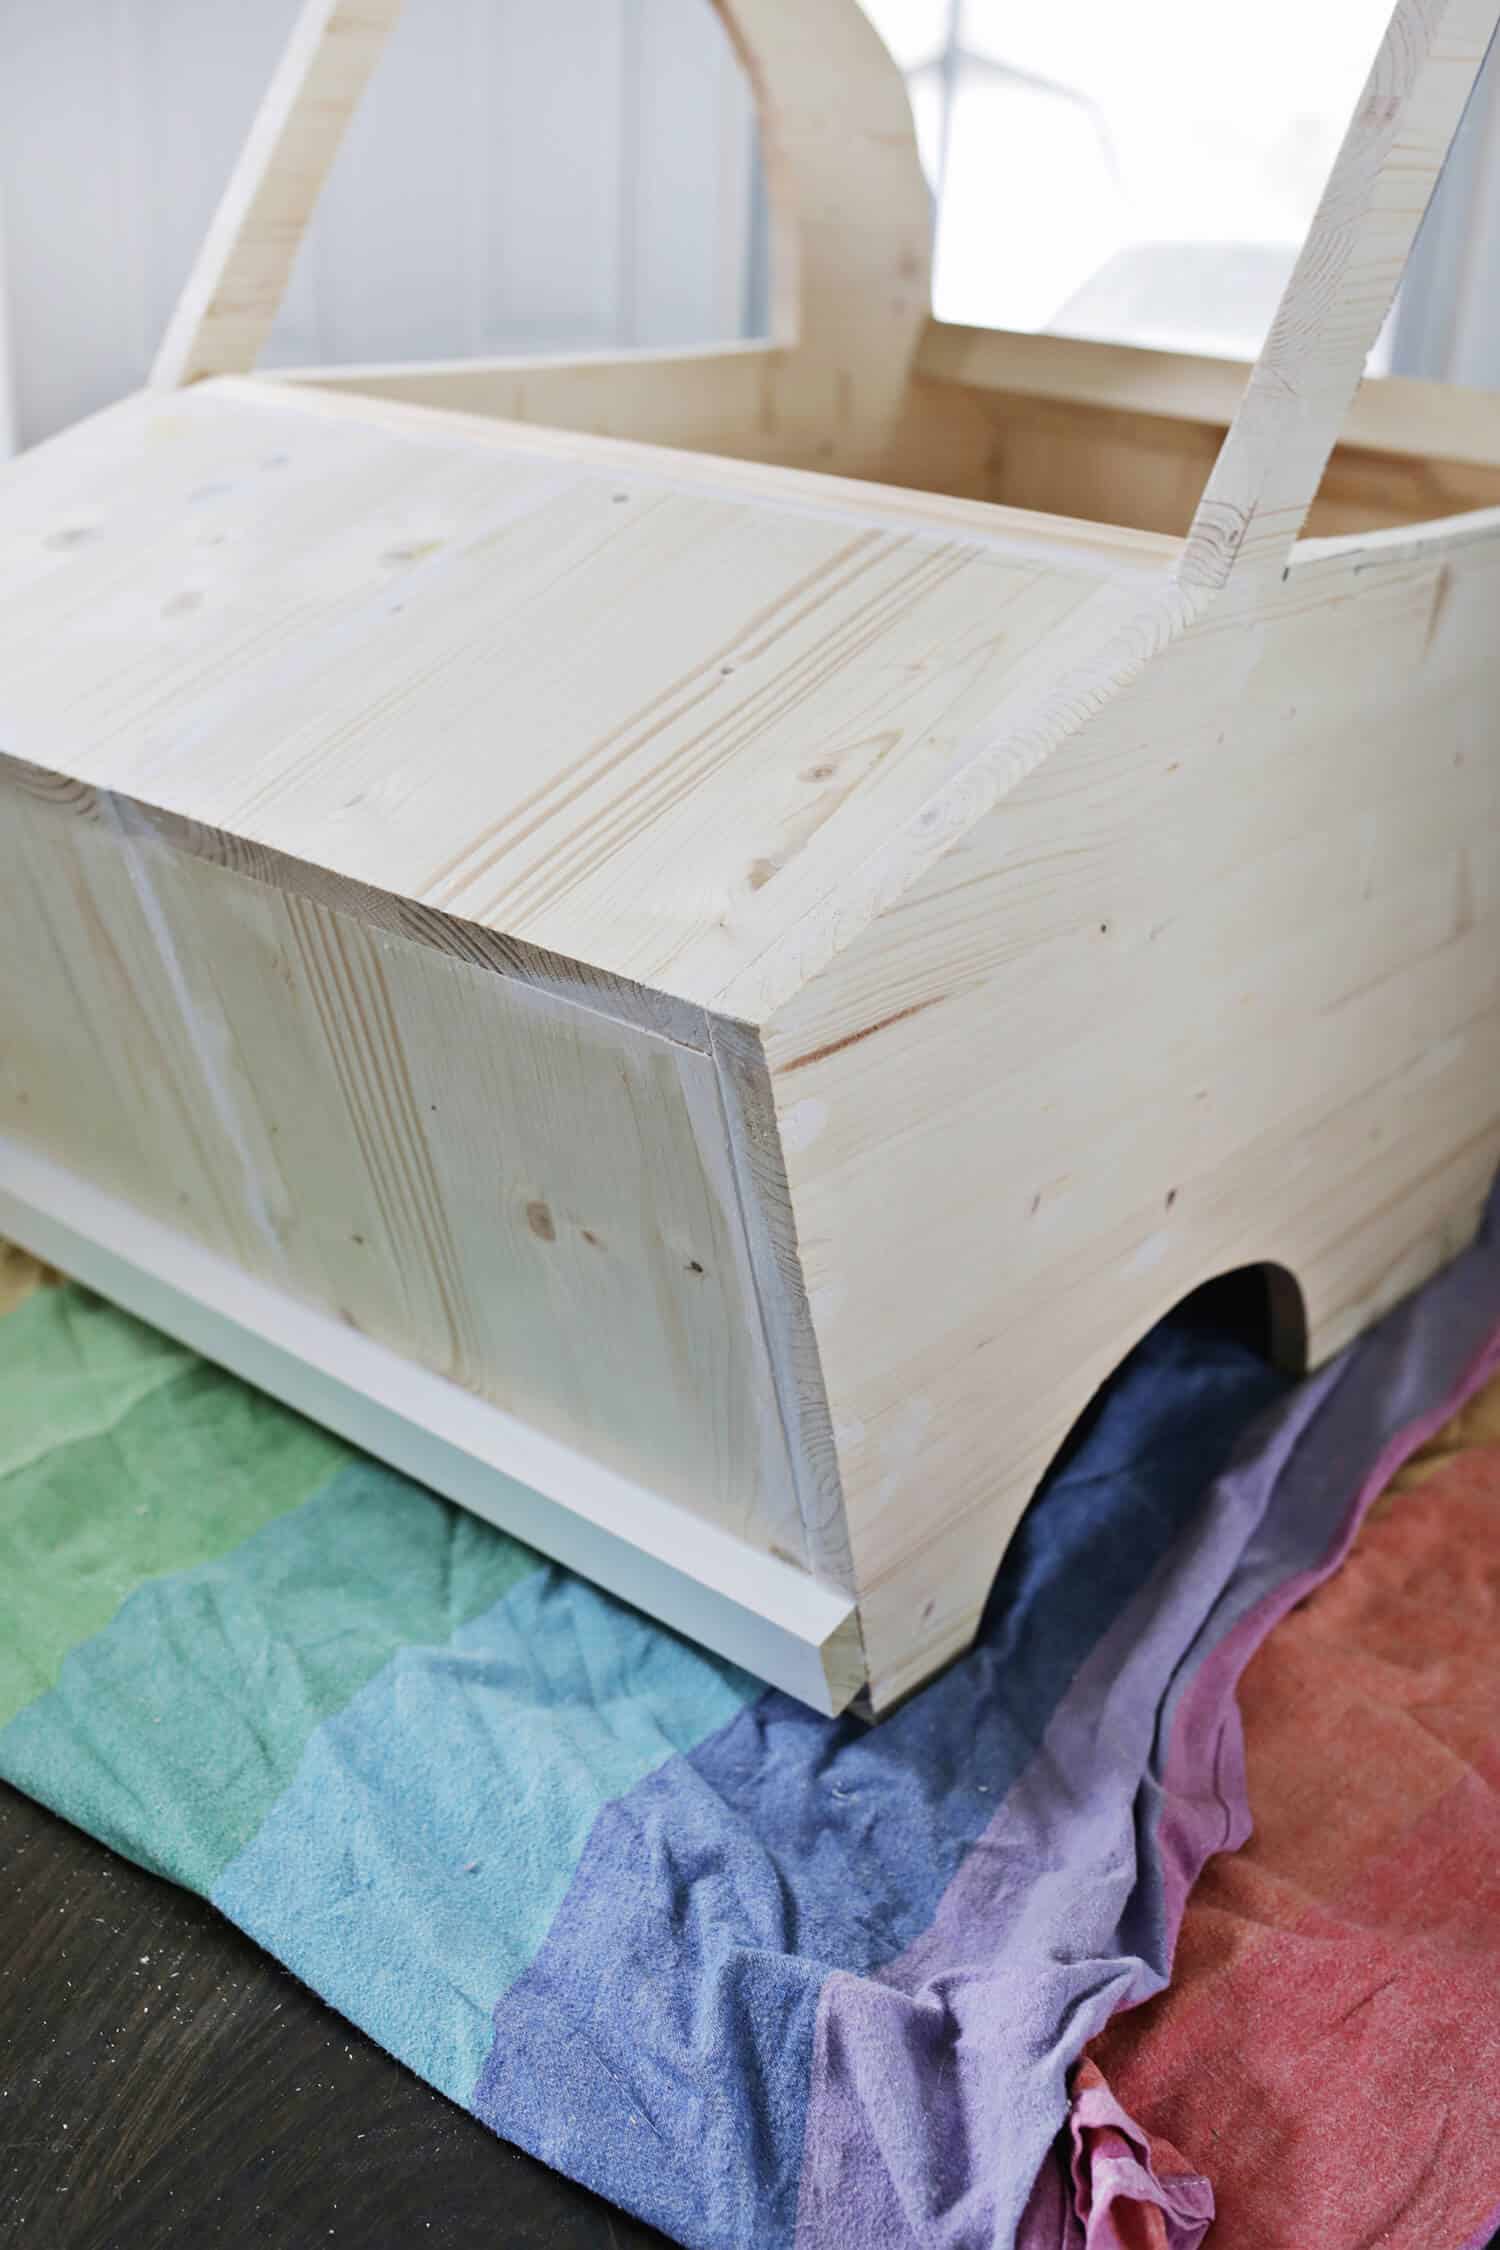 Fill any gaps or crevices with wood filler or caulk, allow to dry and do a light sanding where needed. You can also use the 1 1/2″ boards to make a bumper for the front and back panels at this point and attach them with wood glue and nails.
 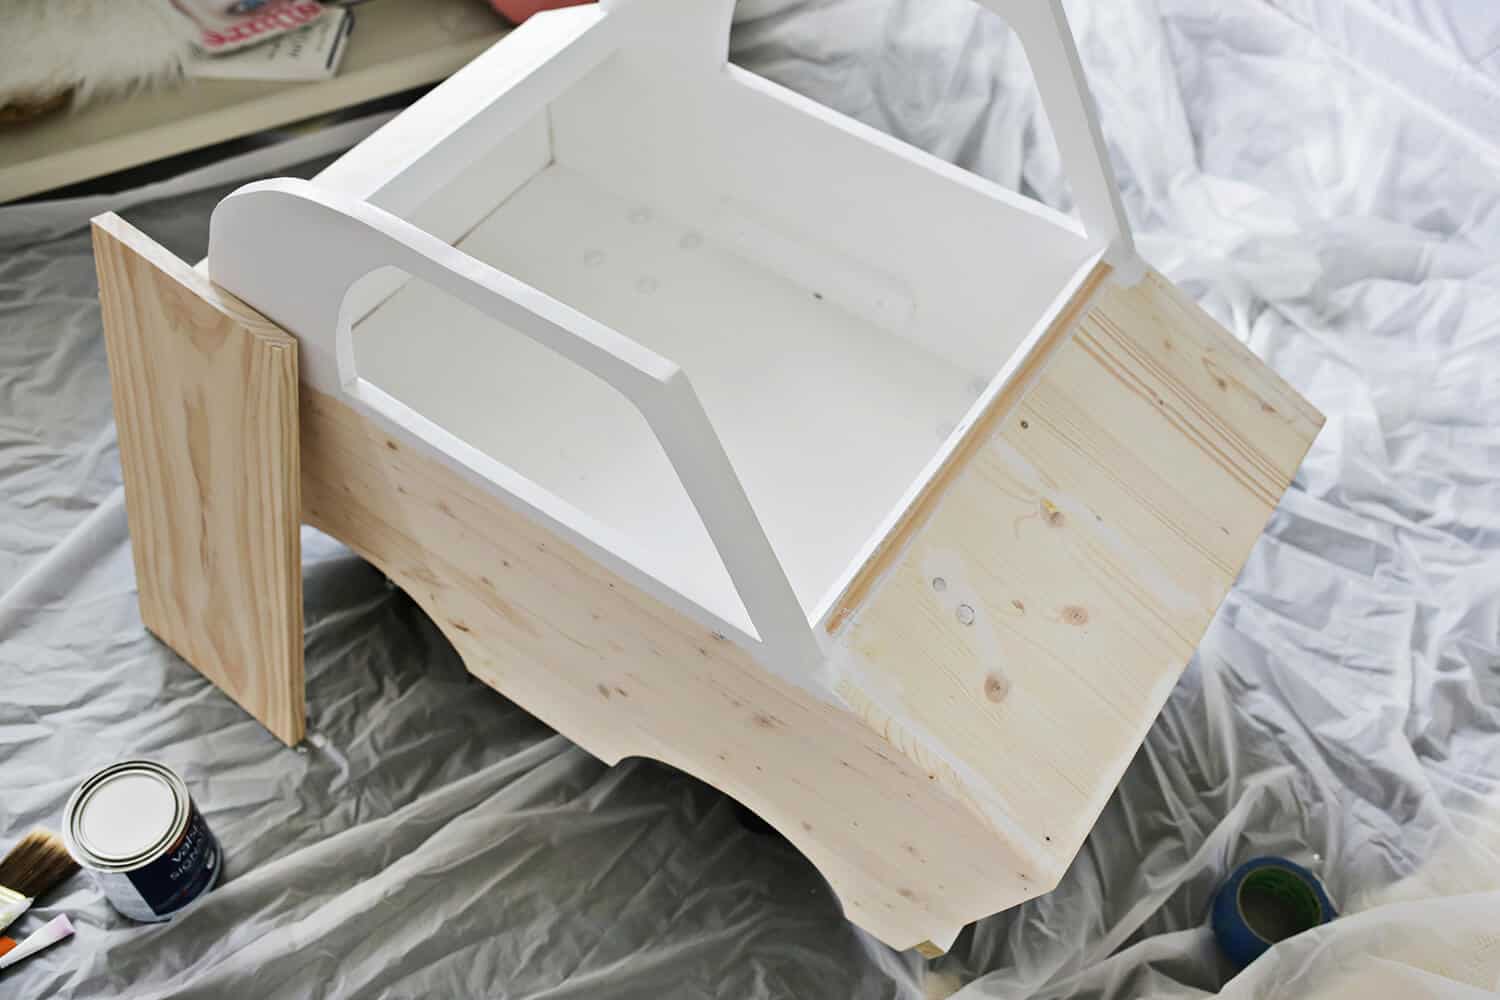 Now it’s really starting to look like a car! Paint the inside and top window sections of your car white and allow to dry. This is a toy that should be kept either indoors or in a shed/garage, so I think interior paint would be fine, but you can do exterior if you want to.
 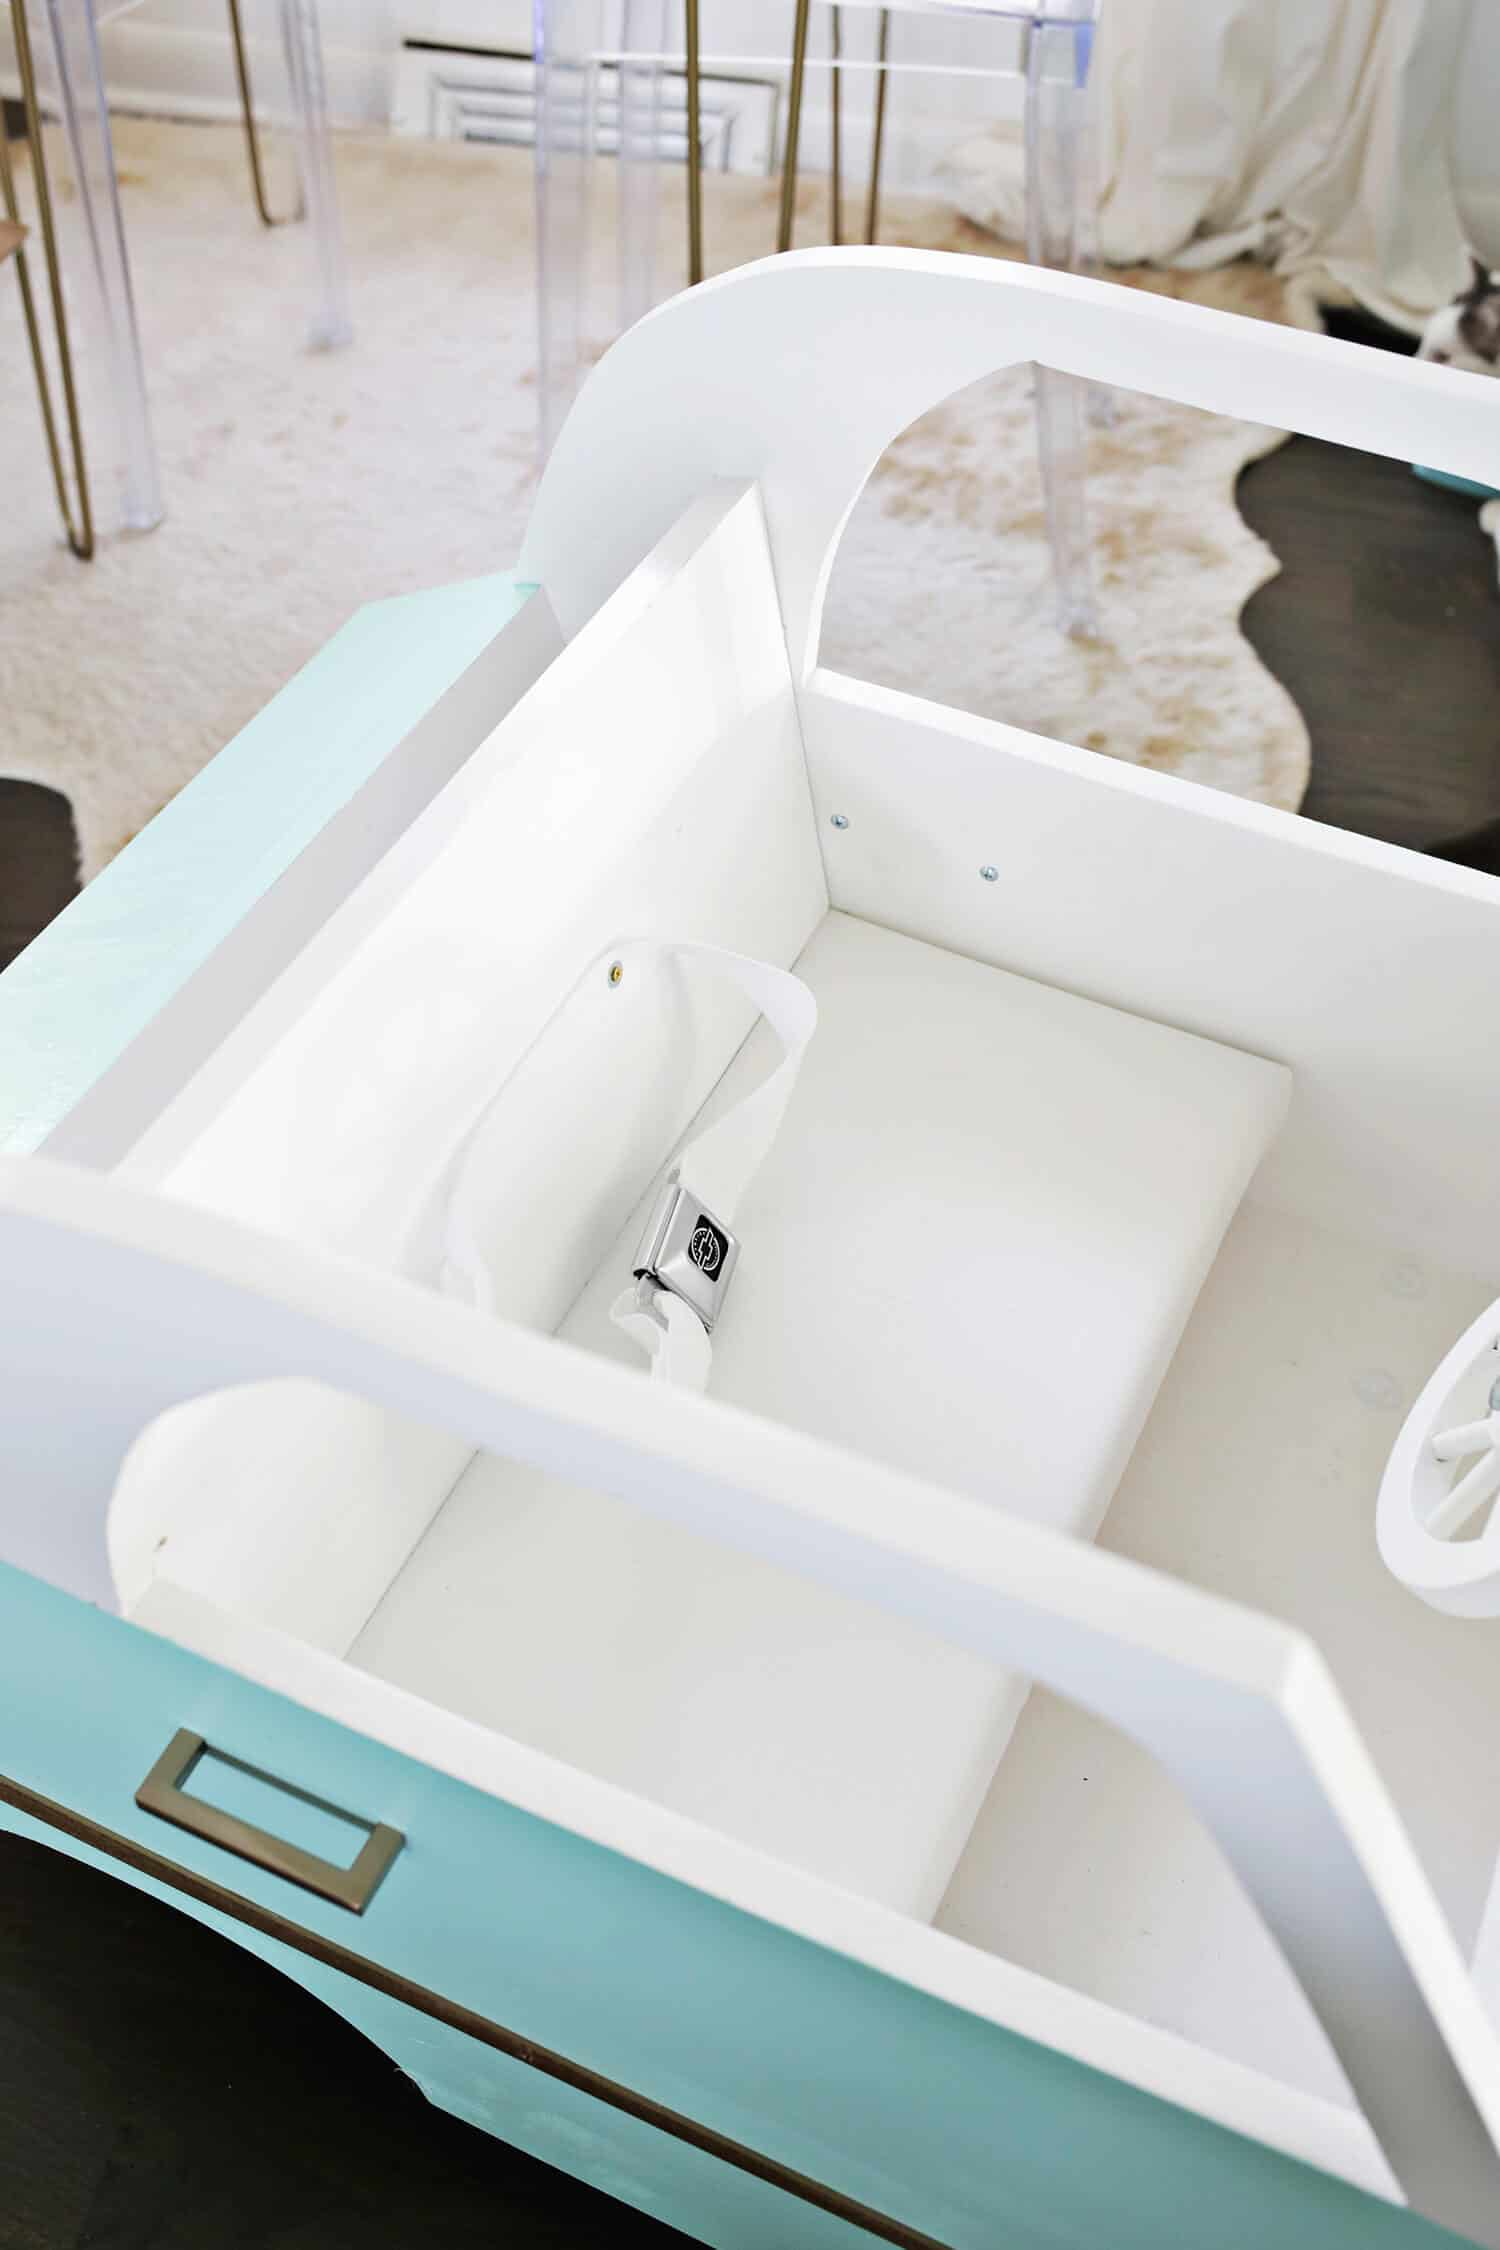 To finish the seat, cut 2 wood sections of your 10″ wide boards (both cut to 20″ long), paint them your interior color and set one on the wooden shelf you created earlier and angle the back piece of the seat slightly right behind it. Glue the boards in place and then nail the boards in from the outside as well. To attach the seat belt, use a screw with a washer to attach the belt directly to the seat in two different places so that the belt is centered, waist-high on the seat. As an optional step, you can cover the bottom board of your seat with a piece of upholstery foam (cut to the seat size) and then wrap it in vinyl and staple gun the fabric on the bottom side. This will give you a bit of a cushier seat for baby’s bottom.
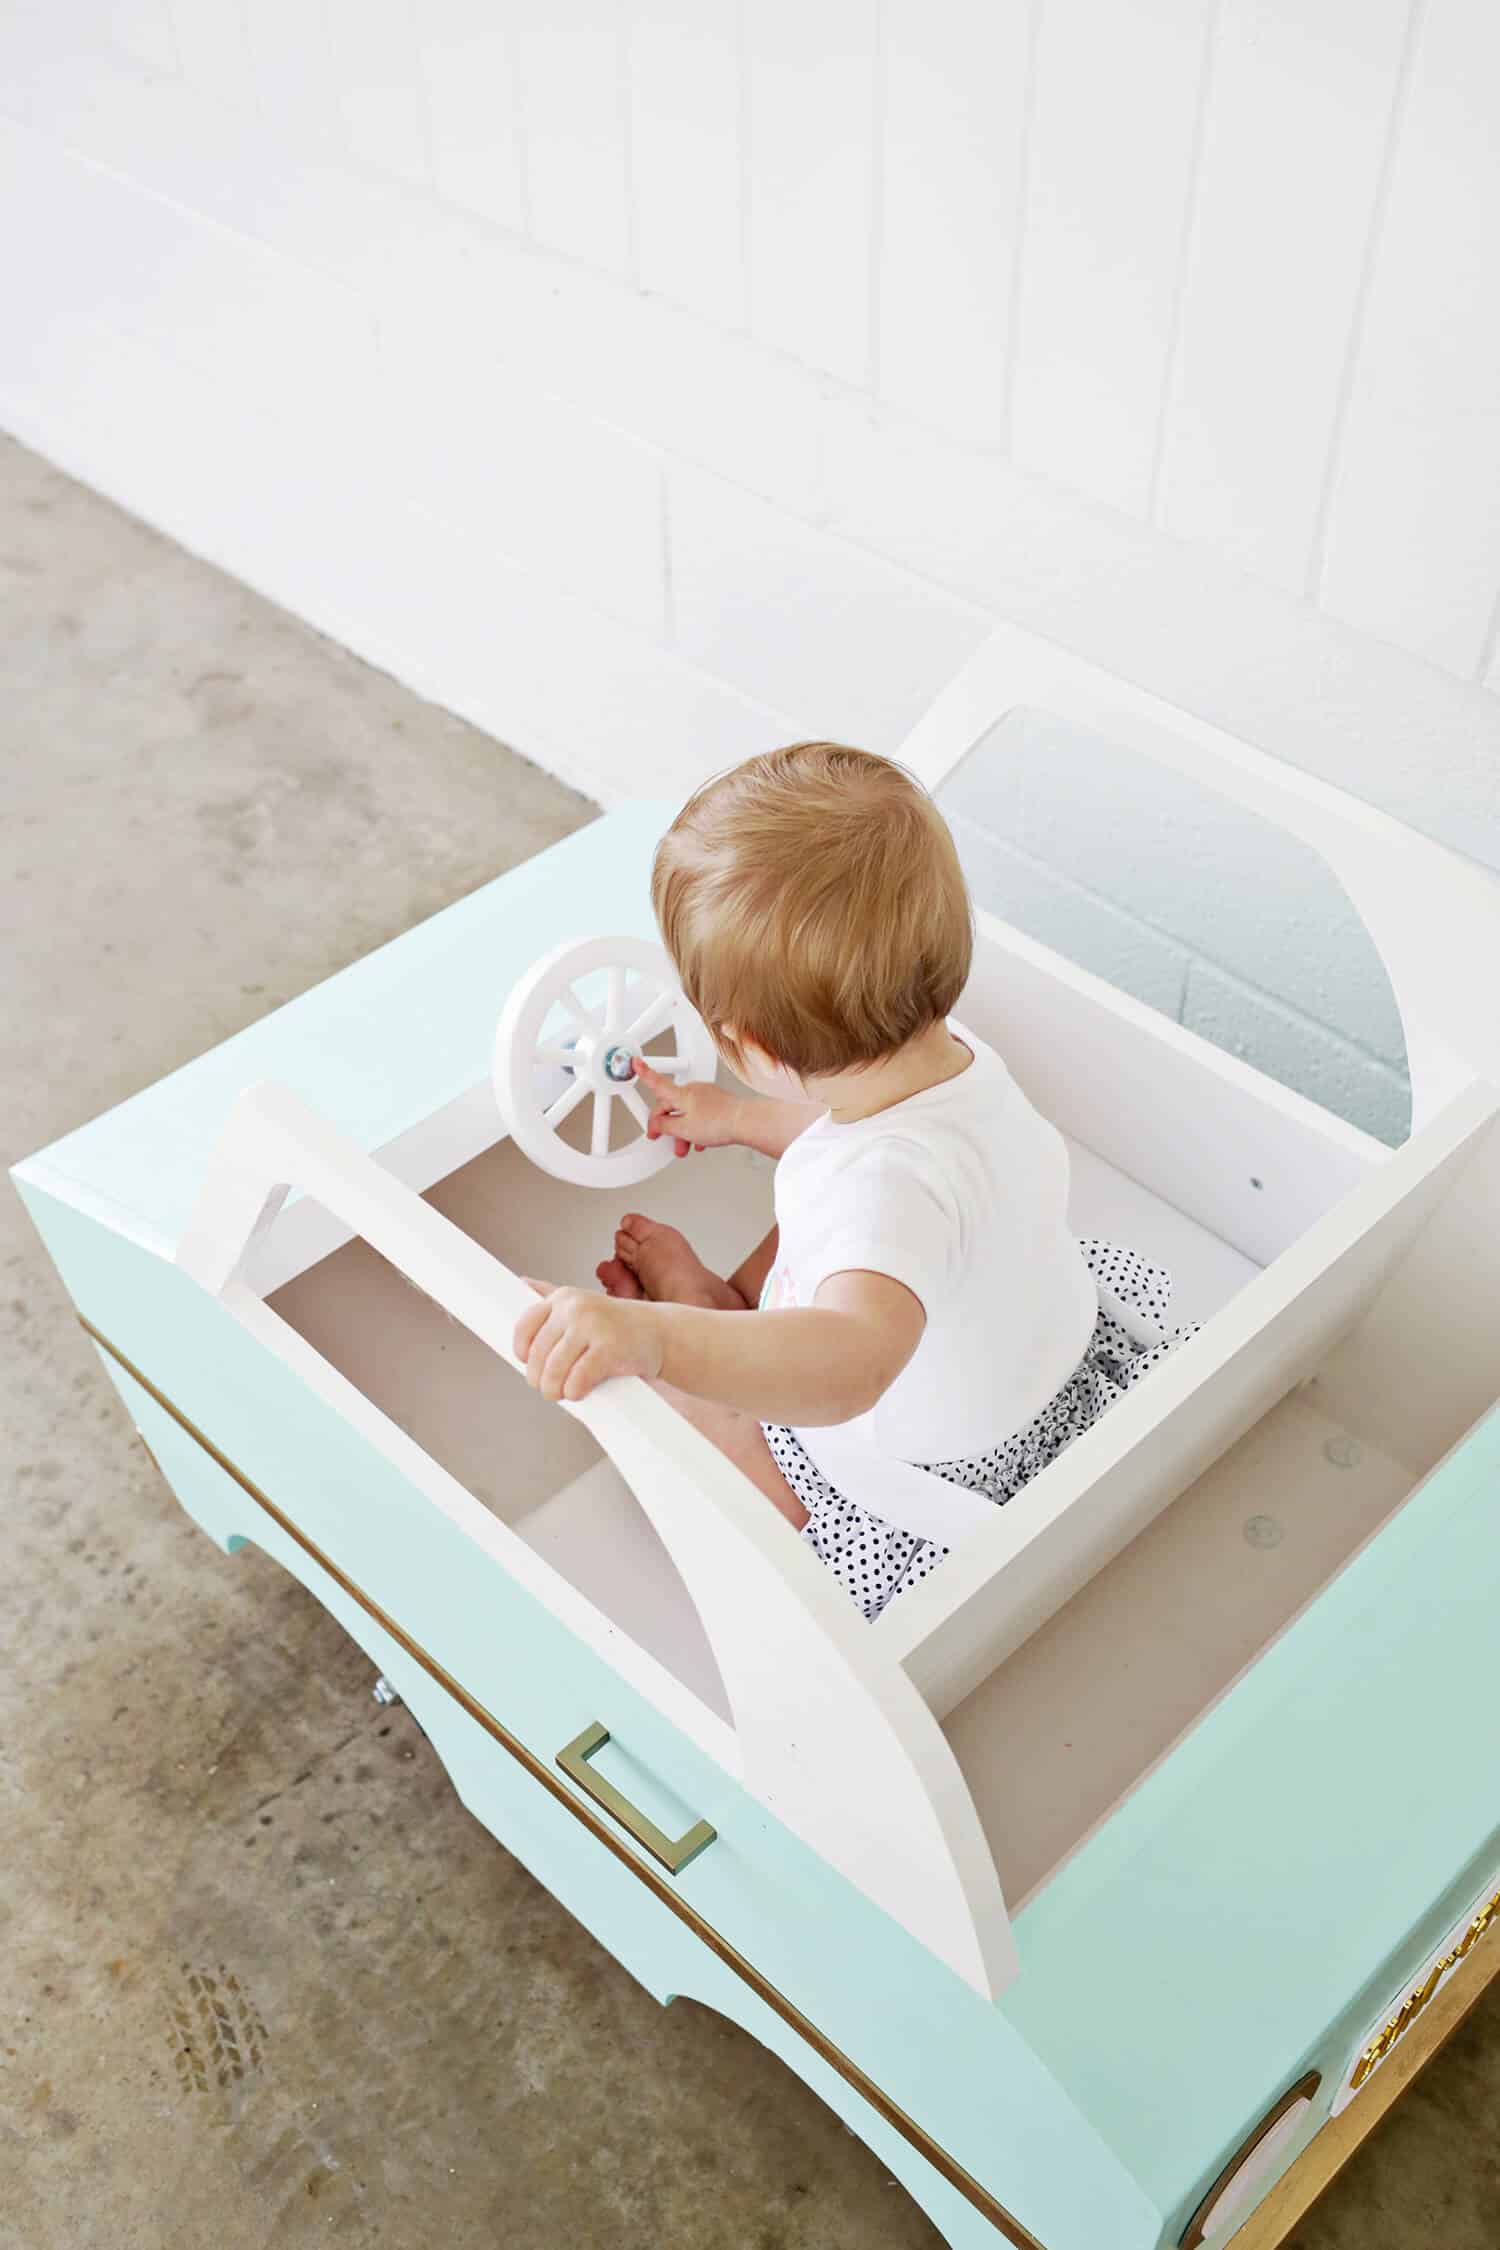
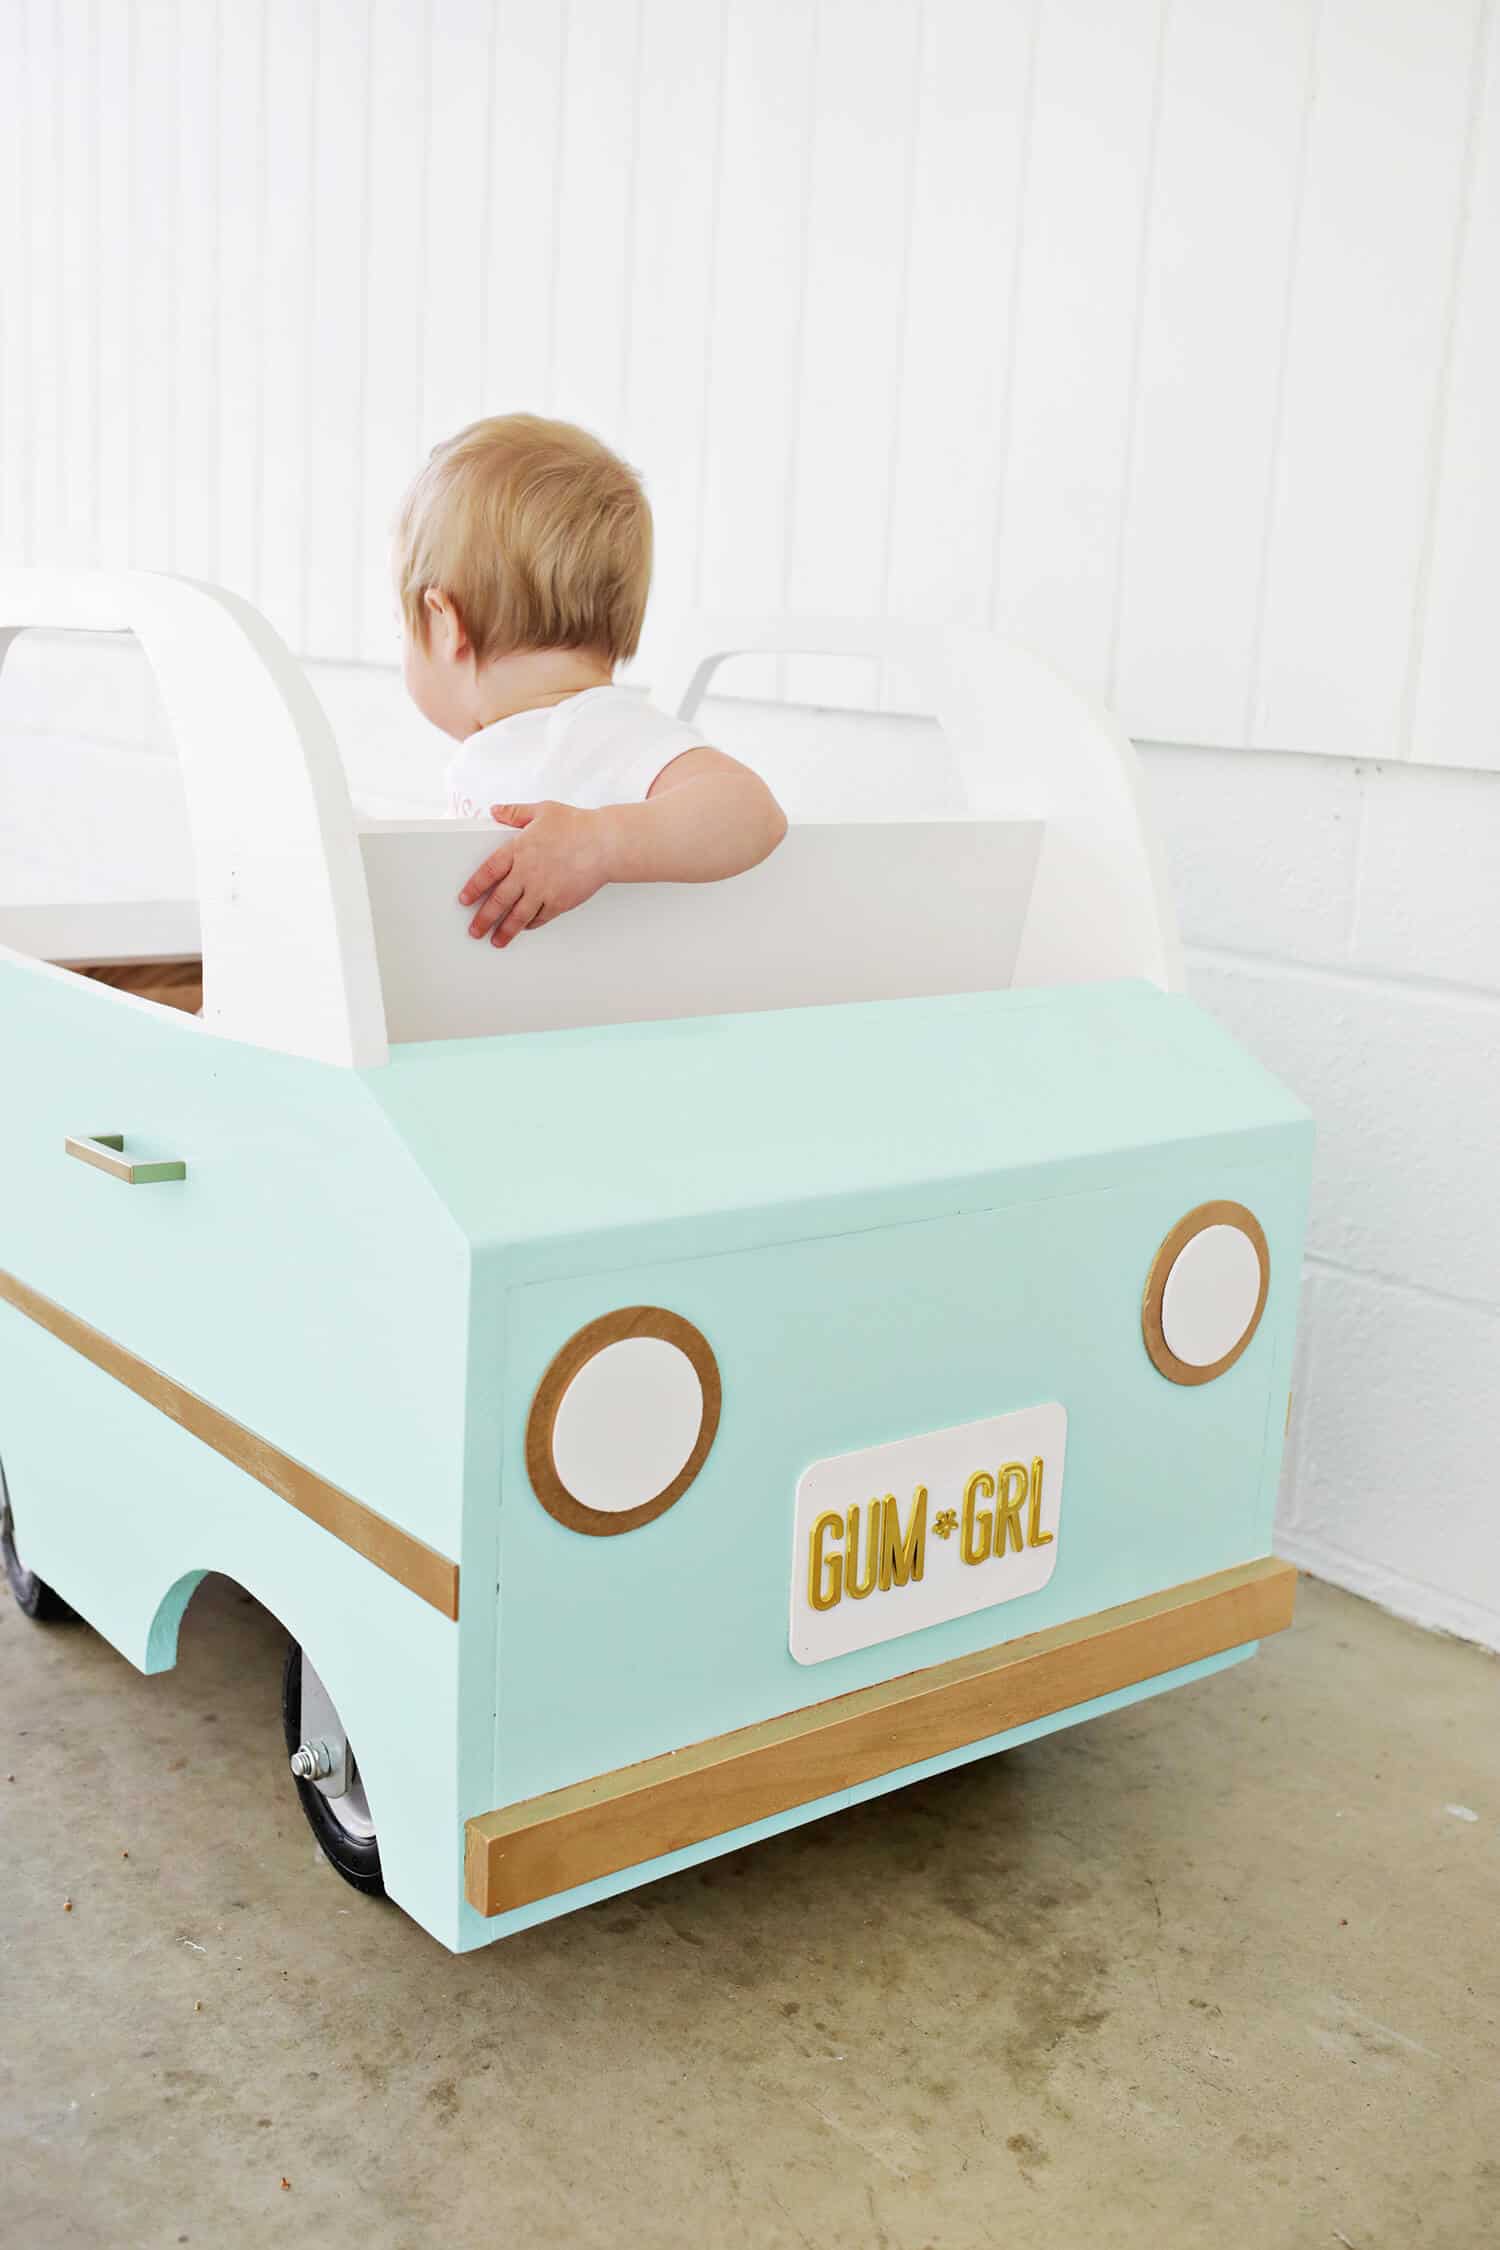
Paint your steering wheel and attach it through the hole you drilled earlier with a long bolt and a nut on the other end. If you want it to be able to spin the wheel around, put the steering wheel through the bolt, then attach a nut, then put the bolt into the hole in the front dashboard, then put another nut on the other side. If you tighten the nuts on either side of the wood but leave a little wiggle room between the steering wheel and the top nut, then your wheel should still be able to spin freely.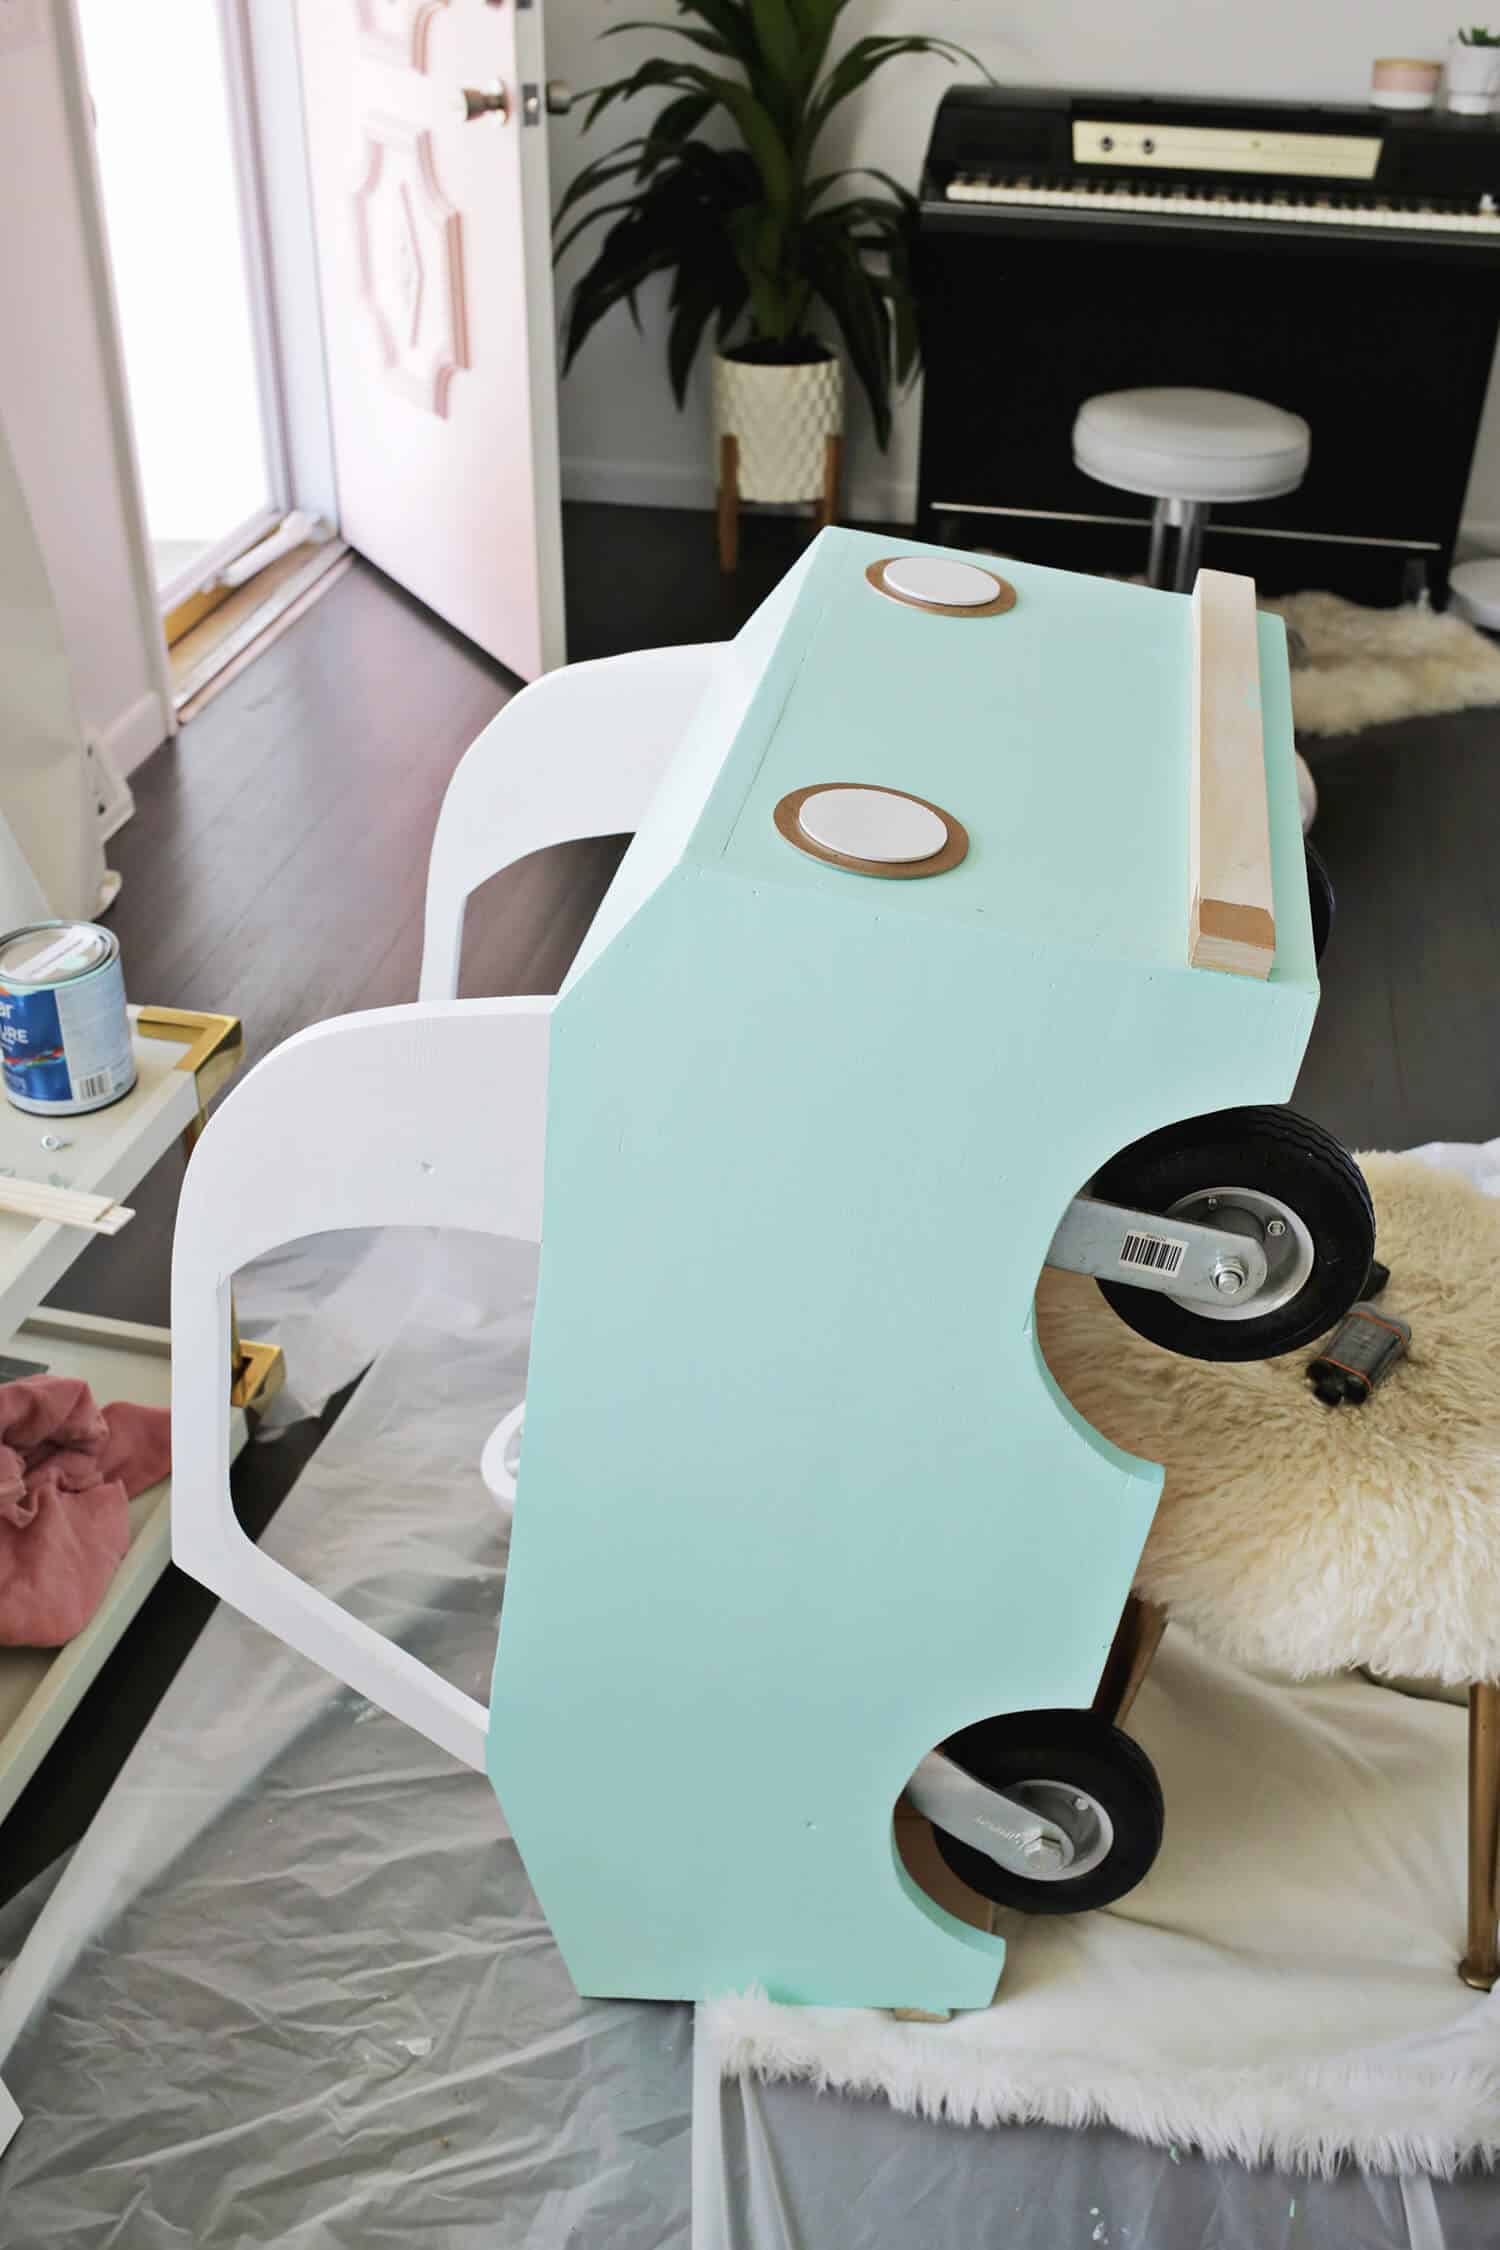 Paint the rest of the car your color of choice (I used Valspar’s Beach Blanket color) and then you can start to add fun details like headlights, license plates, and side strips with your circle shapes and bass wood material. I just cut a rounded rectangle for a license plate and used some gold letterboard letters as the plate numbers (attached with super glue). Attach your wheels back on (if you took them off at that step) and your car is ready to ride!
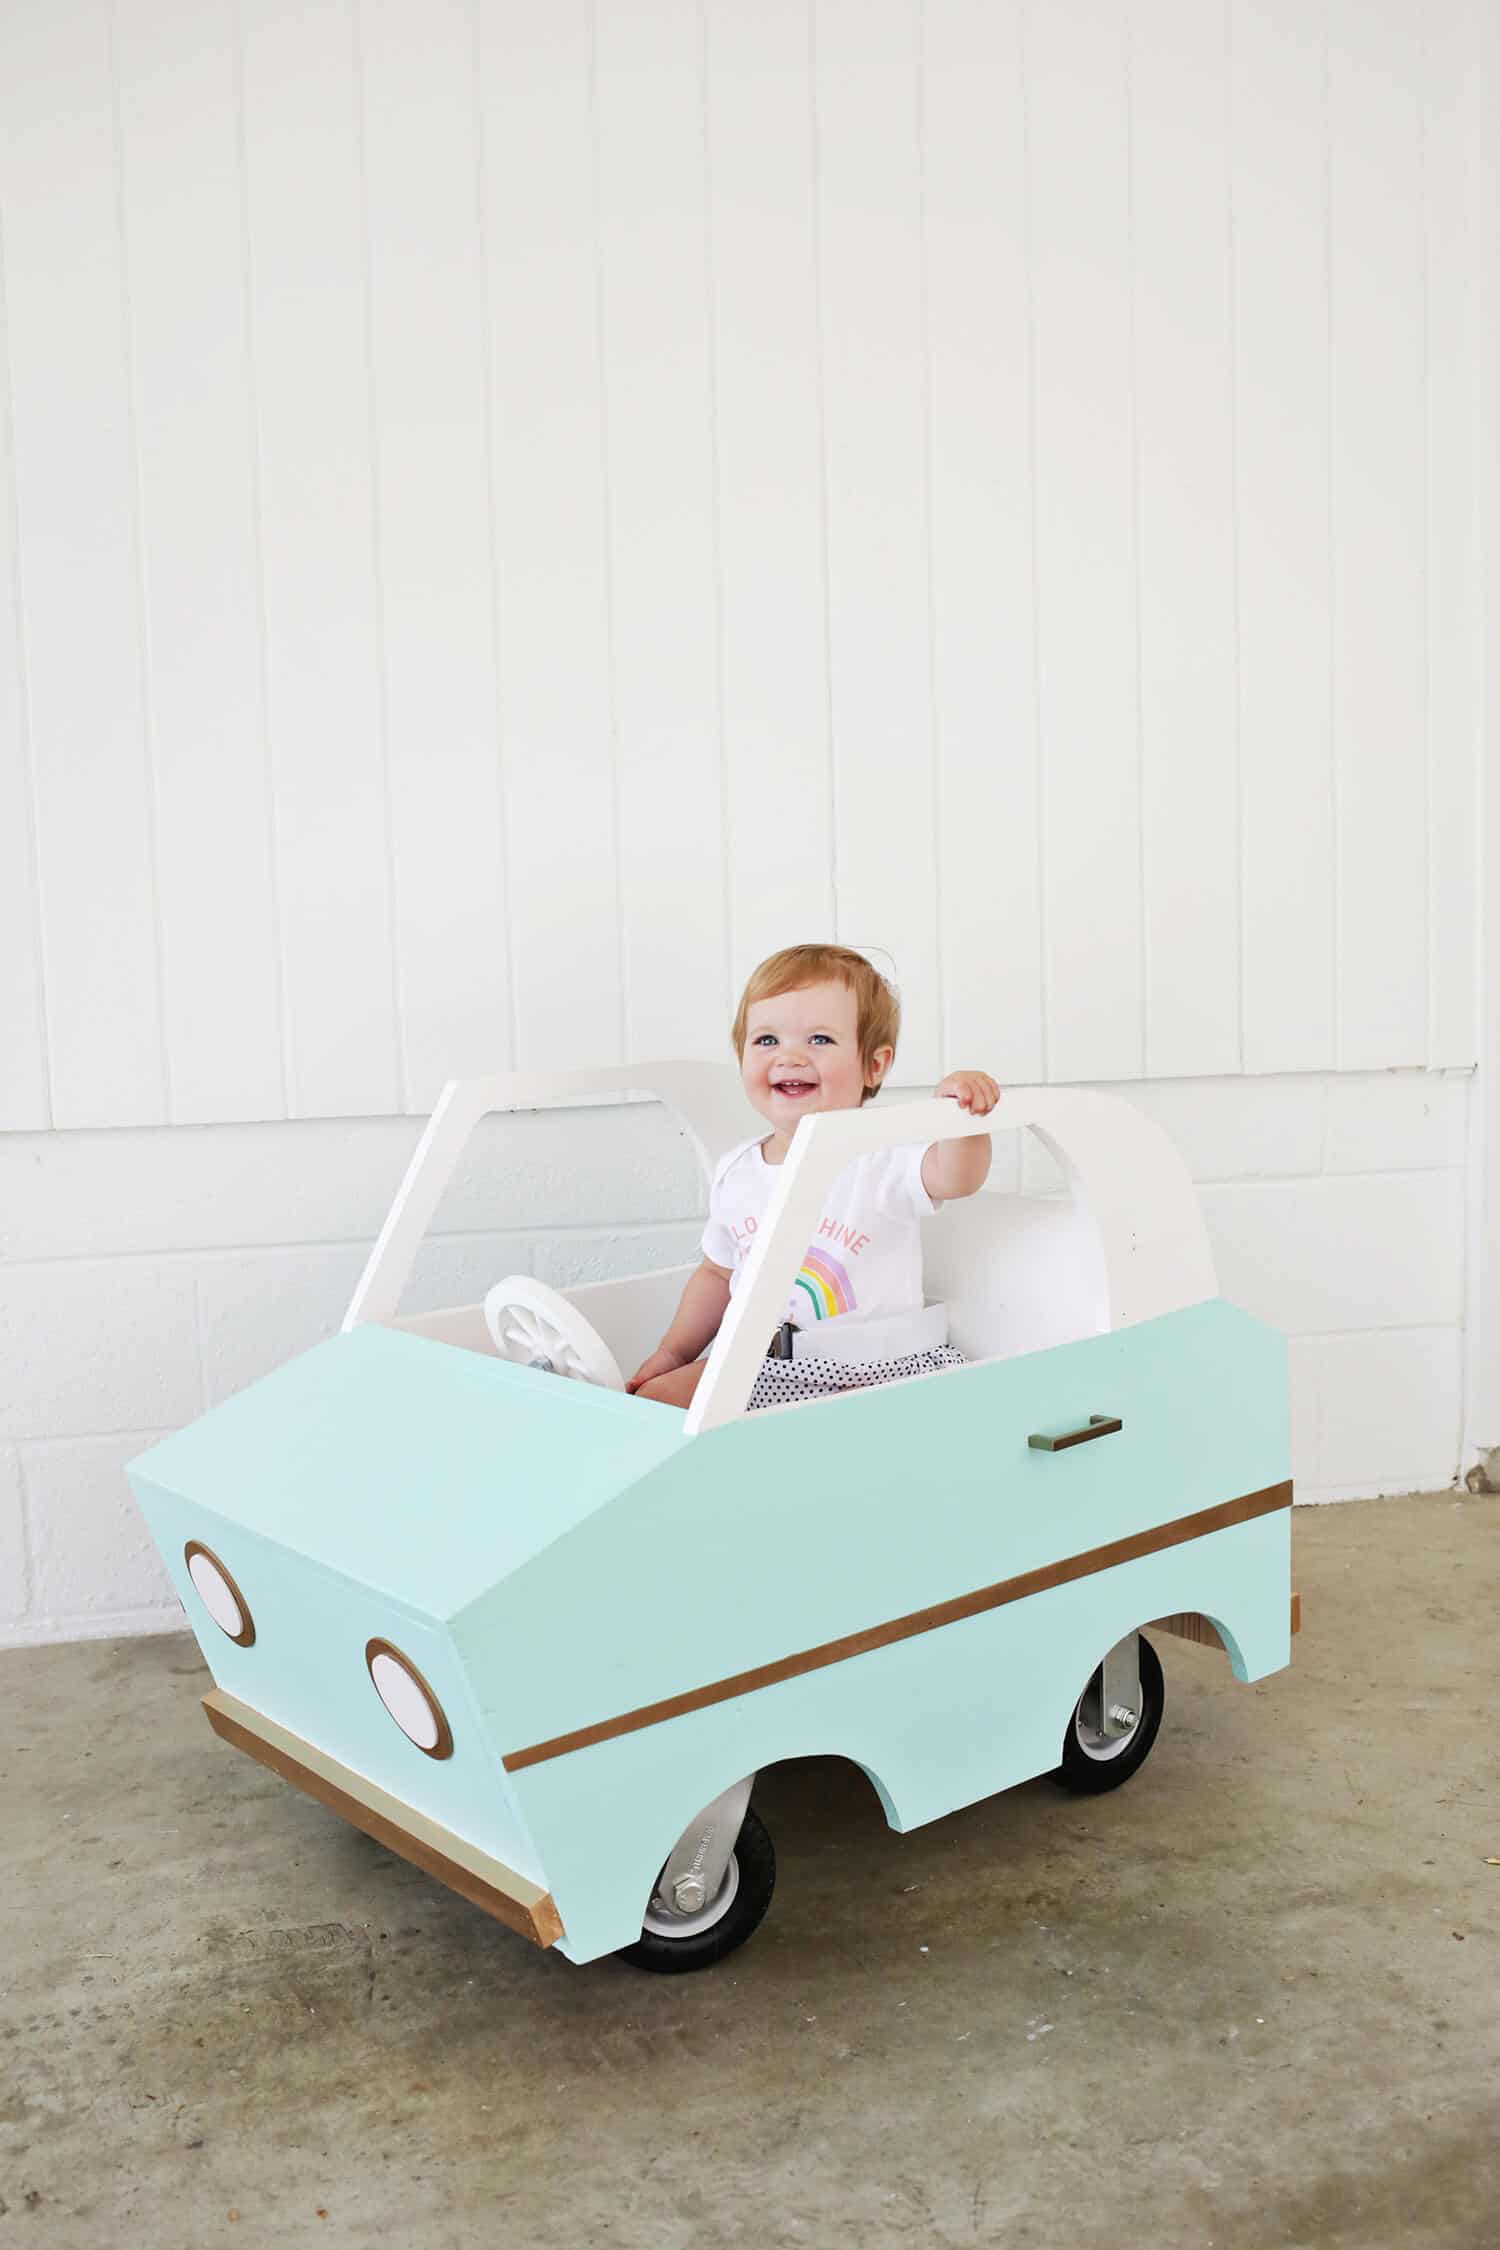
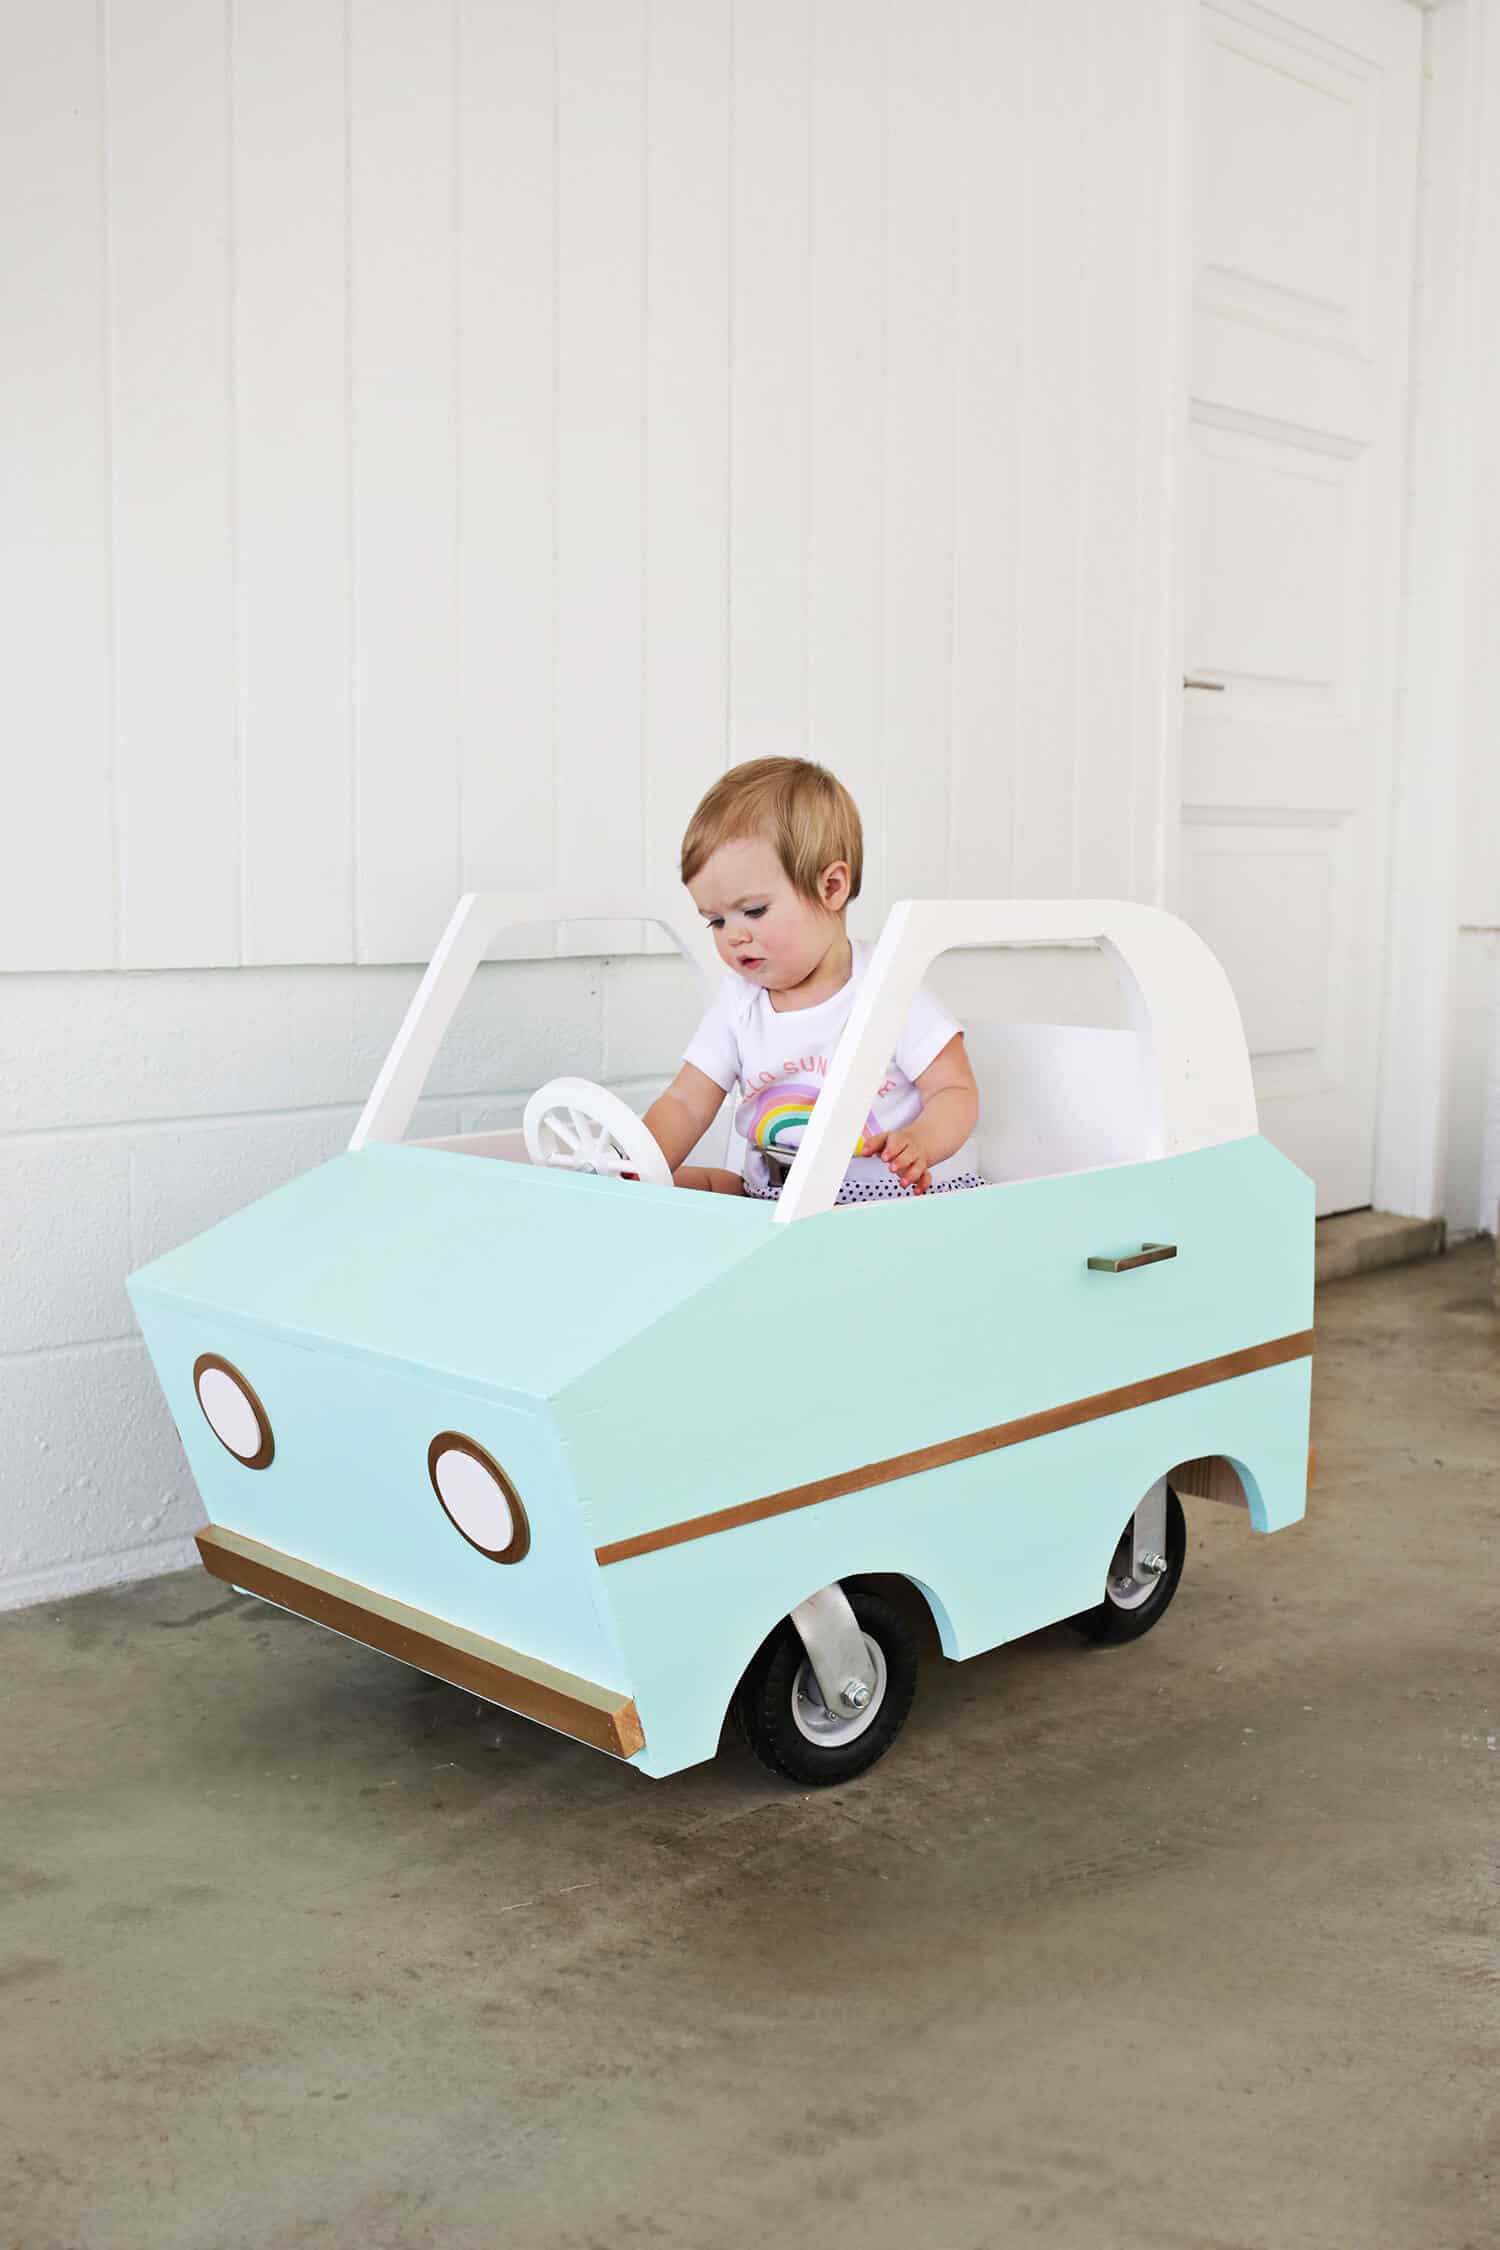
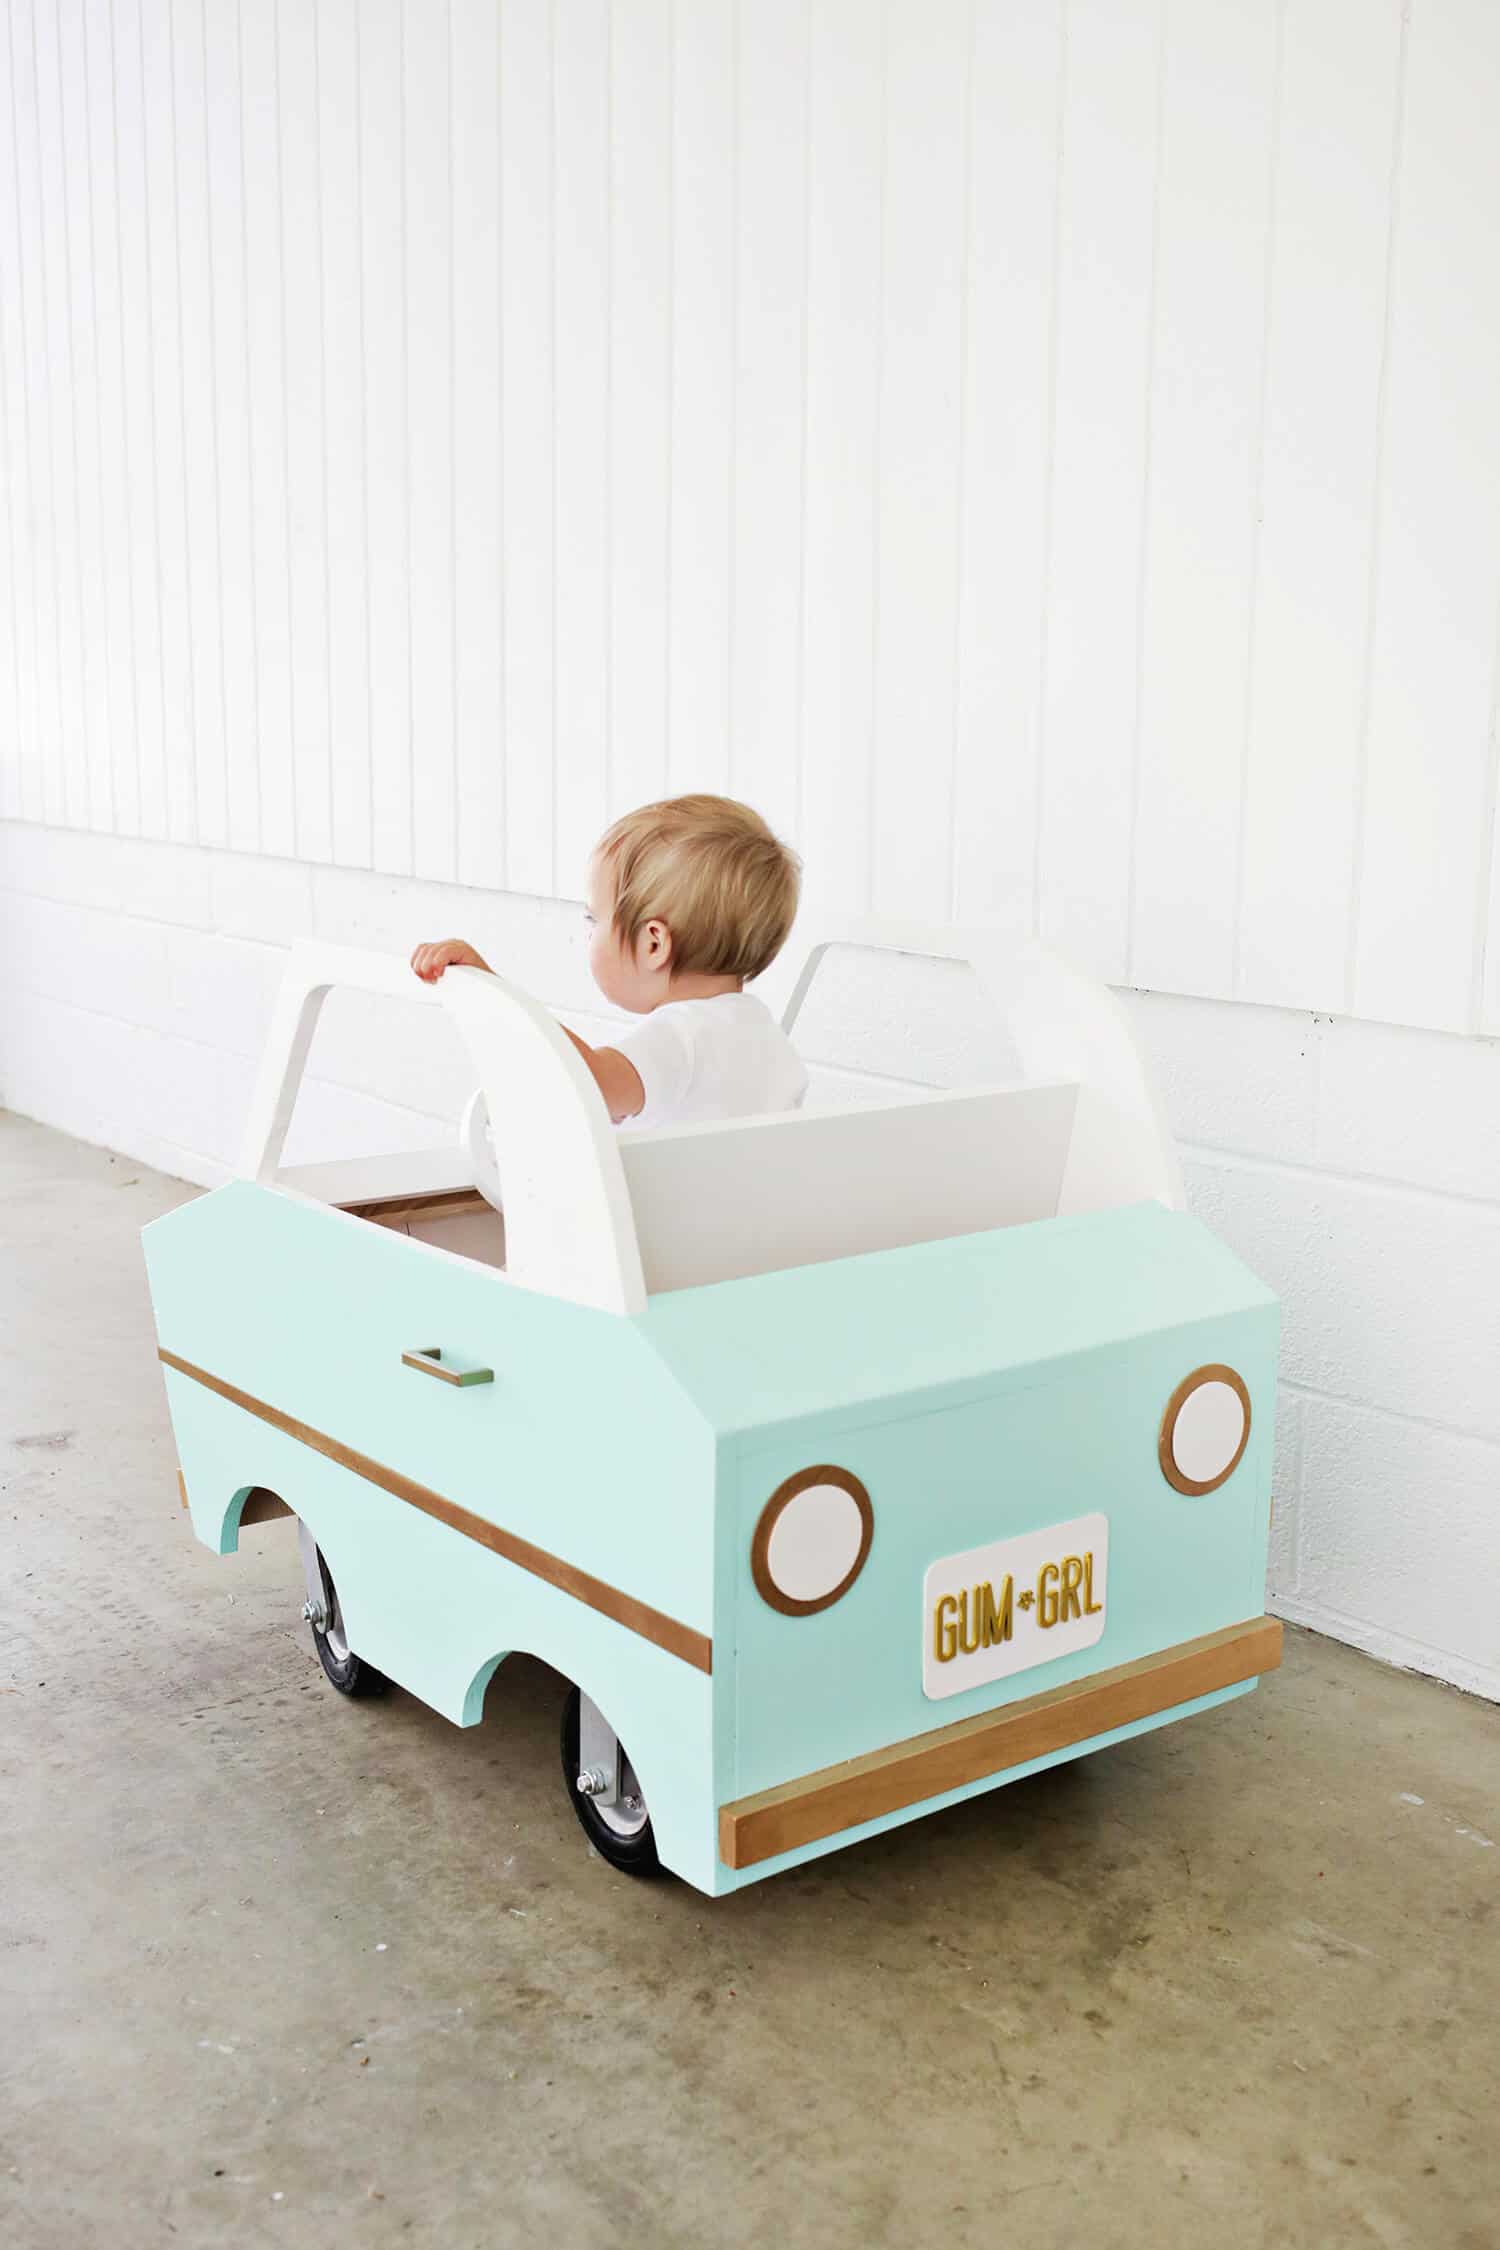
 OMG, HOW CUTE IS THAT??!!
 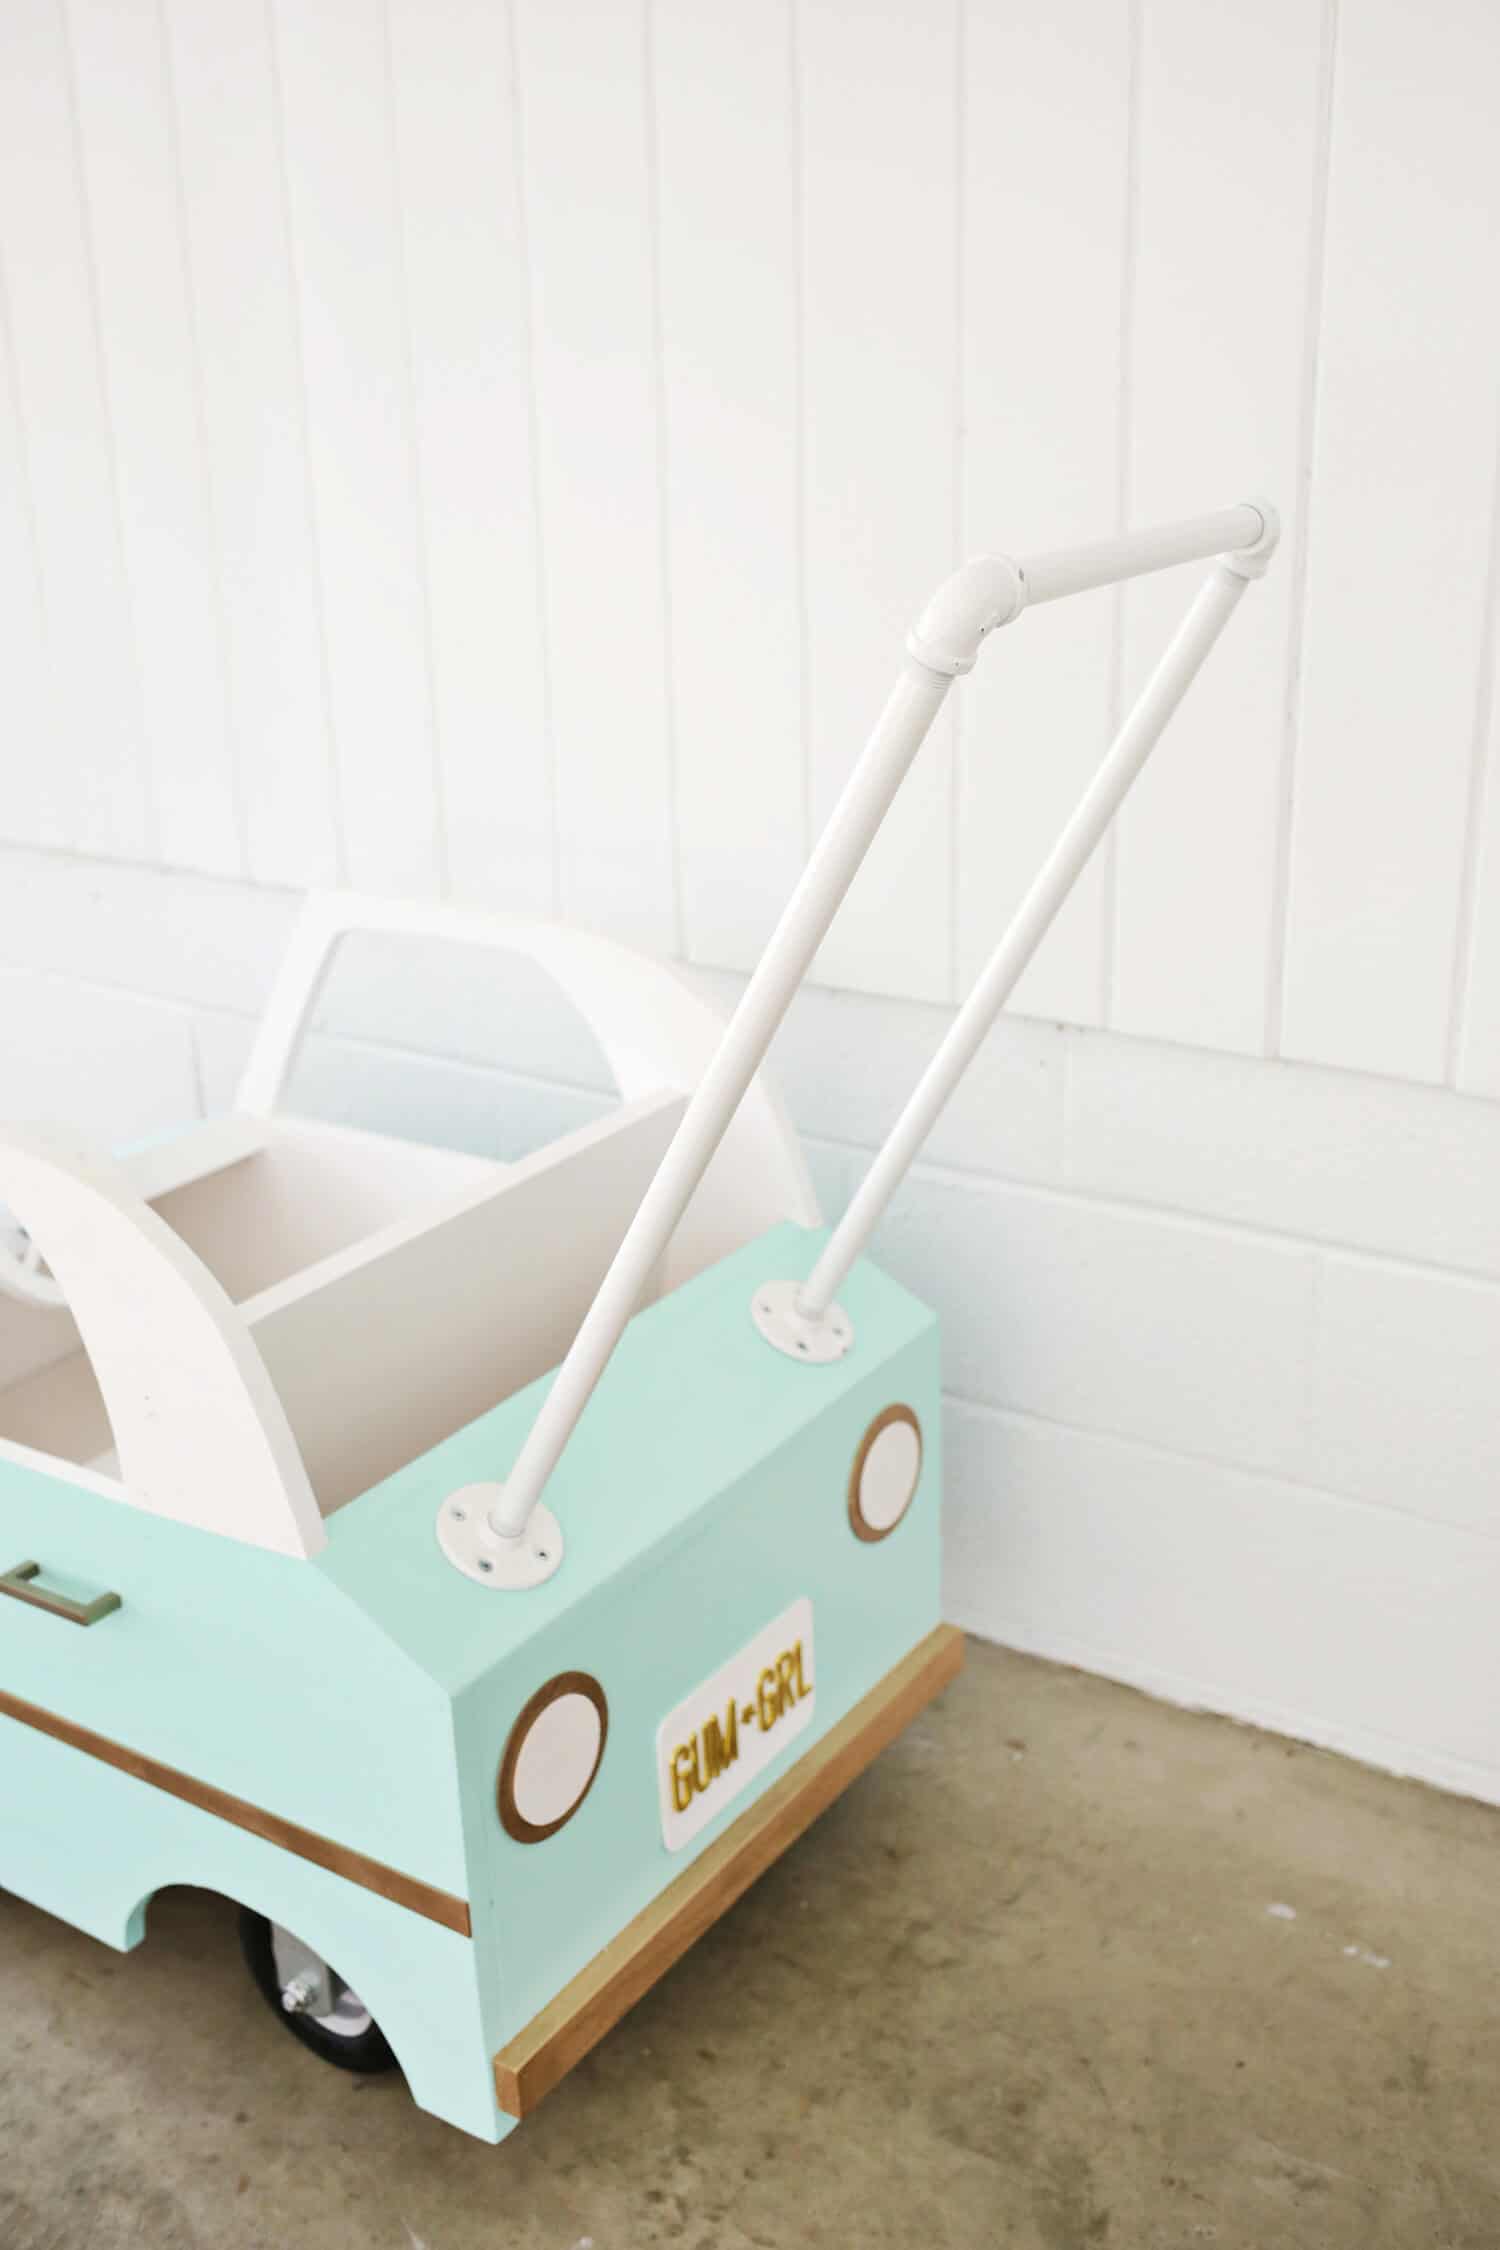 Now, you can push the car by just holding onto the back of it, but if you want a handle so you don’t have to bend over, you can attach the handle supplies in the supply list above to make a long lawn mower-type handle and attach the two round bases with some nuts and bolts. I would clean and paint the handle though so you don’t get grease on your hands when you use it. If you need to store the car, you can take the handle off and just place it inside the car body until you want to attach it again.
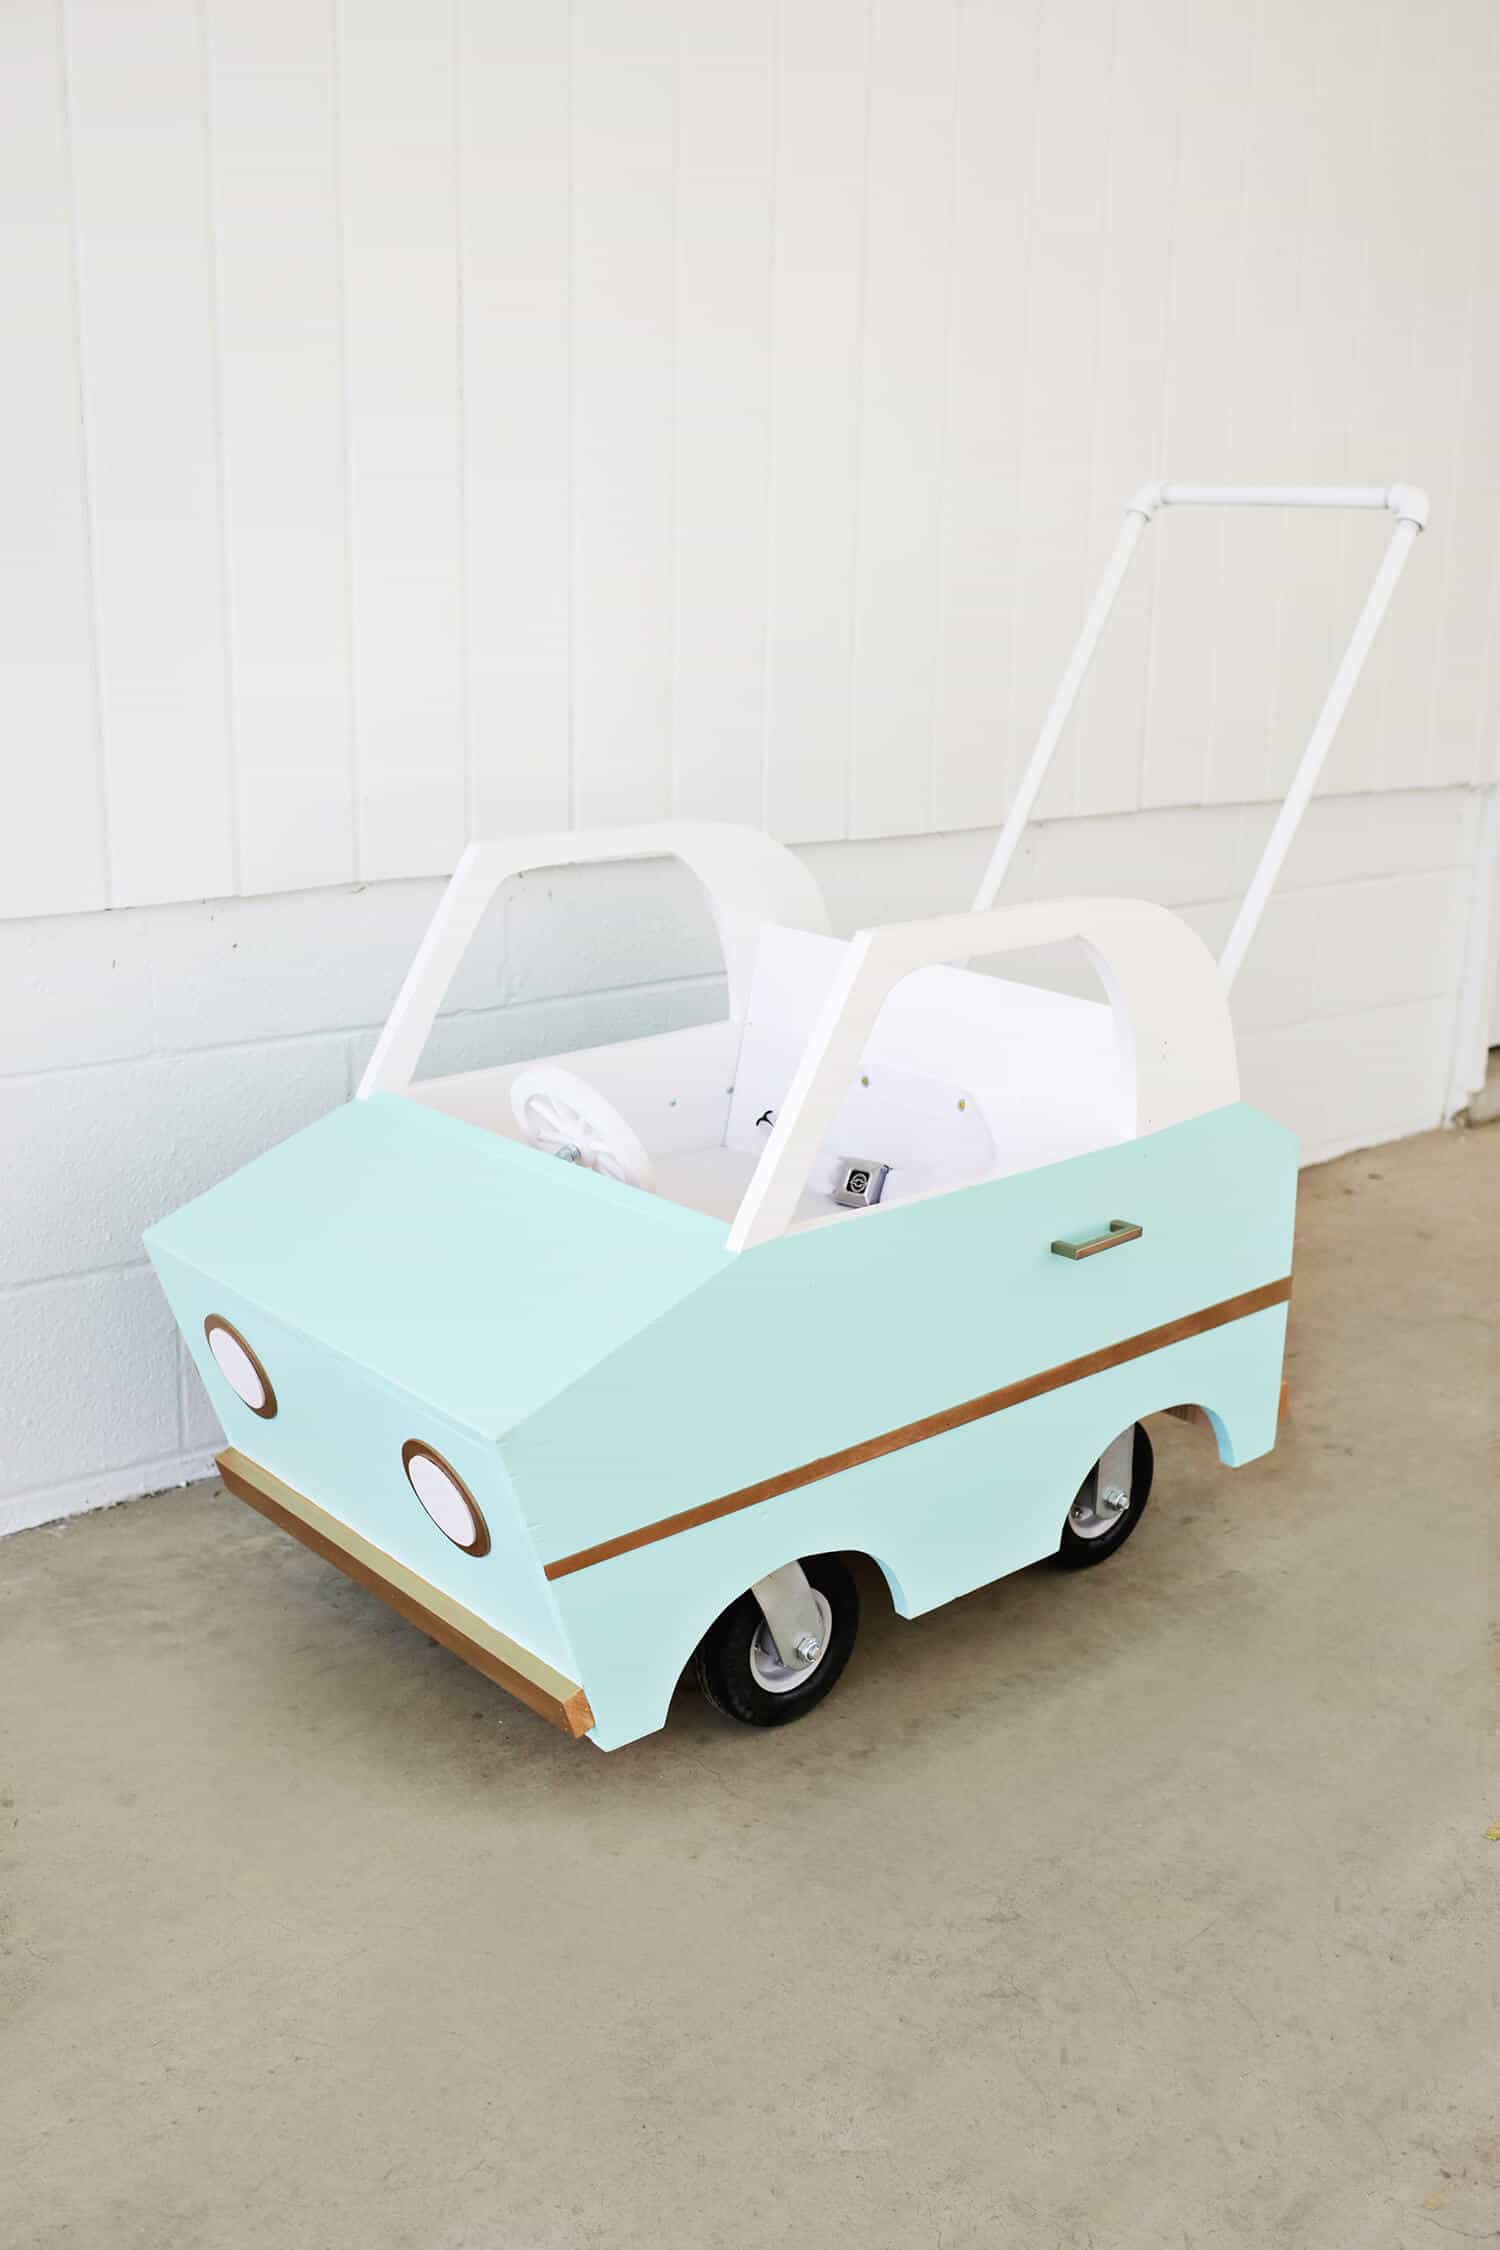
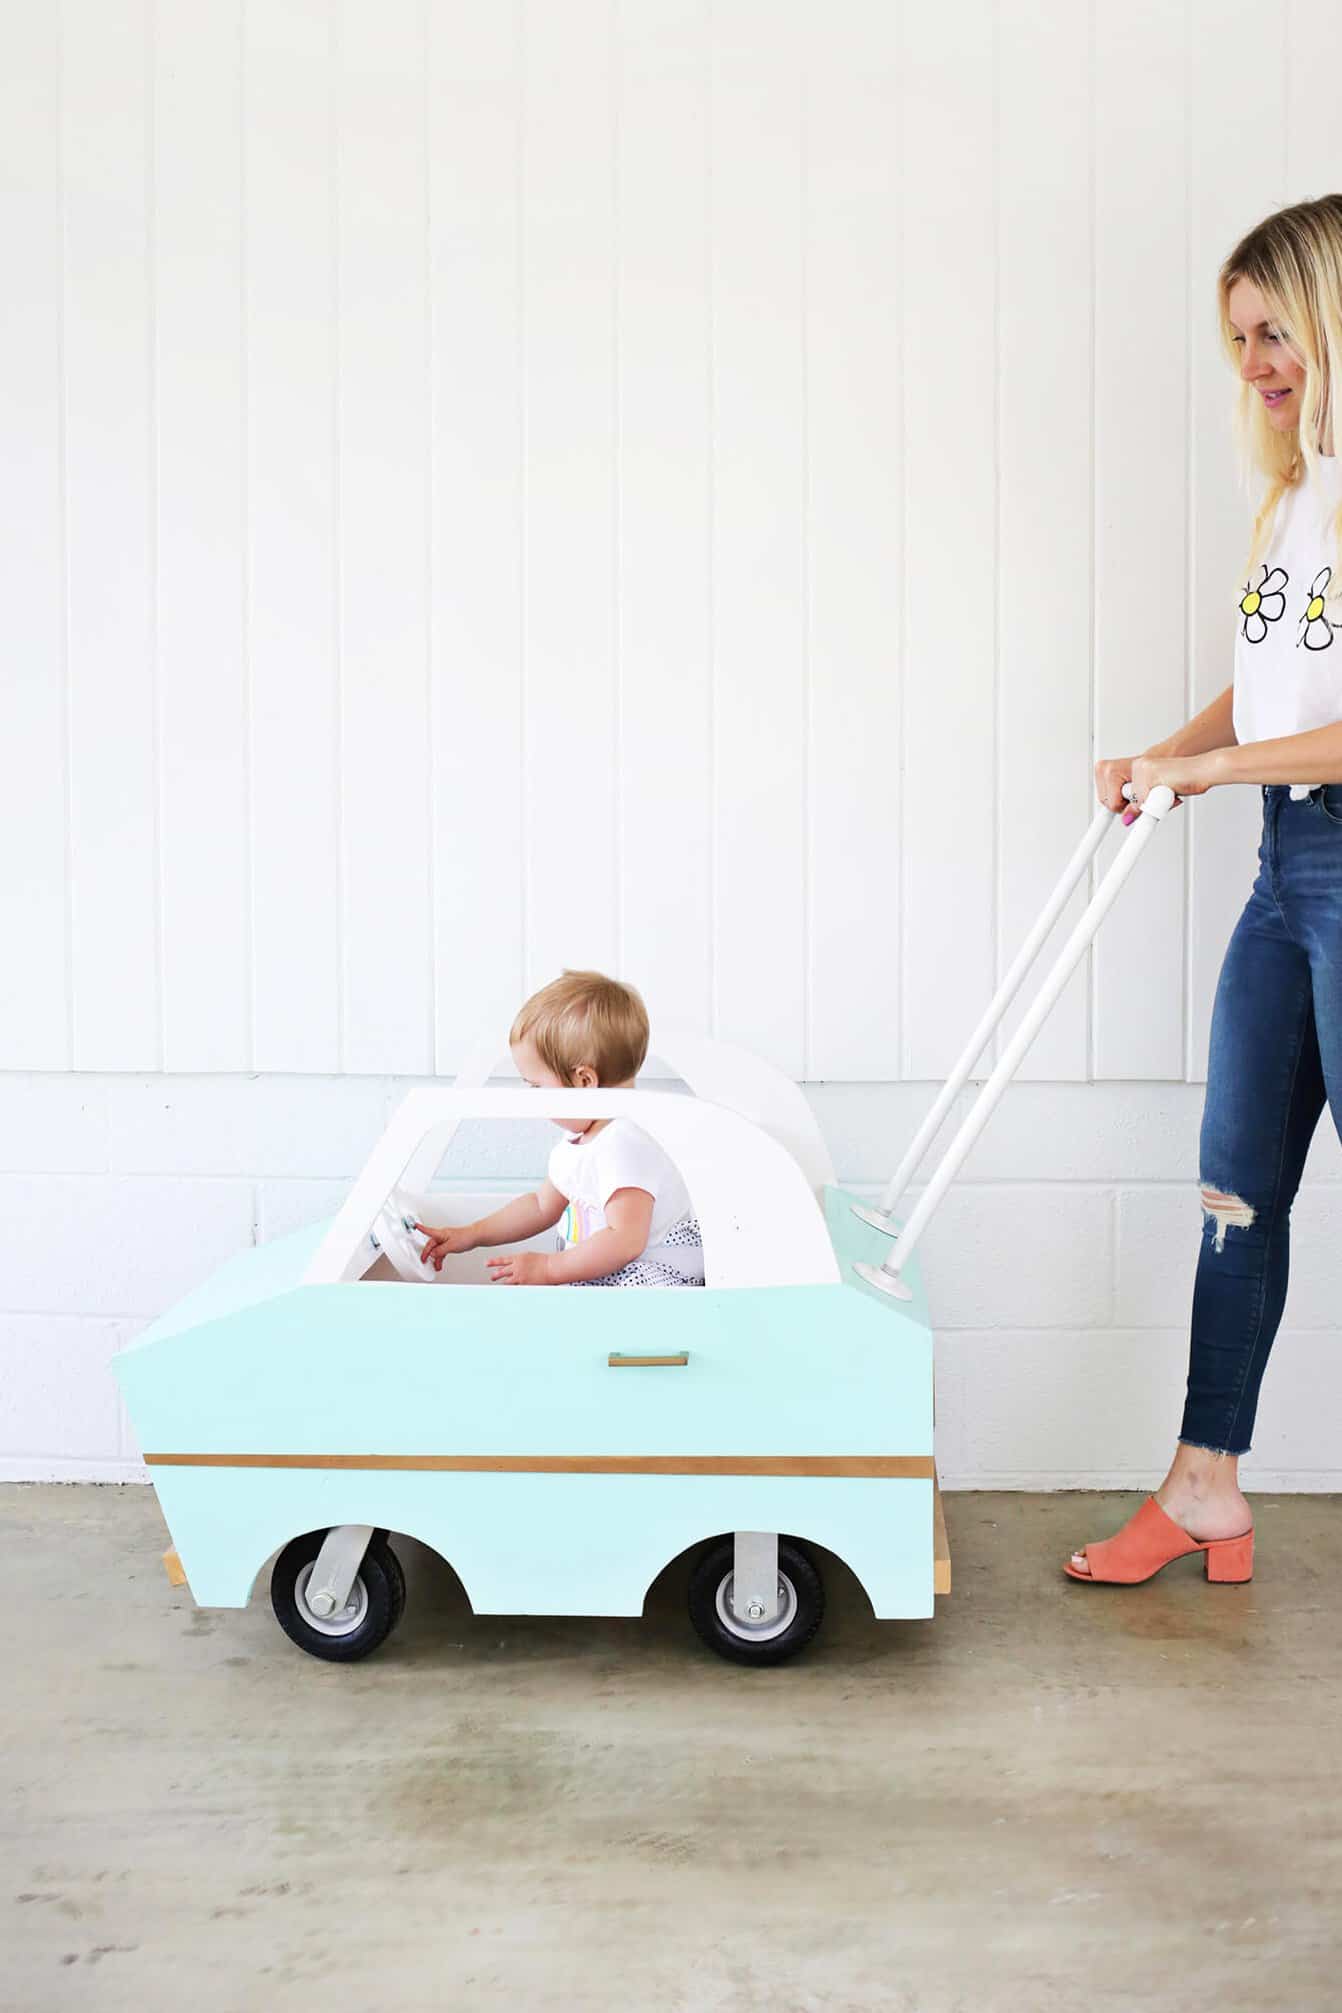 HOW AMAZING IS THAT!?! This really is one of my favorite things that I have ever made; I can’t believe how cute it came out. This is definitely one of those things where it would take a third the time to make it again since we had to figure out all our design mistakes the first time around, but was totally worth it!! For most people, this is probably to be used in a paved driveway/cul-de-sac-type situation, but we’ve definitely used this in our house as well, so that’s always a possibility depending on your floor layout!
I don’t have exact weight dimensions for this car as to how big or small the kiddo should be to fit in this, but the baby should definitely be able to sit up and support themselves unassisted to where you’d feel super confident to have them in the front of a grocery cart with just those little waist belts for upright support. Thicker wood, more corner braces on the floor panel, and more support under the seat will increase the amount of weight you can have in the car, but we had an almost 3-year-old in the car recently that weighs 30-35 pounds and the car handled that weight without any issue. And as with pretty much all baby projects, this is for adult-supervised play only, so don’t let kids play with this without an adult in charge. If you make your own version of this car, tag it with #abmcrafty so we can see all the other sweet baby rides you come up with! xo. Laura
Credits // Author and Photography: Laura Gummerman. Project Assistant: Collin DuPree. Photos edited with ACS for Desktop actions.
P.S. Here’s the link to that cute daisy tee BTW!
22 Comments
I love the colours you chose for the DIY car! It’s completely out of my DIY-abilities but wow, it looks amazing! 😀
Charmaine Ng | Architecture & Lifestyle Blog
http://charmainenyw.com
Oh wow I think this is the cutest diy that has ever been done in the history of diy….here is your crown ???? your babe is adorable too I hope you guys have a fun summer with her cruising around in her new wheels ✌️
This is absolutely adorable!! Lola is lucky to have such a sweet ride!
ok this is TOO cute! would love to DIY an el camino shaped ride for my bb!
Soooo cute! Laura if you’re able can you share the source of Lola’s tshirt too? We’re having a rainbow themed 1st birthday party and it would be perfect!
It was from Old Navy!
Laura 🙂
This is too cute! I don’t have kids but this would totally work as a cute dog house, with a little re-jigging. I just love how you painted it too ????
The colors are amazing! Wonderful DIY! Mine is too big for a pushcart but I love the idea!
THIS is THE best baby DIY I’ve ever seen! What an amazing idea! The little custom license plate is my favorite detail! Surely I can convince my husband that our daughter needs one of these 😉
Wow! This is crazy. Like, next level crazy, but in a really good way. I wanna make one!
This is AMAZING! We need to make one of these for our daughter ASAP!
Paige
http://thehappyflammily.com
Absolutely adorable!! Haha something to keep forever!!
Eva | http://www.shessobright.com
Brilliant work from Laura once again!! She always amazes me!!
What a lovely DIY gift for your baby girl! I couldn’t’ help but notice your orange slides. Love them! Mind sharing the source?
This is the best DIY! Amazing!!! Laura you are DIY royalty.
Laura! This is so bada… !! The license plate kills me
Well, I think it’s time you retire now. There’s no way you will ever be able to top this!
I’m constantly blown away but your ingenuity and engineering, Laura! This is the cutest ride on ever!
Such a cute idea! Come by our Etsy shop for a personalized pretend driver’s license to go with it! ????
Laura, you just made my day! My god daughter, Marin, loves riding around in things. I was just struggling to think of something for her birthday. This is perfect! Thank you so much!
Any idea why I am unable to open or download plans?
Sorry! I’ll email the car template to you.